You can build a solid DIY patio enclosure for a fraction of what a contractor charges. Professional screen enclosures run $15,000 to $40,000 installed. A well-planned DIY version using aluminum framing, quality screen mesh, and a basic door kit typically lands between $1,500 and $5,000 depending on size and materials. The work is manageable for a motivated homeowner: you're basically building a lightweight frame, stretching screen into it, and sealing the gaps. The key is planning everything before you cut a single piece of aluminum.
Do It Yourself Patio Enclosures: Step by Step Guide

Felix Brennan
1 May 2026
What a DIY patio enclosure actually does for you
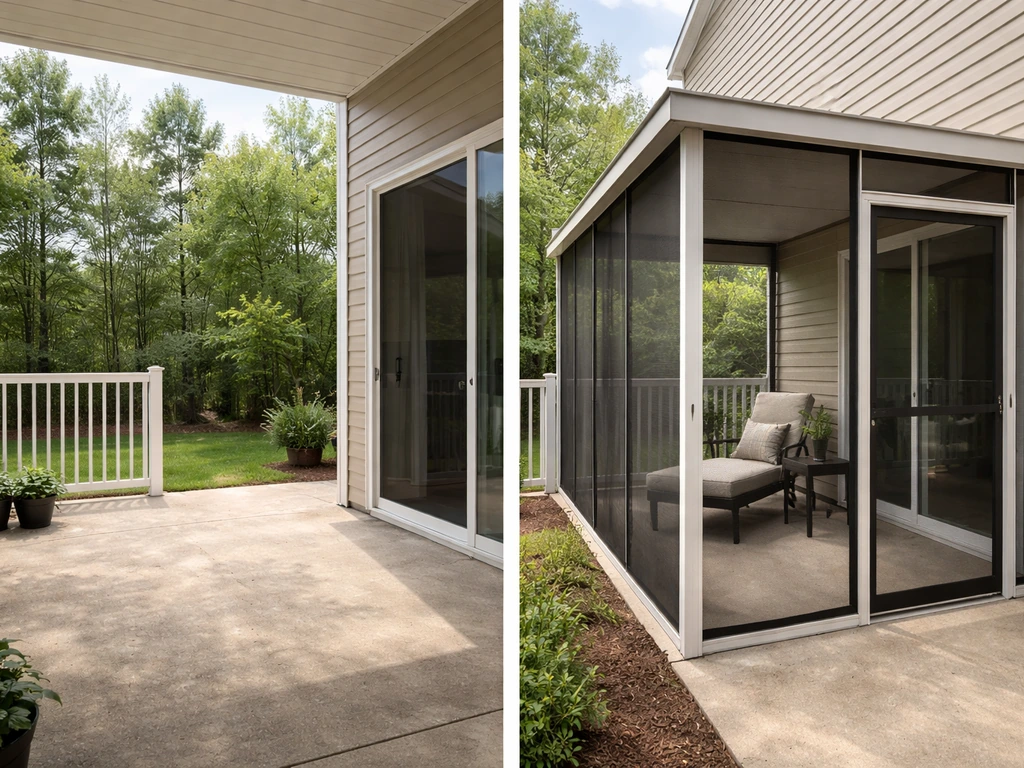
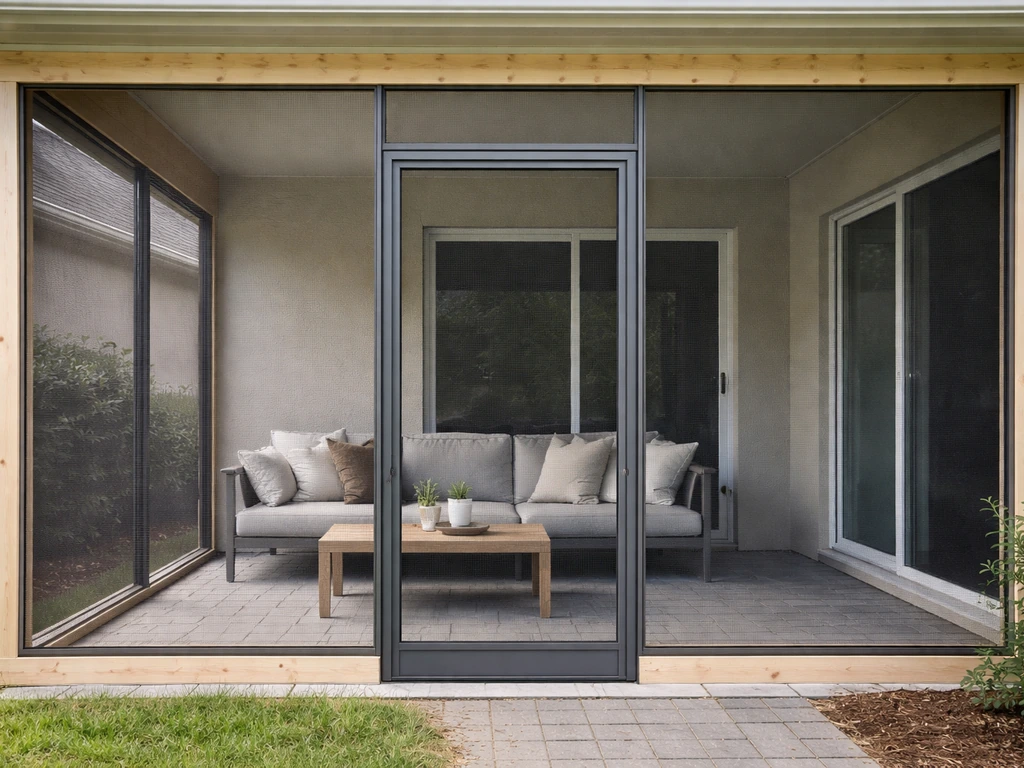
A patio enclosure surrounds your outdoor slab or deck with a mesh or panel framework, turning an open patio into a sheltered room you can actually use. The most common DIY version is a screen enclosure: insect-screen walls on a lightweight aluminum or wood frame, sometimes with a screened or solid roof. This setup solves several problems at once. Mosquitoes and flies stay out. Wind-driven debris doesn't pile up on your furniture. You get shade without losing the open-air feel, and depending on how you build it, you can add removable vinyl or acrylic wind-break panels for rain and cold-weather protection without committing to a full solid wall.
That flexibility is what makes screen enclosures so popular for DIY projects. You're not adding a room addition (which triggers major permitting and structural requirements). You're adding what building codes in many areas describe as insect-screen walls with optional removable panels. The result is a patio that's usable for more months of the year, more comfortable during bug season, and noticeably more pleasant on a breezy or lightly rainy afternoon. Think of it as upgrading your patio from an outdoor space to an outdoor room.
Choosing the right enclosure type for your goals
Before you buy a single piece of hardware, get clear on what problem you're actually trying to solve. The enclosure type that works best for bugs is different from the one that handles wind or gives you privacy. Here's how to match your goals to the right build.
| Primary Goal | Best Enclosure Type | Key Material Choice |
|---|---|---|
| Bug protection | Full screen enclosure, all walls and ceiling | Standard fiberglass or aluminum insect screen |
| Wind and light rain | Screen + removable vinyl/acrylic panels | Clear vinyl roll-up panels or acrylic wind-break inserts |
| Sun and heat reduction | Screen enclosure with solar screen mesh | Solar screen (80–90% shade) on sun-facing walls |
| Privacy (street or neighbor side) | Privacy mesh on lower panels | Privacy mesh or solar screen on specific wall sections only |
| All-season use | Full enclosure with solid polycarbonate or tempered glass panels | Polycarbonate panels with gasketed aluminum framing |
For most DIY builders, a screen enclosure with optional vinyl panels hits the sweet spot. It's lighter, cheaper, faster to build, and doesn't require the same permitting as a solid-wall enclosure. If you want true all-season protection (think: keeping the space warm in winter), you're moving into a sunroom or room-addition project, which is a bigger scope. For the purposes of this guide, we'll focus on the screen enclosure build since that's what most homeowners can realistically complete in a weekend or two.
One smart design move: don't use the same screen on every wall. Use standard insect screen (which keeps visibility crystal clear) on walls where you want to see the yard. Switch to solar screen or privacy mesh on the walls that face the street, a neighbor's fence, or the afternoon sun. You get the bug protection everywhere and tune the privacy and shade where you actually need it.
Planning and measuring: layout, materials list, and budget
Measure twice, order once
Start by measuring your patio slab perimeter carefully. Measure each wall segment separately because patios are rarely perfectly square. Note the height from the slab to the soffit or roof overhang (if your patio has a cover) or to your planned top rail height. A standard screen wall height runs 8 to 10 feet. Also measure any existing posts, columns, or structural elements you'll be working around. Sketch this on paper with dimensions labeled on every side.
Check the slab edges as you measure. When you anchor posts, they need to sit at least 4 inches away from the edge of the slab or any expansion joint. Anchoring too close to the edge can crack the concrete and compromise the post's holding strength. Mark these setback zones on your sketch before you finalize post placement.
Pull a permit first
In most municipalities, a screen enclosure requires a permit. Building without one can create real problems when you sell the house or file an insurance claim. Some counties also have specific structural requirements, like limiting solid material to no more than 25% of any screen wall's total height, or requiring compliance with local wind load standards. The 2015 IRC Appendix H patio cover guidance also addresses how lightweight screen-enclosure components should be treated and notes that the design must account for structural load analysis considerations for enclosure walls, including when insect screening and lightweight materials are used limiting solid material to no more than 25% of any screen wall's total height and compliance with local wind load standards. Your local building department can tell you exactly what applies to your area. The permit fee is usually modest, and the inspection gives you confidence that your structure is safe.
Build your materials list
- Aluminum screen frame channel (or pressure-treated 2x4 lumber for wood frames): enough for all four walls plus top and bottom rails
- Corner connectors and splice connectors for aluminum framing, or joist hangers and angle brackets for wood
- Concrete anchors (wedge anchors or concrete screws) for slab attachment, sized for your post base hardware
- Post base brackets rated for your post size
- Screen mesh (fiberglass insect screen, solar screen, or privacy mesh depending on wall placement)
- Screen spline (vinyl cording) sized to match your frame groove depth
- Spline roller / screen mouse tool
- Screen door kit with hardware (hinges, latch, closer)
- Self-tapping screws for aluminum framing, exterior screws for wood
- Weatherstripping and foam backer rod for sealing gaps at walls, roof, and door frames
- Silicone sealant (exterior grade)
- Utility knife, tape measure, speed square, drill with masonry bit, level
On screen mesh selection: fiberglass screen is the easiest to work with and the most affordable. If you have pets or active kids, look at Phifer TuffScreen or PetScreen, both made from vinyl-coated polyester that resists tearing and puncturing far better than standard fiberglass. One important note: thicker screen materials like TuffScreen and SunTex require a slightly smaller diameter spline than standard screen to get a proper fit in the frame groove. A spline diameter reference chart from Phifer lists the spline diameter values to match different screen types and thicknesses for a proper fit in the frame groove Phifer spline diameter reference chart. Check the manufacturer's spline selection chart before you order.
Budget expectations
A basic 12x16 foot screen enclosure using aluminum framing and fiberglass screen typically costs $1,500 to $2,500 in materials. Upgrading to solar screen on key walls, adding a screen door with a proper closer, and using TuffScreen throughout pushes that to $3,000 to $4,500. If you're adding removable vinyl wind panels, budget an additional $300 to $800 depending on how many panels you need. These numbers assume you own basic tools. If you're renting a concrete drill and a few clamps, add another $100 to $200.
Step-by-step build: site prep, framing, and anchoring
Step 1: Prep the slab and mark your layout
Clean the concrete slab thoroughly. Sweep out debris and wash off any oil or grime near the anchor points. Use chalk line or a pencil to mark exactly where each post will land, keeping that 4-inch minimum clearance from slab edges and expansion joints. Snap a chalk line along the inside perimeter at your planned rail height so you have a visual reference while you work. Double-check that your layout is square by measuring diagonally corner to corner; both diagonal measurements should match within about 1/4 inch.
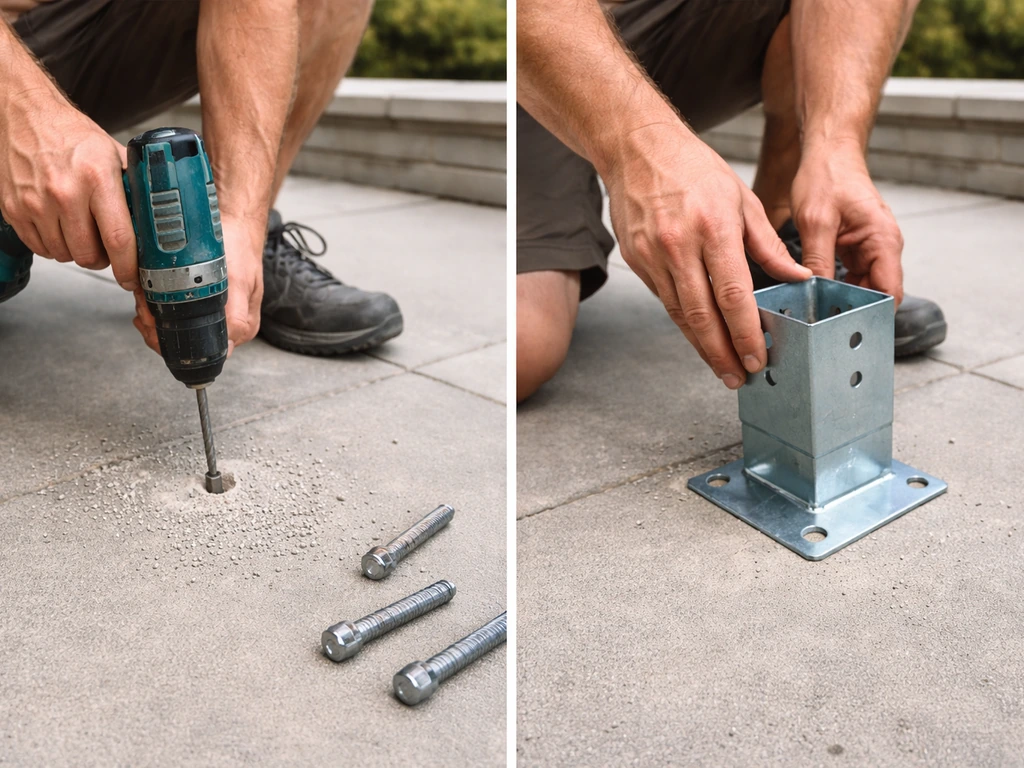
Step 2: Install post base anchors
Drill your anchor holes using a hammer drill with a masonry bit sized to match your concrete anchors. Blow out the dust from each hole before inserting the anchor. Set your post base brackets, install the concrete anchors or concrete screws, and torque them to the fastener manufacturer's spec. Don't guess on this step: under-torqued anchors are the number-one reason DIY enclosures fail in wind. If your slab is thin (under 3.5 inches), consult a structural fastener guide or your permit inspector before anchoring.
Step 3: Set and plumb your posts
Set each post in its base bracket and check for plumb with a level on two adjacent faces. Brace the post temporarily with scrap lumber while you fasten it. Post spacing depends on your framing system: follow your kit's installation guide or manufacturer specs rather than guessing. Most aluminum screen frame systems call for posts every 8 to 10 feet, with intermediate screen frame members spanned between them. If you're building with wood, 2x4 or 2x6 posts at 6 to 8-foot spacing work for a standard-height screen enclosure.
Step 4: Install top and bottom rails
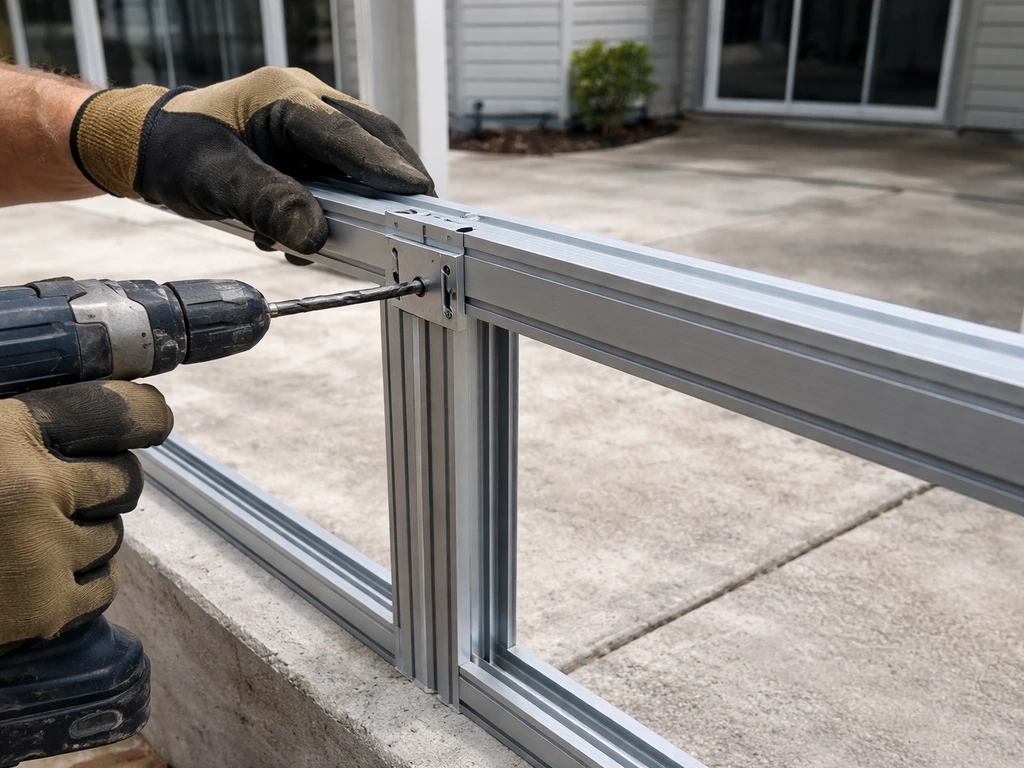
Once posts are plumb and secure, run your top rail between them. For aluminum systems, the rail slides into the post connectors and gets locked with set screws or rivets. For wood frames, use joist hanger hardware or angle brackets at each connection. Install the bottom rail next, keeping it tight to the slab surface to minimize the gap where insects can sneak in. At corners, use the corner connector fittings from your framing kit or cut 45-degree miters for wood. Check that everything is still level and square before moving on.
Step 5: Add the roof framing (if no existing patio cover)
If your patio already has a solid roof or pergola, you can attach the top rail to it and skip a separate roof structure. If not, you'll need to frame a simple sloped roof using lightweight aluminum purlins or pressure-treated 2x4 rafters, angled to drain rainwater away from the house. If not, you'll need to frame a simple sloped roof using lightweight aluminum purlins or pressure-treated 2x4 rafters, angled to drain rainwater away from the house roof framing. A minimum slope of 1/4 inch per foot prevents pooling. For a screened ceiling (rather than a solid one), use the same screen frame channel you're using for the walls, spanning between rafters.
Screening and panel installation: doors, sealing, and fit
Installing screen panels
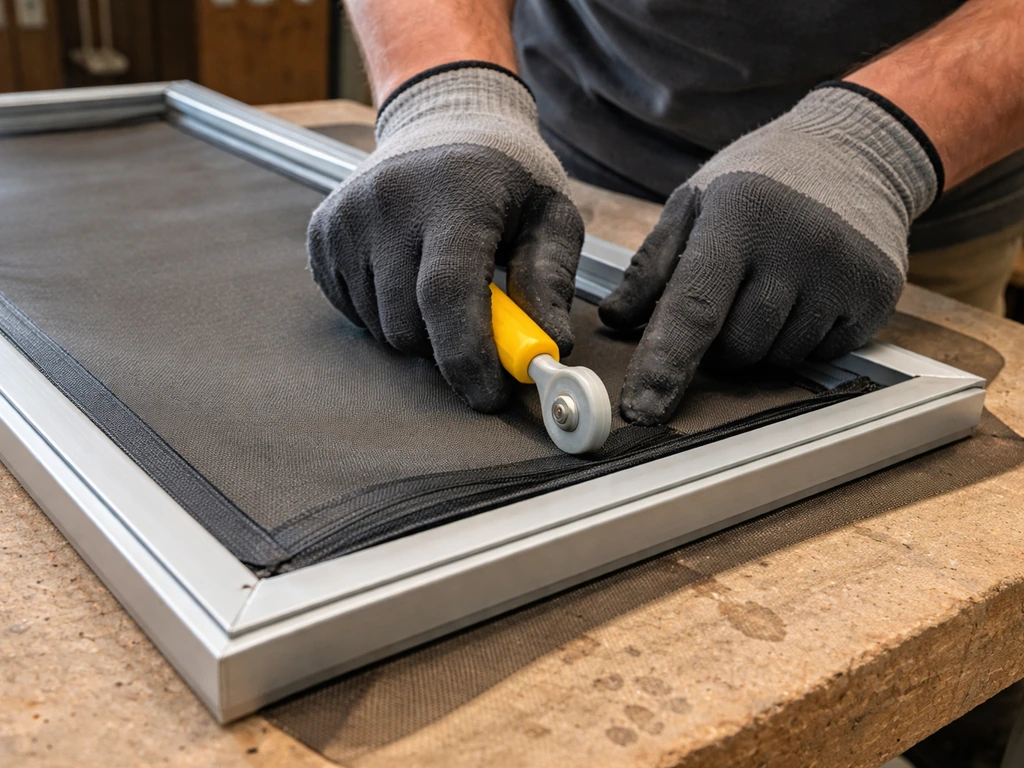
Cut your screen mesh a few inches larger than each frame opening on all sides. Lay the screen over the frame opening and use your spline roller to press the spline and screen simultaneously into the groove, starting at one corner and working your way around. Keep tension consistent as you roll: pulling the screen taut across the panel before you lock each side prevents the sag and wrinkle that makes enclosures look sloppy six months after installation. Keep the screen drum-tight. Once all four sides are splined in, trim the excess screen flush with the outer edge of the spline groove using a utility knife.
Work in manageable panel sections rather than trying to screen an entire 10-foot bay in one piece. Smaller sections (4 to 5 feet wide) are easier to keep taut and give you cleaner results. For the lower panels on any wall where you're using solar screen or privacy mesh instead of standard insect screen, install those panels the same way but remember to swap to the correct (smaller diameter) spline for thicker mesh products.
Installing the screen door
Use a pre-hung screen door kit for the entry opening. These kits come with the door, frame, hinges, latch, and a spring closer already sized together. Mount the door frame into your opening first, shimming it plumb and level before fastening. Hang the door on the hinges and adjust the hinge tension so the door swings freely but closes fully on its own. Set the spring closer tension so the door closes firmly without slamming hard enough to rattle the frame. Test it a dozen times before you call it done.
Sealing the gaps
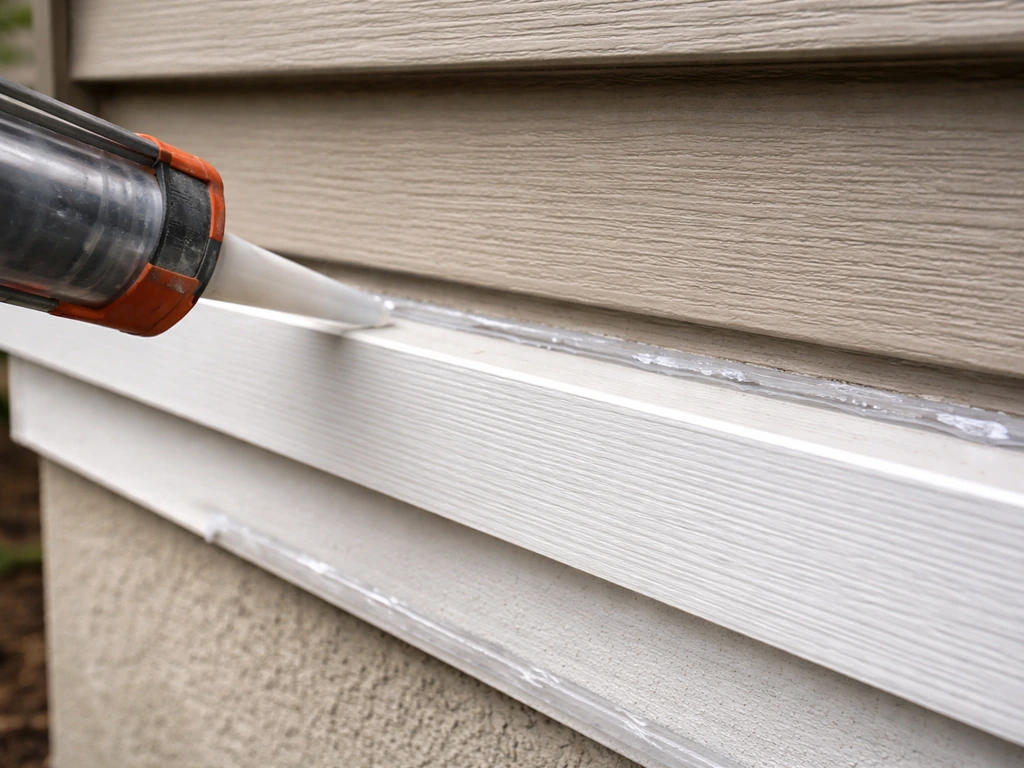
Gaps at the top rail (where your frame meets the house wall or roof soffit), at the slab line (under the bottom rail), and at the door frame are where bugs get in and wind noise comes from. Seal the top connection with exterior silicone caulk and back it with foam backer rod where the gap is large. Along the bottom rail, use a foam weatherstrip seal or a door sweep to close the gap to the slab. At the door frame, apply adhesive-backed weatherstripping to all four sides of the door stop. Close the door and check for light gaps all the way around. If you see light, you'll feel insects.
Common DIY problems and how to fix them
Sagging or wrinkled screen
Sagging screen is almost always a tension problem. On retractable or roll-up screens, adjust the tensioner mechanism to tighten the fabric. On splined panels, the fix is to remove the spline on the affected side, pull the screen tighter, and re-spline it. Prevention is easier than the fix: keep the screen drum-tight during initial installation and don't try to stretch oversized panels across frames that are too large for a single run.
Water leaking in at the roof or wall connection
Leaks at the top of the enclosure where it meets the house almost always mean the sealant joint failed or was never properly done. Scrape out the old caulk, clean the surface, and apply a fresh bead of exterior silicone rated for your climate. In areas with heavy rain, use a step flashing detail: a thin aluminum flashing piece that tucks under the house siding and laps over the top rail before you caulk. This routes water over the joint rather than relying purely on sealant.
Frame or panels out of alignment
Alignment problems usually show up at corners or where sections meet. If posts aren't plumb when you set them, everything downstream is off. The fix mid-build is to loosen the anchor bolts slightly, adjust the post, and re-check with a level on two faces before re-tightening. After the fact, you can sometimes shim rail connections with thin aluminum flat stock to correct minor misalignment without rebuilding.
Wind flapping and instability
If your enclosure flexes or rattles in wind, the problem is almost always under-anchored posts or insufficient diagonal bracing. This is not a cosmetic issue: an enclosure knocked over in a windstorm is a real hazard. Add knee braces (diagonal members from the post to the top rail at roughly 45 degrees) at corners and at mid-span on long walls. Re-check your anchor bolts and torque any that feel loose. If the original anchors pulled out of the slab, you may need to redrill with a larger anchor or switch to adhesive anchors rated for higher pull-out loads. This is a situation where it's worth talking to a structural installer or building inspector before you rely on the structure.
Door that won't close or latch
A door that won't close usually means the frame racked slightly during installation. Loosen the fasteners on one side of the door frame, push the frame back into square, and refasten. If the frame is square but the door still won't latch, adjust the strike plate position on the door stop rather than rehinging the door.
Keeping it looking great: maintenance, seasons, and upgrades
Routine cleaning
Clean your screen enclosure at least twice a year: once in spring and once in fall. Use a soft-bristle brush or sponge with mild dish soap or a screen-specific cleaning solution diluted in water. Rinse with a garden hose at low pressure. Do not use a pressure washer on the screen mesh or aluminum framing. Pressure washers tear fiberglass mesh and can bend or loosen aluminum frame members. Even "low" pressure settings on residential washers often exceed what screen mesh can handle.
Seasonal prep
Before winter, inspect all anchor points, rail connections, and caulk joints. Re-caulk any gaps that have opened up. If you installed removable vinyl wind panels, this is the time to put them in. Check the door closer tension and re-lubricate hinges with a silicone-based spray. In hurricane or high-wind areas, consider removing screen panels entirely during storm season and storing them flat; it takes a few hours but prevents the screen from acting like a sail during extreme wind events.
Smart upgrades after the build
Once the enclosure is up and working, you have a solid base for additional comfort upgrades. Outdoor ceiling fans mounted to the roof structure improve airflow dramatically in hot weather. If you want more shade on the south or west wall, add a roll-down exterior shade or a simple pergola-style shade sail above the roofline. For a more temporary or budget-friendly wind and privacy upgrade on any wall, outdoor curtain panels on a tension rod system can be installed in an afternoon and removed seasonally. For temporary setups, you can also use removable mesh panels, adjustable tension rods, or clip-on screen sections so you can enclose the patio only when you need it temporary patio enclosure.
If you're thinking about going further, converting your screen enclosure into a more protected three-season space is a natural next step. For most homeowners asking how to enclosed patio, converting your screen enclosure into a more protected three-season space is a natural next step. This involves swapping screen panels for polycarbonate or tempered glass inserts in the existing frame, though it often triggers a new round of permitting. It's worth exploring if you want to use the space year-round, and building the initial frame correctly (plumb, well-anchored, properly spaced) makes that upgrade much easier down the road.
Whether you're looking at a quick screen-only weekend build or a more permanent full enclosure, the same principle applies: do the planning and permitting work up front, anchor everything properly, keep the screen tight, and seal every gap. That's what separates a patio enclosure that looks and works great for years from one that sags, leaks, or gets knocked over the first time a storm rolls through. Build it right once and your patio becomes one of the best rooms in your house.
FAQ
How long should I wait after pouring a new patio slab before installing do it yourself patio enclosures?
If your patio slab is new and you are waiting on it to cure, follow the concrete cure timeline before drilling anchors. For typical residential mixes, waiting at least 28 days reduces the risk of spalling, while very early anchoring can undermine pull-out strength. Also confirm slab thickness and expansion-joint locations before you lay out post setbacks, since the guide’s 4-inch clearance rule depends on where those joints are.
Can I tie the top rail or roof of my patio enclosure into an existing overhang safely?
Yes, but only if your design keeps a dry drainage path and does not trap water against the house. The safest approach is to attach the top system to the house roof or soffit only using approved flashing details, then route runoff away from siding and joints. If you cannot guarantee a slope and flashing plan, add a separate roof frame with its own controlled drainage rather than trying to “seal around” a leak-prone connection.
What’s the best way to make do it yourself patio enclosures removable for storms or winter?
If the enclosure must be removable seasonally, plan your closure strategy around how you remove panels and screen doors. For best insect control, keep the bottom seal (weatherstrip or door sweep) in place year-round, and only remove side panels or roof screening that would be exposed to wind loading. For storm season, consider leaving the frame and any rigid roof intact, then remove screen panels that can act like a sail.
My screen patio enclosure flexes in wind, what should I check first?
For patios that get heavy wind, do not treat it as a cosmetic screening job. Use diagonal knee braces at corners and mid-span, and ensure your post spacing matches the frame kit’s spec so the rails and screen do not rack. After installation, do a “gentle shake test,” then re-check torque on anchor fasteners within the first few weeks, since initial settling can loosen hardware.
Should I use the same screen mesh on all walls of my patio enclosure?
Use interior visibility screen where you want to see through, but avoid committing to one mesh type everywhere. Solar or privacy mesh can reduce glare, but it can also change the perceived color and brightness of the space. The practical move is to put solar screen on the hot-facing walls and standard insect screen on the street-facing or yard-facing walls where you want clarity, then make sure you select the correct spline size for thicker mesh.
What screen material is best for do it yourself patio enclosures with pets or kids?
If you have pets or frequent kids, invest in puncture-resistant screen rated for impact, then plan for durability in access locations. The most common failure points are near the door opening and areas where toys or claws repeatedly contact the mesh. Reinforced screen helps, but you should also keep furniture placement and traffic paths away from the mesh edge and tighten panels so they do not sag at the frame.
Do I really need a permit for a screen-based do it yourself patio enclosure?
If your municipality requires permits, “no permit” can be risky, especially at resale or during insurance claims after storm damage. Many areas also specify limits on solid materials in screen walls and require compliance with local wind-load rules. Before you start, contact your building department with your sketch and planned enclosure type so you can confirm whether your project qualifies as insect-screen walls with optional removable panels.
Where do insects and drafts usually leak in a DIY screen enclosure, and how do I troubleshoot it?
Small gaps are usually caused by one of three things: out-of-square framing, spline or screen not seated fully in the groove, or bottom-rail gaps where the slab is uneven. Start by checking alignment at corners, then verify the screen is properly spline-rolled and trimmed. Finally, seal the known leak paths, top joint to house, bottom rail to slab, and around the door stop, and confirm the door closes fully on its own.
If I want a three-season upgrade later, what should I do differently during the initial do it yourself patio enclosure build?
You can, but plan for compatibility and installation workflow. If you convert later, ensure the original frame is strong enough to handle higher-weight inserts like polycarbonate or glass, and confirm you preserved the correct rail spacing and connection points. This is one reason it’s better to assemble the enclosure plumb and fully anchored from the start, because later upgrades often depend on existing structural capacity and permitting requirements.
What’s the safest way to clean a DIY patio screen enclosure without damaging it?
Avoid pressure washing, since high water pressure can damage fiberglass mesh and loosen aluminum frame components or spline seating. Instead, use a soft brush or sponge with mild soap, rinse gently with a garden hose, and focus cleaning on corners, door areas, and lower rails where insects and debris collect. If you notice sag after cleaning, stop and inspect spline seating before continuing.
Next Articles

How to Decorate a Long Narrow Patio: Layout Tips
Practical DIY layout and decor tips to widen a long narrow patio using zoning, furniture spacing, lighting, greenery, an

How to Decorate a Rectangular Patio Step by Step
Step-by-step plan to decorate a rectangular patio with smart layout, zones, furniture fit, lighting, plants, and seasona
How to Decorate a Patio Wall: DIY Ideas and Mounting Tips
DIY patio wall decor for brick, stucco, wood, concrete, or siding with weatherproof mounting tips and maintenance.