You can build a DIY patio misting system for $50 to $300 depending on the pressure class you choose, and most homeowners can install a basic hose-fed setup in a single afternoon. The key to getting it right is matching your system's pressure, nozzle size, and placement to your specific patio layout and climate, skip that step and you end up with wet furniture, clogged nozzles, or a mist that evaporates before you feel any cooling. Here's everything you need to design, build, and maintain a system that actually works.
Do It Yourself Patio Misters: A Build-Ready Guide

Felix Brennan
2 May 2026
When DIY patio misters make sense (and when they don't)
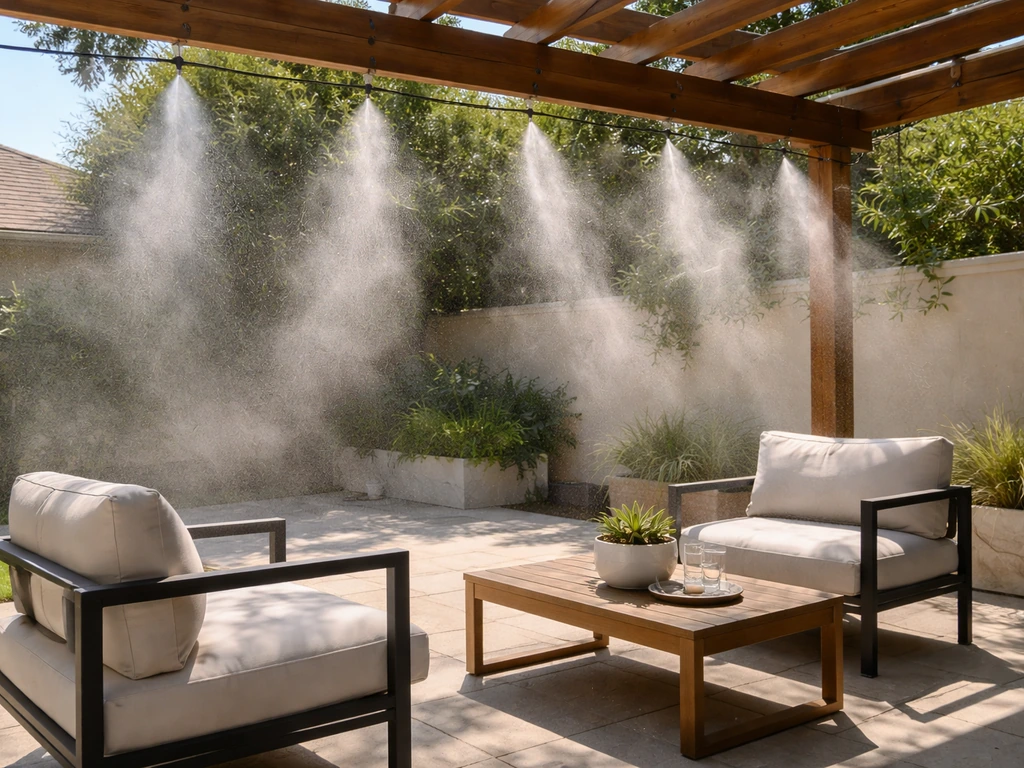
Misting systems work by pushing water through tiny nozzles to create a fine spray that evaporates almost instantly, pulling heat out of the surrounding air. The catch is that evaporation only happens when the air has room to absorb more moisture. Once relative humidity climbs above about 60%, cooling effectiveness drops sharply, you're essentially just making things wet without meaningfully lowering the temperature. If you live in a humid climate like Florida, coastal Georgia, or the Gulf Coast, a misting system will disappoint you most of the time. If you're in a drier region, the Southwest, inland California, the high desert, or anywhere with summer humidity below 50%, a well-designed mister can drop perceived air temperature by 10 to 20 degrees Fahrenheit, and it's absolutely worth the effort.
The other question is your patio's airflow. An open pergola or a roof with open sides on all four faces is ideal because the mist disperses, evaporates, and carries heat away. A screened patio enclosure or a patio with several closed walls traps humidity, cooling still happens, but you need to be more careful about spacing and droplet size so you're not building up moisture inside the space. A fully enclosed room with no cross-ventilation is generally the wrong place for a misting system; consider a portable evaporative cooler instead.
- Good fit: dry climates (under 50–60% RH), open pergolas, roofed patios with open sides, covered decks with airflow
- Acceptable with careful design: screened patios, semi-enclosed spaces with at least one open side or good ventilation
- Poor fit: fully enclosed rooms, high-humidity coastal climates, patios with no airflow or drainage concerns
Choosing the right mister type and system design

There are three pressure classes for DIY misting systems, and the choice affects droplet size, cooling power, cost, and complexity. Understanding the difference before you buy anything will save you a lot of frustration.
Low-pressure (hose-fed) systems
These connect directly to a standard garden hose bib and run on your household water pressure, which is typically 40 to 100 psi. They're the easiest to install, no pump, no dedicated plumbing, and kits start around $30 to $80 at hardware stores. The downside is droplet size. At low pressure, nozzles produce larger droplets that don't evaporate as quickly, so some mist lands on surfaces and you may feel a light spray rather than invisible cooling. For dry, hot climates this is often fine. For enclosed or semi-enclosed spaces, you risk wetting surfaces more than you'd like. These are the right starting point for most DIY beginners.
Mid-pressure systems (around 300 psi)
Mid-pressure systems use a small pump to boost pressure to roughly 300 psi. Droplets are finer than low-pressure output, evaporation is faster, and you get noticeably better cooling without soaking nearby furniture or floors. The pump adds cost, expect to spend $150 to $400 total for a mid-range setup, and requires a nearby GFCI-protected outlet if you're running an electric pump. This is the sweet spot for serious backyard setups and semi-enclosed patios.
High-pressure systems (around 1,000 psi)
High-pressure systems run at roughly 1,000 psi and produce droplets as fine as 3 to 10 microns, so small they're nearly invisible and evaporate almost immediately. You get maximum cooling with essentially no wet surfaces. These systems require a dedicated high-pressure pump, professional-grade stainless or brass fittings, and a more careful installation. Full kits run $400 to $1,500 or more. They're excellent for commercial patios or homeowners who want a premium setup, but they're overkill for most weekend DIY projects.
| System Type | Pressure Range | Droplet Size | Typical DIY Cost | Best For |
|---|---|---|---|---|
| Low-pressure (hose-fed) | 40–100 psi | Large (visible mist) | $30–$100 | Open patios, dry climates, beginners |
| Mid-pressure (pump) | ~300 psi | Medium-fine | $150–$400 | Semi-enclosed patios, serious cooling |
| High-pressure (pump) | ~1,000 psi | Very fine (3–10 microns) | $400–$1,500+ | Premium setups, max cooling, no wet surfaces |
For most DIYers reading this, a low-pressure kit is the right first move if you're in a dry climate with an open patio. Step up to mid-pressure if you have an enclosed or screened space where wet surfaces are a real concern or if you want noticeably better performance without going to a full professional-grade installation.
Sizing and placement for effective cooling

Where you put the mist lines matters just as much as what you buy. Mount your mist line overhead on the structure, the ideal height is between 8 and 14 feet, with 10 to 12 feet being the sweet spot for most residential patios. Too low and the mist hits people before it evaporates; too high and it disperses before cooling the zone where you're sitting.
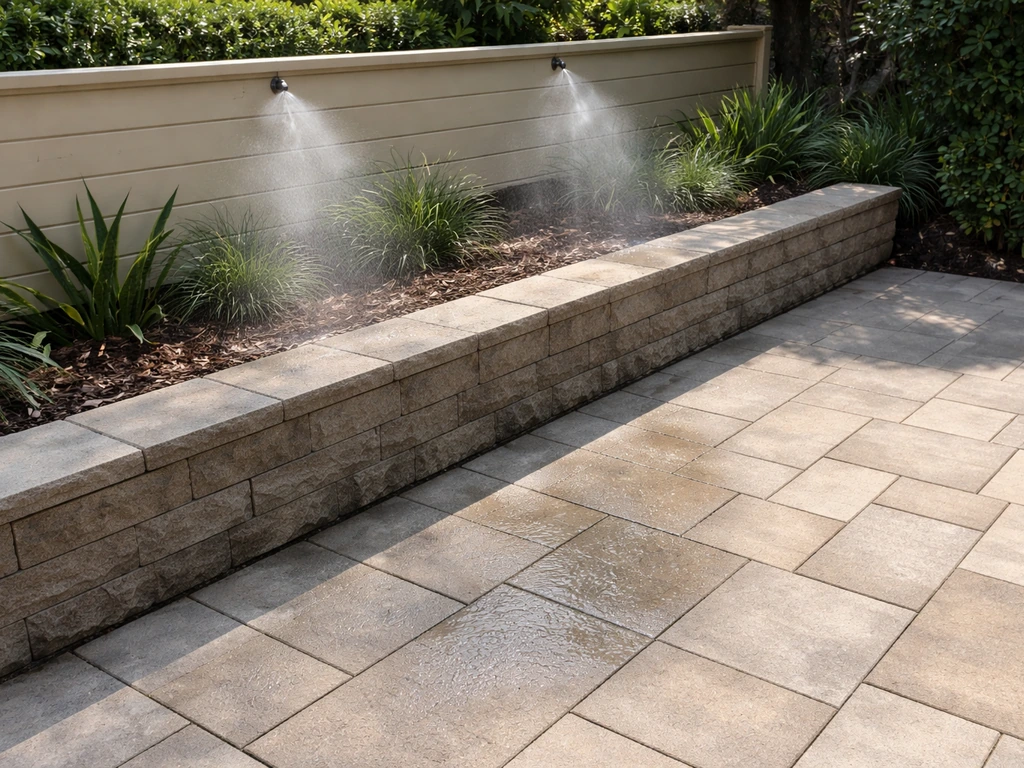
Nozzle spacing is a function of how open your patio is. A fully open space with no roof can use tighter spacing, around 6 feet between nozzles, because airflow disperses mist quickly. A roofed patio with four open sides can space nozzles about 12 feet apart. A roofed patio with one or more closed or screened sides should space nozzles around 14 feet apart to avoid over-saturating the air and wetting surfaces. The Home Depot guidance also suggests starting your first nozzle about 2 feet from the house wall or structure edge, which prevents mist from blowing back onto the exterior.
Run the mist line around the perimeter of your patio rather than through the center. This keeps mist at the edges of the occupied zone and lets it drift inward with natural airflow, cooling the sitting area without drenching it. For a screened patio, be especially conservative, consider running the line only along the side that faces the prevailing breeze so mist is pushed through the space naturally.
Parts list and tools for a DIY build
Here's what you need for a complete low-to-mid-pressure DIY misting system. For a step-by-step guide and parts list, see how to build a patio misting system. If you want better cooling than a basic hose-fed setup, you can also learn how to choose between low-, mid-, and high-pressure mister systems for your patio. Quantities depend on your patio size; a 200-square-foot patio will typically use 40 to 60 feet of tubing and 6 to 12 nozzles for a perimeter run.
Parts list
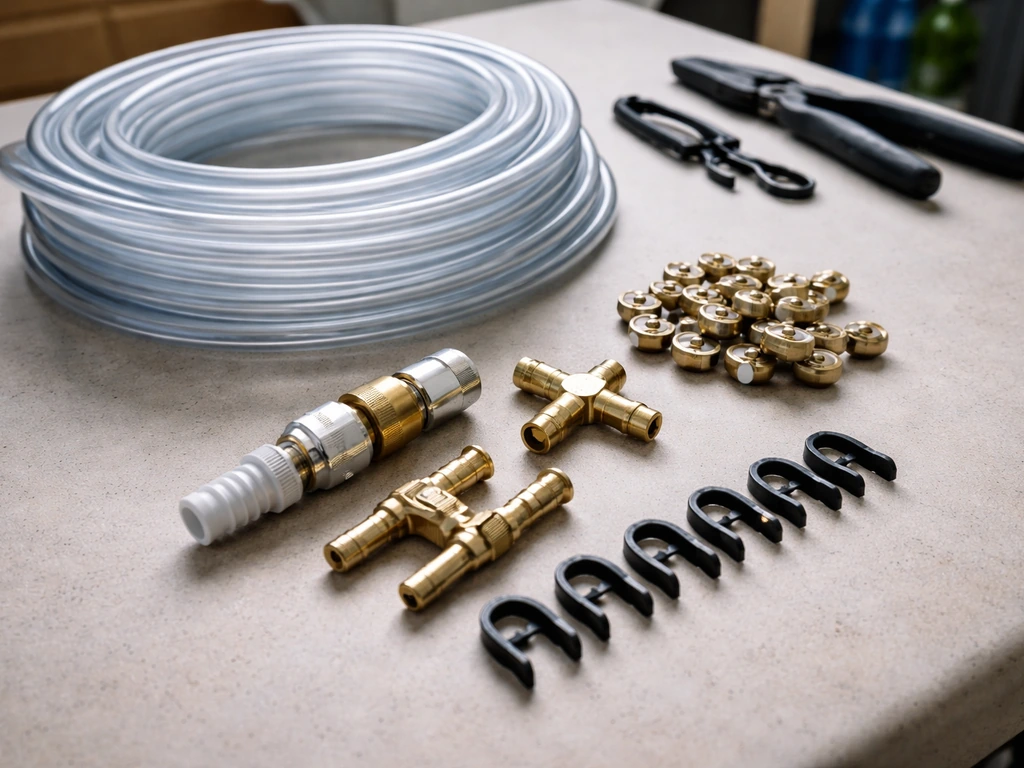
- Misting tubing: 3/8-inch OD poly or nylon tubing for standard mist systems (1/2-inch for fog/special-effect applications); buy at least 10% more than your measured run
- Misting nozzles: brass or stainless, sized for your pressure class; for low/mid-pressure, a 0.007–0.008 inch orifice diameter works well for cooling-range droplet sizes
- Nozzle tee fittings: one per nozzle insertion point; these press into the tubing and hold the nozzle
- End cap: one for the terminal end of the tubing run
- Garden hose adapter fitting: threads onto your hose bib and accepts the 3/8-inch mist line
- Inline sediment filter: 5-micron rated; install between the hose bib and the mist line—this is non-negotiable for nozzle longevity
- Check valve (anti-drip): install at the start of the run to prevent dripping when the system shuts off and to stop back-siphonage
- Backflow preventer: a pressure vacuum breaker (PVB) or reduced pressure zone (RPZ) assembly; required by most local codes when connecting to a potable water supply
- Mounting clips or clamps: stainless steel or UV-rated plastic to attach tubing to the overhead structure; one every 18–24 inches
- Timer/controller (optional but recommended): a simple battery-operated hose timer ($20–$50) lets you automate run cycles and prevent water waste
- Pump and pressure regulator: for mid-pressure systems only; choose a pump rated for your target pressure with an integrated bypass valve
Tools list
- Tape measure
- Tubing cutter or sharp utility knife (to cut clean, square ends on poly tubing)
- Drill with a bit sized to match your mounting clip screws
- Adjustable wrench or pliers (for fitting connections)
- Teflon tape (PTFE tape for threaded connections)
- Zip ties or cable staples (for tidying tubing runs)
- Bucket or towels for leak testing
Installation steps
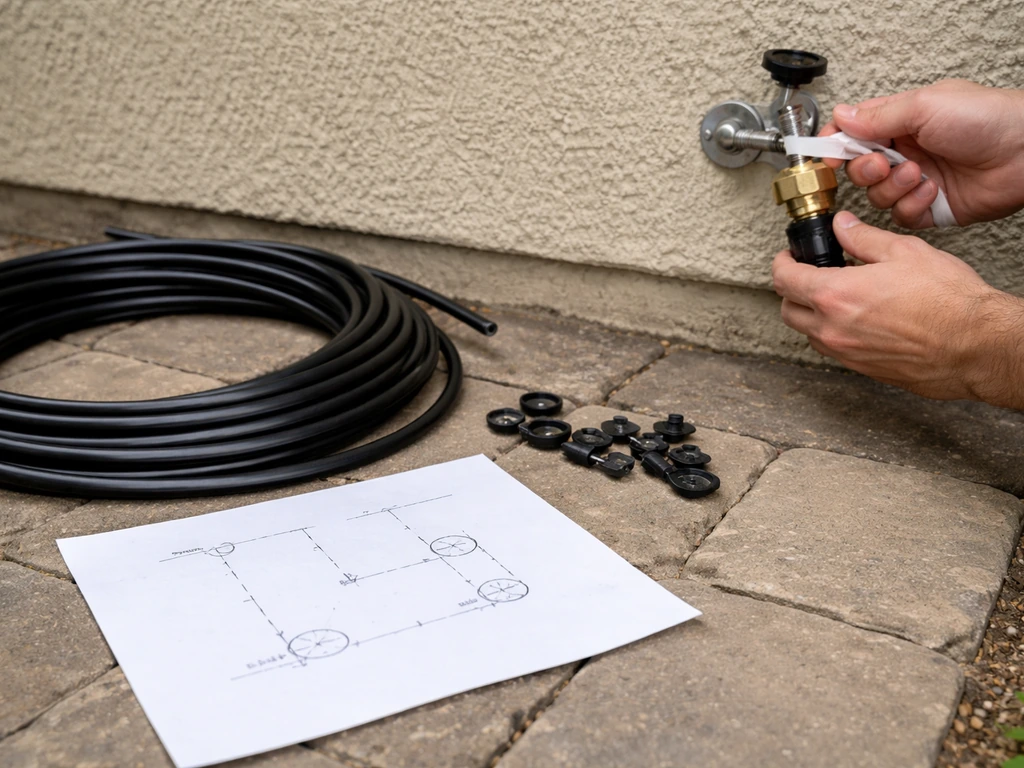
Take 30 minutes to plan the layout on paper before you touch a fitting. Sketch your patio, mark the hose bib location, draw your intended tubing run, and count nozzle locations. This prevents you from ending up with a nozzle in the wrong place or a run that's too short.
- Install the backflow preventer first. Thread it directly onto the hose bib using Teflon tape on the male threads. This is a code requirement in most areas and protects your drinking water supply from contamination via back-siphonage.
- Attach the inline sediment filter to the outlet of the backflow preventer. Some kits include a filter housing; if yours doesn't, buy a separate 5-micron filter housing and cartridge. Make sure flow direction arrows on the filter body point away from the hose bib.
- Connect the check valve downstream of the filter. This prevents water from draining back out of the mist line when the system is off, which reduces dripping at nozzles and keeps the line primed.
- For mid-pressure systems, install the pump between the check valve and the mist line. Mount the pump on a flat surface out of direct rain if possible, plug into a GFCI-protected outdoor outlet, and follow the manufacturer's pressure-setting instructions.
- Run the mist tubing along your planned overhead route. Start from the inlet end and dry-fit the entire run with mounting clips before making any connections. This lets you adjust placement before committing.
- Secure tubing with mounting clips every 18 to 24 inches. Use a drill to pre-set the clips into wood beams, metal fascia, or whatever overhead structure your patio has. Keep the line as level as possible to prevent one-sided dripping.
- Insert nozzle tee fittings at your planned spacing points (6, 12, or 14 feet apart depending on your patio type). Push the tubing firmly into each tee until it bottoms out, then thread in the nozzle finger-tight plus a quarter turn. Don't overtighten—brass nozzles strip easily.
- Cap the end of the tubing run with an end cap. Press it firmly until it locks.
- If you're using a timer, install it between the hose bib and the backflow preventer, following the timer's instruction sequence. Set run cycles for 15 to 30 minutes during peak afternoon heat, with breaks in between to avoid over-humidifying the space.
- Leak test before walking away. Turn on the water slowly, watch every connection for drips, and check each nozzle for consistent spray. A connection that drips on the outside of a fitting usually means the tubing wasn't fully seated—remove, check, and re-insert.
Water pressure, filtration, and keeping nozzles clog-free
Clogged nozzles are the number one complaint with misting systems, and they're almost entirely preventable with proper filtration. Mineral deposits, sediment, and biofilm are the culprits. A 5-micron inline sediment filter catches most of the dirt and sand before it reaches the nozzles. Plan to replace that filter cartridge once a year under normal water quality conditions, or every 3 to 6 months if your water is particularly hard or silty. If you're seeing reduced spray from specific nozzles, remove them and soak them in white vinegar for 30 minutes to dissolve mineral deposits, then rinse and reinstall.
For high-pressure systems, the filtration requirement is more demanding. A two-stage setup, a 20-micron pre-filter followed by a 5-micron fine filter, is the standard approach. Skipping this step at high pressure means you'll be replacing nozzles constantly.
Pressure matters too. For hose-fed systems, most residential hose bibs deliver 40 to 80 psi, which is enough to push water through low-pressure nozzles effectively. If you're noticing weak, dripping spray rather than a fine mist, your pressure may be too low, check with an inexpensive hose bib pressure gauge (about $10). If household pressure is below 40 psi, a low-cost booster pump can help. If specific nozzles spray fine but others drip, the problem is almost always a clogged orifice or a fitting that's not fully seated.
Safety, cost, and climate considerations
Preventing slippery surfaces
The biggest safety risk with a misting system isn't the mist itself, it's what happens when water accumulates on the patio floor. Repeated surface wetting promotes algae and biofilm growth, which turns tile, concrete, and stone dangerously slippery. Two things help here: good patio drainage and conservative misting cycles. Your patio surface should slope away from the house at roughly 1 to 2% grade (about 12 to 17 millimeters of drop per meter, or roughly 1/8 inch per foot) so water runs off instead of pooling. Keep misting cycles short enough that the floor stays mostly dry between runs. If you're dealing with an existing slope problem, that's a project to address before installing any misting system.
Electrical safety
Any pump, controller, or electrical component used outdoors must be plugged into a GFCI-protected outlet rated for outdoor use. If your patio doesn't have one, have an electrician add it before you install a pump-driven system. Water and non-GFCI outlets in the same space is not a shortcut worth taking.
Water conservation
A typical low-pressure misting system uses roughly 1 to 2 gallons per hour per nozzle. A 10-nozzle system running 4 hours a day adds up fast, use a timer to run the system only during peak heat hours (usually noon to 6 p.m.) and skip days when humidity is already high. You'll save water and get better cooling results both.
Rough cost expectations
- Basic hose-fed DIY kit (25–50 feet): $30–$80
- Add a quality inline filter and backflow preventer: $20–$50
- Add a battery timer: $20–$40
- Mid-pressure pump upgrade: $100–$250
- High-pressure complete kit: $400–$1,500+
- Total for a practical beginner setup (low-pressure with filter, check valve, timer): $70–$170
Winterizing your misting system
If you live somewhere that freezes, winterizing is not optional, water left in tubing, filters, valves, and pumps will expand and crack them. The process is straightforward: shut off the water supply to the system, open the lowest nozzle or a drain point to release pressure, disconnect the filter housing and drain it completely, and drain any pump by disconnecting inlet and outlet tubing so residual water can escape. Remove the tubing run if it's easily detachable, or at least blow it out with compressed air. Store the filter cartridge, pump, and any brass fittings indoors for the winter. Your backflow preventer, especially an RPZ assembly, also needs to be drained and protected from freezing; check local code for whether it needs to be removed seasonally or can be insulated in place. CSU Extension also describes backflow prevention devices for irrigation, including the pressure vacuum breaker (PVB) concept and how they protect potable water from contamination caused by backsiphonage backflow preventer.
Climate reality check
If you're on the fence about whether misters will work in your area, check your regional average summer afternoon relative humidity online before spending money. Below 40% RH, a misting system is genuinely transformative. Between 40% and 60%, you'll get meaningful cooling. Above 60%, especially above 70%, the mist won't evaporate fast enough to cool anything, and you'll just be making surfaces wet. For humid climates, shade sails, pergola covers, and ceiling fans deliver better results with less maintenance.
Once you've got your basic system running well, there's a lot of room to refine the build, dialing in nozzle spacing, adding automation, or upgrading to a mid-pressure pump for finer mist. The guides on building a patio misting system from scratch and on exactly how to install misters on a patio structure go deeper on those specific topics if you want to take the next step after getting your first system up and running.
FAQ
Can I install do it yourself patio misters on a covered porch or near an outdoor living area with kids and pets?
Yes, but only if there is a safe way to drain and keep the floor from staying wet. For frequent splash-free operation, run the mist lines along the perimeter, keep your nozzle height in the 8 to 14 ft range, and use shorter run cycles, then confirm the ground slopes away from the house. If the area floods or ponds even briefly, fix drainage first because algae buildup can still make surfaces slick.
How long should I run do it yourself patio misters each day to avoid wet floors and slippery surfaces?
Do not run the system constantly. In most backyards, a timer that runs in short bursts during peak heat works better than a long single session, because you want the floor to dry between cycles. As a practical rule, if you notice visible wetting or puddling after a run, shorten the next cycle and reduce total daily runtime.
My misters look like they are spraying rather than cooling, what should I troubleshoot first?
If the system is making larger droplets, the cooling effect often drops first, then wetting becomes obvious. Start by checking your filtration (clogging can change spray pattern), confirm all nozzles are seated correctly, and verify your water pressure at the hose bib before blaming nozzle count or spacing. For low-pressure systems that drip, a supply pressure increase (or a mid-pressure upgrade) usually fixes the root cause.
Will do it yourself patio misters work if my water is hard or comes from a well?
Not necessarily. Some kits are designed for standard hose-bib feed, but many do not handle sprinkler-well water, high-sediment sources, or aggressive water treatment well. Before installing, inspect a month of your local or well water for sediment issues, then match filtration depth to that condition. If your water is very hard or has visible particles, plan on more frequent filter changes or consider a higher-end system with better filtration capacity.
How often should I clean nozzles and filters, and what signs mean I should service them now?
Over time, biofilm and mineral scale can form even with filtration, especially if the system sits full of water. After long off periods, run short test cycles and watch spray uniformity nozzle-to-nozzle. If you see partial coverage, soak affected nozzles in vinegar as described, and check whether the inline filter cartridge is due for replacement.
I have a screened patio, will nozzle spacing and droplet behavior be different than an open patio?
If you have a screened or partially enclosed patio, you may need wider spacing and more conservative runtime than an open-air setup. The goal is to let mist evaporate before it accumulates, so reduce nozzle density, keep the nearest nozzle start point away from walls that trap airflow, and monitor humidity and floor wetness during the first week of operation.
Can I use do it yourself patio misters inside a mostly enclosed outdoor room?
A true full enclosure is usually a poor fit, not just because of limited airflow, but because the mist can increase indoor humidity and create condensation problems. If you are trying to cool a mostly enclosed room, consider a portable evaporative cooler or improve ventilation first. If you proceed with misters, treat it as a semi-enclosed zone and plan for more conservative misting.
What kind of automation can I add to a DIY mister system (timers, controllers), and what electrical cautions matter?
Yes, but it must match the system design. For low-pressure hose-fed kits, you often can add a timer switch for peak-hours scheduling, but avoid devices that do not switch outdoor-rated loads. For pump-driven systems, use outdoor-rated, GFCI-protected controls, and confirm the timer or controller’s electrical rating matches the pump’s draw.
Would a humidity sensor prevent wasted water on humid days, or is it overkill?
If you want the system to shut off automatically when humidity is high, you can use a humidity-based controller, but mist systems have diminishing returns above about 60% relative humidity, so the primary value is preventing wetting. Even with humidity control, still use conservative cycle timing, because humidity sensors measure air, not floor wetness, and winds can shift conditions quickly.
How do I fine-tune performance if some areas get wet but other areas feel too warm?
Often you can adjust without replacing the whole run. If airflow is causing oversaturation in one area, change nozzle spacing or move the starting nozzle farther from the structure edge so mist does not blow back. If only a few nozzles underperform, the fix is usually cleaning or reseating those nozzles rather than redoing tubing layout.
Next Articles

How to Decorate a Long Narrow Patio: Layout Tips
Practical DIY layout and decor tips to widen a long narrow patio using zoning, furniture spacing, lighting, greenery, an

How to Decorate a Rectangular Patio Step by Step
Step-by-step plan to decorate a rectangular patio with smart layout, zones, furniture fit, lighting, plants, and seasona
How to Decorate a Patio Wall: DIY Ideas and Mounting Tips
DIY patio wall decor for brick, stucco, wood, concrete, or siding with weatherproof mounting tips and maintenance.