You can build a DIY screened-in patio enclosure over a weekend or two using aluminum or wood framing, fiberglass or aluminum mesh, a spline roller, and basic carpentry tools. The general process is: prep your slab or deck, frame vertical walls between your existing posts or roof structure, install screen panels using spline or a no-spline system, hang a screened door, and seal every gap where bugs could enter. When you plan a screened-in patio enclosure, focus on how the walls meet the existing posts and roof so bugs and weather cannot get in. Budget around $500 to $2,000 for materials depending on the size of your space and the system you choose, and expect to invest 2 to 4 full days of work for a typical 12x16-foot patio.
Do It Yourself Screened-In Patio: Step-by-Step Build Guide

Felix Brennan
1 May 2026
What a DIY screened-in patio enclosure actually includes
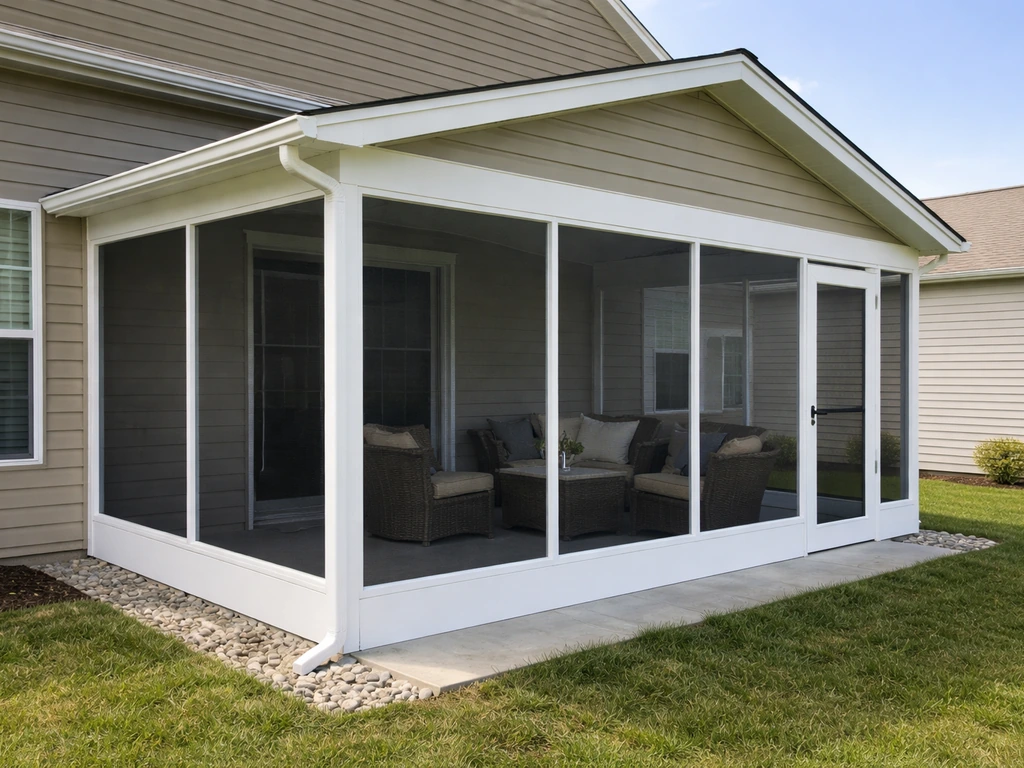
Before you start buying lumber or screen rolls, it helps to understand what you're actually building. A screened-in patio is a framed enclosure that closes off the open sides of a covered outdoor space with screen panels and at least one screened door. The key word here is "covered", if your patio doesn't already have a roof, you either need to add one first or build a full screen room structure from scratch, which is a more involved project.
Most DIY enclosures fall into one of two categories. The first is the add-on approach: you already have a patio cover or pergola, and you're simply adding screen walls between the existing posts and roof framing. This is the most approachable weekend project. The second is a full screen room, where you build a freestanding or house-attached frame including roof structure, walls, and door. This requires more planning, potentially a permit, and more material, but it gives you a true outdoor room.
Choosing your roof and wall layout

For the roof, you have two main choices: a screened roof that maximizes airflow and natural light, or a solid panel or insulated roof that blocks rain completely and provides real shade. If you live somewhere with heavy afternoon sun or frequent rain, a solid roof is worth the extra cost. If you want the breeziest possible space and your patio is already shaded by a tree or overhang, a screened roof keeps things light and airy.
For the walls, think about how many sides you actually need to close in. A three-sided enclosure with the house wall as the fourth side is the most common setup. Some people opt for a partial screen enclosure on just one or two sides for privacy or wind control without fully enclosing the space. For more detail on sizing, materials, and installation steps specific to a patio privacy screen, follow our guide on how to build a privacy screen for patio. Full enclosure on all open sides gives the best insect protection. Your choice here will drive how much framing material and how many screen panels you need.
Planning, measurements, and site prep
Start with a permit check. Many municipalities require a building permit for permanent patio enclosures, especially if you're adding a roof structure or attaching to the house. HOA neighborhoods often have architectural review requirements too. It's worth a 10-minute phone call to your local building department before you buy a single board. Skipping this step can mean tearing out work later.
Once you're clear on permits, measure your space carefully. Record the height from your patio slab or deck surface to the underside of your roof or beam, the width between posts or columns, and the total perimeter you're enclosing. Write these down and double-check them, screen panels and frame components are cut to fit, and even a quarter-inch error can mean a panel that doesn't seat correctly.
Site prep before you frame
Walk the perimeter of your patio and look at what you're attaching to. If you're mounting a ledger board to your house wall, locate the wall studs or rim joist and plan your lag bolt locations. Check whether your existing posts are plumb, if they're leaning even slightly, fix that before you frame screen walls or your panels will never sit flat. For posts anchoring to the slab, make sure the base connections are solid; a loose post base will eventually rack the whole frame. If your slab has cracks near post bases, address those now.
Also look up at your roofline transition. If your new frame will connect to the house fascia or soffit, you'll need flashing or sealant around every penetration point to keep water out. Match your roof pitch to the home's existing roofline where possible, it looks better and handles drainage more predictably.
Materials and screen system selection

The materials you choose affect how long your enclosure lasts and how easy it is to maintain. Here's a breakdown of the main decisions you'll make.
Framing: aluminum vs. wood
| Material | Pros | Cons | Best For |
|---|---|---|---|
| Pressure-treated lumber | Widely available, easy to cut and fasten, budget-friendly | Heavier, needs sealing/painting, can warp over time | Attached add-on enclosures, budget builds |
| Powder-coated aluminum (modular kit) | Rust-proof, lightweight, clean look, hardware included | More expensive upfront, less flexible for odd sizes | Full screen rooms, clean modern aesthetic |
| Cedar or redwood | Naturally rot-resistant, attractive grain | More expensive than PT, still needs finishing | Visible frame areas where appearance matters |
For most DIY add-on enclosures, pressure-treated 2x4 framing is the practical choice. Use it for all bottom plates that contact the slab and for any framing within 6 inches of the ground. Aluminum modular kits are excellent if your patio dimensions are fairly standard, these systems include all the connectors, post bases, and hardware you need, and the components are designed to align easily. Just verify the kit matches your opening sizes before ordering.
Screen mesh types
| Screen Type | Best Use | Visibility/Airflow | Durability |
|---|---|---|---|
| Fiberglass 18x16 mesh | Standard insect screening | Good airflow, clear view | Moderate — tears but easy to replace |
| Aluminum 18x16 mesh | Higher traffic areas, pets | Similar airflow to fiberglass | More rigid, harder to patch but lasts longer |
| Solar/sun control screen | South or west-facing sides with harsh sun | Reduced glare and heat, slightly less airflow | Good — UV-stabilized fibers |
| Privacy screen mesh | Sides facing neighbors or street | Limited outward visibility | Similar to solar screen |
For a standard patio enclosure, blank" rel="noopener noreferrer">fiberglass 18x16 mesh is the go-to choice. It's flexible, forgiving to install, and cheap to replace if a panel gets damaged. If you have pets or kids who push on the screens, upgrade to aluminum mesh on the lower panels. On sun-drenched sides, a solar-control screen from a brand like Phifer can cut heat gain noticeably while still blocking insects. Phifer's insect-screen selection guide compares screen types for enclosure use and highlights differences such as solar insect screening versus standard insect screening for the intended application blank" rel="noopener noreferrer">solar-control screen from a brand like Phifer can cut heat gain noticeably while still blocking insects.
Spline vs. no-spline installation systems
Traditional spline systems use a flexible vinyl cord pressed into a groove channel around the frame perimeter to hold the screen in place. This is the most common method and works with wood or aluminum frames. No-spline systems (like SCREENEZE) use a different clamping mechanism that can make future screen replacement faster and easier. If this is your first build or you anticipate replacing panels down the road, a no-spline system is worth considering. The initial install is comparable in difficulty, but future maintenance is simpler.
Door options
A standard hinged aluminum screened door (typically 32 or 36 inches wide) is the most common and affordable choice. For larger openings or high-traffic situations, a sliding screened door gives more clearance. Whatever you choose, buy the door before you frame the doorway so you can size the rough opening correctly, typically 2 inches wider and 1 inch taller than the door unit.
Tools, supplies, and safety checklist
Gather everything before you start. Running to the hardware store mid-project kills momentum and often leads to suboptimal substitutions.
Tools you'll need
- Tape measure and carpenter's square
- Level (4-foot level is ideal for checking posts and framing)
- Drill/driver with bit set
- Circular saw or miter saw for framing cuts
- Spline roller tool (concave wheel for pressing spline into groove) — and optionally a combo spline roller/screen knife
- Utility knife or dedicated screen trimming knife
- Hammer and nail set
- Staple gun (for wood-frame screen installation)
- Caulk gun
- Safety glasses, work gloves, and hearing protection
Materials and supplies to buy
- Pressure-treated 2x4 lumber (plates, studs, headers) or aluminum modular frame kit
- Structural screws — coated/exterior rated (3-inch for framing connections, plus lag bolts for ledger attachment)
- Post base hardware if adding new posts
- Concrete anchors for slab attachment
- Screen mesh (buy 10-15% more than your calculated area to account for waste)
- Vinyl spline (match diameter to your channel groove — typically 0.140 to 0.175 inch)
- Screen retainer/channel molding if using wood framing
- Pre-hung aluminum screened door with hardware and closer
- Exterior caulk/sealant (paintable silicone or polyurethane)
- Drip cap or flashing (for house-wall attachment points)
- Paint or stain for wood framing (if applicable)
Step-by-step framing and installation
This walkthrough covers the most common scenario: adding screen walls to an existing covered patio with a concrete slab floor and an existing overhead structure (beams, rafters, or a patio cover). Adjust as needed for your specific setup.
- Lay out your wall lines using chalk line or tape on the slab. Mark post locations at roughly 3-foot centers — this gives you solid framing points for each screen panel and keeps individual panel widths manageable.
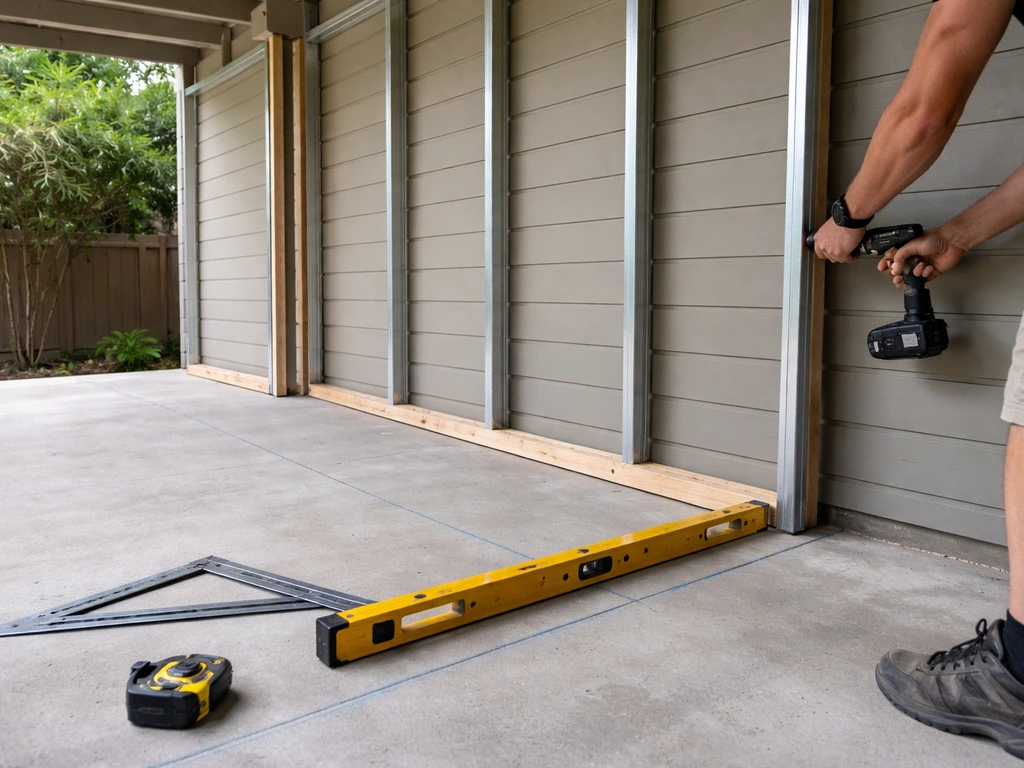
- Install your bottom plate first. For slab-attached framing, cut your pressure-treated 2x4 bottom plate to length, drill pilot holes, and fasten it to the slab with concrete anchors. Use a treated plate here without exception — direct slab contact will rot untreated wood quickly.
- Anchor your corner posts and intermediate posts. Use post base hardware to connect each post to the slab. Check every post for plumb in two directions before fastening permanently. A post that's even slightly out of plumb makes every panel and door installation harder from here on.
- Install your top plate. Cut and fasten the top plate to the underside of your existing roof framing or beam. Drive coated structural screws through the plate into the roof framing — this is a critical structural connection. Use sealant around any lag bolts that penetrate the roofline.
- Frame your doorway opening. Build a proper rough opening with doubled studs (king and jack studs) on each side and a header above. Size it to your door unit plus 2 inches of width and 1 inch of height for shimming.
- Add corner bracing where needed. If your frame feels at all racking or wobbly, add diagonal bracing at corners before moving on. K-braces or even a simple diagonal 2x4 brace will stiffen the structure significantly.
- Install intermediate screen frame members. Each screen panel needs framing on all four sides — top, bottom, and both sides. Nail or screw horizontal nailers between posts at mid-height for taller panels, creating individual framed openings no taller than about 6 feet.
Installing screens the right way
Screen installation is where most DIY projects either look great or look sloppy. The key is getting consistent tension across each panel and driving the spline correctly so the screen stays taut without bunching at corners.
- Cut your screen mesh about 2 inches larger on all four sides than the opening you're filling. You'll trim the excess after the spline is seated.
- If you're using wood framing, staple a screen retainer channel (aluminum U-channel or screen molding) around each opening perimeter before laying the screen. This gives you a clean groove to receive the spline.
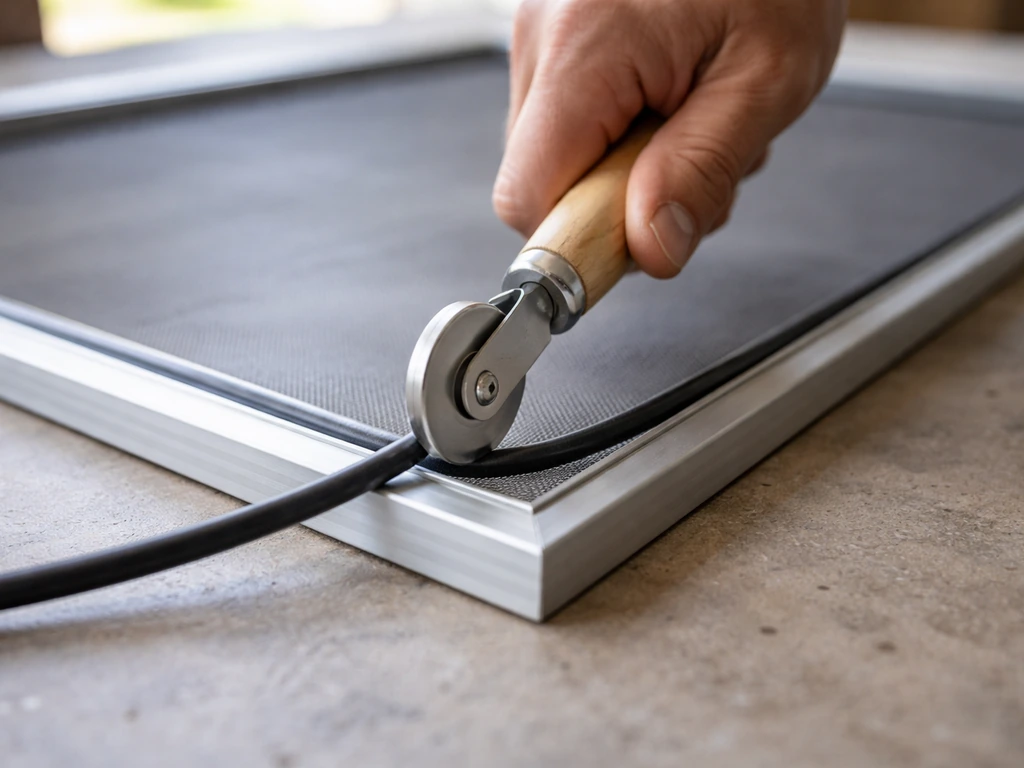
- Lay the screen over the opening and hold it lightly in place. Starting at one of the long sides, begin pressing spline into the groove channel using the concave wheel of your spline roller. Apply moderate, even pressure — the goal is to seat the spline fully into the groove so it grips the screen fabric.
- Work one full side at a time. After the first long side is done, pull the screen gently taut across to the opposite long side and install that spline. Then do the two short sides. Keeping light tension as you roll prevents the screen from wrinkling or going slack.
- At corners, cut the spline at a 45-degree angle across the groove corner for a neat fit — don't try to bend a continuous piece of spline around a sharp corner.
- Once all four sides are splined, trim the excess screen flush with the outer edge of the spline groove using a utility knife or screen trimmer. Hold the knife at a slight inward angle so you cut cleanly without nicking the spline.
- Check the finished panel for any wrinkles, loose spots, or bubbles. A properly installed panel should look taut and flat, with no visible sag.
Sealing gaps and weatherproofing
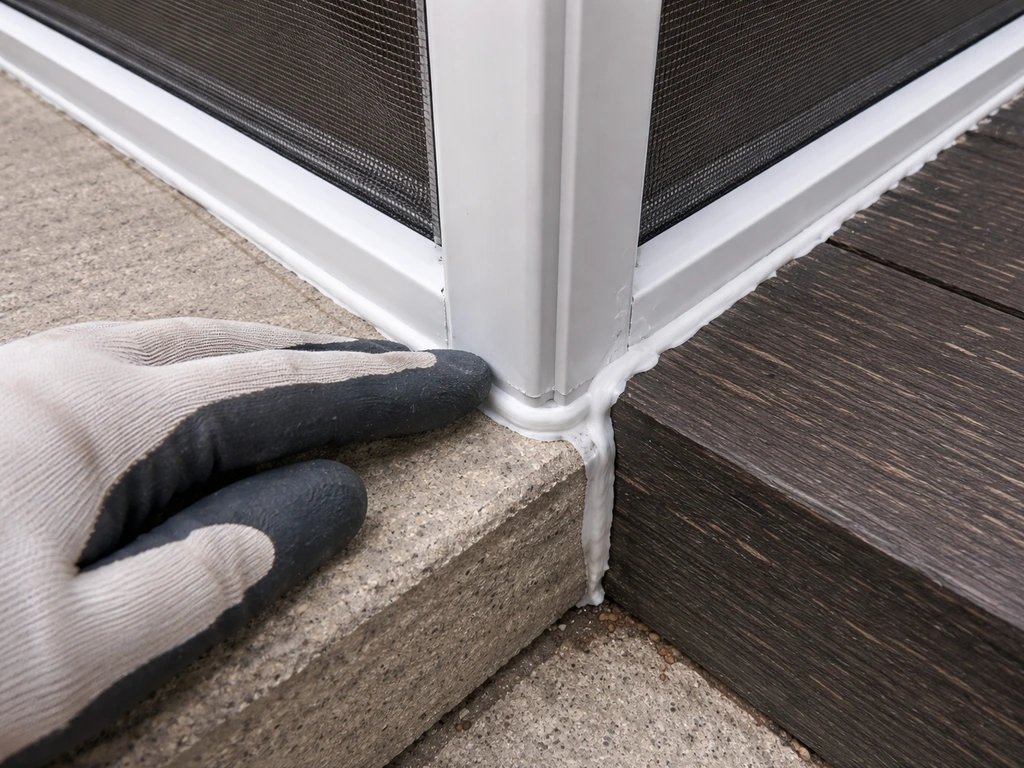
Insects are extremely good at finding even a 1/4-inch gap. Once all panels are installed, walk the perimeter of the entire enclosure and check every joint, corner, frame connection, and transition point. Run a bead of exterior caulk along the joint where your bottom plate meets the slab, along house-wall connections, and around the door frame. Where your enclosure meets the existing roof structure, add drip cap or flashing if there's any possibility of water infiltration. Check that the screened door closes snugly and that the sweep at the door bottom makes good contact with the threshold.
Finishing touches and upgrades
Installing the screened door
Set your pre-hung door unit into the rough opening, shim it level and plumb, and fasten the frame through the jamb into the jack studs. Most aluminum screened doors come with a spring closer, adjust the tension so the door closes firmly on its own but doesn't slam. Add a hook-and-eye latch or a proper door latch for security. If you have kids or pets, a self-closing latch that latches automatically is worth the extra few dollars.
Shade and wind control
Even with screening in place, a west-facing patio can get brutal in the afternoon. Retractable sun shades mounted to the interior of the frame can be rolled down when needed and stowed when you want full airflow. These are a very popular upgrade for patios in the South and Southwest. If wind is your issue, a denser mesh like solar screen on the windward side does double duty as wind and sun control while still blocking insects.
Ceiling fan and lighting
A ceiling fan transforms a screened patio from comfortable to genuinely pleasant on hot days. If your covered patio is protected from direct rain, use a ceiling fan rated at minimum "Damp" (for covered outdoor locations). If there's any chance of rain blowing in, as there might be with a screened roof rather than a solid one, go with a "Wet" rated fan. Install it centered in the space for maximum airflow coverage. Outdoor-rated LED light kits built into the fan handle evening lighting simply.
Optional upgrades worth considering
- Outdoor-rated ceiling fan (Damp or Wet rated depending on roof type)
- Retractable sun/privacy shades on the sunniest sides
- Weatherstripping upgrade on door for a tighter seal
- Outdoor-rated lighting on a separate circuit
- Privacy screen panels on street-facing or neighbor-facing sides
- Converting to a full enclosure with a solid roof panel for all-season use (which edges toward a sunroom conversion — a larger but related project)
Maintenance and troubleshooting after installation
Routine cleaning
Clean your screen panels once or twice a year using a soft brush or low-pressure garden hose spray and mild soap. Don't use a pressure washer directly on screen mesh, the force can loosen spline or deform the mesh. Wipe down aluminum frame tracks and channels with a damp cloth to remove dirt and debris that can cause scratching or sticking if you have sliding components. Let everything dry before the next rain season.
Repairing tears and damage
Small tears up to about 1/2 inch can be patched with a fiberglass screen patch kit available at any hardware store. Larger tears, or damage from pets pushing through panels, usually mean replacing the whole panel, which is straightforward if you installed with spline, just pop out the old spline, pull the screen, and re-install with a new piece of mesh. Address tears early; a small hole grows quickly once the screen starts fraying. If you used a no-spline system, panel replacement is even faster.
Seasonal checks
At the start of each season, walk the entire enclosure and check these things: look for spline that has pulled out of its groove (common after temperature swings cause framing to expand and contract), check every caulked joint for cracking and re-apply where needed, test that your screened door still closes and latches properly (wood frames can shift seasonally and cause doors to stick), and inspect the base of any wood posts or plates for signs of moisture damage or rot. Catching a soft spot in a bottom plate early is a simple repair; ignoring it for two seasons means replacing structural members. Consistent seasonal maintenance is what separates an enclosure that looks great for 15 years from one that starts falling apart in three.
Common problems and fixes
| Problem | Likely Cause | Fix |
|---|---|---|
| Screen panels look wavy or saggy | Insufficient tension during install or spline not fully seated | Remove spline, re-tension screen, re-install spline more firmly |
| Door sticks or won't latch | Frame has racked out of square | Check and adjust corner bracing; re-plumb door jamb and re-shim |
| Bugs still getting in | Gaps at door sweep, base plate, or corner joints | Inspect and caulk all joints; replace door sweep; add weatherstripping |
| Spline pulling out of groove | Wrong spline diameter or temperature-related frame movement | Replace with correct spline size; re-roll and press firmly |
| Frame showing rot at base | Untreated lumber or poor drainage at slab edge | Replace with pressure-treated members; improve slab drainage slope |
If your project grows beyond the basic add-on enclosure described here, there are adjacent paths worth knowing about. If you project grows beyond the basic add-on enclosure described here, there are adjacent paths worth knowing about DIY screened-in patio enclosure. Building a screened porch on an existing patio slab from the ground up involves more structural framing work but follows the same principles at a larger scale. And if you eventually want year-round use, a full enclosure with a solid roof and windows moves you into sunroom conversion territory. But for most homeowners, the DIY screened-in patio described in this guide is the right starting point: practical, achievable in a weekend or two, and genuinely transformative for how much you actually use your outdoor space.
FAQ
Can I build a do it yourself screened-in patio if my patio doesn’t already have a roof?
Yes, but only if the “covered” part already exists or you can add a roof section that matches the drainage plan of your home. A screened-in patio without an overhead roof will still let rain blow in through the screen openings, so you may feel it during storms and get wet flooring. For areas with frequent rain, you typically need either a solid roof above the enclosure or a full screen-room style roof designed to handle water.
Should I use spline or a no-spline system for a do it yourself screened-in patio?
Choose a product that fits your existing frame and your long-term maintenance goals. Spline systems are common and work with wood and aluminum frames, but the screen is only as good as the spline seating. If you think you will replace panels often (kids, pets, wind damage), a no-spline clamping system can make later panel swaps faster and cleaner, without removing spline cord.
What screen material is best for a do it yourself screened-in patio with pets or lots of sun?
Before you buy mesh, decide which wall faces will take the most punishment (sun, wind, kids/pets). Fiberglass mesh is a good default because it is flexible and inexpensive to replace, but aluminum mesh on lower panels is a smart upgrade where people push or where tears are likely. For hot climates, solar-control screening can reduce heat gain on the sunniest sides while still keeping insect protection.
Do I always need a permit for a do it yourself screened-in patio enclosure?
Most outdoor patios with an enclosure need a permit when you add or tie into a roof or make permanent structural changes, but requirements vary by city and HOA rules. Even if you are only adding screen walls, check first if you will attach to the house, mount a ledger, or create a new covered area. A quick call to the building department can save you from rework.
Why do my screens or door start to fit poorly after a few seasons?
Plan for seasonal movement and water management at junctions. If your patio posts or house connections shift even slightly, screens can become slack or doors can start scraping, especially on wood frames. Use exterior-grade caulk at the bottom plate to slab, seal transitions at house-wall connections, and confirm flashing or drip-cap detail at roofline penetrations before finishing the panels.
Where do gaps most commonly happen on a do it yourself screened-in patio, and how do I find them?
The easiest way to avoid leaks and insect entry is to treat the “bottom line” and every transition as a continuous seal. In practice, run exterior caulk where the bottom plate meets the slab, verify the door sweep contacts the threshold along its full width, and inspect corners and joints after installation. Insects can exploit tiny separations, so do a perimeter walk with your eyes close to the seams.
Can I install a ceiling fan on my screened-in patio, and what electrical rating should I use?
Yes, a ceiling fan is a strong comfort upgrade, but use the correct wet rating for your exposure. If rain can blow in because you have a screened roof or gaps at the roofline, use a “Wet” rated fan, not just “Damp.” Also center the fan in the open area so airflow reaches all seated zones.
What is the safest way to clean a do it yourself screened-in patio enclosure?
Be cautious with cleaning methods. Do not pressure-wash the screen mesh, the force can loosen spline or warp the fabric. Instead, use a soft brush or a low-pressure hose spray with mild soap, then let everything fully dry before the next wet season. For sliding tracks, wipe with a damp cloth so debris does not cause sticking.
Should I patch or replace a damaged screen panel on my do it yourself screened-in patio?
Small tears up to about 1/2 inch can often be patched with a fiberglass screen patch kit, but larger damage usually means replacing the whole panel. If you used spline, replacement is typically a matter of popping out the old spline and installing new mesh. Fixing early prevents fraying that can quickly expand the damaged area and make the panel lose tension.
What are the most common measurement or installation mistakes that cause screen panels not to seat right?
Replace, re-tighten, or re-seat components rather than trying to “force” the mesh to fit. A quarter-inch error in cutting or inconsistent tension around corners can prevent a screen panel from seating correctly, and it can leave visible slack or wrinkles. Double-check measurements (height to underside of roof or beam, widths between posts, and perimeter) and do a dry fit before installing spline or clamps.
How can I make a do it yourself screened-in patio comfortable in strong afternoon sun or wind?
Yes, and the decision is about airflow versus protection. A west-facing patio can overheat even under a roof, so interior retractable sun shades can help during peak sun hours while you still keep the enclosure airy. For wind and sun on the exposure side, using denser solar screen on the windward wall can provide double duty without sacrificing insect blocking.
What screened door option works best for a do it yourself screened-in patio, and how should I size the opening?
Yes, but match the door style to traffic and your rough opening. A hinged aluminum screened door works for most openings, while sliding doors add clearance for higher-traffic areas. Buy the door unit before you frame the doorway so you can size the rough opening correctly, typically about 2 inches wider and 1 inch taller than the door itself, then shim and fasten the frame through the jamb into the studs.
Next Articles

How to Decorate a Long Narrow Patio: Layout Tips
Practical DIY layout and decor tips to widen a long narrow patio using zoning, furniture spacing, lighting, greenery, an

How to Decorate a Rectangular Patio Step by Step
Step-by-step plan to decorate a rectangular patio with smart layout, zones, furniture fit, lighting, plants, and seasona
How to Decorate a Patio Wall: DIY Ideas and Mounting Tips
DIY patio wall decor for brick, stucco, wood, concrete, or siding with weatherproof mounting tips and maintenance.