The best way to cover a patio from rain depends on how much protection you actually need. For light or straight-down rain, a retractable awning or a pergola with a solid or louvered roof panel kit does the job well. For wind-driven rain or full waterproofing, you need either a solid-roof cover (aluminum, polycarbonate, or wood with roofing material) or a partial enclosure with side panels or screens. Pick the wrong one and you'll still be mopping up puddles after every storm.
How to Cover Patio From Rain: DIY Options and Steps

Felix Brennan
4 May 2026

First, Figure Out Where the Rain Is Actually Coming From
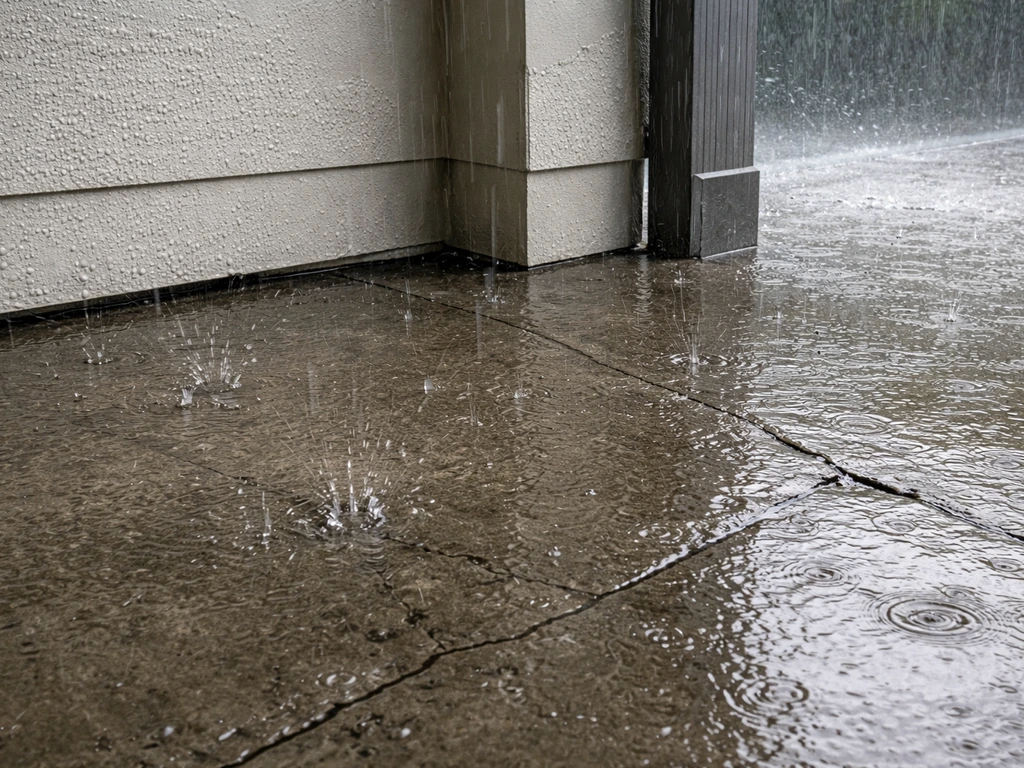
Before you spend a dime on a cover, spend five minutes watching what happens on your patio during a real rainstorm. Rain hits patios in a few different ways, and each one points to a different fix.
- Rain falling straight down through an open or partially shaded space: you need overhead coverage above the patio footprint.
- Wind-driven rain blowing in from the sides: overhead coverage alone won't solve this, you'll need side panels or screens too.
- Water running off the house roof and landing on the patio: the issue is your roof's drip line or missing gutters, not the patio itself.
- Water pooling on the patio slab after rain: your slab slope is wrong, it should drain at least 0.25 inches per foot away from the house.
- Leaks appearing at the wall where an existing cover meets the house: a flashing or sealing problem, not a cover size problem.
Getting this diagnosis right saves you from building a gorgeous pergola only to discover the real problem is water sheeting off your roof onto the patio because there's no gutter above it. Fix the source, then add the cover. Poor water management outside the building can also drive moisture toward your foundation and eventually cause mold problems inside, so this isn't just about comfort.
Covering Options: Awnings, Pergola Roofs, Canopies, and Gazebos
These are all overhead solutions, meaning they put a roof above you without necessarily closing the sides. Here's how they compare for rain protection specifically.
Retractable and Fixed Awnings
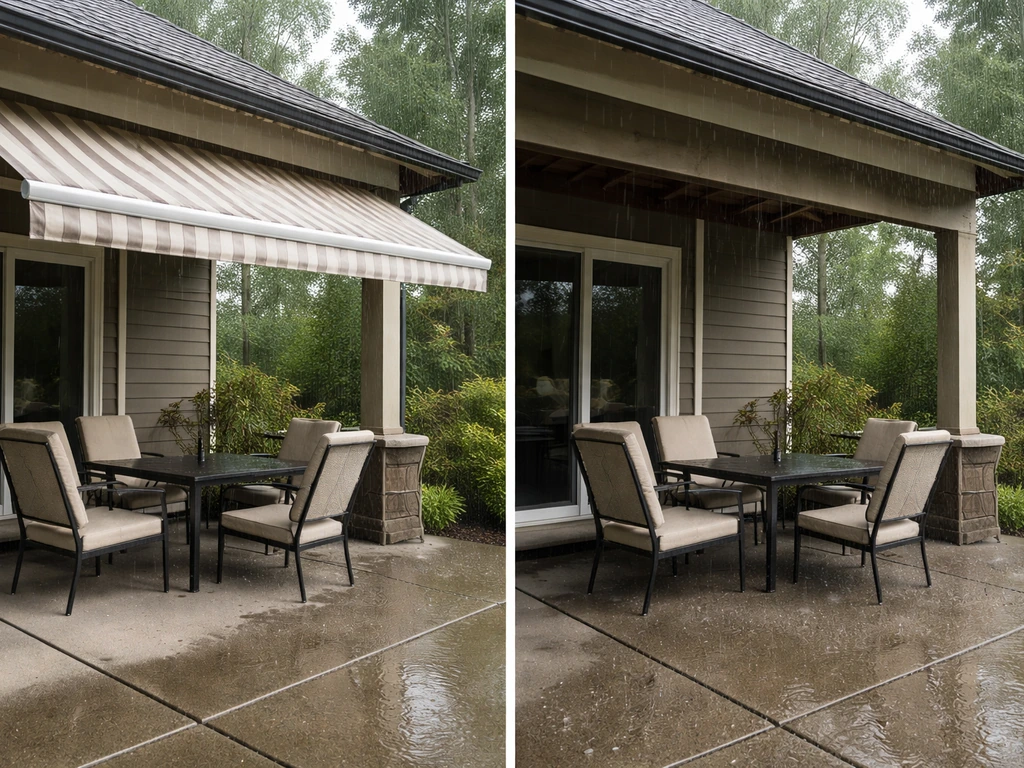
Awnings attach directly to the house wall and extend outward over the patio. They give you solid, controllable coverage for sun and rain when extended. A good fabric or aluminum awning handles straight-down rain well. The limitation is wind-driven rain, which can blow under the fabric edge and soak the outer third of your patio. Fixed (non-retractable) awnings tend to hold up better in rain because they're more rigid, but retractable versions should be retracted in heavy storms to protect the fabric and mechanism.
Pergola Roof Kits and Louvered Pergolas
A bare pergola with open rafters gives you almost zero rain protection. It looks great, but rain goes straight through. To actually stop rain, you need to add a roof kit: polycarbonate panels, corrugated clear roofing, a fabric canopy, or a louvered system. Louvered pergola roofs can close their slats when it rains, but wind-driven rain can still force water through the gaps between louvers. Polycarbonate panel kits are more reliably waterproof and less expensive. For a true pergola setup, plan your budget to include the roof covering from the start.
Canopies and Shade Sails
Freestanding canopy tents work as quick, budget-friendly solutions. They're portable and easy to set up, but most aren't built for heavy or sustained rain. Water can pool in the fabric center if the tension isn't kept tight, and they struggle in wind. Shade sails are primarily sun solutions, not rain solutions. They're angled fabric panels and water runs through the weave or pools in the low point. Don't rely on a shade sail to keep you dry.
Gazebos and Freestanding Roof Kits
A solid-roof gazebo or freestanding aluminum/polycarbonate patio cover kit gives you the strongest rain protection of the overhead-only category. The 2015 International Residential Code (IRC) Appendix H specifies that patio covers must be designed and constructed to sustain blank" rel="noopener noreferrer">dead load plus a minimum vertical live load of not less than 10 psf, and to resist the minimum wind loads in Section R301.2.1. ICC-ES AC340 provides the acceptance criteria used to evaluate patio covers in ICC-ES evaluation reports under the IBC/IRC, including relevant performance criteria such as wind and snow blank" rel="noopener noreferrer">ICC-ES AC340 patio cover acceptance criteria. Quality kits come with integrated gutter channels and can handle wind speeds up to 70 mph. These are great when you can't or don't want to attach to the house wall. The tradeoff is footprint: you need posts anchored in the patio slab or ground, and the footprint is fixed.
| Option | Rain Protection | Wind-Driven Rain | DIY Difficulty | Rough Cost Range |
|---|---|---|---|---|
| Retractable awning | Good (when extended) | Fair | Moderate | $300–$1,500+ |
| Fixed fabric awning | Good | Fair | Moderate | $200–$800 |
| Pergola with polycarbonate roof kit | Very good | Good | Moderate–High | $500–$3,000+ |
| Louvered pergola roof | Good (closed) | Fair | High | $2,000–$10,000+ |
| Freestanding gazebo/solid roof kit | Excellent | Very good | Moderate | $400–$5,000+ |
| Canopy tent | Fair | Poor | Easy | $80–$400 |
| Shade sail | Poor | Poor | Easy | $50–$300 |
Enclosure Options for Serious Rain and Wind Protection

If wind-driven rain is your main problem, overhead covering alone won't fix it. You need to add something to the sides. For wind-driven rain or full waterproofing, you need either a solid-roof cover (aluminum, polycarbonate, or wood with roofing material) or a partial enclosure with side panels or screens how to cover an outdoor patio. A good starting point is to understand how to cover an open patio based on the type of rain and how much side protection you need. This is where enclosure options come in, and they range from simple to substantial.
Screen Enclosures
Screening the sides of a covered patio gives you great airflow and keeps bugs out, but standard screen mesh won't stop rain. However, it dramatically reduces wind-driven rain by slowing the air movement that carries water horizontally. For moderate wind-driven rain, a screened enclosure paired with a solid roof is a highly practical combination, and it's one of the most popular patio upgrade paths. If you’re also trying to cover patio railing, enclosures and wind-blocking panels can help prevent rain from blowing into the open railing area screened enclosure.
Polycarbonate or Acrylic Panels
Clear or tinted polycarbonate side panels give you a wall that blocks both rain and wind while keeping views open and light coming through. These are often used on three-season rooms and screen enclosure upgrades. They can be fixed in frames or designed as removable inserts for seasonal use. If you're going this route, plan for ventilation so the space doesn't turn into an oven in summer.
Outdoor Curtains and Vinyl Drop Panels
Clear vinyl roll-down panels (sometimes called patio curtains or storm panels) are a budget-friendly way to block wind-driven rain on an existing covered patio. They zip or tie into place along the edges of your cover and roll up when not needed. Quality matters here: thin vinyl yellows fast and tears in UV. Look for 20-gauge or heavier vinyl for durability. These won't fully enclose a patio, but they work well for the two or three sides that catch the prevailing wind.
How to Install a Rain Cover: Step-by-Step
The exact steps vary by product, but these are the fundamentals that apply to almost every patio rain cover installation. Get these right and you'll avoid the most common leak problems.
Step 1: Plan the Layout and Size
Measure your patio footprint and add at least 12 to 18 inches of overhang on any open sides. For winter coverage, that overhang helps shield the patio from wind-driven rain and snow melt reaching the edges Measure your patio footprint and add at least 12 to 18 inches of overhang. A cover that's flush with the patio edge will still let rain blow in under the edge. Mark where posts or wall brackets will go. Check for overhead obstructions like gutters, light fixtures, or vent pipes. If you're attaching to the house, locate the wall studs or ledger board, because lag screws into drywall or siding alone won't hold.
Step 2: Set the Slope (Pitch)
This is the step most DIYers skip, and it's why covers leak or pool water. Your patio cover needs slope to shed rain. For polycarbonate panels, the minimum pitch is around 5 degrees, which works out to roughly 1 inch of drop per foot of horizontal run. Some sources recommend 10 degrees (about 2 inches per foot) for better drainage and to prevent debris from sitting on the surface. Attach the high end at the house wall and let the outer edge sit lower. Use a level and tape measure to confirm the drop before you anchor anything permanently.
Step 3: Anchor Posts and Ledger
Freestanding posts should be set in concrete footings or anchored with post bases rated for your local wind load. Don't just rest posts on the patio slab surface, especially in areas with wind or snow. For house-attached covers, lag-bolt the ledger board directly into wall studs or the rim joist, using lag screws at least 3 inches long. Pre-drill to avoid splitting. Use washers under the heads. If you're attaching to stucco or brick, use appropriate masonry anchors.
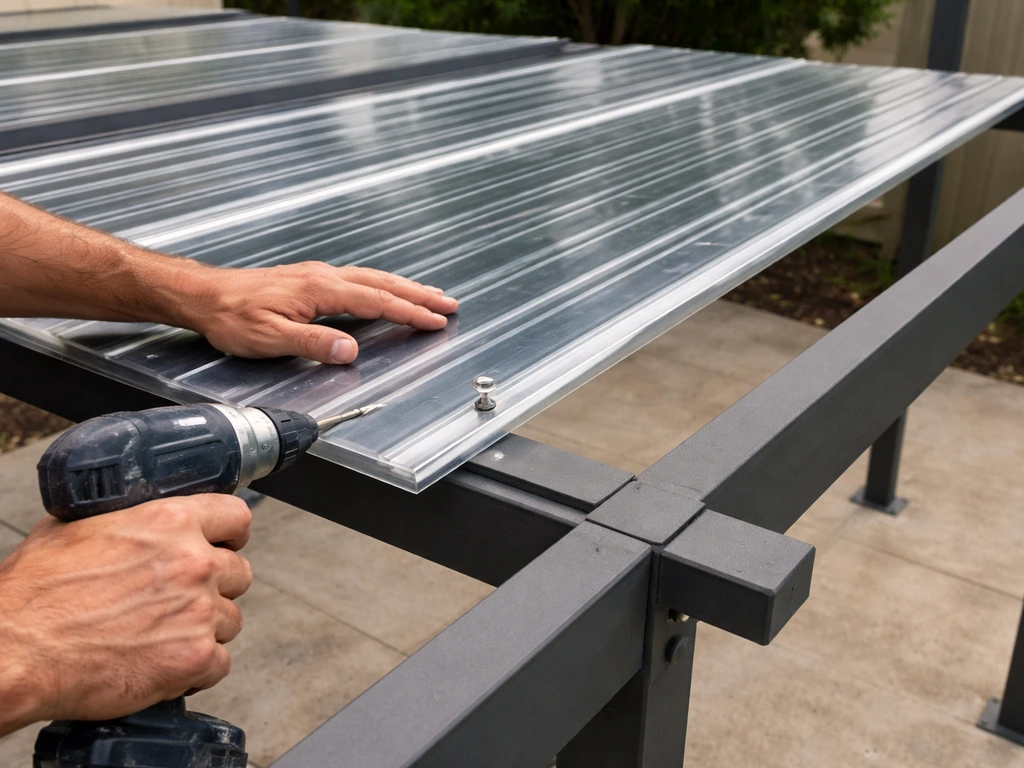
Step 4: Install Roofing Panels or Fabric
For polycarbonate panels, fasten them at regular intervals, typically every 24 inches along the direction of the rafters. Use pre-drilled holes (slightly oversized to allow for expansion) and roofing screws with rubber washers. Never overtighten. Panels should run parallel to the slope direction, not across it, so water flows along the channels and off the low edge. Overlap adjacent panels by at least 4 to 6 inches at any seams that run perpendicular to the slope. Seal side laps with a compatible silicone bead to prevent water infiltration at joints.
Step 5: Install Wall Flashing
Where the cover meets the house wall, you need flashing. This is the number-one place patio covers leak. Flashing is a strip of aluminum, galvanized steel, or flexible membrane that tucks behind the siding above and laps over the roofing material below. Minimum overlap at flashing joints is 6 inches. Seal the top edge where it meets siding with a bead of exterior-grade silicone. If you skip flashing or rely on caulk alone, wind-driven rain will find its way under the joint and drip directly onto the patio, often appearing several feet away from the actual entry point.
Water Management: Gutters, Drainage, and Sealing
Getting water off your cover is only half the job. You also have to control where it goes once it leaves the cover's edge.
Add a Gutter at the Low Edge
Without a gutter at the outer (low) edge of your cover, rainwater free-falls off the edge as a curtain, often landing on the outer portion of the patio or splashing back in. A simple aluminum gutter and downspout at the low edge channels water off to the side and away from the patio. Many solid-roof patio cover kits include an integrated gutter channel for this reason. If your kit doesn't include one, add a standard 4-inch aluminum gutter. Pitch the gutter at least 1/4 inch per 10 feet toward the downspout so water doesn't sit in it.
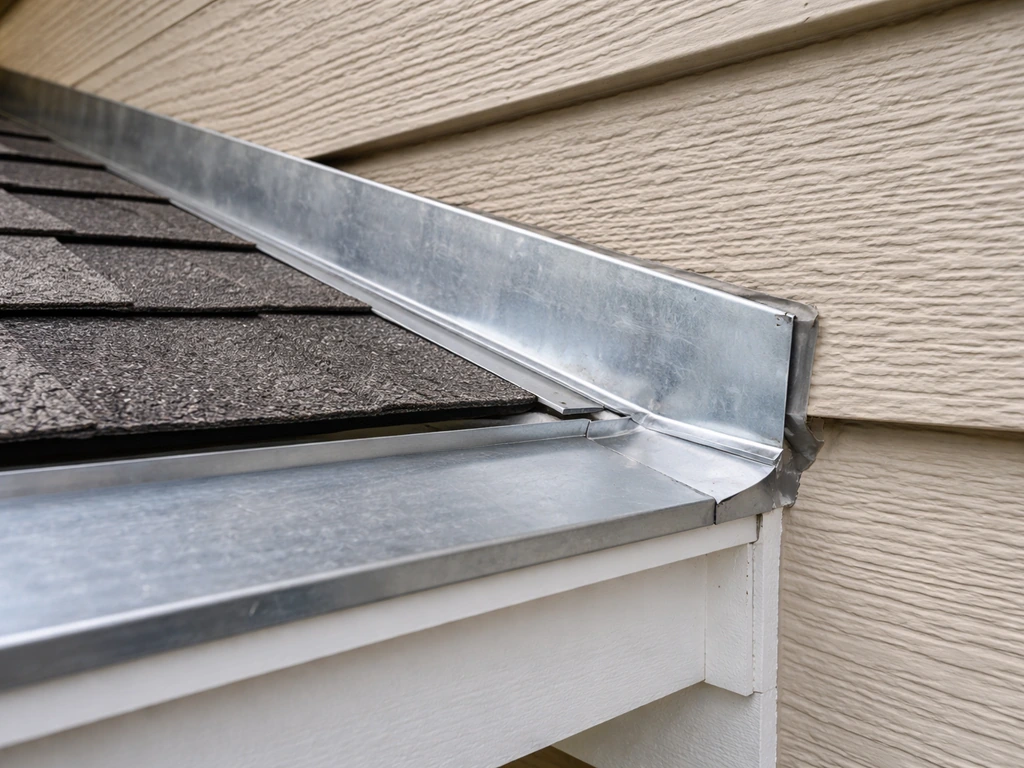
Install a Drip Edge
A drip edge is a thin metal strip that runs along the outer edge of the roof panel and redirects water into the gutter rather than letting it wick back under the roofing material. Bend the corner flap of the drip edge to a 90-degree angle at corners so water doesn't run along the corner and drip behind the gutter. This is a small detail that makes a big difference in keeping the outer edge clean and dry.
Direct Runoff Away from the House
Your downspouts need to discharge water away from the patio and away from the house foundation. The patio slab itself should slope away from the house at a minimum of 0.25 inches per foot. If your slab is flat or sloping toward the house, water will pool at the wall, undercut the foundation, and potentially drive moisture into the structure. You can't fix a bad slab slope without major work, but you can at least make sure your gutter downspouts aren't dumping water at the base of the wall.
Seal All Penetrations and Joints
Any screw hole, panel seam, or gap around posts is a potential water entry point. Use a polyurethane or silicone exterior sealant rated for UV exposure. Don't use painter's caulk outdoors, it breaks down quickly. Check the manufacturer's recommendation for your specific panel or cover material, because some sealants react badly with polycarbonate or certain coatings. Reseal annually or whenever you see cracking or separation.
Choosing the Right Size and Design for Your Space
Rain coverage and sun shading aren't the same problem. A cover sized purely for rain might leave you baking in direct sun during summer mornings, while a cover designed purely for shade might underperform in a rainstorm. Here's how to balance both.
- Size the cover to your activity zone, not just the slab. If your seating area is 10 by 12 feet, build the cover to at least 12 by 14 feet to account for wind-blown rain at the edges.
- Consider your sun angle. In most of the US, afternoon sun comes from the southwest. If summer heat is also a concern, extend the cover's west-facing overhang further than the other sides.
- Think about height. Lower covers (8 to 9 feet at the house wall) feel more sheltered but can feel oppressive in summer. Higher covers (10 feet and up) allow better airflow but may need additional side blocking for wind-driven rain.
- Account for seasonal use. If you want to use the patio in winter or during heavy rain, a solid roof paired with at least one solid or paneled wall on the prevailing wind side will extend your comfortable season significantly.
- Check for permit requirements in your area before building. Attached patio covers over a certain size (often 200 square feet or more) typically require a permit and may need engineered drawings.
If you're also thinking about how to cover an open patio or extend your covered area, the size and layout decisions above apply directly. The goal is always to create a usable, comfortable zone, not just a technically covered one.
Maintenance, Safety, and When to Call a Pro
Regular Maintenance Keeps It Watertight
Even a well-installed cover needs attention every season. Once a year, preferably in spring before the rainy season, run through this quick checklist:
- Inspect all flashing at the house wall for gaps, cracking, or lifting edges. Press any loose sections back and reseal.
- Check every visible screw or fastener for rust or backing out. Tighten or replace as needed.
- Clear gutters and downspouts of debris. Run a hose through them to confirm flow.
- Look at panel seams and overlaps for cracked sealant or separation. Reapply sealant where needed.
- Check that the slope is still correct. Covers can sag over time, especially at the center of long spans. If water is pooling, a center support or rafter may be needed.
- Inspect post bases and anchors for rust, rot, or any sign of movement.
- For fabric awnings, check the fabric for mildew, tears, or fraying at the edge binding.
Safety When Working at Height
Most patio cover installations require working on a ladder or scaffold at 8 to 12 feet. Don't underestimate this. Set ladders on firm, level ground and have a second person hold the base when you're moving panels or handling tools. Never lean a ladder against polycarbonate or unsupported roofing material. Use a tool belt so both hands are free when climbing. If the work requires you to be on the roof itself (not just reaching up from a ladder), use a safety harness anchored to a solid structural point.
When It Makes More Sense to Hire a Pro
Most awning and freestanding gazebo installs are genuinely DIY-friendly if you're comfortable with basic tools and ladders. But there are situations where hiring a contractor is the smarter call:
- You need to attach to a masonry or stucco wall and aren't sure how to properly anchor a ledger.
- The span is longer than 12 to 14 feet without intermediate posts, which may require engineered lumber or steel.
- Your local building department requires a permit with stamped drawings, which typically means a licensed contractor or engineer needs to be involved.
- The drainage situation is complex, for example water needs to be routed through underground piping or integrated with an existing gutter system.
- You've already tried to fix a leak and can't locate the source. Wind-driven rain can enter a joint several feet away from where the drip appears inside, making it genuinely tricky to diagnose without experience.
- You're adding a fully enclosed structure (three-season room or glass enclosure), which crosses into room-addition territory with its own permit and inspection requirements.
Getting a pro involved for a consultation doesn't mean handing over the whole project. Many homeowners use a contractor to handle the ledger attachment and flashing, then finish the rest of the cover themselves. That split approach saves money while making sure the most critical (and leak-prone) parts are done right. If you want to extend your patio cheaply, focus on the key rain-blocking parts and consider a split approach like this to keep costs down how can i extend my patio cheaply.
FAQ
How do I choose between an awning and a pergola roof kit if my main issue is rain but I also get high winds?
For high winds, treat fabric edges as the weak point. If rain is wind-driven, prioritize a rigid solid roof (aluminum or polycarbonate kit) or a pergola with a waterproof roof system plus side blocking (panels or at least skirting/screening on the windward side). If you pick an awning, plan to fully retract it during storms and keep the awning’s drop and mounting points within the product’s rated wind load.
Can I use a tarp to cover my patio from rain instead of installing a real cover?
Short-term, a tarp can work, but avoid tight, sagging, or “sheet-like” setups that trap water. Use edge fastening that prevents flapping, keep enough slope so water runs off, and add a method to prevent pooled water from weighing down the tarp and tearing it. Tarp setups also typically lack flashing and proper runoff control, so they can redirect water into walls or foundations if you’re not careful.
What’s the minimum overhang I should use for rain protection if I want DIY coverage on multiple sides?
Use the 12 to 18 inch guideline as your baseline, then add more on the sides that face prevailing winds. If you’re covering two sides, don’t assume the same overhang is enough on both, wind can drive rain differently across corners. Also remember that corners need extra attention for flashing and seam sealing.
How do I prevent water from leaking at the wall connection if my house is covered in siding that’s not flat?
Don’t rely on caulk alone at the siding interface. Plan for proper flashing that tucks behind siding above and laps over the roofing material below, and ensure the ledger attachment is made to studs or the rim joist. If siding thickness or trim complicates a flush fit, use flashing designed for that siding type so water runs in the right direction instead of behind trim.
Do I need a gutter even if my patio cover has a sloped roof?
A sloped roof needs controlled runoff. Without a gutter at the low edge, water free-falls and often splashes back, or it lands where you don’t want it (outer patio edge and nearby walls). A simple gutter and downspout at the low edge usually provides more consistent drainage than trying to rely on “natural” runoff off the roof edge.
What should I do about drainage if my downspout outlet is near the patio wall or foundation?
Aim the downspout away from the foundation and off the slab area where water can rebound toward the wall. If you can’t relocate the downspout far enough, add proper splash control (for example, extended discharge that points to a safe area). Also confirm the patio slab slope is not carrying water toward the house, because directing roof water onto an area that pools will still cause problems.
How often should I inspect and reseal my patio cover, and what signs mean it’s time to reseal?
Do a full inspection at least once a year before the rainy season. Reseal immediately if you see cracking, gaps around panel seams, peeling sealant, white residue from failed silicone, or any wet staining on the wall side after storms. Also check any areas you can’t easily see during installation, such as under panel overlaps and around post penetrations.
How do I keep polycarbonate panels from developing leak points over time?
Use the correct screw type with rubber washers and avoid overtightening, overtightening can deform panels and create channels for leaks. Keep panel alignment parallel to the slope direction so internal channels drain correctly, overlap seams by the required amount, and seal side laps at joints with a compatible sealant. Finally, pre-drill with clearance for expansion to prevent stress cracking that later turns into leak pathways.
Is screening enough to stop rain, or will it only help with bugs and wind?
Standard insect screening does not stop rain. It’s mainly for airflow and bug control, it may reduce wind-driven rain somewhat by slowing horizontal airflow, but droplets can still pass through the mesh. If wind-driven rain is a concern, pair a solid roof with rain-resistant side protection (for example, polycarbonate panels or storm-rated curtains) on the windward side.
Can I cover a railing that gets hit by rain, and what’s the best practical approach?
Yes, especially if prevailing winds carry rain into the open railing area. The most practical approach is adding wind-blocking side sections or partial enclosure panels so rain doesn’t blow directly through the railing line. Make sure whatever you add doesn’t interfere with gutter runoff at the cover edge, and check that any attachments are secured into suitable structure, not just trim.
When should I hire a contractor for a patio rain cover instead of doing everything myself?
If your project includes ledger attachment and flashing, those are frequent leak-prone areas where contractor experience helps. Also consider professional help if your patio height requires working on a roof with limited access, if the wall substrate is unusual, or if you have to solve complicated drainage issues (like downspout discharge conflicts). A common cost-saving split is to have the contractor do the wall connection and flashing, then DIY the remaining roof panels and runoff hardware.
Next Articles

How to Decorate a Long Narrow Patio: Layout Tips
Practical DIY layout and decor tips to widen a long narrow patio using zoning, furniture spacing, lighting, greenery, an

How to Decorate a Rectangular Patio Step by Step
Step-by-step plan to decorate a rectangular patio with smart layout, zones, furniture fit, lighting, plants, and seasona
How to Decorate a Patio Wall: DIY Ideas and Mounting Tips
DIY patio wall decor for brick, stucco, wood, concrete, or siding with weatherproof mounting tips and maintenance.