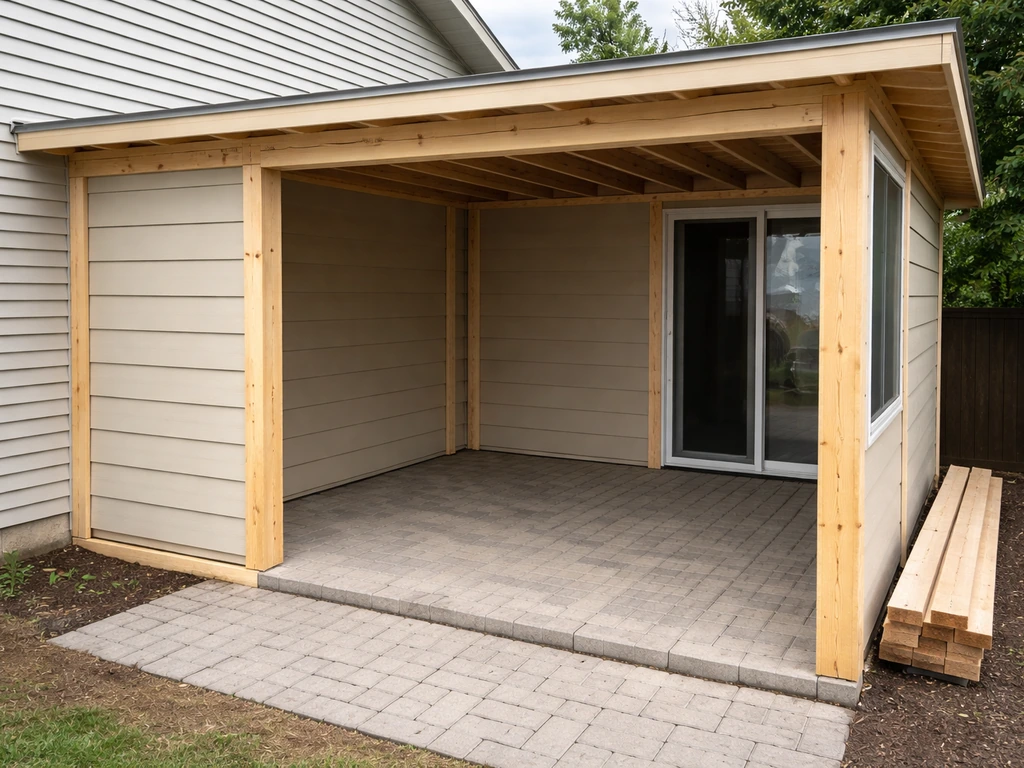
You can enclose an existing patio with walls by framing a perimeter structure using wood, vinyl, aluminum, or masonry, anchoring it to footings or a concrete slab, sheathing and cladding the frames, and tying the new walls into your existing roof or overhang. Done right, the result is a weatherproof outdoor room you can use in rain, wind, and cold. Done wrong, you get rot, leaks, and a structure your building department makes you tear down. This guide walks you through every step so you land in the first camp.
How to Enclose a Patio With Walls: DIY Step by Step

Felix Brennan
3 May 2026
First: what kind of 'walls' are you actually building?
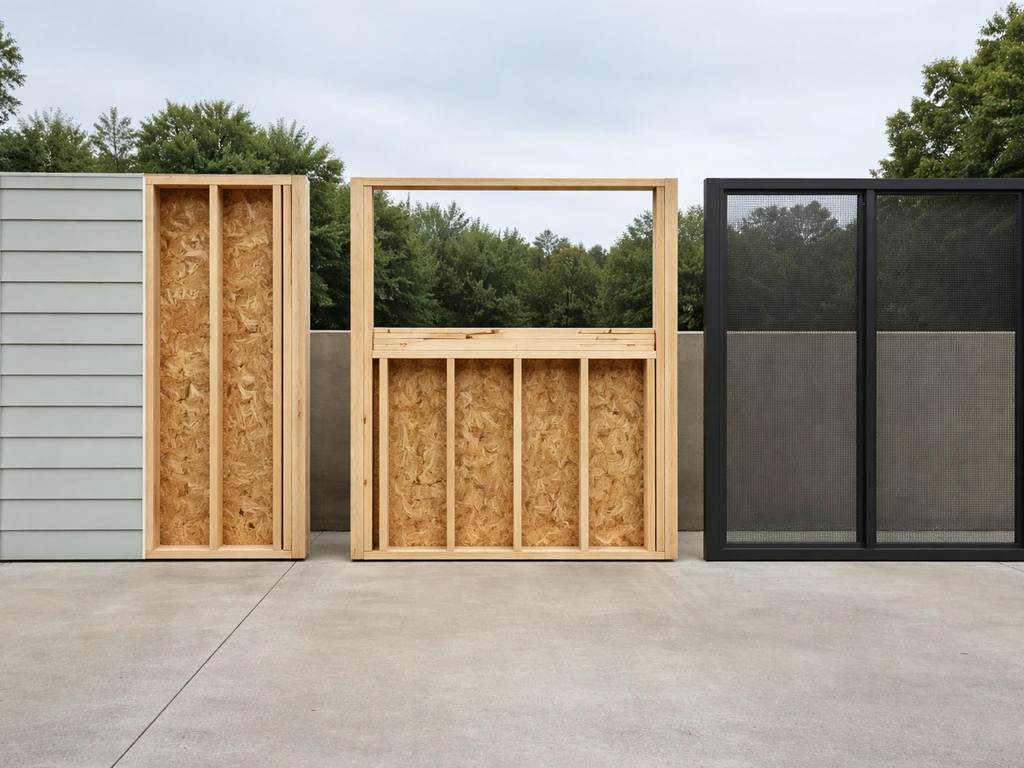
Before you buy a single board, get clear on what you mean by walls. There are three common approaches, and they have very different permit requirements, costs, and construction methods.
- Full solid walls: Wood-framed walls with exterior cladding (siding, fiber cement, board and batten), or masonry block, or vinyl/composite panel systems. These give you the most weather protection, privacy, and structural rigidity. They also trigger building permits almost everywhere.
- Framed wall panels with mixed infill: A structural frame (wood or aluminum) with a combination of solid panels, windows, glass, or polycarbonate sections. This is the most popular middle-ground option for patio enclosures. You get light, you control weather, and you can tune the design to your climate.
- Semi-enclosure/windbreak walls: Low knee walls (typically 24 to 36 inches tall) topped with screens, lattice, or clear panels. These block wind and define the space without fully enclosing it. They rarely require permits but also don't give you year-round comfort in harsh climates.
This article focuses mainly on the first two types: solid or paneled walls that create a real enclosure. If you're leaning toward a screened enclosure, a lattice approach, or a glass or polycarbonate panel system, those have their own detailed build paths worth looking at separately. If you want to do this with lattice instead of solid or paneled walls, you will need a specific approach for framing, airflow, and weather protection lattice approach. If you want to build a glass patio enclosure, focus on selecting the right glass panel system, planning support framing, and following weatherproofing details for joints and seals glass or polycarbonate panel system. For a fully walled enclosure that handles serious weather, read on.
Planning: layout, permits, and site requirements
This is where most DIYers rush, and where most problems start. Spend an afternoon here before you spend a dollar at the lumber yard.
Measure your patio perimeter and check the existing roof
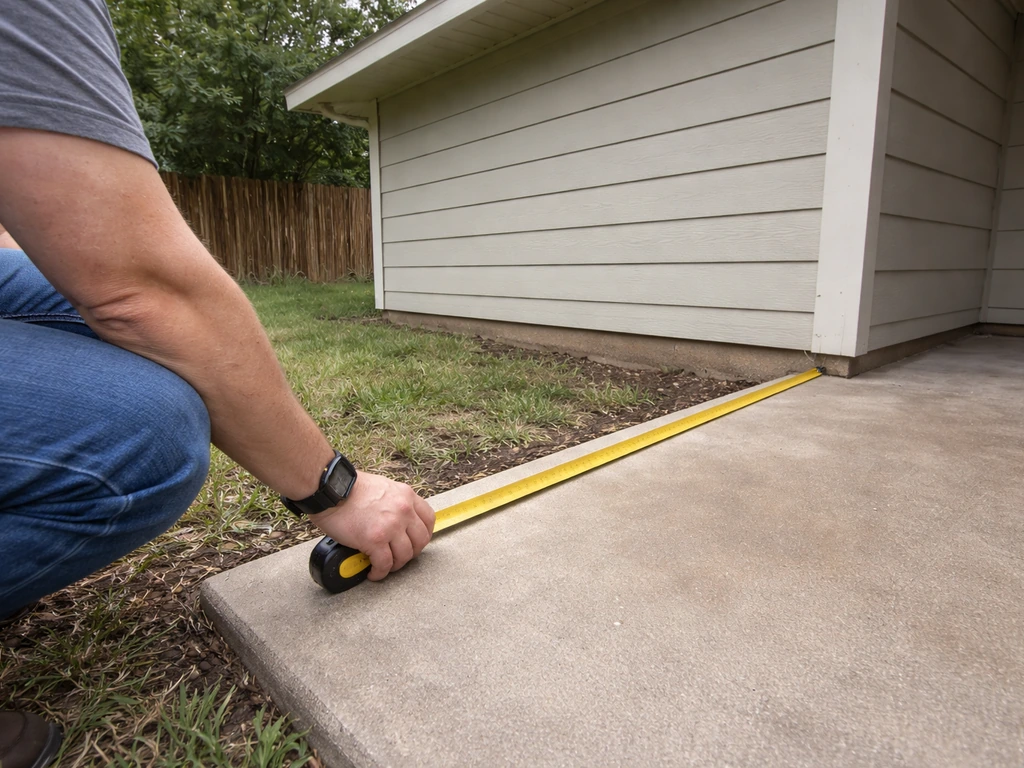
Walk your patio and measure every side you plan to enclose. Note where the existing roof or overhang starts, what it's attached to, and how far it extends. Your new walls have to tie into that structure. Check whether the existing roof framing is strong enough to support the new wall loads at its perimeter. If the patio cover was built as a lightweight shade structure, it may not be. A structural engineer can assess this for a few hundred dollars and can save you from a collapse or a failed inspection.
Permits and HOA rules
Let's be direct: if you're adding solid walls to a patio, you almost certainly need a building permit. Even in jurisdictions where a basic patio cover doesn't require one, the enclosure of that cover typically does. Cities like Tampa require permit applications for any structure that turns a covered patio or porch into an enclosed space.
Chula Vista's guidance makes clear that even when a permit isn't required in edge cases, the construction must still comply with all applicable building codes. Denver has specific rules about what percentage of wall area must be glass (65% in some non-habitable enclosure categories) to qualify for lighter construction requirements. Pull the permit. It protects your home's resale value and prevents you from being ordered to demolish unpermitted work.
Check your HOA documents too. Many HOAs regulate material colors, roof pitch, or exterior finishes on any addition visible from the street. Get written approval before construction starts.
Egress, ventilation, and light requirements
If your enclosure will adjoin a bedroom window and that window serves as the bedroom's required emergency egress, you cannot block it. Several building department guidelines are explicit on this: enclosures that would use a bedroom window as the only egress opening are not allowed without providing an alternate egress path. Plan your wall layout so bedroom egress windows either remain accessible from the enclosed space or have a direct exterior door nearby. Your new room will also need ventilation openings. California's regulations, for example, require a minimum 18-inch clear ventilating opening between the underside of an awning and the top of enclosure walls in certain configurations. Your local code will have similar minimums.
Wind load and local code requirements
The 2021 International Residential Code (IRC) and FEMA wind provisions require that wall framing be designed for local wind speeds. Some areas, like Commerce City, CO, design for 115 mph wind loads under IRC Section R602.10 wall-bracing requirements. Your permit office will tell you the design wind speed for your zone. This affects post sizing, anchor bolt spacing, and whether you need let-in bracing or structural sheathing panels.
Choosing your wall materials
Each material has real trade-offs in cost, durability, labor, and appearance. Here's an honest comparison.
| Material | Pros | Cons | Best For |
|---|---|---|---|
| Wood framing + cladding | Affordable, easy to work with, widely available, paint/stain finish options | Requires rot-resistant species or treatment, needs regular maintenance, vulnerable to moisture if flashing fails | Most climates; great for DIYers with basic carpentry skills |
| Vinyl/composite panel systems | Low maintenance, rot-proof, no painting needed | Less structural rigidity, limited color options, can look plasticky up close | Mild to moderate climates; budget-conscious builds |
| Aluminum or steel framing | Strong, rust-resistant (aluminum), thin profiles allow more glass infill | Higher cost, requires cutting tools, harder to modify later | Coastal or high-humidity climates; modern aesthetic |
| Brick or concrete block (masonry) | Extremely durable, excellent thermal mass, fire-resistant | Heavy, requires footings, professional-level work, slowest to build | Permanent structures in high-wind or high-security applications |
| Glass or polycarbonate panels | Maximum light, weather protection without blocking views | Glass is heavy and expensive; polycarbonate can yellow over time | Sunrooms, mild climates, or where natural light is the priority |
For most DIY patio enclosures, pressure-treated wood framing with a moisture-resistant exterior cladding (fiber cement board, vinyl siding, or painted cedar) is the sweet spot. It's the most forgiving to build, easiest to modify, and widely permitted. If you want more light and a cleaner look, pair the wood frame with polycarbonate or glass panel inserts in the upper half of each wall bay.
If you are planning glass windows for the enclosure, focus on proper framing, insulation, and sealing around the window openings to keep everything weather tight how to enclose a patio with windows. If you want to enclose a patio with glass, treat those panels as part of the wall system and plan for sealing, framing clearances, and safe installation glass or polycarbonate panel inserts.
If you are specifically enclosing your patio with plastic, polycarbonate panels are a common option for adding a weather barrier while still letting in light how to enclose a patio with plastic. Glass enclosure systems and full masonry walls are excellent but lean toward professional installation.
Weatherproofing the enclosure

Weatherproofing is where patio enclosures succeed or fail. Most of the leaks, rot, and mold problems we see in enclosed patios come from skipping or rushing the following details.
Moisture barriers and drainage planes
Every framed wall needs a water-resistive barrier (WRB) behind the exterior cladding. House wrap or building felt works for this. The WRB is your second line of defense when cladding lets water through, which it will eventually. Per Building America Solution Center guidance, you need to install flashing at the bottom of exterior walls and integrate it with the WRB so any water that gets behind cladding drains down and out rather than into your framing. Leaking exterior cladding assemblies are one of the most common construction callbacks precisely because this detail gets skipped.
For masonry or brick veneer walls, always install an air gap behind the veneer with weep holes at the base. This cavity lets any water that penetrates flow down to the flashing and out through the weep holes, rather than soaking into the backup wall. The WBDG and ASHI both make clear that without weep holes and proper base flashing, masonry walls will eventually saturate the backup structure.
Sill pan flashing at windows and doors
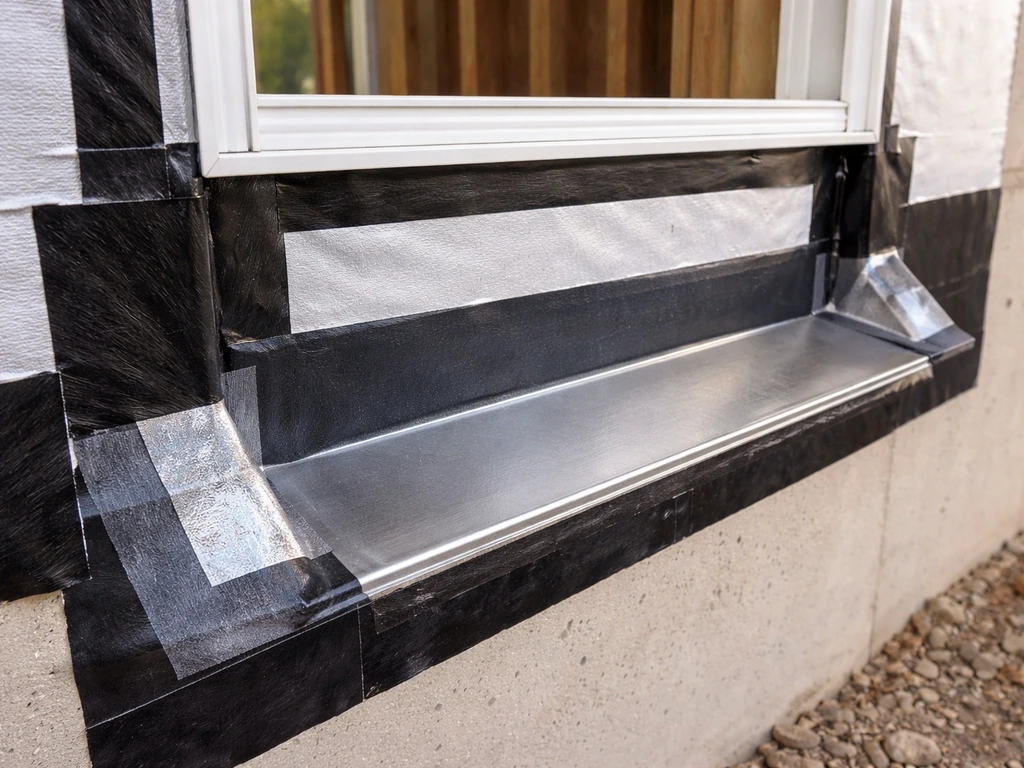
Every window and door opening needs a sill pan flashing below it. This is a sloped pan that catches any water that runs past the window unit or frame and directs it back out to the exterior wall surface. IRC Section R703. 4 (and related state codes) require sill pan flashing to be sealed or sloped to direct water to the WRB or exterior wall finish.
The front edge of the sill pan should extend roughly 3 inches below the rough opening sill and about 3 inches outward at the corners. The sill pan's bottom face should remain open to drain to the exterior. Do not seal the front edge of the pan to the drainage plane or you trap the water instead of draining it. Use membrane flashing at the jambs and head, but always keep that sill base free to weep.
Managing condensation and humidity
Enclosed patios that aren't conditioned spaces are especially prone to condensation because the air temperature swings widely. Condensation forms when any surface drops below the dew point of the interior air. In cold climates, high indoor humidity means moisture condenses on cold wall surfaces and glass, which leads to mold and rot over time.
Keep relative humidity in the enclosure in check: open ventilation panels in mild weather, use a dehumidifier in humid seasons, and consider insulating the walls if you plan to heat the space. University of Minnesota Extension provides guidance on preventing moisture and mold indoors by controlling indoor humidity and condensation risks in enclosed spaces high indoor humidity means moisture condenses on cold wall surfaces and glass.
University of Minnesota Extension research is clear that managing relative humidity is the most effective way to prevent condensation damage and mold in enclosed spaces. If you're in a humid climate, design your enclosure with operable vents or windows that you can open easily.
Doors, openings, and airflow
Where to put the door
Plan for at least one full-size exterior door (minimum 32 inches wide, ideally 36 inches) on the side most convenient to the house and yard. If your enclosed patio is long, a second door on the opposite end improves airflow and gives you a natural path through the space. Avoid placing doors in corners where they'll be hard to swing open or where water tends to pool. If the enclosure connects to the house through a sliding glass door, confirm that door will still function as an egress point after enclosure.
Framing door and window openings
Frame all openings with a proper header sized for the span. For a standard 36-inch door in a non-load-bearing wall, a doubled 2x6 header is typically sufficient. For wider spans or load-bearing walls, consult a span table or your building department. Rough openings should be 2 inches wider and 2 inches taller than the door or window unit to allow for shimming and leveling. Install king studs, jack studs, and a cripple stud above the header following standard framing practice.
Sealing doors and openings
Install the door with the sill pan flashing in place before the door unit goes in. Tape the pan to the WRB on both sides. Set the door unit, shim it plumb and level, and fasten it. Apply membrane flashing up the jambs and across the head, lapping over the WRB. Caulk the exterior trim with a paintable, exterior-grade sealant. Use a sloped sill pan system with end dams at the corners to push any water that reaches the sill outward and away from the building envelope rather than letting it pool at the door frame. Check the seal every year and recaulk wherever you see cracking or gaps.
Ventilation requirements
Plan for operable ventilation: casement windows, awning windows, or fixed panels with operable inserts. A good rule of thumb is that ventilation openings should total at least 10 percent of the floor area of the enclosure. Regulations in some states (such as California's awning-enclosure code) require a minimum clear ventilating opening of 18 inches between the top of the wall and the underside of the roof structure. Even if your local code doesn't specify this, it's a practical minimum to prevent heat buildup and condensation.
Step-by-step build sequence
Here's the order of operations for a wood-framed patio enclosure with panel or solid cladding. This is the sequence that keeps you from having to undo and redo work.
- Mark the wall layout: Snap chalk lines on the slab for your wall plate positions. Confirm corners are square using the 3-4-5 triangle method. Mark all door and window locations.
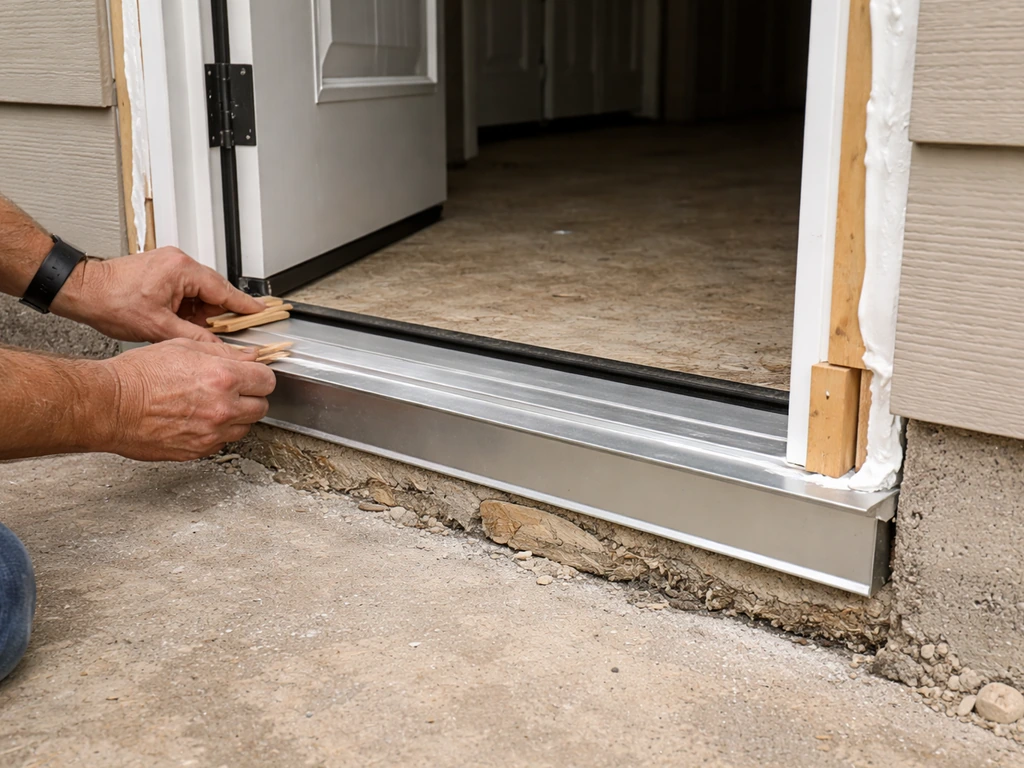
- Install footings or anchor to slab: If your slab is at least 4 inches thick and in good condition, you can anchor pressure-treated bottom plates directly using concrete anchor bolts (1/2-inch diameter, embedded at least 7 inches, spaced no more than 6 feet apart and within 12 inches of each end). For walls in high-wind zones or on soil rather than slab, dig pier footings below frost line and pour concrete with an embedded post anchor or J-bolt.
- Set posts and anchor: For post-and-beam designs, set 4x4 or 6x6 posts in post bases anchored to the footings or slab. Plumb each post with a level and brace it temporarily. Space posts to match your panel or window widths, typically 48 to 96 inches on center.
- Install the top plate and tie to roof: Attach a double top plate to your posts. Where the wall meets the existing roof or overhang, use a ledger or blocking to make a weathertight connection. Install metal flashing where the wall meets the roof to prevent water entry at that joint.
- Frame wall bays: Fill in between posts with standard stud framing at 16 or 24 inches on center, depending on your cladding and local code. Frame all door and window rough openings with headers, jack studs, and king studs at this stage.
- Apply water-resistive barrier: Wrap all framed walls with house wrap or building felt, starting at the bottom and lapping each course over the one below. Tape all seams. Integrate the WRB with the slab flashing at the base of each wall.
- Install flashing at base, openings, and roof transitions: Install metal drip edge flashing at the base of each wall, overlapping the WRB to direct water off the slab edge. Install sill pan flashing in every window and door rough opening before units go in. Flash the wall-to-roof transition.
- Install windows and doors: Set each unit on its sill pan, plumb and level, and fasten. Apply jamb and head flashing. Seal exterior trim with caulk.
- Install exterior cladding: Apply siding, fiber cement board, or your chosen exterior finish over the WRB from the bottom up, maintaining a gap above grade and above the slab. Follow manufacturer nailing patterns.
- Finish interior framing and surfaces: Add insulation if you're conditioning the space, then cover with your interior wall finish (paint-grade plywood, cement board, or drywall rated for moisture-prone areas).
- Install doors, hardware, and weatherstripping: Hang doors, adjust for square, install all hardware, and apply weatherstripping to all door perimeters and thresholds.
- Final caulking and sealant pass: Go around every exterior joint, penetration, and transition with exterior-grade caulk. Pay special attention to where the wall meets the house and where trim meets cladding.
- Schedule inspection: Call for your framing inspection before cladding and a final inspection after completion, per your permit requirements.
Finishing, maintenance, and what to avoid
Finishing touches
Once the structure is closed in, finish the exterior with a quality paint or stain rated for exterior use. Two coats over a primed surface is the minimum. If you used cedar or redwood cladding, a penetrating oil stain gives better long-term performance than surface paint in wet climates. For the interior, use a semi-gloss or satin paint that can handle humidity and is easy to wipe down. Install gutters or extend existing gutters over the new enclosure walls if your roof sheds water onto the wall tops.
Seasonal maintenance
- Every spring: Walk the perimeter and check all caulk lines and sealants for cracking or separation. Recaulk anywhere you find gaps. Check flashing at the roof-wall transition and around doors and windows.
- Every fall: Clear any debris from the base of the walls and from any drainage gaps. Check weep holes in masonry walls for blockage. If you live in a cold climate, check interior humidity levels and reduce them before heating season to prevent condensation on cold walls.
- Every 3 to 5 years: Repaint or restain exterior cladding. Re-examine all door weatherstripping and replace anything that's compressed or cracked.
- After any major storm: Inspect the roof-to-wall connection and the wall base for water intrusion or movement.
Common mistakes to avoid
- Skipping the permit: Unpermitted patio enclosures can stall a home sale, trigger forced demolition, and void homeowner's insurance claims. Pull the permit.
- Not tying into the existing roof properly: Walls that aren't structurally connected to the roof framing above can rack and fail in wind. Use proper connectors and have your connection detail reviewed.
- Sealing the sill pan's front edge: This traps water behind the pan instead of draining it. The exterior face of the sill pan must remain open to drain.
- Using untreated lumber at the base: Bottom plates must be pressure-treated lumber where they contact concrete. Regular dimensional lumber will rot within a few years.
- No vapor or moisture barrier behind cladding: Skipping the WRB means the first water intrusion through cladding saturates your framing directly.
- Blocking bedroom egress windows: Plan your wall layout before construction so you don't accidentally eliminate a required egress path from an adjacent bedroom.
- Ignoring drainage at the slab edge: Water that pools against the base of your new walls will wick into the framing. Flash the base, maintain a gap between cladding and slab, and make sure the slab or ground slopes away from the structure.
- No ventilation plan: An enclosed patio with no operable openings becomes a heat trap in summer and a condensation zone in winter. Design vents in from the start, not as an afterthought.
FAQ
Do the walls need to be built to the same height as the patio cover, or can I change the height?
You can change the wall height, but you must re-check roof tie-in details, wind load design, and condensation risk. If you raise the walls, the new wall tops become additional water-shedding surfaces, so plan coping or flashing and confirm the attic or roof drainage path still works.
Can I enclose a patio without tying the walls into the existing roof or overhang?
Usually you should not, unless your design creates a fully self-supporting roof system. If you leave the new walls “floating,” they may not brace correctly under wind, and inspectors often require a direct structural connection at the top or a separate lateral-load path.
What’s the fastest way to avoid rot at the base of the new walls?
Keep treated lumber and cladding details tight to the WRB system. Use a continuous flashing layer at the bottom edge, make sure the WRB laps correctly, and provide drainage so water can escape instead of wicking into the framing.
How far should the wall framing posts extend into the footing or slab?
Match your design to local frost depth and your engineered plan. In many areas, anchor bolts and embedment are tied to frost and uplift resistance, so “whatever fits” can fail inspection even if the wood looks well protected.
If I use vinyl or aluminum siding instead of fiber cement, do I still need a WRB and flashing plan?
Yes. Siding materials are not waterproof membranes. You still need a WRB behind the cladding and correct flashing at wall heads, wall bottoms, and openings, because water can reach the WRB through seams or fastener penetrations.
Do I need weep holes if I’m using masonry only as a decorative veneer?
Yes for veneer assemblies. An air gap behind the veneer and properly placed weep holes at the base are what allow incidental water to drain. Without that drainage path, the backup structure can become saturated over time.
How do I handle an existing downspout that discharges near the new wall?
Redirect it so roof runoff lands away from the wall footing and doesn’t splash the cladding joints. If you cannot relocate it, extend the discharge and add splash blocks, and verify that gutter routing does not dump concentrated water onto the enclosure base.
Can I block or replace a bedroom window that provides required egress?
You should not. If a bedroom window is the required emergency egress, the enclosure generally must keep that opening usable from the room or provide an alternate code-compliant egress path with a nearby exterior door or a second opening.
Do I have to insulate the patio walls to prevent condensation and mold?
Not always, but you need to control indoor humidity and manage thermal performance. Even unconditioned spaces can suffer condensation, so plan for operable ventilation, consider a dehumidifier in humid seasons, and insulate if you plan to heat the enclosure.
What humidity targets or levels should I aim for inside an enclosed patio?
Instead of chasing a number blindly, manage relative humidity so surfaces stay above the dew point. Practically, using a hygrometer and keeping humidity moderate (especially in cold months) helps prevent condensation on glass and cold wall areas.
How many doors and windows do I need for airflow?
A single exterior door is often workable, but long enclosures benefit from a second exterior door for cross-ventilation. For openings, a practical rule is that ventable areas add up to a meaningful fraction of the floor area, and you may also need specific minimum clearances between awning undersides and wall tops depending on local rules.
What’s the correct way to size headers and rough openings for DIY wall bays?
Confirm span requirements with your building department or a span table, especially for wider openings. Also keep rough openings oversized for shims and leveling, and use proper king studs, jack studs, and cripples so the load path is correct and the window or door units sit square.
Should I install the sill pan before the door or window, and how do I keep it draining?
Install sill pan flashing beneath the rough opening before setting the unit, then integrate it with the WRB. Keep the drainage plane free to weep, meaning the sill pan front edge is not sealed in a way that traps water behind the opening.
How often should I check and re-caulk the exterior trim around windows and doors?
Do a seasonal visual check, and plan for at least annual inspection. Recaulk promptly if you see cracking, gaps, or discoloration around exterior-grade sealant joints.
Is it okay to build the enclosure in winter or during wet weather?
It depends on your materials and drying conditions. Delayed flashing and WRB details can trap moisture in framing, so prioritize weatherproof sequencing, avoid closing in when cladding or WRB can’t dry, and use only exterior-rated materials suitable for the current conditions.
Next Articles

How to Decorate a Long Narrow Patio: Layout Tips
Practical DIY layout and decor tips to widen a long narrow patio using zoning, furniture spacing, lighting, greenery, an

How to Decorate a Rectangular Patio Step by Step
Step-by-step plan to decorate a rectangular patio with smart layout, zones, furniture fit, lighting, plants, and seasona
How to Decorate a Patio Wall: DIY Ideas and Mounting Tips
DIY patio wall decor for brick, stucco, wood, concrete, or siding with weatherproof mounting tips and maintenance.