You can hide a patio AC condenser unit using a slatted wood or composite screen, a built-in louvered housing, or a combination of lattice panels and plants, as long as you keep at least 12 inches of clearance on the sides, leave the top completely open for 48 to 60 inches above the unit, and preserve a clear path to the service disconnect. The goal is to make the unit invisible without turning it into an oven.
How to Hide an AC Unit on a Patio Without Blocking Airflow

Felix Brennan
17 May 2026
Quick Reality Check: What Does "Hiding" Actually Mean Here?
Before you pick up a saw or buy lattice panels, it's worth being honest about what you're solving for. Most homeowners want one of three things: they want the unit to be less of an eyesore from the patio seating area, they want it to look intentional and built-in rather than bolted-on as an afterthought, or they want to reduce the noise somewhat while they're sitting outside. All three are achievable. What isn't achievable, and what trips up a lot of DIYers, is fully boxing the unit in like a piece of furniture. A condenser needs to pull in outside air, reject heat through the coil, and discharge hot air upward. Anything that interferes with that cycle makes the unit work harder, shortens its life, and can void your warranty.
So think of your project in terms of screening, not enclosing. You want visual barriers that break the line of sight to the unit without creating a hot pocket of recirculated air around the coils. That's the mindset that makes every decision in this guide easier.
- Screened look: open-sided panels or lattice that break sight lines without restricting airflow
- Integrated housing: a built frame with louvered or slatted faces that looks architectural and stays code-safe
- Partial camouflage: plants, pots, or decor arranged to draw the eye away from the unit
- Shade-only: a small overhead cover or pergola element that shades the unit without boxing it in
Low-Cost Patio Screen and Enclosure Options
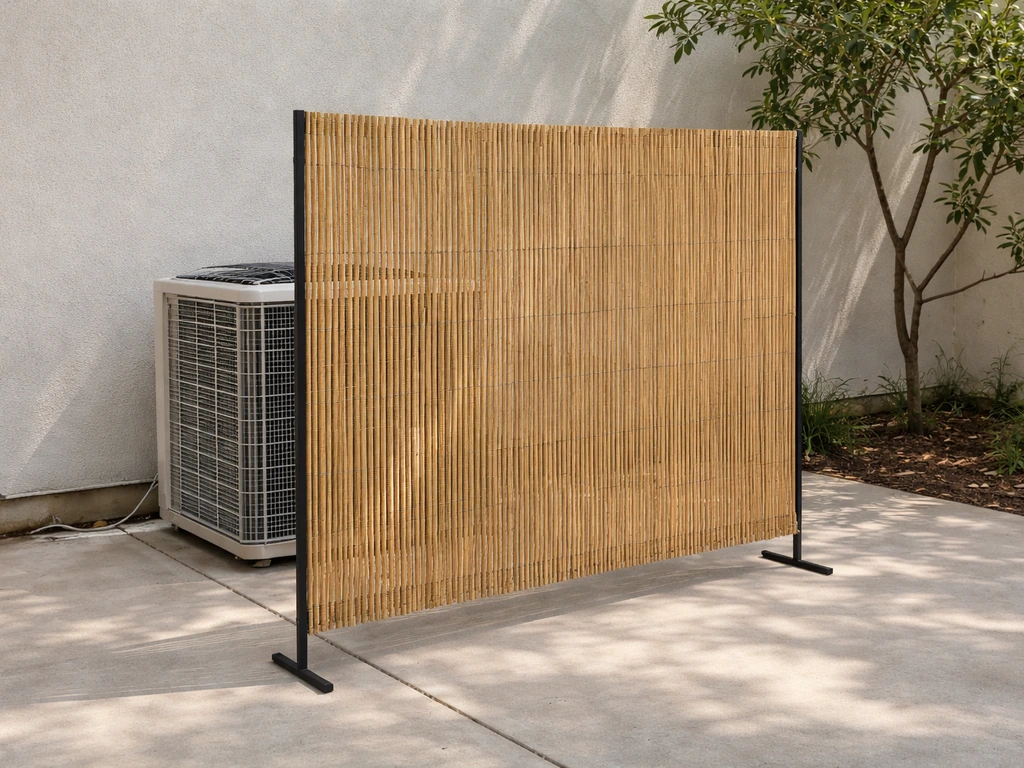
If you want a quick win without building anything from scratch, a freestanding screen or partial patio enclosure panel is your fastest route. These range from $40 bamboo reed screens you clip to an existing railing to $200 modular composite privacy panels that look like they belong on a high-end deck. The key with any pre-made screen is placement: set it at least 12 to 18 inches away from the unit on any side where the coils face out, which is typically the sides and back of a standard split-system condenser.
Bamboo or reed roll panels work well in mild climates but deteriorate quickly in humid or rainy regions. A cedar or redwood slatted screen holds up much better and costs around $80 to $150 for a 4-by-6 foot panel at most home centers. Composite or PVC lattice panels are the most durable choice if you're in a wet climate, they won't warp, rot, or splinter, and they're easy to cut to size with a circular saw.
If your patio already has a partial enclosure or screen system going in, coordinate the AC screen with that existing structure. A panel that matches your patio screening material or color will look far more intentional than a standalone bamboo roll propped in front of a white condenser. This is the same logic that applies when you're thinking about how to hide a grill or other patio equipment, matching materials to what's already there is the cheapest upgrade you can make.
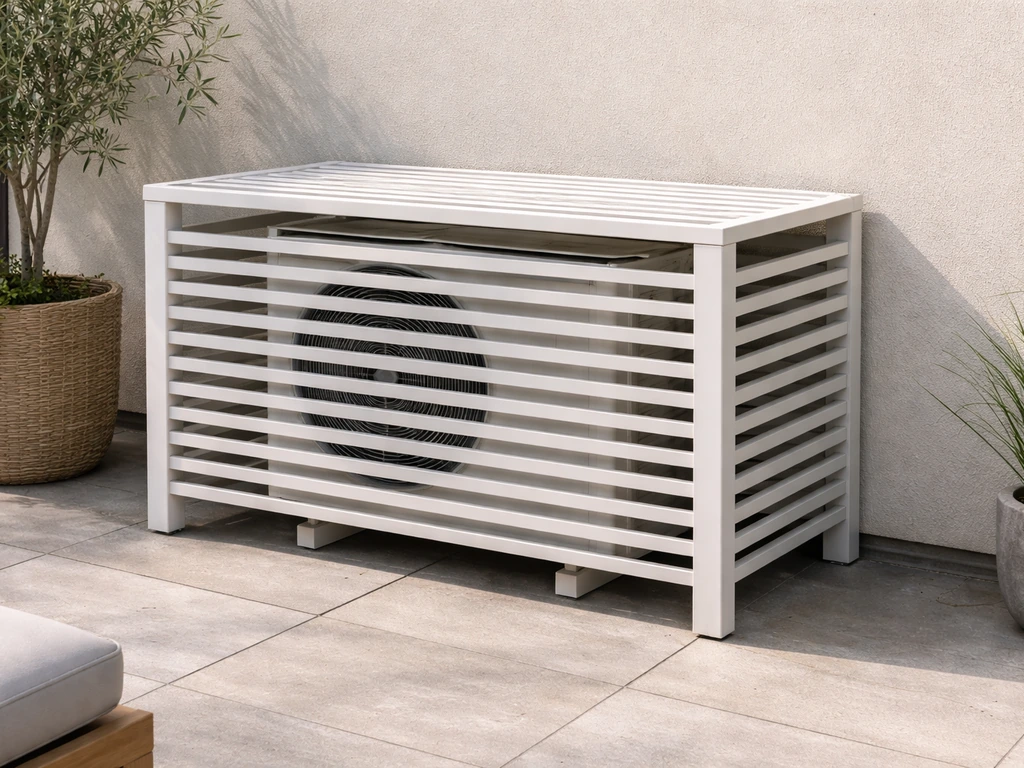
Built-In Housing: Frames, Panels, and Airflow-Safe Design
A built-in AC housing is the most polished solution and it's more DIY-friendly than it looks. The basic structure is a three-sided frame (never four fully solid sides) with louvered or slatted panels, a removable or hinged front panel for service access, and an open top. You're essentially building a cabinet without a back or a solid top.
Framing and Panel Materials
Pressure-treated 2x4 lumber makes a solid frame that can handle outdoor conditions without rotting at the base. For the panel faces, you have two good options: build your own slatted panels using 1x3 or 1x4 boards spaced 1 to 2 inches apart, or purchase pre-made louvered shutter panels from a home center and mount them into your frame. Pre-made louvers are faster and often look more finished. Either way, the spacing matters, the panel faces need at least 50% open area (net free area) to allow adequate airflow, and some engineering guidance pushes that to 65% for best performance. In practical terms, a 1-inch gap between 2-inch slats gets you right in that range.
Clearance Dimensions You Cannot Ignore
Every major HVAC manufacturer publishes minimum clearance requirements, and they're not suggestions. Here's what the specs consistently show across brands like Trane, Lennox, and Mitsubishi Electric:
| Clearance Zone | Minimum Distance | Why It Matters |
|---|---|---|
| Sides (coil faces) | 12 inches minimum | Air intake to condenser coil — blocking this causes overheating |
| Back of unit | 12 inches minimum | Secondary airflow and service access |
| Above unit (discharge) | 48 to 60 inches unrestricted | Hot air must discharge freely upward; Trane specifies 60", Lennox 48" |
| Front/service panel face | Enough for a person to work | Required for coil cleaning, refrigerant service, and electrical access |
These numbers mean your housing frame needs to be sized around the unit's footprint plus clearance, not just the unit itself. Measure your condenser's width and depth, add 12 to 18 inches on every enclosed side, and that becomes your interior frame dimension. Build the outer box to those interior measurements and you're set.
The OK vs. Not-OK Enclosure Test
Mitsubishi Electric's installation manuals use a helpful OK/NG (no good) diagram concept for enclosed spaces. A three-sided screen with an open face and open top is acceptable. A four-sided box, even with gaps, that traps the discharge air and recirculates it back into the intake is not acceptable. Before you finish your frame, stand back and trace the airflow path mentally: cool air should be able to enter the screened sides, and hot discharge air should have a clear, unobstructed path straight up for at least 4 to 5 feet. Alpine Home Air’s “Architect & Engineering Manual” defines “free area” for louvered openings and specifies a minimum of 65% free area for louvers to achieve the intended net-free-area effect for venting enclosures. If anything interrupts that path, redesign before you fasten the last panel.
Shade vs. Enclosure: Redirecting Sun Without Trapping Heat
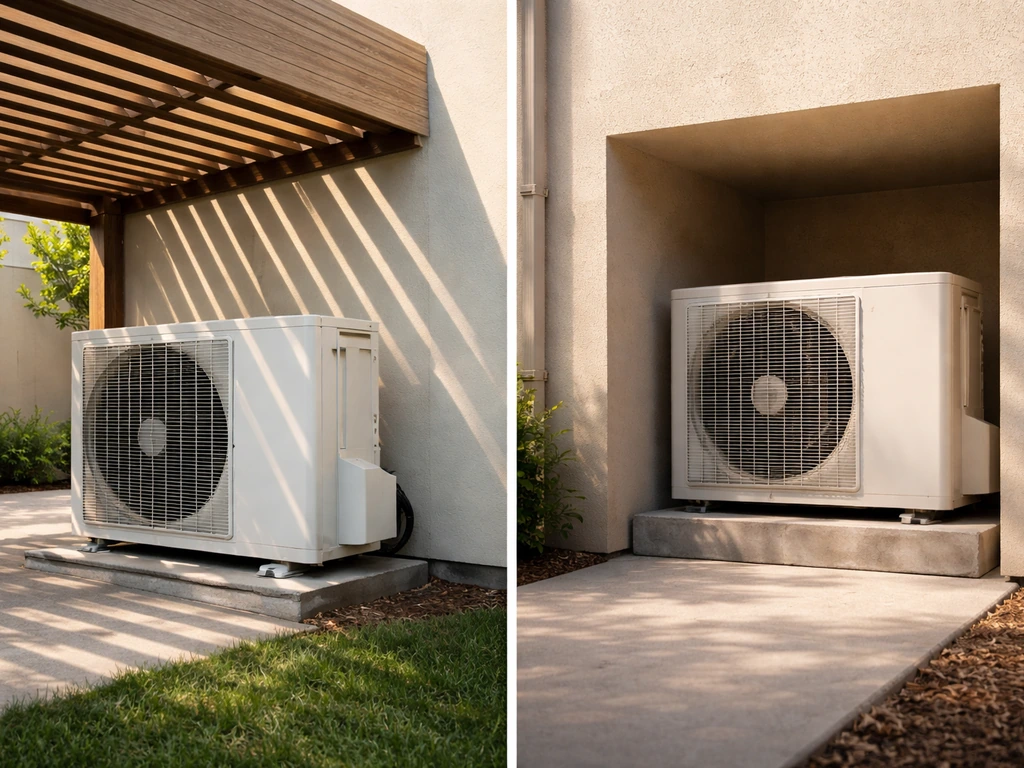
There's a real difference between shading the unit and enclosing it, and the difference matters for performance. Shading the condenser from direct afternoon sun is actually a good thing, a unit sitting in full sun all day works harder than one in partial shade, and a simple pergola element or shade sail positioned above it can reduce the thermal load. The catch is that the shade structure cannot restrict the top discharge zone. A shade sail angled to block western sun while leaving vertical clearance above the unit is fine. A solid roof sitting 24 inches above the unit is not.
The same logic applies to patio covers. If your covered patio extends over the AC unit and the soffit is within 48 to 60 inches of the top of the unit, you have a problem. For a covered patio, shade is fine as long as it doesn't block the unit's discharge airflow, which is a different question than whether you can put a regular tv on a covered patio can you put a regular tv on a covered patio. In that situation, the solution is to reposition the unit outside the roofline if possible, or to work with an HVAC tech to verify the discharge isn't being recirculated under the cover. A well-designed pergola with open slats overhead can work, just make sure the slat spacing keeps net free area above 50%.
Fully enclosing the unit with a solid cover, even seasonally, can trap moisture and create rust and mold problems. HVAC professionals consistently advise against solid seasonal covers, and the concern applies equally to decorative enclosures that are too airtight. Keep air moving and you keep the unit healthy.
Finishing Touches: Trim, Plants, and Visual Blending
Once your screening or housing structure is in place, the finishing work is what makes it look like it was always supposed to be there. Paint or stain the frame to match your patio's trim color, this single step does more for the integrated look than almost anything else. Add a matching cap trim along the top edge of your frame if you want a cleaner line. If your patio has a fence or railing, continue that same material or profile into the AC screen.
Using Plants Safely
Plants are a natural visual buffer and they work well, with the right placement. The rule is the same 12-inch minimum clearance that applies to fences and panels. Ornamental grasses, boxwood, or compact shrubs planted in a line 18 to 24 inches from the unit look intentional and allow airflow. Avoid vines that could grow into the unit's coils or fan blades. Avoid dense evergreen hedges planted close on multiple sides, as they create a near-solid barrier that behaves like a wall, exactly the problem you're trying to avoid.
Potted plants give you more control because you can move them for service calls. A row of tall ornamental grasses in large pots, positioned 18 inches from the unit, can screen it almost completely from a seating area without any construction at all. Just don't forget to move the pots when the tech shows up for annual maintenance.
Decor and Lighting
Strategic decor placement can redirect attention more effectively than trying to hide something completely. A well-lit planter or a piece of patio art on the wall adjacent to the unit draws the eye away from it. String lights along the perimeter of your patio frame the space visually so the condenser becomes background. These tricks work especially well in evening outdoor living situations where most people actually use their patios.
Maintenance Access and Safety Considerations
This section is the one most DIY guides skip, and it's the one that matters most for long-term success. Whatever you build or install, your HVAC technician needs to be able to reach the unit quickly and work around it comfortably. When you secure a grill to your patio, prioritize stability and safe access so servicing stays easy and nothing gets in the way secure the grill to the patio. That means a hinged or fully removable panel on at least one face, enough clearance to crouch or kneel beside the unit to access the coil fins, and unobstructed access to the service disconnect.
The Disconnect Rule
NEC 440.14 requires that the disconnecting means for an AC unit be within sight of and readily accessible from the equipment. That disconnect box, the small breaker or pull-out fuse block usually mounted on the wall near the unit, cannot be hidden behind a panel that requires tools to open, and it cannot be inside an enclosure that puts it out of sight of the unit. Your housing design needs to leave that disconnect visible and reachable without dismantling anything. Build your frame so the disconnect box is either outside the enclosure footprint or visible through an opening. This is a code requirement, not a preference.
Drainage and Condensate Planning
Condensate and drain water are real considerations in an enclosed patio setting. During heating operation especially, condensate discharge can be significant. If your housing sits on a patio slab, make sure water can drain away from the unit's base and out from under the frame, don't build a frame base that creates a water dam. To keep things looking clean, make sure the patio drain cover isn't sealed in a way that blocks drainage around the unit. If the unit has a drain pan or condensate line, verify that it exits freely and doesn't pool inside the screen enclosure. In cold climates, ice buildup during defrost cycles adds to this consideration. Keep the base of your frame open at grade level, or use a gravel bed inside the frame footprint to improve drainage.
Annual Service Access
Design your enclosure with the annual service visit in mind from day one. If a panel is hard to remove, you'll procrastinate on it. Make it a hinged door with a simple latch, or use removable panels fastened with screws into pre-drilled pilot holes so they come off in under two minutes. Label which panel removes first if there's an order of operations. Your future self, and your HVAC tech, will appreciate it.
DIY Planning Checklist: Materials, Measurements, and Next Steps
Here's how to move from idea to execution. Work through this list before you buy anything, and you'll avoid the most common mistakes.
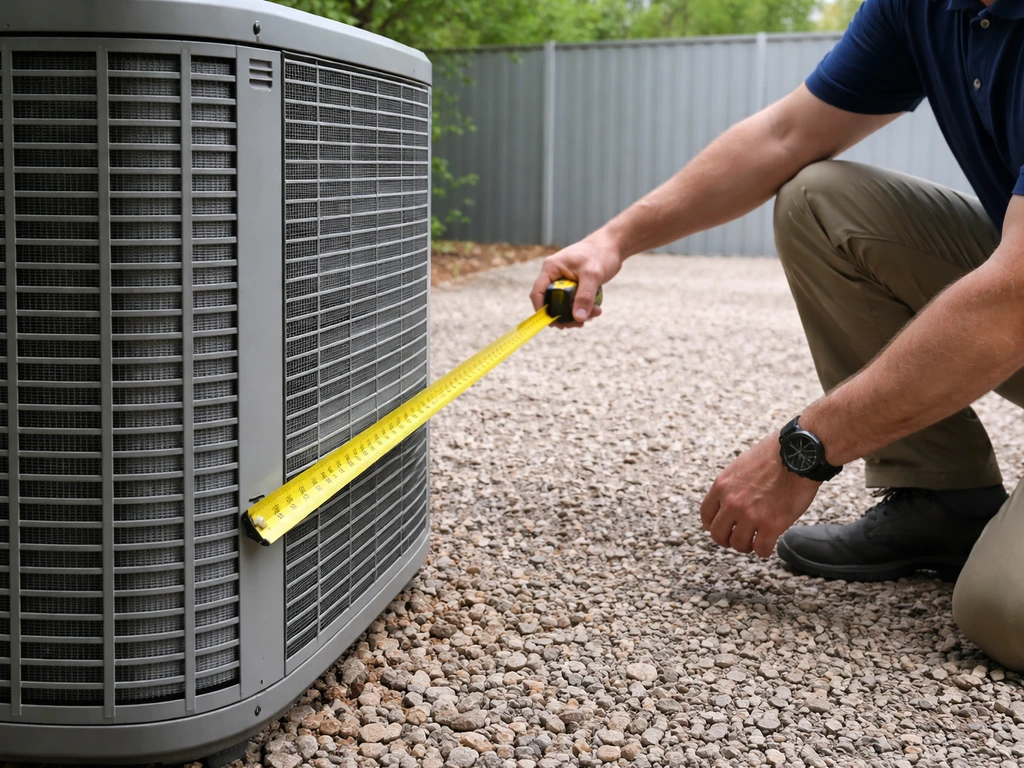
- Measure your unit: record the width, depth, and height of the condenser. Note where the coil faces are (typically the sides and back), where the fan discharge is (top), and where the service panel and electrical disconnect are located.
- Add clearance: add at least 12 inches to each enclosed side and confirm you have 48 to 60 inches of unobstructed vertical space above the unit top before anything overhead cuts in.
- Sketch your enclosure footprint: mark the outer frame dimensions on the ground with chalk or tape to visualize the space. Make sure the disconnect box is outside or visible from the enclosure.
- Choose your approach: decide between a freestanding screen, a built-frame housing, or a plant and decor camouflage strategy — or a combination. Match materials to existing patio finishes.
- Select panel materials: if building slatted panels, plan for 1 to 2 inch gaps between slats. If using louvers, choose panels with at least 50% net free area. Avoid solid boards, solid fence panels, or tightly woven materials on any face adjacent to a coil.
- Plan your service access: designate one face as a hinged door or removable panel. Confirm that removing it gives a technician working room beside and in front of the unit.
- Check drainage: confirm the unit base has a path for water runoff. If the enclosure sits on a concrete pad, leave a gap at the base or cut a drainage channel.
- Buy materials and build: pressure-treated 2x4s for the frame, your chosen panel material, exterior screws, and paint or stain to match existing trim. A basic three-sided frame with one removable panel is a weekend project for most DIYers.
- Verify before you call it done: stand inside the enclosure area mentally and trace the airflow path. Cool air in through the louvered sides, hot air out the open top. Make sure nothing blocks either path.
- Schedule your first service call after installation so a tech can confirm clearances and note any issues before the first full cooling season.
If you're also managing other patio equipment or wiring as part of this project, the same planning discipline applies, think about access, airflow, and visual consistency across everything you're improving at once. A cohesive patio upgrade that addresses the AC unit, extension cord routing, and other hardware as a single project usually produces a much cleaner result than tackling each piece separately. If you want the patio to look even cleaner, pairing this plan with how to hide extension cords on patio can help keep the wiring out of sight extension cord routing. If you want to enjoy it outdoors too, learn how to watch TV outside on a patio so weather and glare do not ruin the experience.
FAQ
Can I hide my patio AC condenser with a fully closed cabinet if I leave small vents?
Generally no. Even with tiny gaps, a near-sealed enclosure can trap hot discharge air and recirculate it back into the intake. Use a three-sided concept (sides screened, front open, top open) or a fully vented louvered housing sized to the manufacturer’s clearance requirements, and keep the discharge path unobstructed upward.
How much clearance is enough if my condenser is close to a patio fence or wall?
Use the manufacturer minimums as the final authority, then plan around at least 12 to 18 inches on any side you’re effectively screening. If a wall or fence reduces airflow on one side, treat that side like an “enclosed” condition and size your screen spacing to prevent air starvation around the coils.
Is it better to use a screen with plants or a solid slatted panel for hiding the unit?
Plants help visually but need spacing and grooming. If you want lower maintenance, use slatted cedar/redwood or composite panels with correct net-free airflow area, then add plants as a visual foreground buffer rather than creating a near-solid barrier on multiple sides.
What happens if I accidentally cover the top of the condenser discharge area?
You can overheat the compressor and raise head pressure, which makes the unit cycle more often and can shorten component life. The discharge zone needs to remain free, so avoid awnings, solid caps, and patio covers that encroach into the top clearance zone (commonly 48 to 60 inches above the unit).
Can I install an exterior sound-dampening screen to reduce noise and still keep airflow?
Yes, but choose designs that are airflow-first. Avoid thick insulation blankets and solid acoustic panels around the sides or top. Use slats, louvers, or an open-top housing that still preserves the required intake side spacing and a clear upward discharge path.
Are bamboo reed panels okay in humid or rainy climates?
They tend to degrade faster in damp conditions. If you’re in a wet climate, use cedar/redwood slats or composite/PVC lattice so the material won’t warp, rot, or splinter, and re-check spacing after seasons of swelling or sag.
Do I need to worry about the service disconnect when building the screen?
Yes. NEC-style rules require the disconnecting means to be within sight and readily accessible. Don’t hide it behind a panel that requires tools or removes. Plan your housing so the disconnect is outside the enclosure footprint or visible through a direct opening.
How should I handle condensate or drain water when the unit is in an enclosure?
Make sure the base of the enclosure does not create a water dam. Keep drainage paths open so water can leave the slab area, and verify the unit’s drain pan or condensate line exits freely without pooling inside the screened area. In cold climates, allow for defrost-related ice buildup by keeping the base open at grade or using a gravel bed strategy.
Can I put the condenser enclosure directly on the patio slab?
It’s usually fine, but avoid sealing the bottom edge in a way that traps moisture. If you build a frame base, leave an open path for water to escape, or elevate and drain the interior footprint so the enclosure doesn’t become a moisture trap.
What’s the easiest way to make access for annual maintenance?
Design for fast removal from day one. Use a hinged panel or removable panels that come off in minutes (not hours), and label the correct “first remove” panel. Make sure a technician can reach coil fins and disconnect components without dismantling the entire screen.
Do I need to match the enclosure material to my patio fencing, or is it just cosmetic?
It’s mostly about aesthetics, but alignment can also improve function. Matching materials and color to surrounding railings or enclosures helps the structure look intentional, and consistent spacing reduces the chance you’ll accidentally create an airflow obstruction where different panels meet.
Should I shade the unit instead of hiding it?
Shading can reduce thermal load, but it must not block discharge airflow. A pergola with open slats or a properly angled shade sail can be helpful, while solid roofs or close soffits within the top discharge clearance zone can create recirculation and overheating.
Will any of these options affect my warranty?
They can. Manufacturers often require compliance with specific airflow and clearance conditions, and improperly boxing the unit can trigger warranty issues. Before building, confirm your design meets the manufacturer’s minimum clearance specs and keeps required service access unobstructed.
Next Articles

How to Decorate a Long Narrow Patio: Layout Tips
Practical DIY layout and decor tips to widen a long narrow patio using zoning, furniture spacing, lighting, greenery, an

How to Decorate a Rectangular Patio Step by Step
Step-by-step plan to decorate a rectangular patio with smart layout, zones, furniture fit, lighting, plants, and seasona
How to Decorate a Patio Wall: DIY Ideas and Mounting Tips
DIY patio wall decor for brick, stucco, wood, concrete, or siding with weatherproof mounting tips and maintenance.