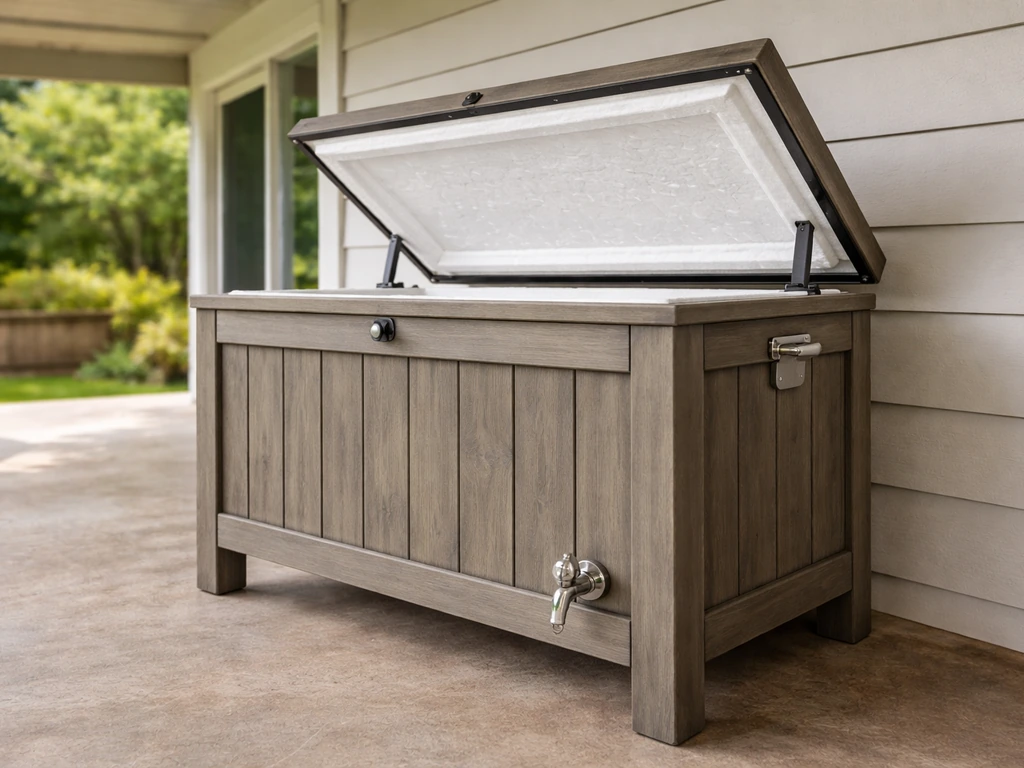
You can build a solid, weatherproof patio cooler ice chest in a weekend using lumber, rigid foam insulation, and a plastic liner, no advanced carpentry needed. The basic version takes about 3 to 4 hours and costs $50 to $80 in materials. A fully insulated build with a drain spigot and foil-faced foam runs closer to $100 to $150 but will hold ice for 48 to 72 hours in summer heat, which is a big step up from a standard store-bought cooler sitting on a bare patio.
How to Make a Patio Cooler: DIY Ice Chest Guide

Felix Brennan
20 May 2026
What a patio cooler actually is (and which design you should build)
A patio cooler, sometimes called an outdoor ice chest, is an insulated box that lives on your patio permanently or semi-permanently and is designed to hold bagged ice, drinks, and food during outdoor gatherings. It is not a freezer or a mechanical appliance. Think of it as a heavy-duty, built-in cooler that looks intentional on your patio instead of like something dragged out of the garage.
There are three common DIY design paths, and which one you pick depends on how much time and money you want to invest.
- Simple styrofoam or repurposed cooler conversion: The fastest and cheapest option. You take a large foam or plastic cooler, reinforce it with a wooden frame, and dress it up so it looks like outdoor furniture. This works fine for occasional use but will not last more than a season or two outdoors.
- Wood-framed ice chest with a plastic liner: The most popular weekend build. You construct a box from lumber (cedar and pine are both common), line the inside with a plastic storage bin or stainless steel liner, add rigid foam insulation between the liner and the wood, and put a hinged lid on top. This holds ice well and looks great.
- Fully insulated wooden ice chest with drain spigot: The step-up version of the wood-framed build. It adds foil-faced foam on all six sides, a better lid seal, and a drain spigot at the lowest point so you can run melt water out instead of scooping it. This is the one to build if you entertain often or live somewhere hot and humid.
This guide focuses on the wood-framed version with the drain spigot, since it gives you the best real-world performance for a patio that gets regular use. Where steps are simpler for the basic version, we will call that out.
Materials and tools you will need
Gather everything before you start. Running to the hardware store mid-build is the main reason weekend projects stretch into two weekends.
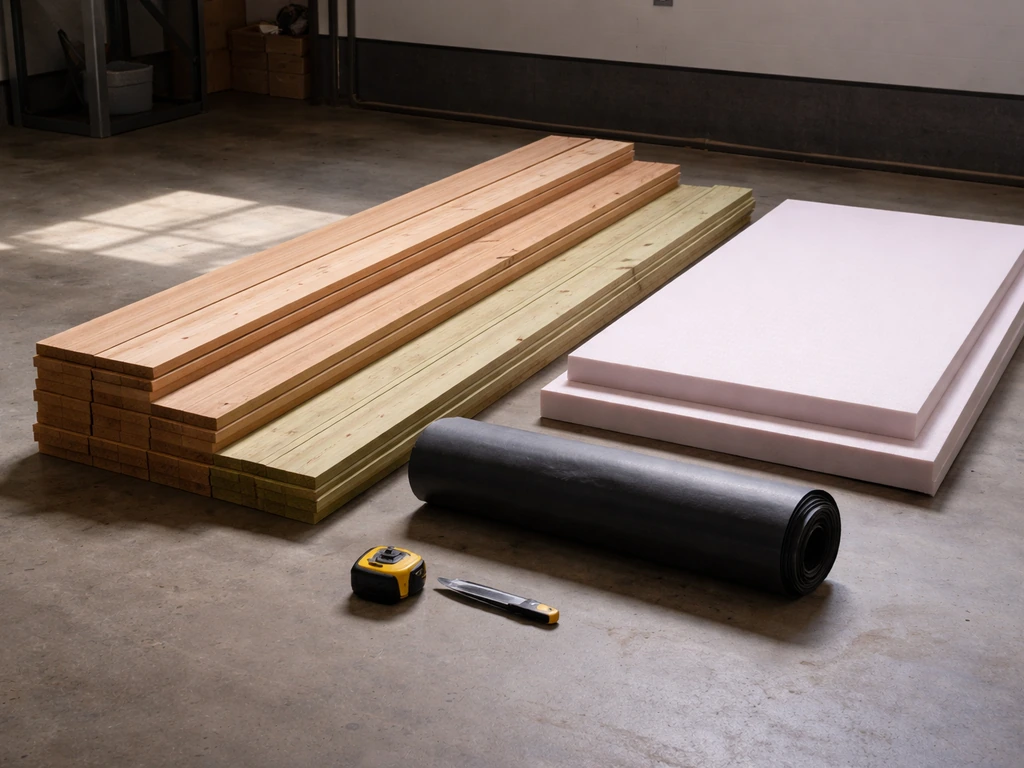
Materials list
- 1x6 cedar or pressure-treated pine boards (enough for your chosen dimensions — see sizing section below)
- 2x4 framing lumber for the base and corners
- 1.5-inch thick rigid foam insulation board (foil-faced gives the best performance), cut to fit all six interior panels
- One plastic storage bin or galvanized steel tub to use as the interior liner — it should fit inside your framed box with about 1 inch of clearance on all sides for insulation
- One 3/4-inch brass or PVC drain spigot with a rubber washer and nut
- One piano hinge or two butt hinges (stainless steel for weather resistance) for the lid
- Exterior wood glue
- 1.5-inch and 2.5-inch exterior screws (stainless or galvanized)
- Construction adhesive (Liquid Nails or equivalent) for bonding foam panels
- Waterproof caulk or spray foam sealant for sealing foam seams
- Exterior wood stain, paint, or sealant for the outer surfaces
- A rope or cabinet pull handle for the lid
- Optional: weather-stripping foam tape to create a lid seal
Tools list
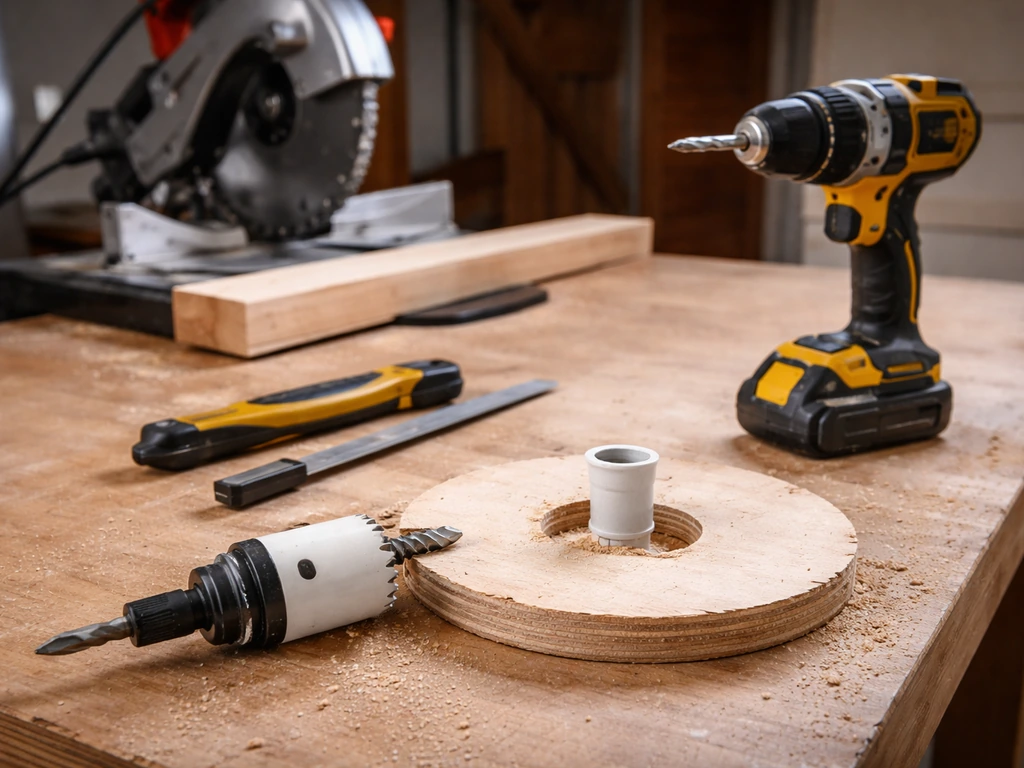
- Circular saw or miter saw for cutting lumber
- Utility knife or foam cutting blade for cutting rigid insulation
- Drill/driver with bits
- Hole saw bit (sized to your drain spigot diameter, typically 1 inch)
- Tape measure and pencil
- Clamps for glue-up
- Square for checking corners
- Sandpaper (80 and 120 grit)
Step-by-step build instructions
Plan on spending about 4 to 6 hours on this build, plus drying time overnight for glue and sealant. The steps below are for the fully insulated version with a drain. If you are doing the simpler version, skip the foam and spigot steps.
Step 1: Cut your lumber to size
Using the dimensions you chose (see the sizing section below for guidance), cut your 1x6 boards for the four sides and lid. Cut 2x4s for the base frame and corner supports. A standard beginner-friendly size is 36 inches long by 18 inches wide by 20 inches tall. Sand all cut edges before assembly.
Step 2: Build the outer box frame
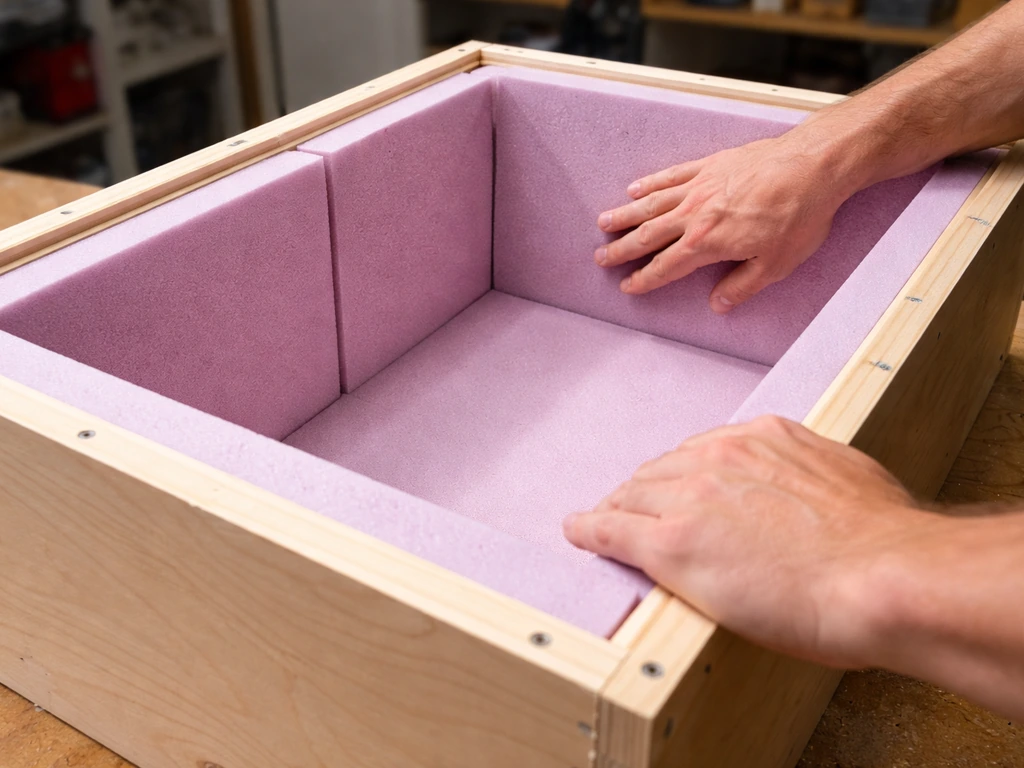
Assemble the four sides using exterior screws and wood glue. Use your square constantly here, a box that is even slightly out of square will make the lid fit badly. Pre-drill all your holes to prevent splitting, especially near board ends. Attach the base frame from 2x4s, which will give the box enough height to clear the ground and improve airflow underneath, which matters for durability.
Step 3: Install the foam insulation panels
Cut your rigid foam insulation to fit the inside of all four walls and the bottom of the box. Use construction adhesive to glue the foam to the interior wood surfaces. Foil-faced foam should be installed with the foil side facing inward toward the liner, which reflects radiant heat back and slows ice melt noticeably. Once panels are in place, run a bead of waterproof caulk or spray foam along every seam. This step makes a bigger difference than most people expect, air gaps are where cold escapes.
Step 4: Install the drain spigot
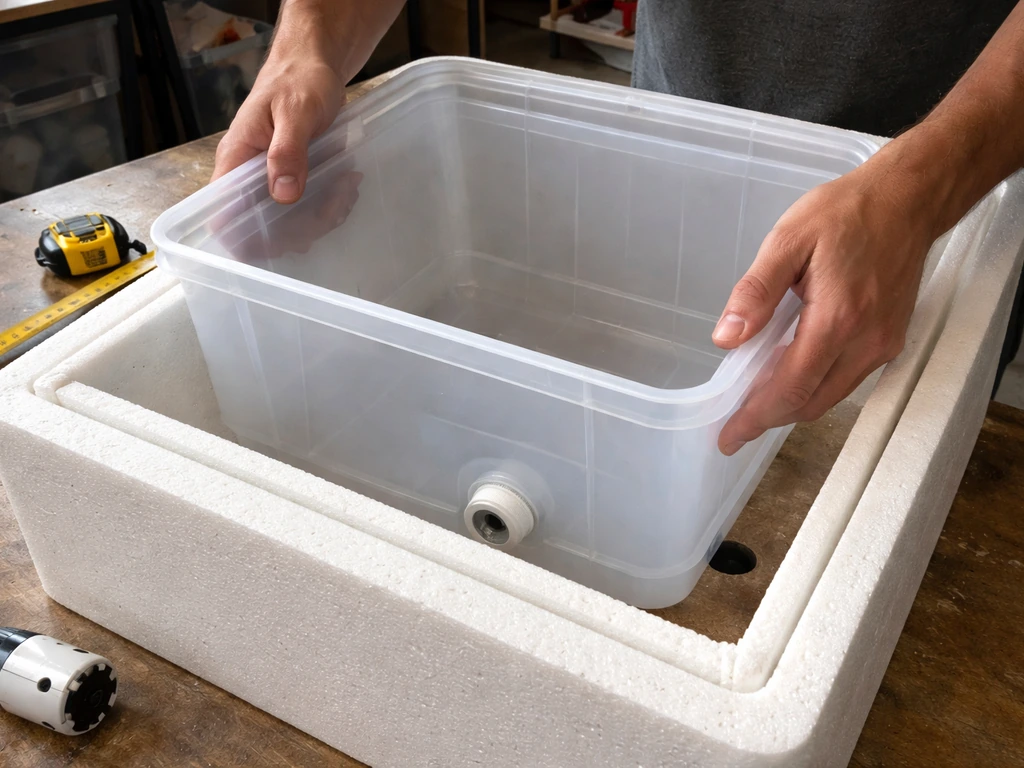
Before dropping the liner in, mark the drain location on the lowest exterior wall, about 1 inch up from the bottom interior floor. Use your hole saw to drill through the wood and foam together. Feed the spigot through from the outside, place the rubber washer on the inside, and hand-tighten the nut. Do not overtighten or you will crack the foam. Run a thin bead of waterproof caulk around the outside of the fitting where it meets the wood. This lets you drain melt water by simply opening the spigot over a bucket or directly onto the ground, rather than dealing with a soggy box every time.
Step 5: Set the liner in place
Drop your plastic storage bin or galvanized steel tub into the foam-lined box. It should sit snugly. If there are gaps between the liner and the foam walls, cut thin strips of foam to fill them and glue them in place. The liner sits directly on the foam-lined floor. Do not glue the liner itself down, you want to be able to remove it for cleaning.
Step 6: Build and attach the lid
Cut your lid boards to match the outer box dimensions exactly. Glue and screw a frame on the underside of the lid from thin strips of 2x4 or 1x4 to give it rigidity. Cut a piece of rigid foam to fit the underside of the lid and glue it to the lid frame with construction adhesive, this is important because the lid is where the most heat gain happens. This approach is consistent with common outdoor ice chest DIY designs, where rigid foam is secured to the underside of the lid to reduce heat gain through the top rigid foam insulation is secured to the underside of the lid to reduce heat gain through the top. If you want a better seal, stick a strip of foam weather-stripping tape around the inside perimeter of the lid where it contacts the box rim. Attach the lid with your stainless hinges and add your rope or pull handle.
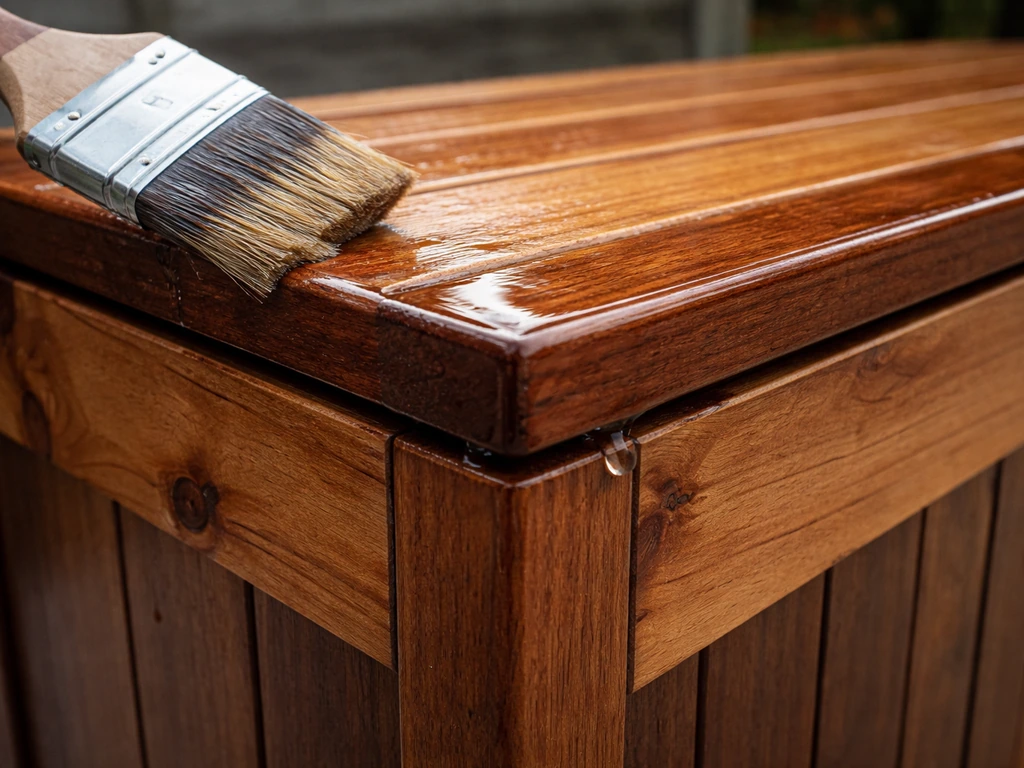
Step 7: Seal and finish the exterior
Apply exterior wood stain or a waterproof sealant to all outer wood surfaces. Two coats is better than one. Let it cure fully (typically 24 hours) before putting ice in the box. If you are using cedar, a simple teak oil or clear exterior sealant keeps the natural look while protecting the wood from moisture and UV damage.
Sizing, placement, and insulation: what actually keeps ice longer
This is where a lot of DIY patio coolers fail in practice, people build a beautiful box and then wonder why the ice is gone in six hours. Real cooling performance comes down to three things: how big the box is relative to how much ice you put in, where you place it, and how well the insulation is installed.
Getting the size right
A good rule of thumb for an outdoor ice chest is to plan for about 2 pounds of ice per person per day. For a party of 8 people over a full afternoon, that is 16 pounds of ice minimum, plus room for drinks and food. A box with an interior volume of roughly 40 to 50 quarts (about 18 inches wide by 14 inches deep by 18 inches tall inside the liner) is a practical starting point for most backyard gatherings. Going bigger is rarely a mistake. A larger thermal mass means ice lasts longer even when you are opening the lid frequently.
Where to put it
Shade is the single biggest factor in ice retention outdoors. A patio cooler sitting in direct afternoon sun can lose ice twice as fast as the same cooler in shade. Place yours in the shadiest corner of the patio, ideally away from a grill or outdoor heater. A covered patio or pergola location is ideal. If your patio is mostly exposed, consider pairing the cooler location with a shade sail or umbrella overhead.
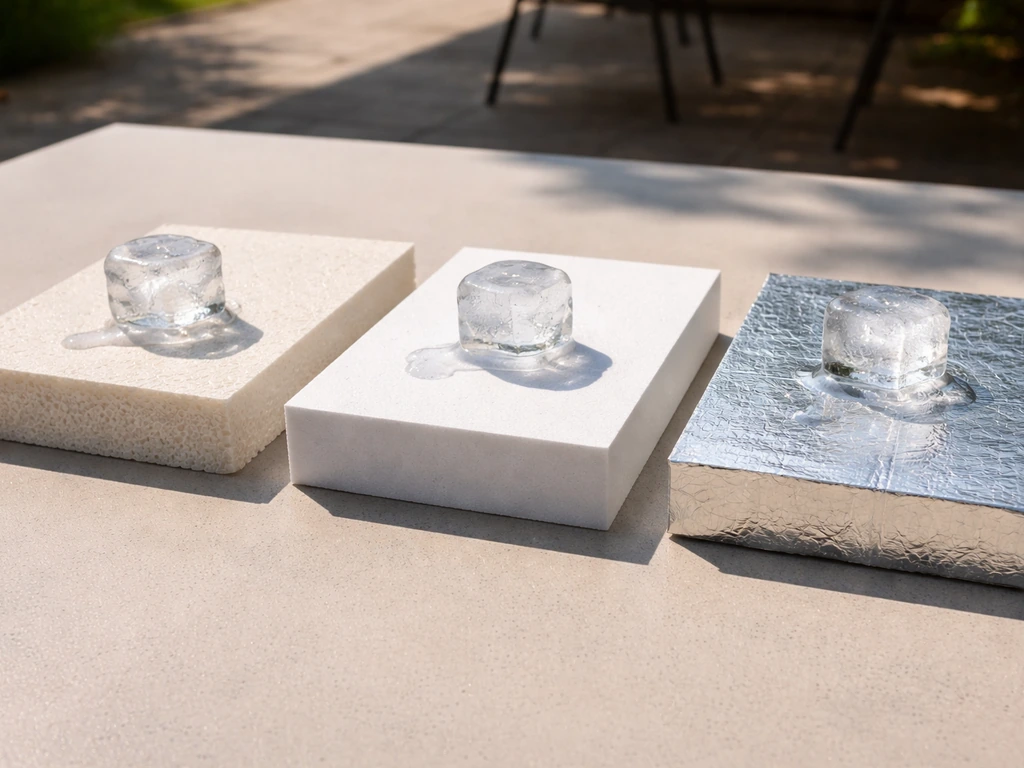
Insulation choices compared
| Insulation Type | R-Value per Inch | DIY Friendliness | Best For |
|---|---|---|---|
| Standard white EPS foam (beadboard) | ~R-3.8 | Very easy to cut and glue | Budget builds, occasional use |
| Extruded polystyrene (XPS, e.g., pink or blue foam) | ~R-5 | Easy to cut, rigid | Better performance, same effort |
| Foil-faced polyisocyanurate (polyiso) | ~R-6 to R-6.5 | Slightly more fragile, easy to cut | Best performance per inch, recommended |
For a patio cooler, 1.5 inches of foil-faced polyiso on all sides is a practical sweet spot, you get meaningful insulation without making the box so thick that your interior volume shrinks dramatically. If you want to go further, two layers of 1-inch foam with seams staggered and offset will outperform a single thicker layer because you eliminate thermal bridges at the joints.
Waterproofing, drainage, and weatherproofing for outdoor use
An outdoor cooler that is not properly waterproofed will start rotting within a season. The wood is exposed to condensation from the outside, melt water from the inside, and rain from above. You need to address all three.
Protecting the exterior wood
Use exterior-grade lumber to begin with, cedar is naturally rot-resistant and a great choice. Pressure-treated pine is cheaper and very durable but can be harder to work with. Whichever you choose, seal all exterior surfaces with an exterior stain/sealant before use and reapply once a year. Pay extra attention to the base, which sits closest to the ground and gets the most moisture exposure. If you can, put the cooler on rubber feet or a patio tile to keep the base off the deck surface.
Managing melt water with the drain
The drain spigot you installed in Step 4 is your best friend here. Keep it closed while the cooler is in use and open it at the end of the party to drain all the melt water before it can sit and degrade the foam or cause odors. If your patio drains well, you can run a short piece of flexible hose from the spigot to direct water away from the deck. Some people set the cooler up slightly elevated and tilted toward the drain side to ensure every last bit of water drains out.
Sealing the foam from moisture
Rigid foam itself does not absorb water, but the seams and edges where it meets wood or other foam pieces will let moisture in if not sealed. Use waterproof caulk along all interior foam seams and around the drain fitting. If you used spray foam to fill gaps, let it cure and trim it flush, then seal over it. The liner does most of the work of keeping water off the foam, but redundant sealing is worth the extra 20 minutes.
Rain and lid weatherproofing
If your patio is not fully covered and the cooler will be left out during rain, make sure the lid overhangs the box by at least half an inch on all sides so water sheds away from the seam. A small drip edge of aluminum flashing tacked to the underside of the lid overhang is an easy upgrade that prevents rain from running down the inside of the box. When the cooler is not in use for extended periods, store it in a covered area or drape a waterproof tarp over it.
Maintenance, troubleshooting, and keeping things safe
A well-built patio cooler will last for years with minimal upkeep, but there are a few problems that come up regularly. Here is how to handle them before they become headaches.
Preventing and fixing odors
The main cause of a smelly cooler is melt water that sits too long with food residue in it. Drain the cooler completely after every use and rinse the liner with clean water. For stubborn odors, a solution of 1 tablespoon of baking soda per quart of warm water left to soak in the liner for 30 minutes will handle most cases. For really persistent smells, a diluted bleach rinse (1 tablespoon bleach per gallon of water) followed by a thorough rinse and air dry works reliably. Let the liner and the interior foam dry completely before closing the lid, trapping moisture inside accelerates the odor problem.
Improving ice retention if it is melting too fast
If your ice is not lasting as long as you expected, work through this checklist before assuming the build has a flaw. Pre-chill the cooler for an hour with a sacrificial bag of ice before your actual ice goes in, this dramatically slows melt. Use block ice or larger cubes instead of crushed ice, since smaller ice has more surface area and melts faster. Keep the lid closed as much as possible. And revisit the placement, even partial shade matters. If the box itself seems to be the problem, check the foam seams for gaps and re-caulk any that look compromised.
Dealing with leaks
If you notice water appearing outside the box when the drain is closed, the most likely culprits are the drain fitting seal or a crack in the liner. Remove the liner and inspect it first. A plastic storage bin can crack over time; replace it every few years or upgrade to a galvanized steel tub which is more durable. If the drain fitting is leaking, unscrew it, clean the threads, wrap with plumber's tape, reapply caulk, and reinstall.
Annual maintenance checklist
- Inspect and reapply exterior sealant or stain, especially on the base and any areas showing fading or graying.
- Check all screws for corrosion and replace any that have rusted, especially hinge screws.
- Inspect the foam seams inside and re-caulk any that have separated.
- Test the drain spigot by running water through it to confirm it seals and drains cleanly.
- Check the lid hinges and tighten any loose hardware.
- Clean the liner thoroughly and let it dry before storing or using for the new season.
Safety considerations
A few practical safety notes worth keeping in mind: Do not use a DIY patio cooler to store raw meat and drinks in the same compartment without a divider or separate container for the meat. Melt water from raw meat is a food safety issue. Keep the cooler away from outdoor grills and fire pits, foam insulation is not fireproof and wood will char. If you have young children on the patio, consider adding a simple latch to the lid so it cannot be opened without adult help.
Once your cooler is built and running well, you will probably start thinking about the rest of the patio setup around it. You can also apply the same waterproofing and drainage ideas to a DIY patio trash can setup so it stays cleaner outdoors. Keeping the whole patio cooler in hot weather, not just the cooler box itself, is a bigger puzzle that involves shade structures, airflow, and surface choices. And if you enjoy building functional patio furniture, a patio storage box uses a very similar build process and pairs naturally alongside a dedicated ice chest. Both projects together can completely transform how usable your outdoor space feels on a hot summer afternoon.
FAQ
What’s the best way to size a patio cooler for a party (how do I avoid running out of ice)?
Start with ice quantity, then add space. Plan on about 2 lb of ice per person per day, then choose a box big enough that you can still fully separate ice from drinks and food. If you expect frequent lid openings, size up one step because every opening shortens ice life even if you used the right total pounds.
Should I put the cooler on the ground, patio tile, or a deck, and how high should it be?
For durability and drainage, keep the base off the bare deck surface. Rubber feet, patio tiles, or short non-rusting spacers help reduce standing moisture near the wood. Aim for a slight elevation so any melt water naturally trends toward the drain side, and keep the area under the drain clear to avoid pooling.
How do I pre-chill the cooler correctly before guests arrive?
After the sealant cures, add a sacrificial bag or two of ice and let it sit for about an hour before replacing with your actual ice. This cools the wood and foam surfaces so the first real melt period is shorter, which helps you notice better performance during the first couple of hours.
Can I use a normal cooler drain plug or should I use a spigot?
A spigot is usually better for consistent draining because you can fully open it and direct melt water with less mess. If you use a plug-type drain, make sure the opening is large enough to empty the basin fully, otherwise leftover water can sit in the liner and lead to odors.
Do I need to glue the plastic liner in place, or can it stay removable?
Keep the liner removable, do not glue it down. Removability makes cleaning easier and reduces buildup that causes smell. If the liner slides during use, fill small gaps with thin foam strips instead of fixing the liner permanently.
Why does my patio cooler leak when the drain is closed, even though I caulked everything?
Most leaks come from the drain fitting seal or a hairline crack in the liner. Take the liner out, inspect it for fractures, then if the liner looks fine, remove the spigot, clean the threads, apply plumber’s tape, re-caulk around the exterior fitting, and reinstall without overtightening (foam can crack).
How much lid overhang do I need to prevent rain from running into the box?
Aim for at least a half-inch overhang on all sides so water sheds away from the lid-to-box seam. If rain commonly blows toward the patio cooler, add a small drip edge on the underside of the overhang (like a trimmed aluminum strip) to reduce runoff into the interior.
Is foil-faced polyiso the only insulation that works, and can I stack foam layers?
Foil-faced polyiso works well because it helps with radiant heat transfer, but stacking insulation also helps when it’s installed thoughtfully. Two layers with staggered seams can outperform one thicker layer by reducing heat paths through joints, but you still need waterproof caulk on every foam seam to prevent moisture ingress.
What’s the fastest way to stop bad odors from building up?
Drain completely after every use, rinse the liner, then let everything dry with the lid open before closing. For active odors, soak the liner using baking soda in warm water (about 1 tablespoon per quart) for roughly 30 minutes, then rinse thoroughly and air dry.
Can I store raw meat and drinks in the same patio cooler compartment?
Avoid it unless you use a divider or keep meat sealed in a separate container. Melt water from raw meat is a food safety concern, and in a DIY patio cooler you can’t rely on sanitation the way you would with dedicated food storage.
Is it safe to store drinks next to a grill or fire pit?
Keep the cooler away from grills and fire pits. Foam insulation is not fireproof, and nearby radiant heat can degrade materials, speed melting, and increase charring risk for wood.
What’s the best ice type to maximize how long the ice lasts?
Use block ice or larger cubes when possible. Crushed ice has more surface area, it melts faster, and it can force you to refill mid-event even if the cooler is well insulated. Block ice also creates a slower, more predictable melt.
How often should I reseal or reapply protective coating to the exterior wood?
Reapply exterior stain or sealant about once per year, and always ensure the coating fully covers the base area since it sees the most moisture. If you notice water beading changes or darkening that spreads, that’s a cue to re-coat sooner.
Next Articles

How to Keep Patio Cool in Summer: DIY Shade and Cooling
Step-by-step DIY shade, airflow, and misting tips to keep an outdoor patio cool, open or covered, fast

How to Decorate a Long Narrow Patio: Layout Tips
Practical DIY layout and decor tips to widen a long narrow patio using zoning, furniture spacing, lighting, greenery, an

How to Decorate a Rectangular Patio Step by Step
Step-by-step plan to decorate a rectangular patio with smart layout, zones, furniture fit, lighting, plants, and seasona