Replacing a patio screen comes down to four things: knowing what type of screen system you have, measuring correctly before you order anything, removing the old screen without damaging the frame, and pressing the new mesh or panel in so it's tight and clean. If what you need is patching just a damaged section, the same spline-and-fit approach still applies, just with smaller measurements Replacing a patio screen. If you're wondering how to rescreen a patio, follow the steps for measuring, cutting, and seating the spline so the mesh stays tight and wrinkle-free. Most homeowners can do the whole job in an afternoon with about $20 to $50 in materials and a handful of basic tools. If you're looking to build a diy bug screen for patio openings, the same spline and mesh-measuring approach applies patio screen replacement. The trickiest part is usually getting the spline seated evenly or getting a replacement door to glide smoothly, but both of those are very fixable once you know what to look for.
How to Replace a Patio Screen Step by Step DIY Guide

Identify your patio screen type and parts
Before you buy anything or pick up a tool, spend five minutes figuring out exactly what you're dealing with. Patio screen systems fall into a few distinct categories, and the replacement approach is different for each.
Fixed screen panels
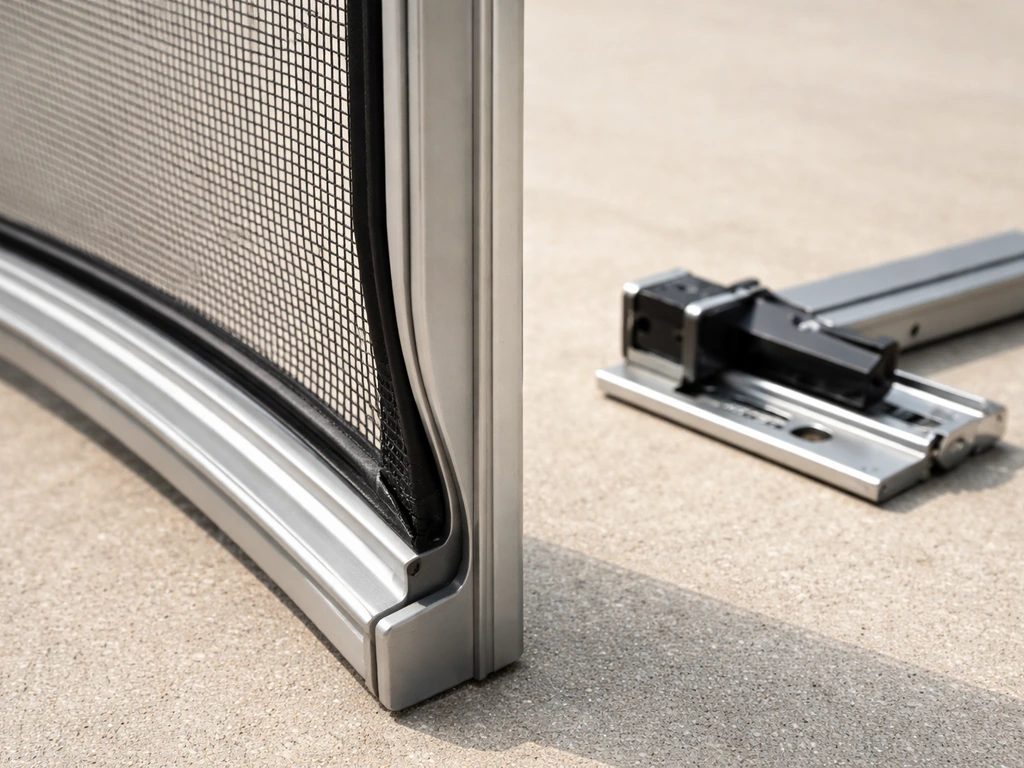
These are the stationary mesh panels that fill the openings in a screened porch or patio enclosure. They're almost always held together with a spline system: a rubber or vinyl cord that's pressed into a channel running around the inside edge of an aluminum frame, pinching the mesh in place. When you look closely at the edge of the frame, you'll see a small groove with a round cord sitting in it. That cord is your spline, and it's the key to the whole system. The frame itself is usually aluminum, though older enclosures sometimes use wood.
Sliding patio screen doors
A sliding screen door rides in a track at the top and bottom of the door opening on small rollers. The mesh inside the door frame is also held by a spline, so you can replace just the mesh without buying a whole new door. But if the frame is bent, the rollers are cracked, or the door just won't track right no matter what, a full door replacement is often easier than fighting a damaged frame.
Hinged screen doors
Hinged screen doors swing open on hinges just like an interior door. The mesh replacement process is the same as fixed panels (spline and channel), but the door needs to be rehung and adjusted so it swings freely and latches properly. These are common on patio enclosures with a dedicated entry door.
Parts to know before you start
- Spline: the rubber or vinyl cord that locks mesh into the frame channel. It comes in different diameters (typically 0.140" to 0.210") and you need the right size for your frame's groove.
- Spline groove (channel): the small channel around the inside perimeter of the frame where the spline sits. Measure this to choose the correct spline diameter.
- Screen mesh: the woven fabric that fills the frame. Common choices are fiberglass (soft, flexible, beginner-friendly) and aluminum (stiffer, more durable).
- Rollers: the small wheels at the bottom (and sometimes top) of a sliding screen door that let it glide in the track.
- Track: the U-shaped channel at the top and bottom of a door opening that the sliding screen door rides in.
Measure for the right replacement screen

Wrong measurements are the number one reason a replacement screen job has to be done twice. Measure the frame opening, not the existing torn mesh, because mesh stretches and distorts over time.
Measuring a fixed panel
Measure the outer dimensions of the frame itself: height and width from outside edge to outside edge. If you're only replacing the mesh inside an existing good frame, measure the inside dimensions of the spline channel opening (not the full frame). Cut your replacement mesh about 2 inches larger than the opening in each direction so you have material to grip while you're rolling in the spline. You'll trim the excess flush once the spline is seated.
Measuring a sliding screen door
For a sliding screen door, you need to measure inside the track system. Measure the width from the inside of the U-channel on one side to the inside of the U-channel on the other side. For height, measure from the top of the roller track at the bottom to the top of the U-channel at the top of the frame. When ordering a replacement door panel, add about 1/8 inch to your overall width measurement so the door fills the track without binding. Always measure in at least two spots (top and bottom for height, left and right for width) because tracks aren't always perfectly square, and you want the larger number.
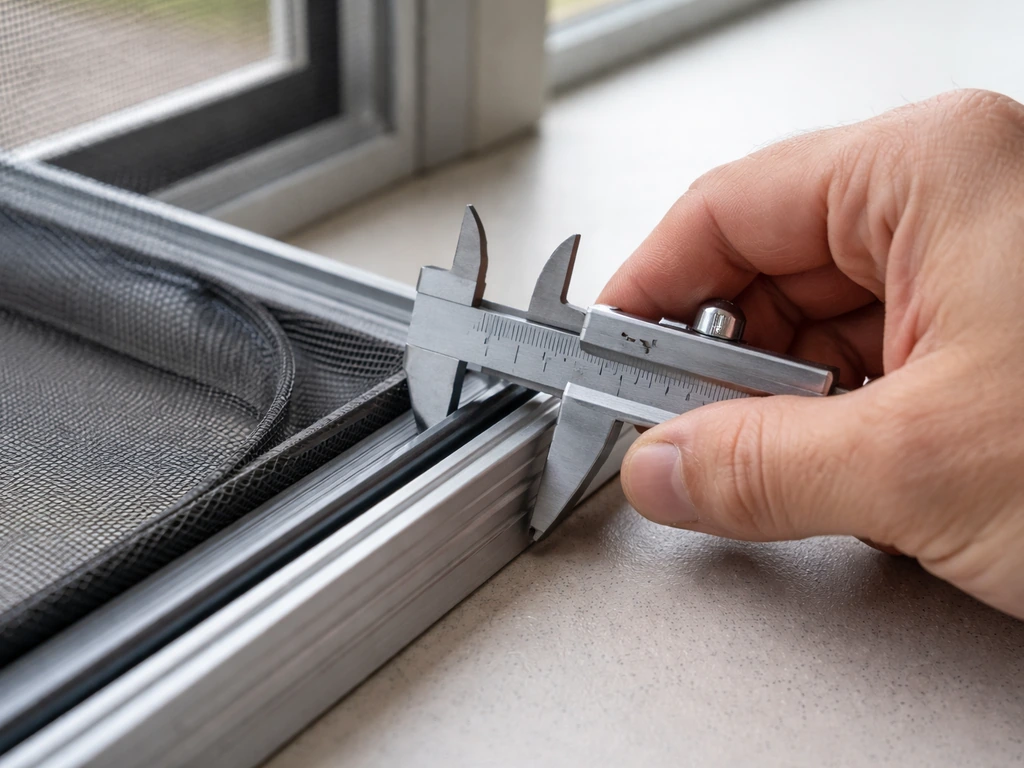
Measuring for the right spline
Use a ruler or calipers to measure the width of the spline groove channel in your frame. Spline that's too thin will let the mesh pop out. Spline that's too thick won't seat properly and will leave bumps along the edge. Most patio enclosure frames use spline in the 0.140" to 0.175" range, but always check your specific frame. When in doubt, bring a short piece of the old spline to the hardware store and match it.
Tools and materials checklist
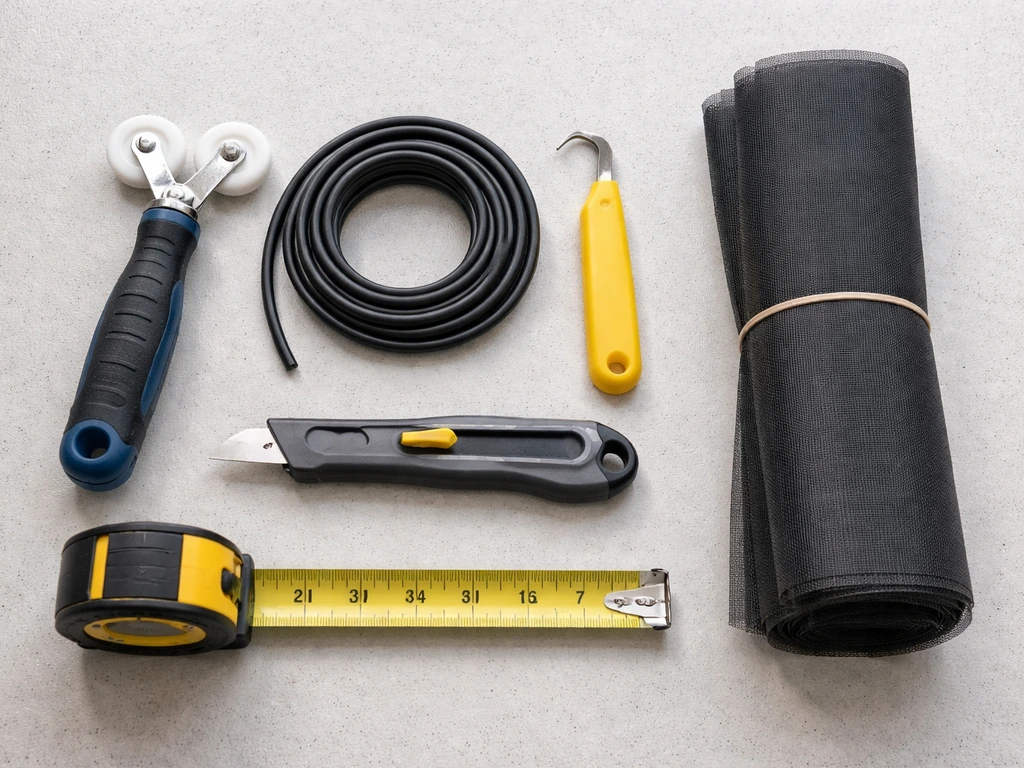
You don't need a lot of specialized equipment here. Most of this you may already have, and the rest is cheap and available at any home improvement store.
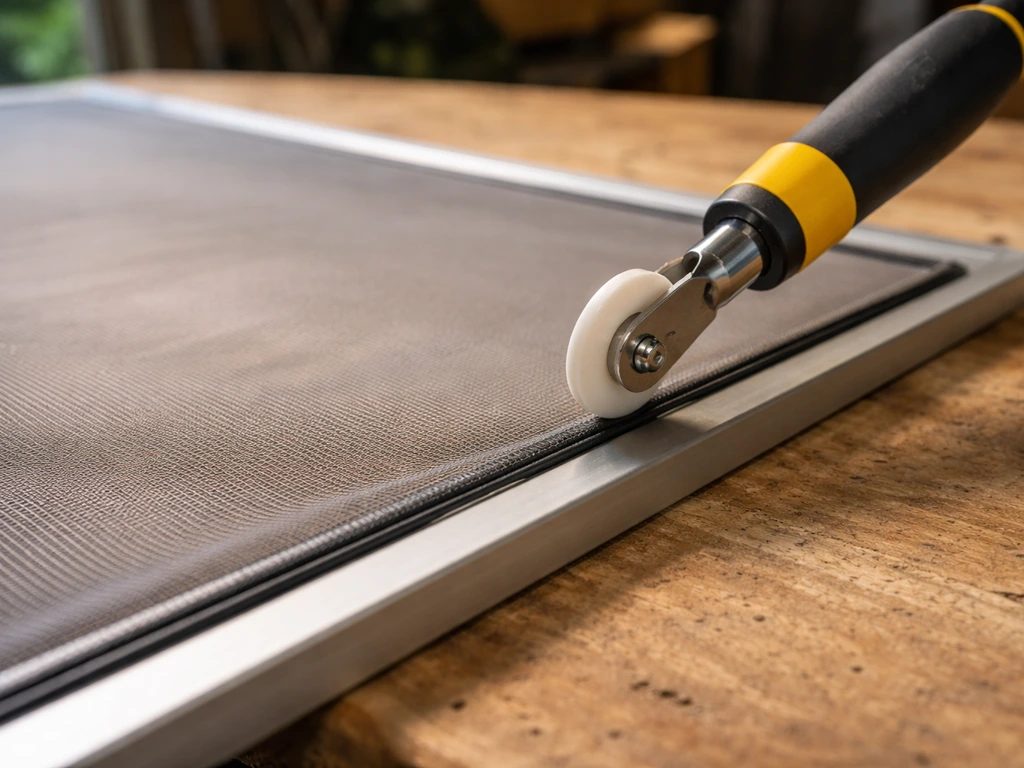
- Spline roller (also called a screen rolling tool): a small hand tool with two wheels, one concave for pressing mesh and one convex for seating spline into the groove. This is essential and costs about $5 to $10.
- Replacement screen mesh (fiberglass or aluminum): buy a roll larger than your opening so you have overlap to work with.
- Replacement spline: match the diameter to your frame's groove. Buy about 20% more than your frame perimeter to avoid running short.
- Utility knife: for trimming excess mesh and cutting spline ends.
- Flathead screwdriver or awl: for prying old spline out of the groove.
- Tape measure: for accurate measurements of the frame and opening.
- Scissors: helpful for rough-cutting mesh before installation.
- Clamps or binder clips: to hold mesh in position while you start rolling the spline.
- Screwdriver (Phillips and flathead): for removing door hardware and adjusting rollers.
- Needle-nose pliers: useful for pulling stubborn old spline from corners.
- Work surface: a flat table or sawhorses make the job much easier than working on the ground.
For mesh material: fiberglass is the right choice for most DIYers replacing patio screens. For a smooth DIY install, use these panel and mesh tips to guide how to make screen panels for patio enclosures. It's flexible, easy to work with, won't corrode, and tolerates the spline rolling process without cracking. Aluminum mesh is more durable and gives a crisper look but is stiffer and less forgiving if you make a mistake during installation. If pets or sharp objects are a concern, look for pet-resistant or heavy-duty polyester mesh options.
Remove the old screen panel or screen door
Removing a fixed screen panel
- Look for any clips, fasteners, or retainer strips holding the panel in the enclosure frame. Many patio enclosures use a system where the screen panel slides into tracks or is held by plastic or metal clips at the corners. Release or unscrew these before trying to pull the panel out.
- Once the panel is free, lay it flat on your work surface. Find the spline in the channel around the edge of the frame. It's the round cord sitting in the groove.
- Use a flathead screwdriver or awl to pry one end of the spline up out of the groove, starting at a corner. Work it up gently so you don't gouge the aluminum channel.
- Once you have a few inches loose, grip the spline and pull it out along the channel. It should come out in one long piece. If it's brittle and breaking, use needle-nose pliers to work through the stubborn sections.
- With the spline removed, the old mesh simply lifts out of the frame. Clean out any debris, old spline pieces, or dirt from the channel before reinstalling.
Removing a sliding screen door
- Slide the door to one side and locate the roller adjustment screws at the bottom corners of the door frame. These are usually Phillips head screws accessible through small holes in the bottom rail.
- Turn the adjustment screws to lower the rollers, which will give you clearance to lift the door out of the track.
- Tilt the bottom of the door toward you, lift it up into the top track, and swing the bottom out and down to remove the door.
- Lay the door flat on your work surface. If you're only replacing the mesh, follow the spline removal steps above. If you're replacing the entire door, set it aside and proceed with measuring and installing the new door.
- While the door is out, take a moment to clean the top and bottom tracks with a stiff brush or vacuum. Grit in the tracks is a common reason doors bind even after you reinstall them.
Install new screen mesh or panel
This is the step that intimidates most beginners, but the spline-and-roller method is genuinely straightforward once you start. The goal is to get the mesh pulled tight and even across the frame with no wrinkles or sags.
- Lay the frame flat on your work surface. Roll out the new mesh over the frame and cut it roughly 2 inches larger than the frame on all sides. You want enough overhang to grip while you work.
- Use clamps or binder clips to hold the mesh flat and centered on the frame. Make sure the mesh weave is straight relative to the frame edges, not at an angle.
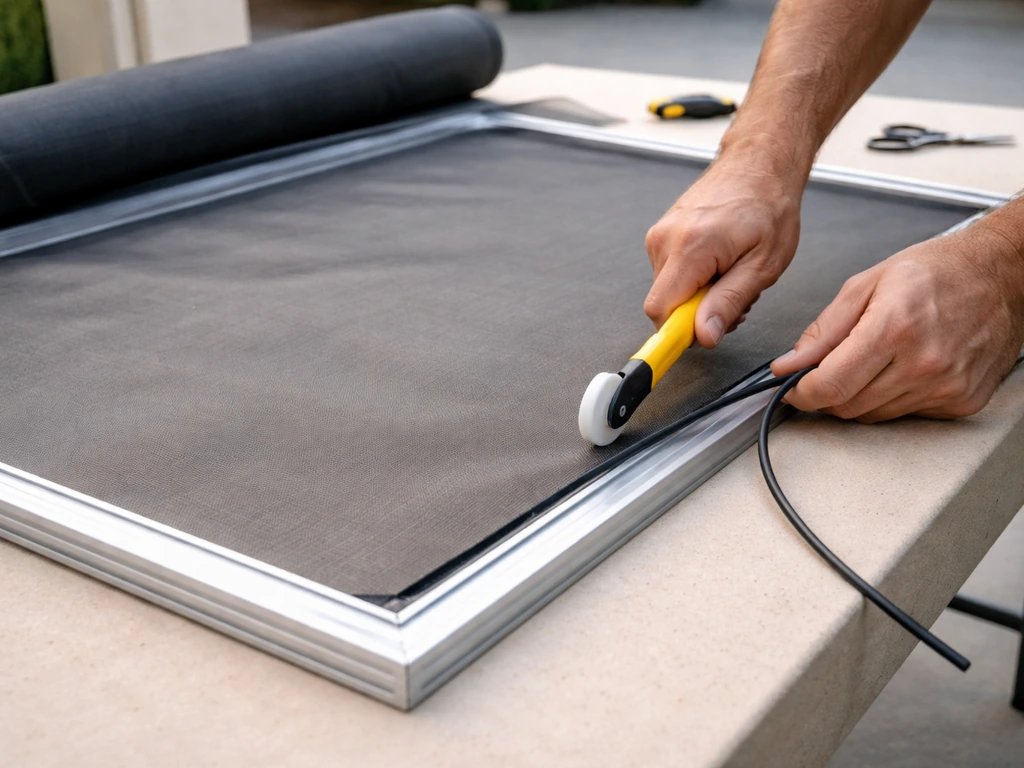
- Start at one corner. Use the convex wheel of your spline roller to begin pressing the new spline into the groove, trapping the mesh underneath it. Press firmly and work along the first side in one smooth stroke.
- Move to the opposite side and pull the mesh gently but firmly to create light tension before rolling the spline in on that side. Repeat for the remaining two sides, pulling tension as you go. This is how you avoid a saggy or wavy screen.
- At corners, the mesh will bunch slightly. Use scissors to make a small diagonal cut at each corner (about 45 degrees) to reduce bulk and allow the mesh to lie flat. Don't cut so close that you expose the corner of the channel.
- Once all four sides of spline are seated, run the convex roller back over the entire perimeter to make sure the spline is fully and evenly pressed into the groove. It should sit flush or just below flush with the frame surface.
- Use a utility knife to trim the excess mesh from around the outside of the spline. Hold the blade flat against the outside edge of the frame and slice in one smooth pass. Pressing the blade against the frame (rather than angling it inward) gives the cleanest cut without nicking the frame.
If you're installing a full replacement panel kit (a pre-assembled frame with mesh already installed), the process is even simpler: just slide or clip the panel back into the enclosure's retainer system in reverse order of how you removed it. For sliding screen and panel removal and installation, Lowe’s product guide PDF also describes reversing the removal steps and checking roller adjustment as part of getting the door back in place correctly slide or clip the panel back into the enclosure's retainer system in reverse order of how you removed it. Make sure all clips or fasteners are fully engaged before moving on.
Rehang and adjust a patio screen door for smooth operation
A door that drags, sticks, or won't latch is almost always a roller or alignment issue, and it's easy to fix if you know where to look. If you are trying to close in a patio by improving a screen door or enclosure opening, start by fixing the tracking and latch so it shuts smoothly every time patio screen door.
- Before rehanging, clean the top and bottom tracks thoroughly. Even a little sand or debris causes binding. A stiff brush followed by a damp cloth works well.
- To rehang a sliding screen door: tilt the top of the door into the upper track first, then swing the bottom in and lower it onto the bottom track rollers.
- Slide the door back and forth a few times. It should glide smoothly without lifting or dragging. If it drags on the bottom, the rollers need to be raised. If it's hard to seat in the track, they may need to come down.
- Find the roller adjustment screws at the bottom corners of the door (sometimes hidden behind small plugs). Turn them clockwise to raise the door, counterclockwise to lower it. Make small quarter-turn adjustments and test between each one.
- When the door is at the right height, check that the door frame is parallel to the side jamb when it's fully closed. If one corner gaps more than another, adjust only the roller on that side until the gap is even.
- For hinged screen doors, check that the hinges are tight and the door doesn't sag at the latch side. If it does, tighten the top hinge screws first. If the screws are stripping out, use longer screws or fill the holes with toothpicks and wood glue before re-driving.
- Test the latch or handle. It should engage cleanly without forcing. If it's misaligned, adjust the strike plate position slightly rather than fighting the door closed.
Common mistakes and quick troubleshooting
Here are the issues that come up most often during patio screen replacement, and what to do about each one.
| Problem | Likely Cause | Fix |
|---|---|---|
| Screen is saggy or wavy after installation | Mesh wasn't pulled taut before seating the spline on opposite sides | Remove the spline on the loose sides, re-tension the mesh, and re-roll the spline |
| Spline won't stay in the groove, keeps popping out | Spline diameter is too small for the groove, or groove is damaged | Measure the groove width and switch to the correct (larger) spline diameter |
| Mesh tore at a corner during installation | Cut was too aggressive at the corner, or mesh was over-tensioned | Start over with a new piece of mesh; make shallower diagonal corner cuts next time |
| Sliding door binds or sticks in the track | Dirty track, rollers set too low, or door not seated squarely | Clean the track thoroughly, raise rollers via adjustment screws, and check door alignment |
| Door doesn't close fully or gaps at one corner | Rollers are uneven, causing the door to ride at an angle | Adjust only the roller on the gapping side until the door frame is parallel to the jamb |
| Trimmed mesh edge looks ragged | Utility knife blade was dull or angled inward | Use a fresh blade and keep it flat against the outer frame edge |
| Spline sits above the channel surface and creates a ridge | Spline is too large in diameter for the groove | Replace with the correct smaller diameter spline |
| Replacement panel doesn't fit the opening | Measured the old mesh instead of the frame, or didn't account for track clearance | Re-measure the frame or track opening and reorder with the correct dimensions |
One thing worth knowing: if you're dealing with multiple damaged panels across a whole enclosure, the process scales up predictably. Work one panel at a time, keep your mesh roll nearby, and cut each piece fresh rather than trying to pre-cut all panels at once. Openings in enclosures are rarely all exactly the same size, even if they look identical. Similarly, if your enclosure is in rough shape overall, it may be worth considering whether a full rescreening or even a more substantial rebuild is the better long-term move rather than patching panel by panel.
If your patio screen door is a sliding door that simply won't track right no matter how much you adjust the rollers, inspect the rollers themselves closely. For a sliding screen door that won't track, This Old House recommends a step-by-step approach that includes adjusting the roller screws and cleaning or adjusting the components before deciding to replace the door blank" rel="noopener noreferrer">adjust the rollers. how to repair screen patio inspect the rollers themselves closely. Cracked or flat-spotted rollers don't respond to adjustment and need to be replaced. Replacement rollers are inexpensive and usually sold at hardware stores by door height and roller diameter. Swapping them out takes about 15 minutes and often completely fixes a door that seemed ready for the trash.
Most patio screen replacements are very doable in a single afternoon once you have your materials in hand. Getting your measurements right before you start and using the proper spline diameter are the two things that make the biggest difference between a clean, tight result and a frustrating redo. Once you have the right materials and measurements, you can follow the same panel or door steps to build a durable patio screen enclosure measurements right. Take those two steps seriously and the rest of the job tends to go smoothly.
FAQ
Can I reuse the existing spline if the channel still looks good?
Often yes, if the old spline is not cracked, hardened, or stretched and the channel is clean. If you see flattened sections, it tears when you press it back in, or it no longer grips evenly, replace it, matching the spline diameter to your frame groove (many use about 0.140 to 0.175).
What should I do if the mesh arrives with a wrinkled edge or a kink from shipping?
Let it unroll flat for a few hours, then trim from the straight edge. Avoid stretching hard to “make it fit,” because that usually leads to ripples after the spline is seated. If the kink is severe, cut back to the undamaged section before rolling in the spline.
How tight should I seat the spline, and how do I know it is even all the way around?
Seat the spline with steady pressure across the full length, using a spline roller or spline tool, so the cord sits fully down into the channel without gaps. Check by running your hand along the edge, you should feel a uniform rim with no soft spots or lifted corners.
My screen keeps popping out along one edge, what’s the most common cause?
Usually the wrong spline size or an installation gap from pulling the mesh unevenly. Recheck the spline diameter, then confirm the channel is free of dust, old spline debris, and old adhesive. If needed, remove that section, clean the groove, and re-roll with the correct spline.
Can I cut the mesh exactly to the measured opening, or do I need extra material?
Use extra for spline and grip. The practical method is leaving extra (commonly about 2 inches in each direction when fitting panel mesh into a channel) so you can tension the mesh while rolling, then trim flush once fully seated.
What’s the best way to prevent distortion when installing multiple panels in one enclosure?
Work panel by panel, keep the mesh roll near the frame, and cut each opening fresh instead of assuming the openings are identical. Even small size differences between panels create uneven tension that shows up as sagging or wrinkling.
How do I measure a sliding screen door panel correctly if the track is not perfectly square?
Measure in multiple spots and use the larger dimension, for width compare left and right track U-channel spacing, for height compare top reference to bottom track and also verify roller track height. Add the small recommended clearance for the door to fill the track without binding (often about 1/8 inch for width when ordering panels).
What if my sliding door drags only at one corner?
Check whether the mesh edge is too thick or uneven at that corner, and confirm the door is seated square in the tracks. If the spline bulges or the panel edge sits proud, it can catch. If adjustment does not help, inspect rollers and replace any cracked or flat-spotted rollers that do not roll smoothly.
Do I need to replace the entire sliding screen door if the frame is slightly bent?
Not always. If the frame is only lightly warped, new rollers, realignment, and correct panel sizing can fix tracking. If the frame is visibly twisted, the track is distorted, or the door still cannot close evenly after adjustments, replacing the full door is usually faster and avoids repeated installs.
Which mesh type should I choose if I have pets or sharp objects near the patio?
For most DIY installs, fiberglass is common, but consider heavier-duty polyester or pet-resistant options when claws, regular contact, or debris are a concern. Aluminum mesh is durable but less forgiving if you need to redo a section, because it is stiffer during spline seating.
When should I consider patching instead of replacing the whole patio screen?
Patch when the frame is solid and only a small section has torn or holes, and when you can access the spline to remove a limited section cleanly. If multiple areas are damaged across the same panel, or the mesh is broadly stretched and sagging, a full panel or full rescreening typically yields a cleaner, more uniform result.
What tools make spline installation easier, and what happens if I skip them?
A spline roller or spline tool helps press the cord evenly without flattening it. A clean channel is also critical, use a shop vacuum and a stiff brush to remove old debris. Skipping the right pressing method often creates lifted edges that pop out after a few days.

Practical DIY layout and decor tips to widen a long narrow patio using zoning, furniture spacing, lighting, greenery, an

Step-by-step plan to decorate a rectangular patio with smart layout, zones, furniture fit, lighting, plants, and seasona
DIY patio wall decor for brick, stucco, wood, concrete, or siding with weatherproof mounting tips and maintenance.