The fastest way to shade a sunny patio is to pick one method that matches your structure and sun angle, then install it in a weekend. A freestanding cantilever umbrella works if you just need spot coverage today. A shade sail works great for open patios with good anchor points. A pergola with a canopy or polycarbonate roof is the gold standard if you want permanent, weather-resistant shade. The right choice depends on how much sun you get, when you get it, and what your patio is physically attached to. Here's how to work through that decision and actually get it done.
How to Shade a Sunny Patio: DIY Step-by-Step Guide

Felix Brennan
4 May 2026
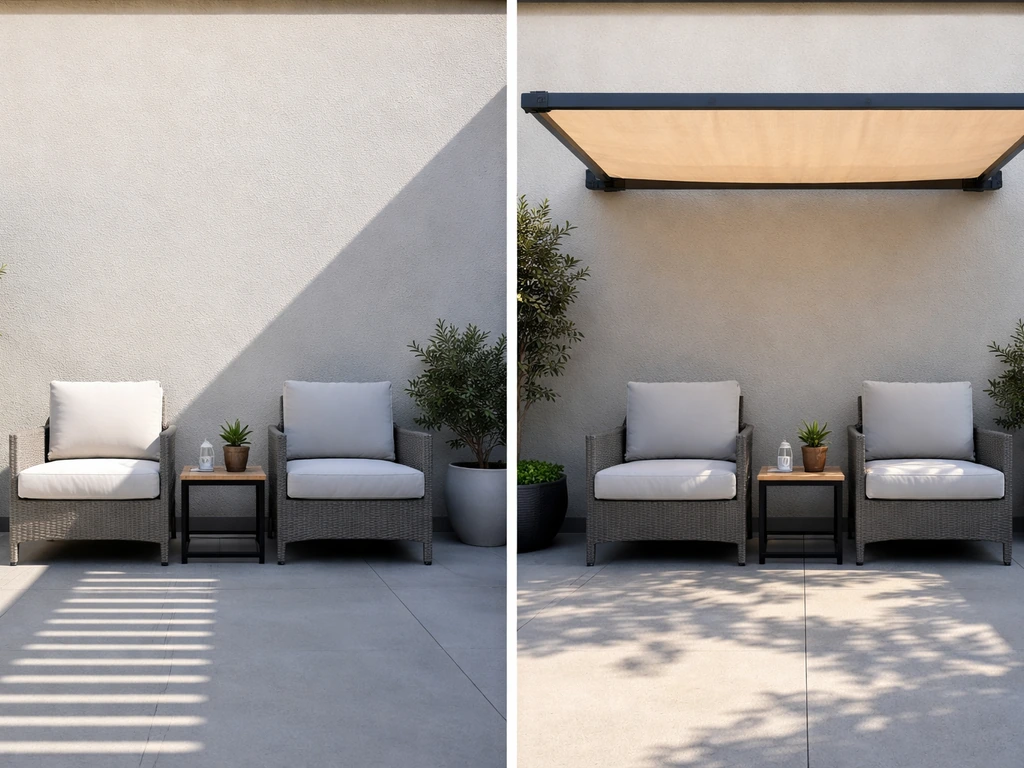
Figure out your sun exposure and shade goals
Before you buy anything, spend one day watching your patio. Note when the sun hits it directly, where the shadows fall at 9am, noon, and 3pm, and which direction it faces. A south-facing patio gets hammered all day. An east-facing one is brutal in the morning but shady by afternoon. West-facing patios are the worst in late afternoon and evening when the sun is low and direct. That detail matters because a fixed overhead structure handles midday sun perfectly but does almost nothing for a low western sun at 5pm.
A simple way to estimate how much shade a structure will cast: use the formula L = h / tan(α), where h is the height of your shade structure and α is the solar altitude angle at the time you want coverage. At solar noon in summer at mid-latitudes, the sun sits around 65 to 75 degrees high, so a 10-foot pergola beam casts a shadow of roughly 4 to 5 feet.
At 3pm when the sun drops to around 45 degrees, that same beam casts a 10-foot shadow. Free tools like ShadowCalculator. com or ShadeMap let you plug in your address and see exactly how shadows move across your yard at any hour and any date. It takes about five minutes and saves you a lot of guesswork.
Once you know your sun pattern, get specific about your goals. Are you trying to keep the patio cool enough to sit outside in August? Protect outdoor furniture from UV fading? Create a comfortable shaded dining area? Make the space usable year-round? Your answer changes the solution. Full-day, all-season comfort calls for a permanent structure. Occasional afternoon shade might be solved with a single good umbrella.
Choose the best shading option for your patio type
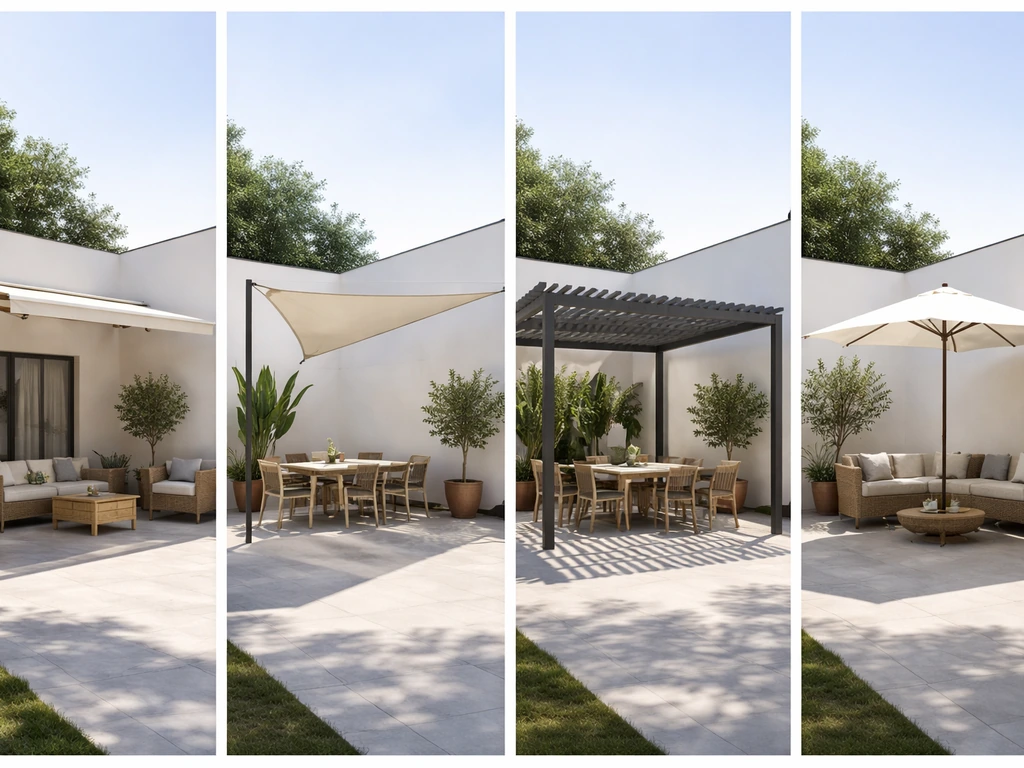
There's no single best shade solution. The right one depends on your patio layout, your budget, and how permanent you want to go. Here's a practical breakdown of the most common options and where each one shines.
| Option | Best For | Approximate Cost (DIY) | Shade Coverage | Permanence |
|---|---|---|---|---|
| Patio umbrella | Small seating areas, renters, quick fix | $50–$300 | 6–11 ft diameter | Portable |
| Shade sail | Open patios with anchor points, modern aesthetic | $80–$400 | 12–20 ft spans | Semi-permanent |
| Retractable awning | Patios attached to the house, flexible coverage | $300–$1,500 DIY | 8–20 ft projection | Permanent mount, retractable |
| Freestanding pergola with canopy | Detached patios, no house wall available | $400–$2,000 | 10–20 ft wide | Permanent |
| Attached pergola or patio cover | Decks and patios adjacent to house | $600–$3,000+ | Full patio coverage | Permanent |
| Polycarbonate or metal roof panel | Full waterproof shade, year-round use | $500–$2,500 | Full patio coverage | Permanent |
| Shade screen or privacy curtains | Wind and sun filtration, side protection | $100–$500 | Perimeter coverage | Semi-permanent |
| Trellis with climbing plants | Natural shade, budget-friendly over time | $100–$600 | Partial to full | Permanent, grows over seasons |
Pergolas and patio covers
If you want the most durable, attractive, and functional shade solution, a pergola or solid patio cover is the right direction. An attached pergola mounts to a ledger board on your house wall, uses two or four posts at the outer edge, and supports either open rafters (partial shade, better airflow) or a full canopy panel roof (complete shade). Aluminum pergola kits have come down dramatically in price and go up in a weekend with basic tools. If you prefer wood, cedar and pressure-treated pine are the standard choices. Building a shaded patio from scratch with posts, beams, and roofing is a bigger project but completely DIY-able.
Shade sails
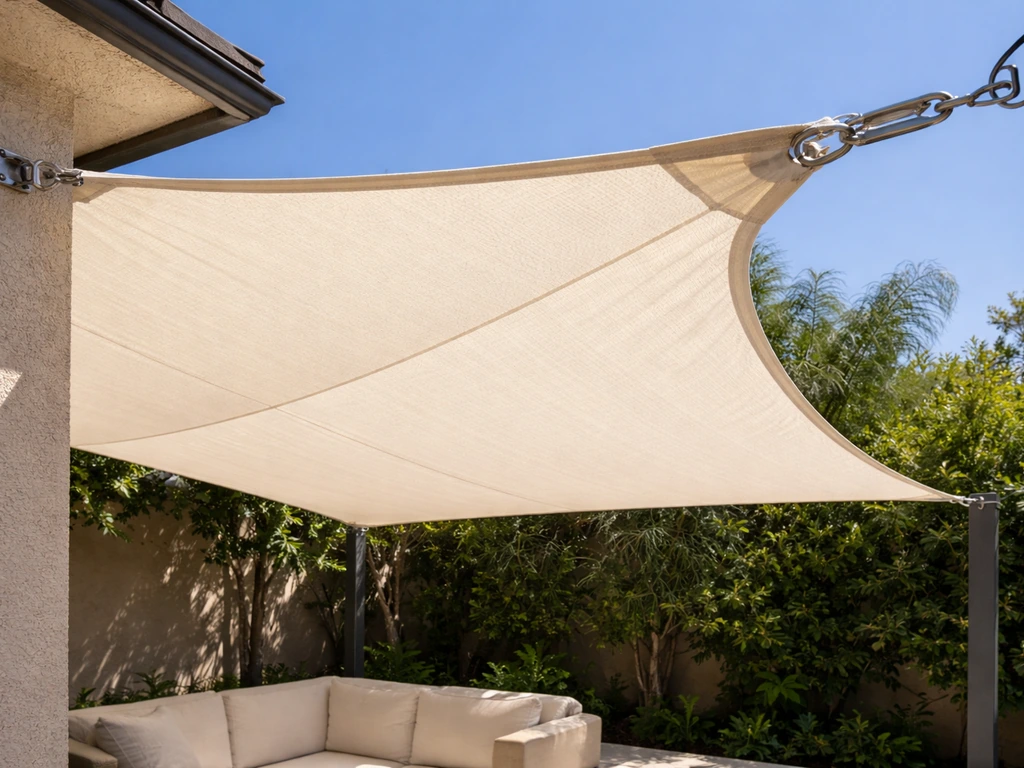
Shade sails are a great middle-ground option. They're fast to install, look sharp, and can cover surprisingly large areas. The catch is that they need solid anchor points, and the typical hardware-store post-in-concrete anchor setup takes more planning than most people expect. You'll need to angle the sail at least 20 to 30 degrees off horizontal so rain runs off instead of pooling. They're not ideal in high-wind areas unless you take them down seasonally.
Retractable awnings
A retractable awning mounts to the wall of your house and extends out over the patio on a hinged arm system. Manual crank versions start around $300 to $500 for a quality unit. Motorized versions run $800 and up. The projection (how far it extends out from the wall) typically ranges from 8 to 14 feet. One big advantage: you can retract it during storms or on mild days when you want full sun. The downside is they require a solid mounting wall and don't work for detached patios.
Umbrellas and portable options
A 9 to 11-foot offset cantilever umbrella is genuinely useful if you need shade fast. If you want a DIY option, you can also use simple materials to make sun shades for a patio offset cantilever umbrella. Offset models let you position the shade exactly where you need it without a pole in the middle of your table. Look for one with a weighted base of at least 50 lbs and a wind-vent at the top. They're not a forever solution, but for renters or anyone not ready to commit to a build, they work well right now.
Natural shade with trellises and plants
A pergola or trellis covered with climbing plants like wisteria, trumpet vine, or Virginia creeper creates beautiful natural shade. The tradeoff is time: you're looking at two to three growing seasons before you get meaningful coverage. It's a great complement to an existing structure but not a standalone fast fix.
Measure layout, plan mounting points, and check clearances
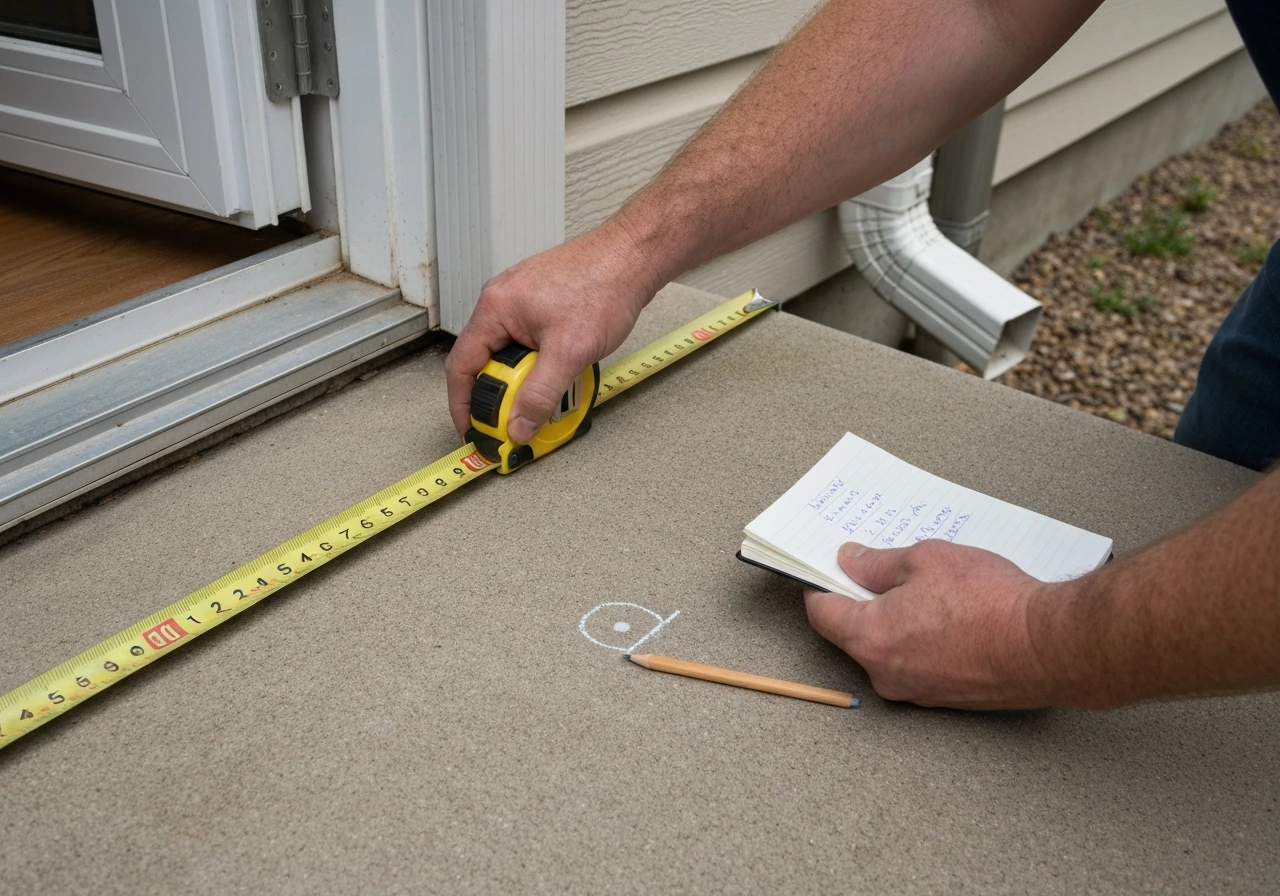
Good measurements upfront prevent expensive mistakes. Grab a tape measure, a notepad, and spend 20 minutes on this before ordering anything.
- Measure the full length and width of your patio slab or deck. Note any obstacles like doors, windows, downspouts, or light fixtures on the house wall.
- Measure the height of your house eave or soffit at the point where an awning or pergola ledger would attach. A minimum finished height of 7 feet under any structure is standard for comfortable clearance; 8 feet is better.
- Identify your attachment wall. Locate wall studs with a stud finder before marking anything. For a ledger board, you need to hit at least two studs, spaced no more than 16 inches apart. Use a level to mark a horizontal line at your desired mount height.
- For freestanding posts, mark post locations on the ground and check that they're square using the 3-4-5 triangle method: measure 3 feet along one side, 4 feet along the adjacent side, and the diagonal should measure exactly 5 feet.
- For shade sails, map all three or four anchor points. Each anchor must be structurally solid: a lag-screwed post, a house fascia board into framing, or a fence post set in concrete. Measure the straight-line distance between each anchor point to confirm your sail size.
- Check local building codes. Most municipalities require a permit for permanent structures like pergolas or patio covers over a certain square footage (commonly 200 sq ft, but it varies). A quick call to your local building department takes 10 minutes and prevents headaches later.
For awning projection, a standard rule of thumb is that the awning should extend out at least half the depth of the patio to provide useful midday shade. NaplesGov’s Solair Pro example pitch/projection table shows how awning projection changes under a “15 degree pitch” versus a “minimum 5 degree pitch” condition Solair® Pro. So for a 12-foot-deep patio, you want at least a 6-foot projection. For afternoon western sun, you actually need side shading or a longer projection since the sun angle is low.
DIY installation steps for common shade options
Installing a shade sail
- Mark and dig post holes for any new posts at least 24 to 36 inches deep, depending on your soil and local frost line.
- Set posts in concrete and let them cure for at least 48 hours before applying any tension load.
- Attach stainless steel D-ring or pad-eye hardware to each anchor point using lag screws into solid framing. Use 3/8-inch or 1/2-inch hardware rated for the sail's tension load.
- Connect turnbuckles to each anchor point. These allow you to adjust tension after the sail is hung.
- Clip the sail's corner rings to the turnbuckles using carabiners or shackles. Start with the highest corner first.
- Tighten turnbuckles evenly across all corners until the sail is taut with no sagging. The sail should be angled so the lowest corner is at least 7 feet off the ground and water can run off.
- Check tension monthly and re-tighten as the fabric stretches.
Installing an attached pergola
- Mark ledger board location on house wall and locate studs. The ledger must land on solid framing, not just sheathing.
- Cut ledger board to length (typically a 2x8 or 2x10 pressure-treated board). Pre-drill holes every 16 inches for lag screws.
- Hold ledger at your marked height, confirm it's level, and lag-bolt it into wall studs with 1/2-inch x 4-inch structural lag screws. Use joist hanger hardware rated for the load.
- Set outer posts in post bases anchored to the patio slab using concrete anchors, or set posts in concrete footings below grade. Posts should be plumb in both directions.
- Attach the outer beam across the top of the posts using post caps. Use structural screws or through-bolts.
- Cut and install rafters from the ledger to the outer beam on 16 or 24-inch centers using joist hangers at the ledger end and rafter ties at the beam end.
- Add any roofing material: polycarbonate panels, shade cloth, aluminum roofing, or leave open for a classic pergola look. For polycarbonate, overlap panels by at least 2 inches and use appropriate flashing at the house wall.
Mounting a retractable awning
- Locate and mark wall studs at the mounting height. Use a 4-foot level to mark a perfectly horizontal line.
- Hold the mounting bracket template (usually included with the awning) against the wall and transfer hole locations. Make sure every bolt hits a stud or use appropriate wall anchors rated for the awning's weight and wind load.
- Drill pilot holes and attach mounting brackets with the hardware provided. Most awnings use two or three brackets across the top.
- With a helper, lift the awning onto the brackets and secure the locking pins or bolts.
- Adjust the pitch angle using the arm adjustment bolts. A minimum 15-degree pitch is needed for water runoff; 20 to 25 degrees is ideal.
- Test the crank or motor operation and confirm the awning retracts fully without catching.
Wind/stability, waterproofing/drainage, and safety considerations
Wind is the number-one thing that turns a nice shade structure into a liability. Any shade sail, umbrella, or canopy that isn't properly tensioned or anchored can become a projectile in a storm. Wikipedia’s shade sail overview notes that proper installation uses considerable tension to help prevent flapping and that shade sails can be taken down in high-wind conditions blank" rel="noopener noreferrer">properly tensioned. Here's what actually matters:
- Shade sails should always be taken down or significantly de-tensioned if you're expecting winds above 30 to 35 mph. Even high-quality HDPE shade cloth will tear or pull anchors out under sustained wind loads at those speeds.
- Umbrellas need a base weight of at least 50 lbs for a 9-foot umbrella, more for larger ones. On a deck, bolt-down base systems are far more reliable than freestanding weighted bases.
- Pergola posts set in concrete below grade (minimum 24 inches, deeper in frost zones) are dramatically more stable than surface-mount post bases. For a freestanding pergola in a windy area, go below grade.
- Any awning or pergola attached to the house wall must use fasteners that actually reach structural framing. Lag screws into sheathing alone will pull out under load.
- For solid-roof structures like polycarbonate or aluminum panel roofs, slope the panels at least 1/8 inch per foot toward the outer edge for drainage. Install a gutter at the outer beam edge to direct water away from the patio.
- If you're in a high-wind zone or hurricane region, check local codes for uplift requirements. Some jurisdictions require hurricane ties or specific post-base hardware ratings.
- Electrical clearances matter if you're adding a fan or lights. Maintain at least 10 feet of clearance between any electrical fixture and a water source. Use exterior-rated fixtures and GFCI-protected circuits.
A word on DIY vs. hiring a contractor: if your pergola or patio cover is larger than about 200 square feet, requires a permit, involves cutting into the house's roof line, or attaches near the main electrical panel, seriously consider getting a contractor for at least the structural and electrical portions. The framing and finishing work you can often do yourself even on a permitted project. The cost to fix a bad ledger attachment or an improperly flashed roof penetration is much higher than the cost of a few hours of professional help upfront.
Maintenance, seasonal adjustments, and how to keep it looking good
A well-built shade structure is mostly low maintenance, but a few seasonal habits make a real difference in how long it lasts and how good it looks.
Spring startup
- Inspect all hardware: tighten any loose bolts on pergola post bases, awning brackets, and shade sail anchors after winter freeze-thaw cycles.
- Check wood members for any cracking, checking, or signs of rot, especially at the ledger-to-house connection and at post bases. Touch up any bare wood with exterior sealant.
- Re-hang shade sails and re-tension them. They stretch over winter and will need a few turns on each turnbuckle.
- Clean shade cloth with a mild soap and water solution using a soft brush. Rinse thoroughly and let dry completely before tensioning to prevent mildew.
- Extend and inspect retractable awnings before peak season. Lubricate pivot arms with a silicone spray. Look for any tears or loose stitching in the fabric.
Summer upkeep
- After any storm with winds over 30 mph, inspect shade sails and awning hardware for shifted anchors or stretched fabric.
- Keep climbing plants on trellises trimmed back from gutters, fascia boards, and any roof penetrations. Overgrown vines cause real damage over time.
- Rinse polycarbonate or aluminum roof panels with a garden hose monthly to clear pollen and debris that can stain or trap moisture.
Fall and winter prep
- Take down shade sails before your first frost or wind season and store them folded in a dry bag. Leaving them up through winter dramatically shortens their lifespan.
- Retract and cover awnings during extended cold periods if possible. Most awning fabrics are fine in cold weather but fare better when not left extended.
- Apply a fresh coat of exterior wood stain or sealant to cedar or pine pergola members every two to three years, ideally in fall before rain season.
- Clear any debris from roof panel gutters before they freeze.
- Check and re-tighten all lag screws at the ledger board connection each fall. Wood movement from moisture cycling can loosen fasteners slightly over time.
The right shading setup turns a patio you avoid in July into the place everyone wants to be. Start by observing your sun pattern, pick the method that fits your patio's layout and your budget, get your measurements right before you order, and install it properly the first time. Whether you go with a quick sail today or a full pergola build this season, getting even partial shade up now makes an immediate difference. Once the basics are in, you can always layer in more coverage, side screening for wind, or even a solid roof panel upgrade later.
FAQ
How do I decide between shade sail and pergola if my patio is exposed to sun all day?
Choose based on whether you need all-day, predictable coverage. A pergola with a fixed canopy gives consistent shade at midday and reduces low-sun glare only if the roof angle and overhang are sized for your late-day hours. A shade sail is great for spot coverage but will not fully “block” low western sun at 5pm unless you add side panels or use a second sail, and you must confirm you have anchor points that can handle tension loads.
What’s the best way to measure for shade if my patio furniture sits in the way of direct sun?
Map the area you actually want shaded using “critical zones,” like your dining table rectangle or the seating cluster. Measure from the sun-facing edge to the farthest piece you want protected, then add a buffer of about 1 to 2 feet so the shade doesn’t miss as the sun moves. This prevents buying a coverage product that shades the floor but leaves chairs in direct glare.
Can I use a pergola or shade cover over a deck that is attached to my house?
Often yes, but attachment details matter. If your setup requires a ledger board, the mounting must be on solid framing, not just exterior siding or trim, and the connection often requires proper flashing to prevent water intrusion. Also confirm roofline clearances if the design involves roof ties near gutters or existing shingles.
Do I need to worry about UV protection with fabric shade sails or umbrellas?
Yes. Decorative shade can still allow significant UV through unless the material is rated for UV reduction. Look for fabrics that specify UV blocking and consider whether the color is light or dark, since darker fabrics tend to reduce glare more but can get hotter. If you’re protecting outdoor cushions, prioritize UV-rated material and add removable covers for extra protection.
What wind setup should I plan for if I live in a breezy or coastal area?
Treat wind as a design constraint, not an afterthought. For shade sails, plan for correct tension, use the proper hardware for your sail size, and remove or slack-tension the sail during high-wind seasons if the system isn’t rated for it. For umbrellas, ensure a weighted base at least as heavy as the manufacturer recommends and keep the vented top unobstructed so it can reduce sail-like pressure.
Will a shade structure shade the patio floor but still leave my eyes in direct sun?
That can happen, especially on west-facing patios. Overhead shade works best for midday sun, but low-angle sun hits from the side. If you notice glare while seated, add side screening, a larger overhang on the west side, or a second targeted panel aimed at your late-day line of sight.
How can I avoid pooling water with a canopy or shade sail?
Angle the coverage so rain sheds away from the center, not into it. A common guideline for shade sails is to keep the surface sloped, roughly 20 to 30 degrees off horizontal, so water doesn’t collect. For pergolas with solid panels, confirm drainage paths and leave appropriate gaps or scuppers so water doesn’t stagnate on top of the covering.
Are retractable awnings safe in storms, and when should I retract them?
Retract during forecasted storms and before high winds, rather than “after it starts.” Many awnings can handle light weather but are not designed to take repeated gust impacts while extended. Also check that the wall mounting is to framing, not only drywall or exterior cladding, because weak mounts can fail under wind load.
What if I’m renting, can I still shade a patio without drilling into the house?
Yes, offset cantilever umbrellas and standalone shade sails are usually the easiest low-permanence options. Prioritize products with heavy bases, correct wind-venting, and clear instructions for anchoring or setup without permanent mounts. If you use a sail, verify you can achieve the required anchor strength without damaging property, since weak anchors are the biggest failure point.
How do I reduce heat beyond just blocking sunlight?
Combine shade with airflow and surface choices. Open-rafters pergolas keep more breeze, and lighter materials can reduce radiant heat buildup on the floor. If you’re aiming for “sit-comfortably” shade, also consider adding side screening strategically to block direct gusts while still allowing some ventilation.
Should I install shade first or landscaping like pavers and planters first?
Install the shade support system first, then finalize hardscape around it. If you pour pavers or build raised beds first, you may end up needing extra patchwork to route posts, anchors, or drainage. Keeping post locations flexible early makes it easier to align coverage with the sun pattern you observed.
When is it worth hiring a contractor for a shaded patio?
Beyond size or permits, hire help when you need structural tie-ins to the house roofline, any electrical work, or ledger attachments that penetrate or alter the exterior envelope. Structural errors that affect load paths or flashing can cause hidden damage, water leaks, and expensive repairs, even if the visible shade itself looks correct at first.
Next Articles

How to Decorate a Long Narrow Patio: Layout Tips
Practical DIY layout and decor tips to widen a long narrow patio using zoning, furniture spacing, lighting, greenery, an

How to Decorate a Rectangular Patio Step by Step
Step-by-step plan to decorate a rectangular patio with smart layout, zones, furniture fit, lighting, plants, and seasona
How to Decorate a Patio Wall: DIY Ideas and Mounting Tips
DIY patio wall decor for brick, stucco, wood, concrete, or siding with weatherproof mounting tips and maintenance.