The best way to shade a patio depends on three things: how much coverage you need, whether you have solid anchor points (a wall, posts, or an overhang), and how much you want to spend. For most homeowners, a shade sail or retractable awning handles the job well at a reasonable cost and can be installed in a weekend. Pergolas and attached patio covers are the premium move when you want something permanent and good-looking. This guide walks you through every option, how to size it, how to mount it safely, and how to keep it working year after year.
How to Shade a Patio: Best DIY Options and Steps

Felix Brennan
11 May 2026
Choosing the right shade type for your patio
Before buying anything, figure out what kind of sun problem you actually have. Is the sun overhead at noon? Beating in from the west at 4 PM? Streaming in low at an angle under an existing overhang? The answer changes which solution works. Overhead shade (shade sails, pergolas, awnings) handles high sun well. But a west-facing patio is a different beast: the late-day sun comes in low and sideways, and a flat overhead cover can still let it hit you at eye level. For west-facing situations, you often need both an overhead shade element and a vertical screen, sail angle, or fence on the western edge. That combination is what actually makes the space comfortable.
Here's a quick overview of the main options and when each one makes sense:
| Option | Best For | DIY Difficulty | Typical Cost | Durability |
|---|---|---|---|---|
| Shade Sail | Medium patios, flexible coverage, budget install | Moderate | $50–$400 | 5–15 years (fabric) |
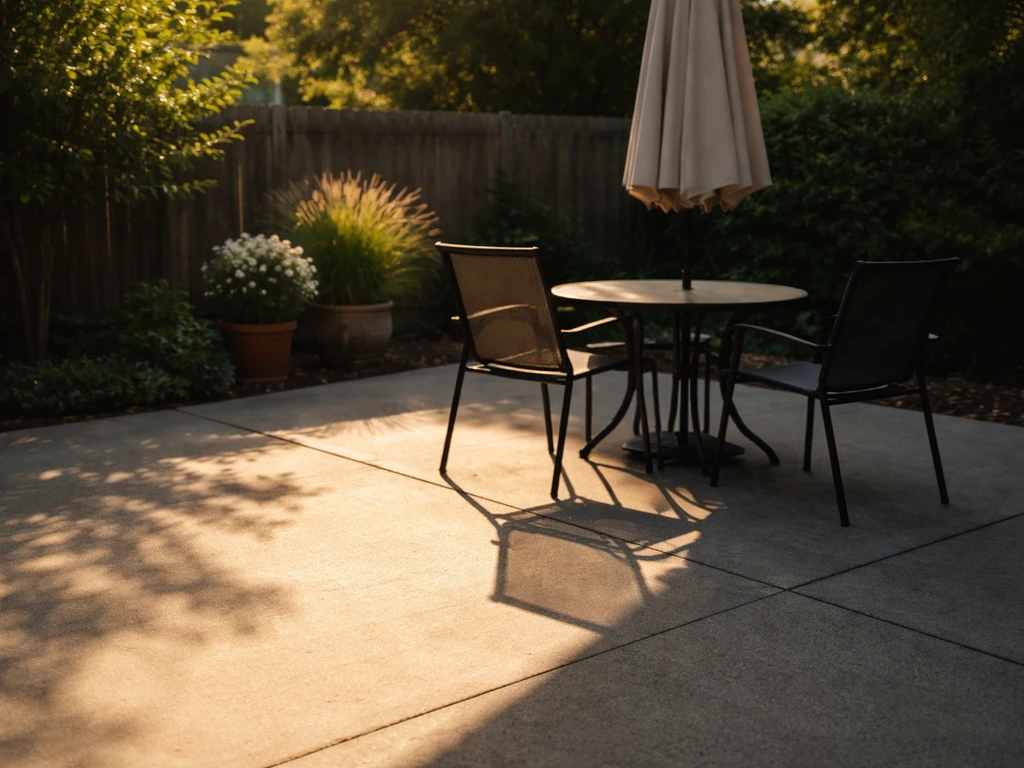
| Patio Umbrella | Small areas, renters, no drilling | Easy | $80–$600 | 3–7 years |
| Retractable Awning | Attached house wall, on-demand shade | Moderate–Hard | $500–$3,000+ | 10–20 years |
| Freestanding Pergola | Large patios, no wall attachment needed | Hard | $800–$5,000+ | 15–30+ years |
| Attached Pergola/Cover | Permanent extension of living space | Hard | $1,500–$10,000+ | 20–30+ years |
| Shade Curtains/Screens | Wind + sun combo, low-angle sun | Easy–Moderate | $100–$600 | 3–8 years |
If you're renting or want zero commitment, a large offset umbrella with a weighted base is your fastest path. If you own your home and want something that actually transforms the patio into a usable room, a shade sail or retractable awning is the sweet spot of cost versus impact. Pergolas are worth the investment if you plan to stay in the house long-term and want the space to feel finished.
DIY shade structures: shade sails, umbrellas, and pergolas
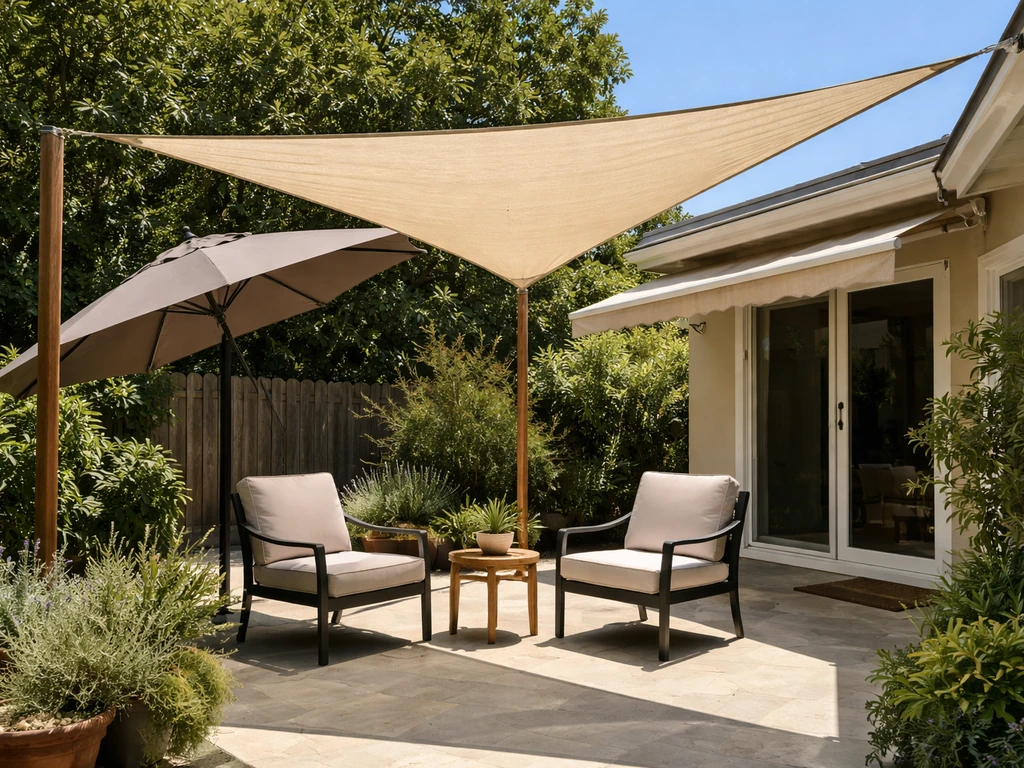
Shade sails
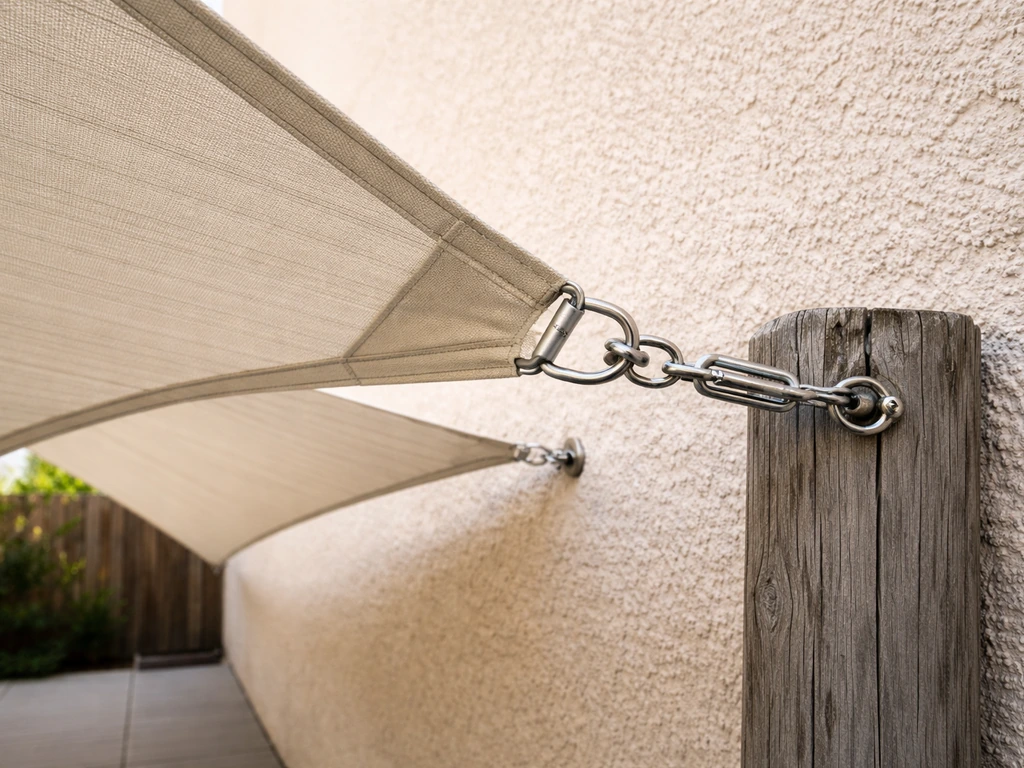
Shade sails are tensioned fabric panels anchored at three or four corners to fixed points. They're affordable, look modern, and can cover areas that no single umbrella could reach. The catch is that they only work well when installed with proper tension and geometry. A slack sail flaps in the wind, pools water in the middle, and tears prematurely. A well-tensioned sail with one corner higher than the others sheds rain, stays taut, and can last a decade or more. HDPE shade fabrics typically carry UV degradation warranties of 10 to 15 years when properly installed and maintained.
Patio umbrellas
Umbrellas are the easiest option but require heavier bases than most people expect. A large 11-foot umbrella should have a base weighing at least 50 to 75 pounds. Offset (cantilever) umbrellas are more practical than center-pole models because they let you sit under them without a pole in the middle of your table. They're not great in wind, and they won't shade a large back patio adequately on their own, but for a bistro setup or a small seating area, they're hard to beat on convenience.
Retractable awnings
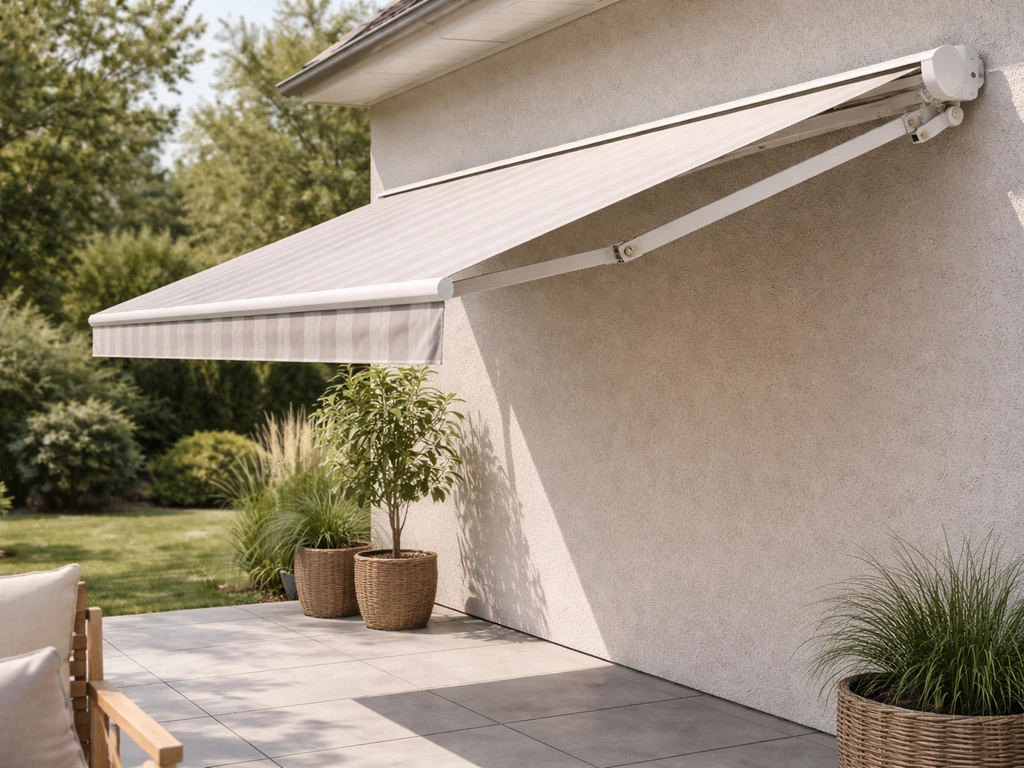
Retractable awnings mount to your house wall and extend outward on a roller mechanism. They're ideal when you have a clear wall surface with studs to anchor into and want the ability to open up the sky when the weather is nice. Motorized versions can include wind sensors that auto-retract the awning before it gets damaged. Manual versions are cheaper and perfectly fine for most homeowners. The key measurement here is projection: blank" rel="noopener noreferrer">awning manufacturers measure projection down the fabric slope, not as a horizontal distance, so a 12-foot awning doesn't give you 12 feet of horizontal shade coverage. Plan for roughly 85 to 90 percent of the stated projection as actual ground coverage. The SunSetter Essentials awning installation manual includes a geometry example showing the awning pitch (drop) should be set so that, at full projection, the lowest point at the front bar is 6'6" awning pitch (drop) set so the lowest point at the front bar is 6'6" at full projection.
Pergolas
A pergola is a freestanding or wall-attached structure with posts, beams, and either open rafters or an added fabric/louvered roof. Open-rafter pergolas filter sun but don't block it fully. Adding a shade sail, polycarbonate panels, or a shade cloth roof turns a pergola into a proper shade structure. Freestanding pergolas are great when you can't or don't want to attach to the house wall. Attached pergolas feel more integrated and share one wall with the house, reducing the number of posts you need to dig footings for.
How to install patio shade (step-by-step)
Installing a shade sail
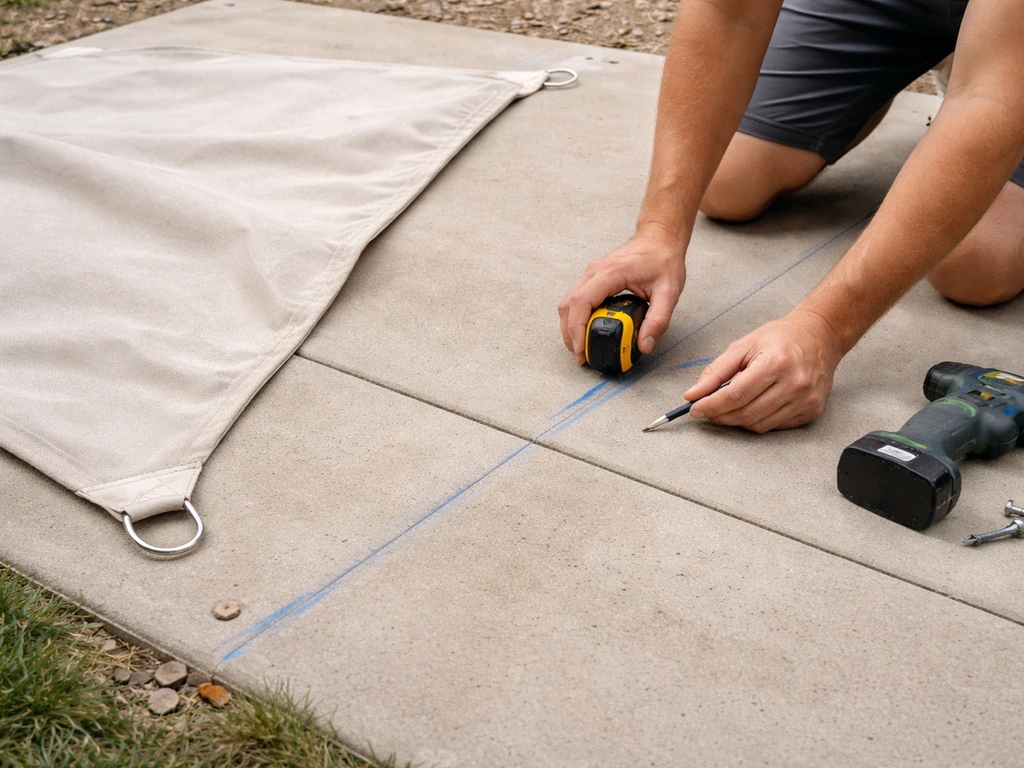
- Mark your anchor points on the ground. Lay out the sail flat to visualize coverage, then identify where each corner will attach. Add 10% of the sail's length beyond each corner ring to account for the tensioning hardware (turnbuckle and snap hook). So for a 12-foot sail edge, your anchor point should be about 13.2 feet from the opposite anchor, not 12 feet.
- Check anchor strength. Every anchor point needs to handle at least 100 lbs of pretension at minimum, and during high winds (think 100+ mph gusts), forces at each attachment point can reach thousands of pounds. This means you're anchoring to structural posts set in concrete, a solid masonry wall with proper hardware, or a house ledger bolted into framing, not wood fencing or hollow brick.
- Install your fixed anchors. At each point, install a pad eye or eye bolt rated for the load. On a wooden post or beam, a lag-threaded eye bolt works well. Into concrete, use a sleeve anchor or wedge anchor.
- Attach turnbuckles to the anchors. These allow you to fine-tune tension after the sail is up.
- Hang the sail loosely first. Clip a snap hook or carabiner to each corner D-ring and hook them to the turnbuckles. Don't tension yet.
- Set your height gradient. Raise one corner at least 12 to 18 inches higher than the others. This creates the slope that sheds rain and preloads the sail with tension for better wind performance.
- Tension the sail gradually and evenly. Tighten each turnbuckle a few turns at a time, working around all corners equally. The sail should be drum-tight with no visible sag or wrinkles. The minimum fixing height is 8 feet; most installs work best between 9 and 12 feet.
- Check all hardware and re-tension after the first week. Fabric stretches slightly at first, and turnbuckles can loosen.
Installing a retractable awning
- Find your studs. Lag bolts must go into wall studs, not just drywall or siding. Most awning warranties require stud mounting. Use a stud finder and mark your stud locations clearly.
- Set your mounting height. The awning bracket should go at a height that puts the lowest point of the extended awning at or above 6 feet 6 inches from the patio surface. SunSetter's geometry example shows that mounting at 9 feet above the deck puts the front bar at about 6'6" when fully extended. For comfortable headroom, aim to mount no lower than 7'6" above the patio, with 9 feet being the practical ideal.
- Confirm wall clearance. You need at least 7 feet 6 inches of floor-to-overhang clearance for the awning to extend without hitting the soffit or eaves.
- Attach the mounting bracket to the wall into studs using the supplied lag bolts.
- Lift the awning cassette onto the bracket (two-person job for units over 10 feet wide).
- Extend the awning to full projection and check that the pitch is set correctly (typically 14 to 20 degrees downward slope so rain runs off).
- For motorized units, connect the power supply per the manufacturer's wiring instructions. Professional installation is strongly recommended for motorized systems.
Installing a freestanding pergola
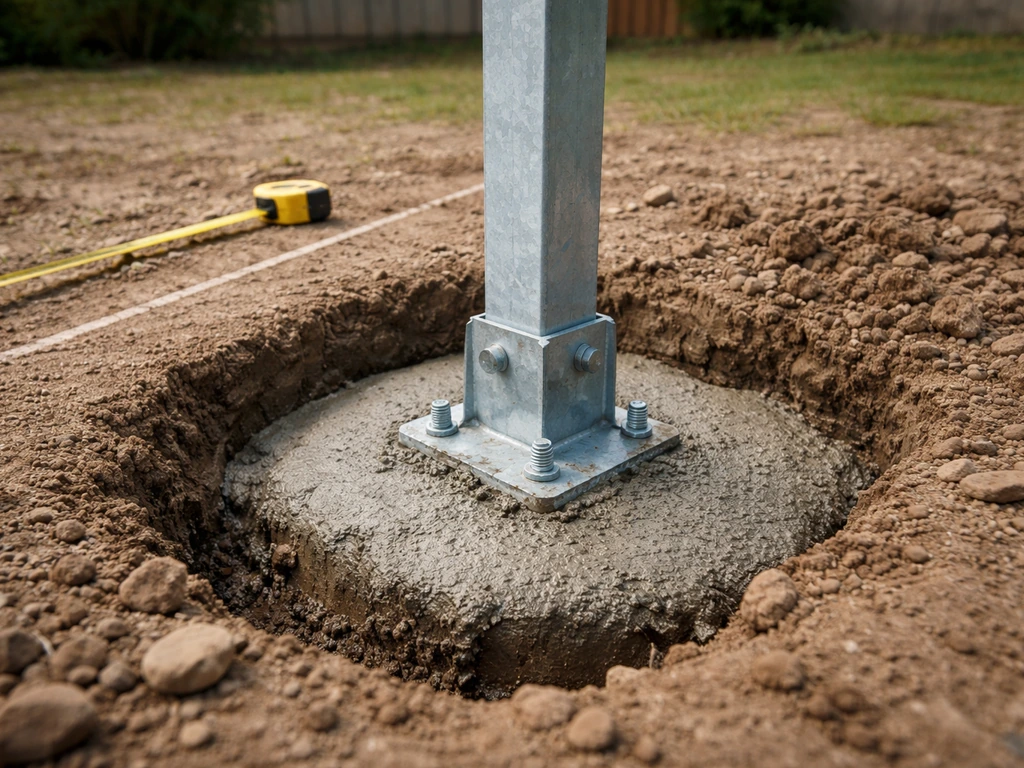
- Mark your post locations and dig footings below your local frost line. Frost heave can lift posts out of the ground if footings are too shallow.
- Set posts in concrete. For a standard 4-post pergola, each footing should be at least 12 inches in diameter and extend 6 inches below the frost depth for your region.
- Use adjustable post bases anchored into concrete if you're on a slab. In high-wind areas, use four L-brackets per post for additional resistance.
- Attach beams to posts, then add rafters across the top. Check for square before fastening permanently.
- Add your shade layer: shade cloth, lattice, polycarbonate roofing, or a shade sail stretched across the rafters.
Materials, mounting, and layout for large and back patios
Large back patios often need more than one shade element, or one larger structure than most DIYers expect. For a 20x20-foot patio, a single 16-foot shade sail won't cut it. You have a few options: install multiple overlapping sails (make sure they don't touch each other, as rubbing causes premature wear), use a large pergola with a shade cloth roof, or install a wide retractable awning if you have a long wall to mount to.
For large shade sails specifically, you can use your home's wall or existing posts as anchor points on one side, and set new steel or wood posts in concrete for the other corners. Steel posts in the 4-inch square or 3-inch round range are worth the extra cost over wood for permanent sail installations because they don't rot and maintain consistent tension over time.
For freestanding pergolas on a large patio, the posts should be spaced no more than 12 feet apart without an intermediate beam or additional support. A 20-foot span without a mid-point post typically requires engineered lumber or steel beams, which pushes the project into professional territory unless you're confident with structural sizing.
When you don't have any wall attachment options, a freestanding retractable awning is a real choice. These mount to independent posts set in concrete rather than to a building wall. The trade-off is that freestanding awnings cost more, require secure post footings, and are less common in the DIY market, so installation usually warrants a professional.
For mounting hardware in general: use stainless steel or hot-dipped galvanized hardware throughout. Zinc-plated hardware corrodes faster outdoors, especially in humid or coastal climates, and corroded hardware can fail under tension loads.
Sizing, coverage, and sun exposure planning
The number on the box is not the shade coverage you'll get on the ground. A shade sail listed as "10x10" describes the distance between the corner rings when fully stretched, but the actual shaded footprint on the ground depends on how high the sail is mounted and the angle difference between corners. As a general rule, expect 10 to 20 percent less ground coverage than the sail's listed size, especially when you have a height gradient between corners.
To size properly, measure the area you want to shade at the times you actually use the patio. Then add about 20 percent to that area to account for the geometry losses described above. For a 10x12-foot seating area, you want a sail in the 12x14-foot range, not a 10x12.
Sun angle is just as important as size. Think about when you use the patio. Noon sun is nearly overhead, so overhead shade works. But if you use the patio from 4 PM to 8 PM and it faces west, that sun is coming in at 20 to 40 degrees above the horizon. A shade sail or overhead cover alone won't block it from reaching your face and your seating area. For a patio that gets west sun from mid-afternoon into the evening, focus on blocking the low, sideways rays with both overhead shade and a vertical screen on the western edge west-facing patio shading. You also need a vertical or angled element on the western side: a shade curtain, a lattice panel with climbing plants, a solid fence section, or a sail angled steeply from a high west-side anchor down to a low east-side anchor. This is the single most common mistake in west-facing patio shading, and it's why people install a nice sail and still feel baked at dinner time.
A simple way to plan your layout: stand where you'll be sitting, note the direction of the worst sun, and hold up a board or tarp at different angles until the sun is blocked. That angle and direction tells you where your shade structure needs to intercept the light. Then you design backward from there to figure out anchor heights and positions.
Budget vs premium: best ways to shade a patio
The best shade option isn't the most expensive one. It's the one that fits your patio's geometry, your anchor options, and how much time you want to spend on it. Here's how the main options stack up honestly:
| Option | DIY Weekend Install? | Approx. Cost (Materials) | Looks Great? | Handles Wind? | Lifespan |
|---|---|---|---|---|---|
| Shade sail (DIY) | Yes (one day) | $80–$400 | Yes | Good if tensioned correctly | 10–15 years (fabric) |
| Offset umbrella | Yes (one hour) | $150–$600 | Decent | Poor–Fair | 3–5 years |
| Manual retractable awning | Yes (half day, two people) | $500–$1,500 | Very good | Good (retract during storms) | 10–20 years |
| Motorized retractable awning | Not recommended DIY | $1,500–$4,000+ | Excellent | Excellent (auto wind sensor) | 15–25 years |
| DIY freestanding pergola kit | Yes (full weekend+) | $800–$3,500 | Excellent | Good with proper footings | 15–30 years |
| Attached pergola + shade cloth | Requires some carpentry skill | $1,500–$6,000+ | Best looking | Excellent | 20+ years |
Our honest recommendation: for most homeowners on a budget, start with a quality shade sail from a brand like Coolaroo or ShadeSails LLC paired with proper steel hardware and concrete-set posts if you don't have existing anchor points. You'll spend $200 to $500 total, get good coverage, and it will last a decade if you take care of it. If you’re trying to figure out how to shade a patio from sun, the main thing is matching the shade type to the sun angle at the hours you actually use the space how to shade patio from sun. If you want something more permanent and your budget allows, a pergola kit with a shade cloth or polycarbonate roof is a weekend project that adds real value to the home. Retractable awnings hit the sweet spot if you have a house wall to mount to and want the flexibility of opening up to full sun on nice days.
Maintenance and safety for long-lasting shade
Shade sail maintenance
- Re-tension every sail at the start of each season. Fabric relaxes over winter and turnbuckles can back off. A loose sail flaps in wind, causing accelerated fabric wear and uneven corner stress that can eventually tear the material.
- Take the sail down before storms or sustained winds above 35 to 40 mph. Most manufacturers explicitly recommend this. Leaving a sail up in a storm creates shock loads that can rip the fabric or pull anchors out of walls.
- Clean with mild soap and water two or three times a year. Dirt and mildew weaken fabric fibers over time. Rinse thoroughly and let dry fully before folding for storage.
- Inspect all hardware at least once a year: check turnbuckles for corrosion, snap hooks for bent gates, and eye bolts for any movement in their anchors. Replace any hardware showing rust or deformation.
- If you're running multiple sails, make sure they don't overlap or touch. Rubbing between sails in wind causes holes and fraying.
Retractable awning maintenance
- Retract the awning during rain, wind above 25 mph, or snow. Most fabric awnings aren't designed to handle standing water or snow load.
- Clean the fabric with mild soap twice a year and let it dry fully before retracting to prevent mildew inside the roller.
- Lubricate the roller mechanism and arms annually with a silicone-based spray (not WD-40, which attracts dirt).
- Check wall mounting bolts once a year for any loosening, especially after a hard storm season.
Pergola maintenance
- Inspect post bases and footings annually for cracking concrete or corrosion on post brackets.
- For wood pergolas, apply a UV-protective sealant or stain every two to three years to prevent cracking and graying.
- Check all beam and rafter connections for loosening hardware, especially after winters with heavy snow or ice.
- Replace any shade cloth or fabric roof panels when you start seeing UV degradation (fading, brittleness, or holes). HDPE fabrics typically last 10 to 15 years before needing replacement.
Safety notes worth knowing
Don't extend sail corners with rope, chain, or cable extensions to reach anchor points that are too far away. This changes the tension geometry, creates excessive shock loads in wind, and is a common cause of hardware failure and sail damage. If your anchor points aren't in the right place, move the anchors, not the corners. Also, if your patio shade structure attaches to the house or requires footings, check with your local building department about permit requirements. Many jurisdictions require permits for attached structures and have minimum wind-load design requirements that affect how the structure needs to be anchored. It's a quick phone call that can save you from having to redo the work later.
FAQ
What’s the difference between a shaded area “size” and the real ground coverage I’ll get?
Most products list dimensions by the distance between corner rings or the awning’s rated projection, but the footprint changes with mounting height and corner height differences. A practical check is to simulate it by holding a tarp to your target angles, then measure the blocked area at the sitting height, not just at floor level.
How high should I mount a shade sail or awning so it blocks sun but doesn’t trap too much heat?
Aim to keep the lowest edge high enough for comfortable airflow and clearance, then pitch the structure so rain sheds away from seating. If you have west or late-day sun, slightly higher mounting on the west side and a more aggressive angle can reduce side glare and keep light from hitting faces directly.
If my patio is windy, is a shade sail still a good idea?
It can be, but wind behavior matters more than the fabric. Use tighter tension geometry with proper corner heights, keep sail edges high enough to avoid flapping, and avoid adding improvised extensions. In very gusty areas, retractables or engineered pergola systems with roof panels often perform more predictably.
Can I use both a shade sail and a vertical privacy screen, and how do I mount the screen safely?
Yes, especially for west-facing patios where low, sideways sun bypasses overhead shade. Mount the vertical screen to the same sturdy anchor points (or separate posts) rather than to the sail fabric itself, so loads from wind on the screen do not transfer into the shade sail hardware.
What fabric should I choose for a shade sail, HDPE versus alternatives?
HDPE is common because it balances UV resistance and durability, often with long degradation warranties when installed correctly. If you want more privacy, consider a lower openness fabric, but remember that more coverage can also reduce airflow, so ventilation becomes more important for comfort.
How do I prevent water pooling when my patio has an uneven slope or uneven anchor heights?
Your layout should allow the sail to shed water, meaning at least one corner is higher so the fabric drains rather than forming a sag pocket. If your patio grade is uneven, adjust anchor heights or swap anchor locations, rather than relying on slack tension to “make it fit,” which leads to flapping and premature wear.
Should I buy a single large shade structure or multiple smaller ones for a big patio?
Multiple elements can be easier to tension and can target specific seating zones, but they need spacing so they do not rub together. For example, two sails placed side by side should have a small gap between them, and you should plan their anchor points so each panel can be tightened independently.
Are offset umbrellas worth it for “real” patio shading, or do they only cover small areas?
They’re best for localized shading like a bistro table or a corner conversation area. For whole-back-patio comfort, the umbrella footprint usually isn’t enough unless you’re willing to accept partial coverage, and the weighted base must match the umbrella size and your wind conditions.
What’s the most common mounting mistake that causes early failure?
Improper anchor and hardware selection, especially using the wrong connectors or relying on corroding fasteners outdoors. Use stainless steel or hot-dipped galvanized hardware, and ensure anchor points are structurally solid enough to handle tension loads, not just decorative attachment points.
How do I estimate how much hardware and anchoring I need for a sail?
Plan around corner hardware count and tensioning points, then size your anchors so they can resist pull from wind and geometry, not just support their own weight. If you are using new posts, design the post spacing to match sail corner positions and keep post footings deep and secure enough for your local conditions.
Do I need a permit for a patio shade installation?
It depends on whether it’s attached to the house, whether it involves new freestanding footings, and local wind-load rules. Even some “simple” attached awnings and posts can trigger permit requirements, so check with your building department before you pour concrete or drill into the wall.
What should I do if I can’t get the anchor points where the instructions suggest?
Don’t extend sail corners with rope, chain, or cable to reach farther anchors, because it changes tension and creates dangerous shock loads. The better approach is to relocate anchors or choose a different system size or type (for example, change to a pergola section, add a second panel, or use a vertical element).
How should I size shade if I use the patio only during certain hours?
Measure the area you need during your typical usage window, then add buffer for geometry losses and sun angle effects. If your main problem is evening west sun, prioritize intercepting the low sideways rays with both overhead shade and a western vertical or angled component, even if that means slightly over-sizing the overhead element.
What maintenance prevents UV and wind damage over time?
Keep the fabric clean enough to avoid buildup that accelerates wear, check tension periodically (especially after storms), and inspect hardware for corrosion or loosening. For retractables with sensors, verify the wind settings match your conditions and ensure the awning retracts fully before severe weather.
Next Articles

How to Decorate a Long Narrow Patio: Layout Tips
Practical DIY layout and decor tips to widen a long narrow patio using zoning, furniture spacing, lighting, greenery, an

How to Decorate a Rectangular Patio Step by Step
Step-by-step plan to decorate a rectangular patio with smart layout, zones, furniture fit, lighting, plants, and seasona
How to Decorate a Patio Wall: DIY Ideas and Mounting Tips
DIY patio wall decor for brick, stucco, wood, concrete, or siding with weatherproof mounting tips and maintenance.