Building a patio privacy wall comes down to four decisions made in the right order: how tall and wide you need it, what material fits your budget and skill level, how deep your posts need to go for your soil and climate, and how you'll finish it so it lasts. Get those four things right and the actual build is straightforward weekend work for most homeowners.
How to Build a Privacy Wall for Patio: Step-by-Step DIY

Felix Brennan
29 Apr 2026
Choosing the right privacy wall style and height

Before you buy a single board, figure out what problem you're actually solving. Are you blocking a neighbor's sightline from their second-story deck? Cutting wind from the west? Just want to feel less exposed while sitting outside? Each of those goals points to a different height, orientation, and style. If you have a patio gas line or grill burner, you should know how to disconnect patio gas safely before doing any work around the area.
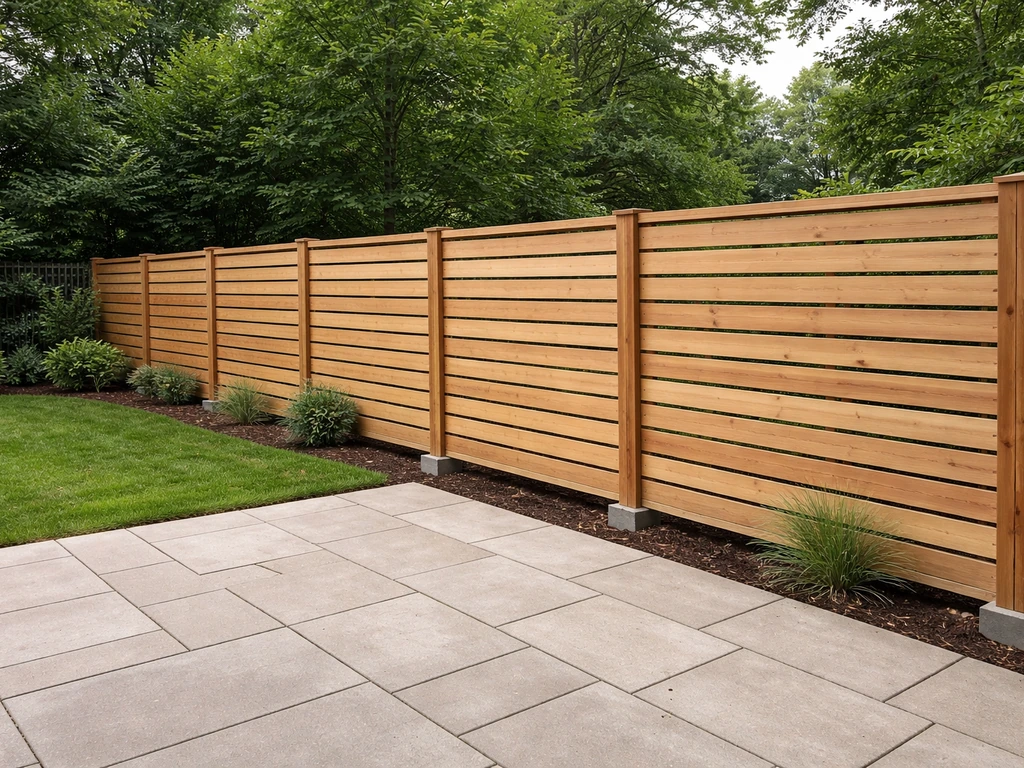
Most patio privacy walls land between 6 and 8 feet tall. A 6-foot wall blocks a standing adult's line of sight from ground level, which handles most situations. If you're dealing with elevated neighbors or a raised deck, you may need 7 or 8 feet. Just know that anything over 6 feet often triggers permit requirements (more on that in the next section) and needs beefier posts and footings.
For style, you've got a few main directions to choose from. A solid panel wall (wood boards, vinyl, or composite) gives maximum privacy but also catches maximum wind, which means your foundation has to work harder. A lattice or slatted wall lets air through, reduces wind load significantly, and still blocks most sightlines if the gaps are small. A masonry or brick wall is the most permanent and weather-resistant option but also the most involved build. Hybrid walls, like a solid lower section with lattice on top, give you privacy where it counts while letting breeze flow through.
Think about orientation too. A wall on the west or north side of your patio can double as a windbreak. If you're on a corner lot or have a long open exposure, you might need an L-shaped layout with two connected runs rather than a single straight panel. Freestanding walls work well when you can't attach to a structure. Attached walls, bolted to the house, a pergola, or existing posts, are generally more stable and easier to level but require you to work around what's already there.
Planning measurements, layout, and rules before you dig
This is the step people skip and then regret. Spend an hour here and you'll avoid having to tear out work later.
Permits and height limits
Most jurisdictions cap residential fence and privacy wall height at 6 feet without a permit. Austin, Nashville, Salt Lake County, Milwaukee, and countless other cities all draw the line around 6 feet for standard residential lots. Going over that threshold almost always requires a building permit and sometimes additional engineering. Even at 6 feet, some areas have rules about placement relative to the property line, street right-of-way, or front setback. Check your local building department's website first. A quick phone call or online records search takes 20 minutes and could save you from a stop-work order.
HOA rules
If you're in an HOA, read the guidelines carefully before designing anything. HOAs often have their own height limits that are stricter than local code. For example, some HOA deck guidelines cap privacy screening at no more than 3 feet above the deck railing and a total of 6 feet above the deck floor. Approved materials, colors, and finishes can also be regulated. Submit your plans for approval before you buy materials.
Property lines and setbacks
Know where your property line actually is, not where you think it is. Many homeowners build on the wrong side of the line and have to move or remove the structure. Check your property survey, or hire a surveyor if you're unsure. Most codes require a wall to be set back at least a few inches to a few feet from the property line. Check your local setback rules so your post locations comply from the start.
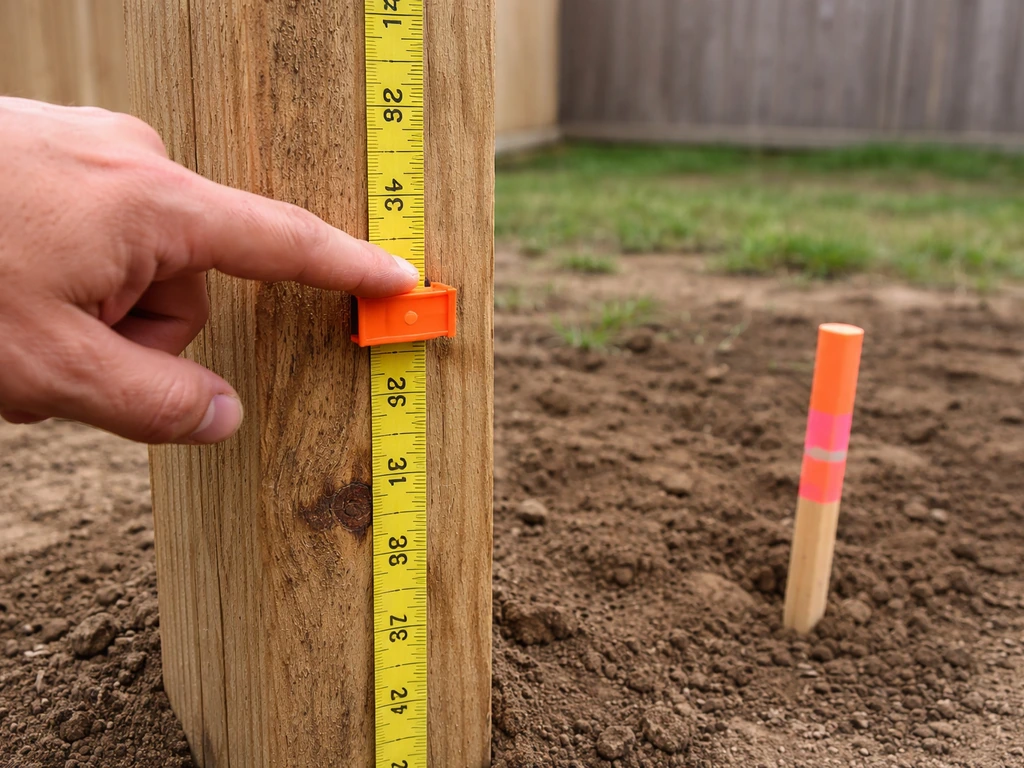
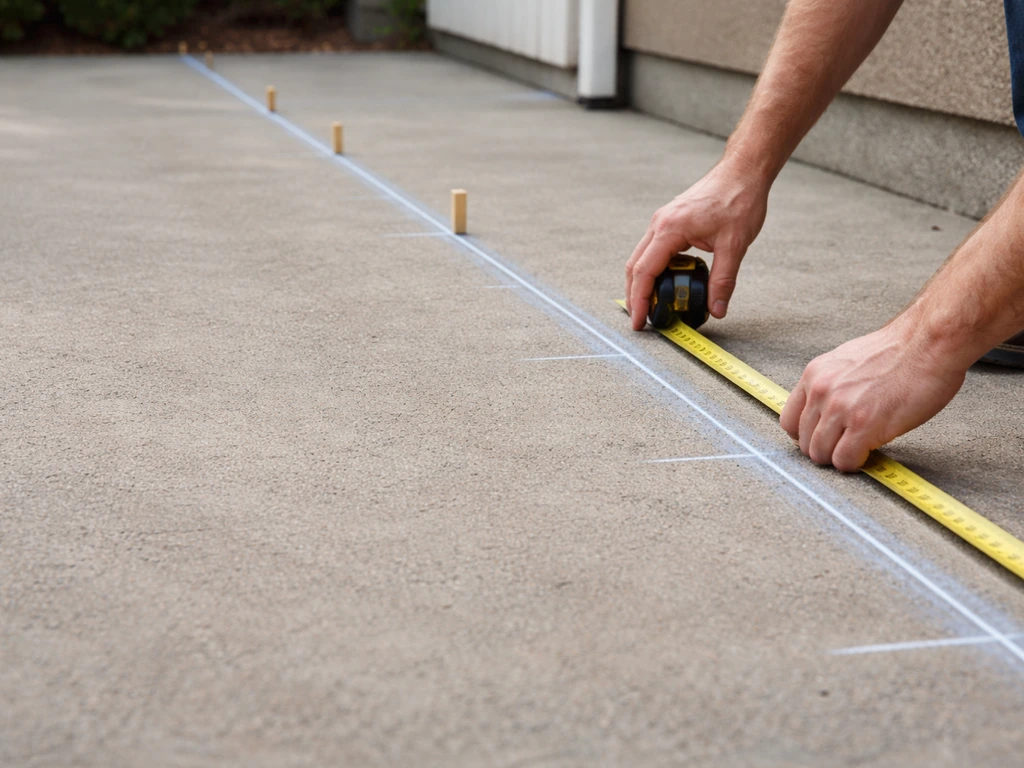
Measurements and layout
Measure the total length of wall you need and divide it into bays. Standard privacy fence panels come in 6-foot or 8-foot widths, so plan your post spacing to match. For a custom-built wall, 6-foot centers between posts is a common and structurally sound spacing for a 6-foot-tall wall. Mark your post locations with stakes and string line before anything else, then double-check the diagonal measurements to confirm the layout is square. A layout that looks right to the eye is often slightly off; the diagonal check catches it early.
Materials and tools: matching your budget and skill level
Here's an honest look at the main material options. Pick based on how long you want it to last, how much you want to spend, and how much maintenance you're willing to do over the years.
| Material | Typical Cost | Durability | Maintenance | DIY Difficulty |
|---|---|---|---|---|
| Cedar wood | Moderate | 15–20 years with care | Seal/stain every 3–5 years, clean annually | Easy to moderate |
| Pressure-treated pine | Low to moderate | 15–20 years | Stain/seal every 2–3 years | Easy |
| Vinyl/PVC | Moderate to high | 20–30 years | Wash twice a year, no painting needed | Easy |
| Composite | High | 25+ years | Occasional cleaning | Easy to moderate |
| Brick/masonry | High | 50+ years | Reseal every 3–4 years | Difficult |
| Metal (steel/aluminum) | Moderate to high | 20–30 years | Touch up paint or coating as needed | Moderate |
For most DIYers tackling their first privacy wall, pressure-treated pine or cedar is the sweet spot. Both are easy to cut and fasten, widely available, and forgiving of minor measurement errors. Cedar is naturally rot-resistant and looks great. Pressure-treated pine is cheaper and handles ground contact well. Vinyl is great if you genuinely hate maintenance, but the panels and posts are bulkier and heavier than they look, and the systems require more precise post spacing. Brick is beautiful and permanent but really is a masonry project, not a carpentry one.
Tools you'll need
- Post hole digger or rented power auger (strongly recommended for 3+ posts)
- Level (4-foot level is worth it)
- Circular saw or miter saw
- Drill/driver with bits
- Speed square
- Tape measure and chalk line
- String line and stakes
- Mixing tub or wheelbarrow for concrete
- Safety glasses, gloves, hearing protection
Site prep and getting your foundation right
The foundation is the part that separates a privacy wall that lasts 20 years from one that leans over after two winters. Don't shortcut this step.
Post depth: the most important number
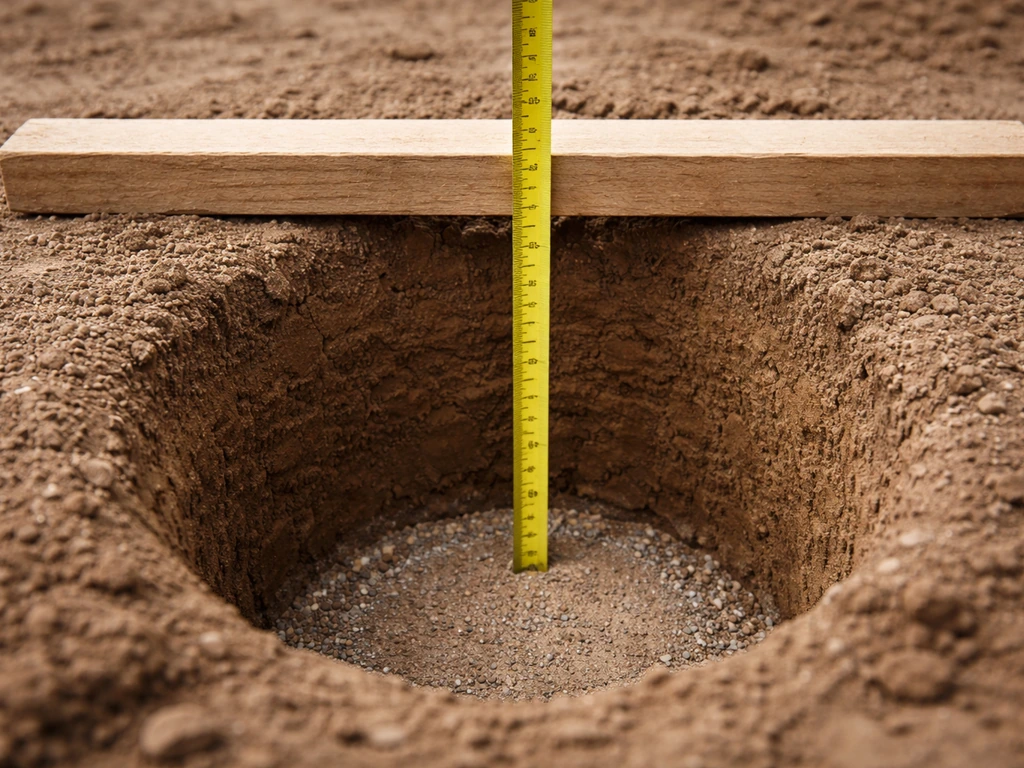
The general rule is to bury one-third of the post's total length below grade. For a 6-foot wall using 9-foot posts, that means at least 36 inches in the ground. In freeze-thaw climates, you need to go below the frost line, which can mean setting posts 42 to 48 inches deep. A 4x4 post in Michigan, for example, may need to go down 42 inches just to stay below the frost line. Check your local frost depth (searchable by zip code) and dig to whichever number is deeper: one-third of post length or frost line depth. Post holes should be 10 to 12 inches in diameter for standard 4x4 posts.
Setting posts in concrete
Dig your holes, add 4 to 6 inches of gravel at the bottom for drainage, then set the post. Brace each post with diagonal 2x4 braces screwed to stakes in the ground while the concrete sets. Check for plumb (vertical) on two perpendicular faces with your level. Mix and pour your concrete, then recheck plumb before the concrete firms up. Let concrete cure for at least 24 to 48 hours before loading the posts with panels. Rushing this step is the number-one cause of a leaning wall six months later.
Freestanding walls on a patio slab
If your patio is a concrete slab and you can't dig into it, use surface-mount post bases rated for the post size you're using. Anchor them with concrete anchor bolts drilled into the slab, following the manufacturer's specified bolt pattern. Surface-mount installs work, but they're more vulnerable to wind racking than in-ground posts, so diagonal bracing within the frame becomes even more important. For a high-wind area or a tall wall, in-ground posts in the soil around the slab perimeter are the stronger choice.
Building the frame and installing your privacy panels
Framing the structure
Once your posts are set and cured, run horizontal rails between them. A standard 6-foot privacy wall uses three rails: one near the top, one near the bottom (leaving 2 inches of ground clearance so wood doesn't rot), and one in the middle. Use structural screws or carriage bolts through the posts rather than just toenailing. Toenailed connections are the first thing to work loose when the wall flexes in wind. Check that your rail tops are level as you go; a slightly out-of-level frame makes every panel installation harder.
Wind load and bracing
A solid 6-foot privacy wall acts like a sail in a strong wind. Engineered fence systems are tested to design wind loads of 55 psf or more, but a DIY wood wall doesn't have that built-in engineering unless you plan for it. Diagonal knee braces at the base of each post, metal post caps at the top, and through-bolted rail connections all add meaningful resistance to racking. After any significant storm, walk the wall and check for loose hardware, posts that have shifted in their footings, or rails pulling away from the posts. Catching a loose connection early is much easier than dealing with a leaning wall.
Installing the privacy surface
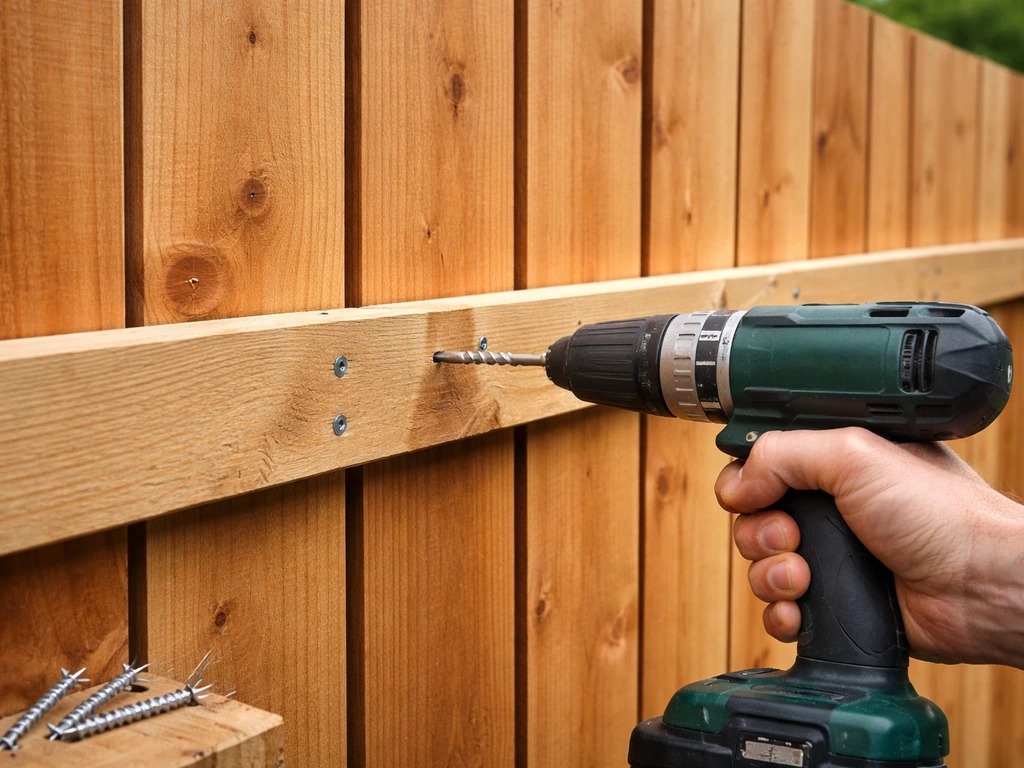
For board-on-board or shadowbox panels, nail or screw each board to the rails with the fastener at least 3/4 inch from the edge to avoid splitting. Leave a 1/4-inch gap between boards for drainage and wood movement. For pre-built panels, drop them into the frame bay and fasten to the rails and posts. Keep panels off the ground by at least 2 inches, ideally more in wet climates, to limit rot. For lattice panels, cut to fit the bay opening and frame the edges with 1x2 or 1x3 trim to keep them from flexing. Check for plumb and level as you go; small errors add up across a long run.
Adding a gate
If you need access through the wall, build the gate frame with a diagonal brace running from the upper corner on the latch side down to the lower corner on the hinge side. This is the direction that resists sag. Use heavy-duty gate hinges rated for the gate weight, and a drop-rod latch rather than a simple hook-and-eye for anything over 4 feet wide. A gate that sags or binds within the first year is almost always a bracing problem, not a hinge problem.
Weatherproofing, finishing, and keeping it looking good
Finishing the wall is what determines how long your work holds up. The right finish for your material is more important than the right brand.
Wood walls
For pressure-treated pine, let the wood dry for 2 to 4 weeks after install before applying stain or sealer, otherwise the preservative treatment prevents good penetration. For cedar, you can seal sooner. Apply a penetrating exterior wood sealer or stain to all surfaces, including the cut ends of boards, which is where moisture gets in fastest. Plan on resealing every 2 to 3 years for pine and pressure-treated wood, and every 3 to 5 years for cedar. If water stops beading on the surface, it's time to recoat. Clean the wall at least once a year with a deck cleaner or mild detergent to prevent mildew buildup, which degrades the finish faster.
Vinyl walls
Vinyl needs no painting or staining, which is its main appeal. It does accumulate algae, mold stains, and road film over time. Clean it twice a year using a soft brush or pad with a mild household cleaner or a product made specifically for vinyl fencing. Avoid abrasive pads or power washers at very close range, which can pit the surface. That's essentially the entire maintenance routine.
Masonry and brick walls
Apply a penetrating masonry waterproof sealer after the mortar has fully cured (typically 28 days). Plan on reapplying a maintenance coat every 3 to 4 years to keep moisture from working into the masonry. In freeze-thaw climates this is especially important, since water that penetrates and then freezes will spall the brick surface over time.
Finishing touches that matter
Post caps do two things: they look finished and they keep water from sitting on top of the end grain of your posts, which is where rot starts. Install them on every post. Add a top rail cap or trim board along the top edge of your panels for the same reason. If your wall meets the ground, add a small gravel border along the base to improve drainage and keep the bottom of the panels dry. These details add maybe two hours to the project and extend the life of the wall by years.
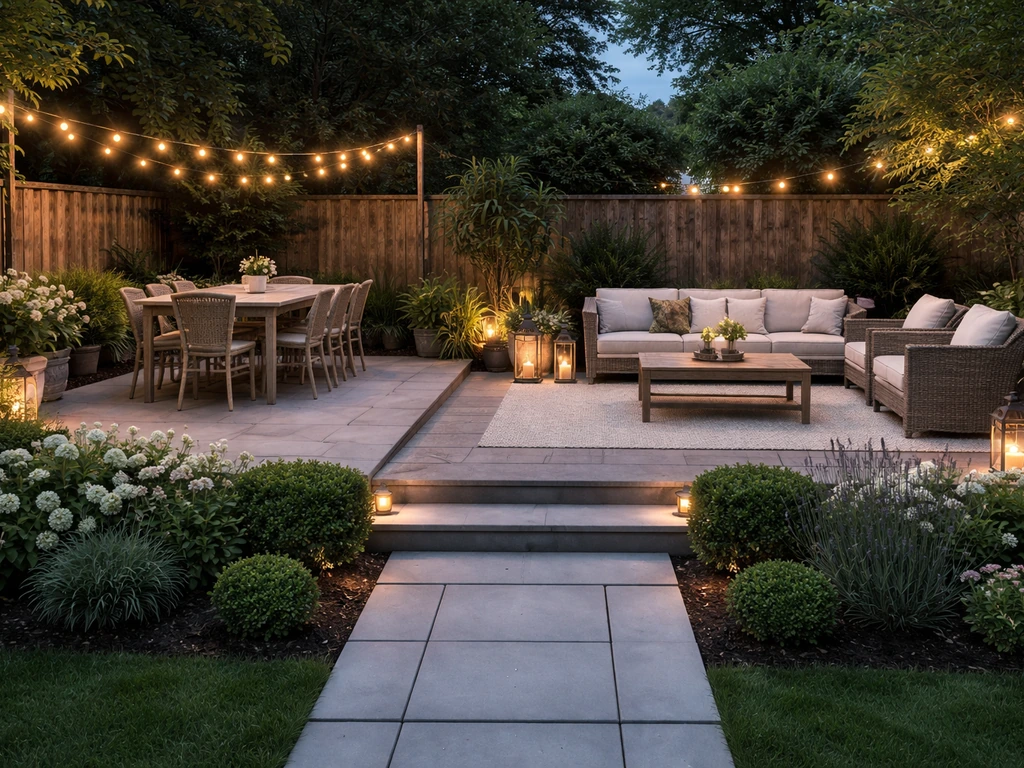
Tying the wall into your patio enclosure and shading
A privacy wall that works well on its own works even better when it's integrated with the rest of your outdoor setup. If you already have a pergola, shade sail, or screen enclosure, the privacy wall should connect to or align with those elements so the whole space feels intentional rather than like a pile of separate projects.
The most common integration point is the pergola or overhead cover. If you're adding wind screens to a pergola, those screens and the privacy wall should be at the same post spacing or at least share a common corner post so they tie together structurally and visually. Pergola wind screen products are designed specifically for this kind of add-on, and they attach to existing pergola posts with brackets, making the connection clean and stable.
If you have an existing deck railing, your privacy wall height needs to account for where the railing already sits. Some HOAs, as noted earlier, measure privacy screen height from the top of the railing rather than the deck floor, which limits how tall you can go without a variance. Build your wall posts to match or bolt to the railing framing so there's no gap that looks unfinished or creates a weak point.
Airflow is worth thinking about before you build. A solid wall on two sides of a patio can create a dead-air pocket in summer that makes the space feel stuffy. If you're enclosing more than one side, consider a lattice or slatted section on one wall to let breeze through while still blocking sightlines. A 2-inch gap between slats is enough for air movement while limiting visibility from outside at typical neighbor distances. This is the same principle used in screened patio enclosures, where the screen material provides privacy and ventilation at the same time. If you're thinking about fully enclosing your patio, that's a bigger project than a privacy wall alone, closer to a full patio enclosure or screened room, which involves different framing, roofing, and possibly floor considerations.
For <a data-article-id="8E0EE70F-E46F-4582-9517-7DF9D1C2E526"><a data-article-id="8E0EE70F-E46F-4582-9517-7DF9D1C2E526">apartment patios</a></a> or situations where you can't dig posts or modify the structure, the privacy wall approach shifts to freestanding weighted planters, modular screen systems, or panel systems that anchor to existing railings. Those options share DNA with a standard privacy wall build but skip the footing work entirely. If you want to fence in an apartment patio, choose a freestanding or railing-anchored system that matches your space and local rules.
Your project checklist: start confidently today
- Decide on wall height, length, and style (solid, slatted, lattice, or hybrid) based on your privacy goals and wind exposure
- Check local permit requirements for your wall height and location relative to property lines and setbacks
- Check HOA guidelines for approved materials, colors, and maximum height limits
- Verify property lines with your survey before marking post locations
- Lay out post locations with stakes and string, check diagonal for square
- Look up your local frost line depth and calculate required post depth (deeper of one-third post length or frost line)
- Rent a power auger, dig post holes 10 to 12 inches in diameter and at least 36 to 48 inches deep depending on frost line
- Add gravel drainage layer, set posts in concrete, brace diagonally, check plumb, let cure 24 to 48 hours
- Install three horizontal rails per 6-foot bay with through-bolts or structural screws
- Install privacy panels or boards with 2-inch minimum ground clearance, fasteners 3/4 inch from board edges
- Add gate with diagonal brace if needed, using heavy-duty hinges
- Install post caps and top rail caps on all exposed end grain
- Apply sealer, stain, or waterproofing appropriate to your material before first rain
- Add gravel border at wall base for drainage
- Set a calendar reminder for annual cleaning and the appropriate recoat cycle for your material (2–3 years for pine, 3–5 years for cedar, 3–4 years for masonry, twice-yearly cleaning for vinyl)
FAQ
How do I know whether I can legally build a privacy wall at 7 or 8 feet on a patio?
Check both privacy requirements and structural limits, because some codes regulate height differently for “fences” versus “screening” and some HOAs measure from the deck floor while others measure from the top of the railing. If your patio sits on a raised base, include the full elevation in your measurement before you decide on 6 or 8 feet.
What should I do if I’m in a freeze-thaw climate and my soil drains poorly?
Use your frost depth to decide footing depth, then confirm your post size and soil type. Clay soils and poor drainage can increase frost heave risk even when you go deep enough, so if water pools after rain, add drainage gravel and consider slightly increasing depth within local code allowances.
Can I attach the privacy wall to my house, and what’s the safest way to do it?
If you need to attach the wall to a house, target structural points like wall studs or ledger boards, not siding alone. Pre-drill, use exterior-rated structural fasteners, and keep the wall bracketed so water can drain away from the connection to prevent trapped moisture.
My patio gets strong winds, how should I adjust the design?
Plan for wind. A solid wall needs more rigidity, so use through-bolts at rails, add diagonal braces at the post bases, and keep post spacing consistent with your panel system. If you experience frequent gusts, it’s usually better to choose a slatted or hybrid design rather than trying to “overbuild” a solid DIY wall after the fact.
How do I prevent rot when the wall is close to the ground or in a rainy area?
Allow for wood movement and drainage by keeping the 1/4-inch panel gaps and ensuring the bottom of panels stays off the ground (at least 2 inches). Also seal cut ends and all horizontal surfaces, because end grain and horizontal edges are where rot starts first.
What are the most common utility mistakes when building a patio privacy wall near a grill or outdoor hookups?
Do a pre-check for underground utilities using your local “call before you dig” service and avoid assuming patio wiring or gas lines are only where you can see them. Mark utilities on the site, and for any work near gas, follow the same “shutoff and verify” approach you’d use for disconnecting appliances, not just turning off a control knob.
Why does my gate sag even when I buy heavy-duty hinges, and how do I fix it?
Gate clearance and alignment matter more than hinge brand. Set the gate frame so the latch side is slightly higher at rest, install the diagonal brace in the load-resisting direction, and use hinges rated for the gate width and expected weight after finishing (including thicker boards or slats).
What’s the best approach if my patio is a slab and I cannot dig post holes?
If you cannot dig or you do not want to disturb a slab, surface-mount bases can work, but you must brace the frame against racking and verify the base is rated for your post size and wind exposure. Add diagonal bracing and consider a slightly more air-permeable (lattice) panel style to reduce lateral load.
How can I avoid ending up with uneven panel gaps along a long privacy wall run?
Start by confirming the post-to-post spacing matches the panel widths you’re buying, then remeasure the diagonal (corner-to-corner) after you set the stakes. If the frame is out of square, you may end up with uneven gaps at the ends that cannot be corrected without moving posts or rebuilding the end bays.
How long should I wait before staining or sealing pressure-treated wood for a patio wall?
If your finish requires drying time (common with pressure-treated lumber), plan your schedule around it. Install posts and rails, then install panels, and wait before staining or sealing when the wood is still wet, because trapping moisture can cause blotching and poor adhesion.
Next Articles

How to Disconnect Patio Gas Safely Step by Step
Step-by-step guide to disconnect patio gas safely, tools, valve shutdown, hose/regulator removal, leak checks, and troub

How to Decorate a Long Narrow Patio: Layout Tips
Practical DIY layout and decor tips to widen a long narrow patio using zoning, furniture spacing, lighting, greenery, an
How to Decorate a Rectangular Patio Step by Step
Step-by-step plan to decorate a rectangular patio with smart layout, zones, furniture fit, lighting, plants, and seasona