Flagging a patio means laying flat stones or pavers to create a solid, level surface you can walk and sit on. Once your patio is level and stable, you can decorate it with flowers using planters, potting beds, and well-placed spillover greenery solid, level surface. The basic process is: excavate the area, build a compacted gravel base, add a bedding layer, set the flags level with a slight drainage slope, cut pieces to fit the edges, and finish the joints with sand or mortar. Whether you're starting from bare ground or pulling up old stones that have shifted, the core technique is the same and it's very much a DIY-able weekend project.
How to Flag a Patio: DIY Guide for Pavers and Repairs

Felix Brennan
29 Jun 2026
Are you installing new flags or repairing old ones?
Before you buy anything, figure out which job you're actually doing. 'Flag a patio' covers two pretty different situations, and each one has its own starting point. The number of flags you need depends on your patio area and the flag size, so measure the finished square footage and plan for a little waste how many flags you need.
If you're building from scratch on bare soil or grass, you'll do the full process: layout, excavation, base build, and setting every stone. That's probably a full weekend for a typical backyard patio, maybe two if the area is large or the soil is difficult.
If you're repairing an existing flagged patio, the job is usually quicker. You're lifting individual stones that have cracked, sunken, or heaved, fixing the base underneath them, and resetting them level. The surrounding flags stay in place. The tricky part is matching the existing joint width and stone height so the repaired section blends in. If old mortar is involved, you'll need to chip it out before you can re-seat the stone properly.
If more than about a third of your existing flags are loose, broken, or significantly uneven, it's usually worth pulling the whole patio and starting fresh rather than doing piecemeal repairs. A failed base is a failed base, and patching over it just delays the problem.
Choose your flags and plan the layout
The word 'flagstone' technically refers to sedimentary rock (like sandstone, limestone, or bluestone) that splits naturally into flat slabs. But for patio purposes, almost any flat, hard paving unit gets called a flag or paver. Your two main choices are natural flagstone or manufactured concrete pavers, and they install differently.
| Feature | Natural Flagstone | Concrete/Manufactured Pavers |
|---|---|---|
| Shape | Irregular, random sizes | Uniform, consistent dimensions |
| Thickness | Varies, typically 1.5–2.5 inches | Consistent, usually 2–3.5 inches |
| Base prep | More forgiving on minor variation | Needs very consistent bedding layer |
| Cutting | Can be hand-scored and snapped or angle-grinder cut | Best cut with a wet saw or angle grinder |
| Look | Natural, organic | Cleaner, more uniform |
| Cost | Moderate to high | Low to moderate |
| Repair | Easy to lift and reset individual pieces | Easy to lift and reset individual pieces |
For most DIYers doing a backyard patio, natural flagstone or large-format concrete pavers both work well with the dry-laid method covered in this guide. If you want a very flat, polished look (think outdoor kitchen or dining area), mortar-set is worth considering, but it's harder to repair later.
Layout patterns and measuring
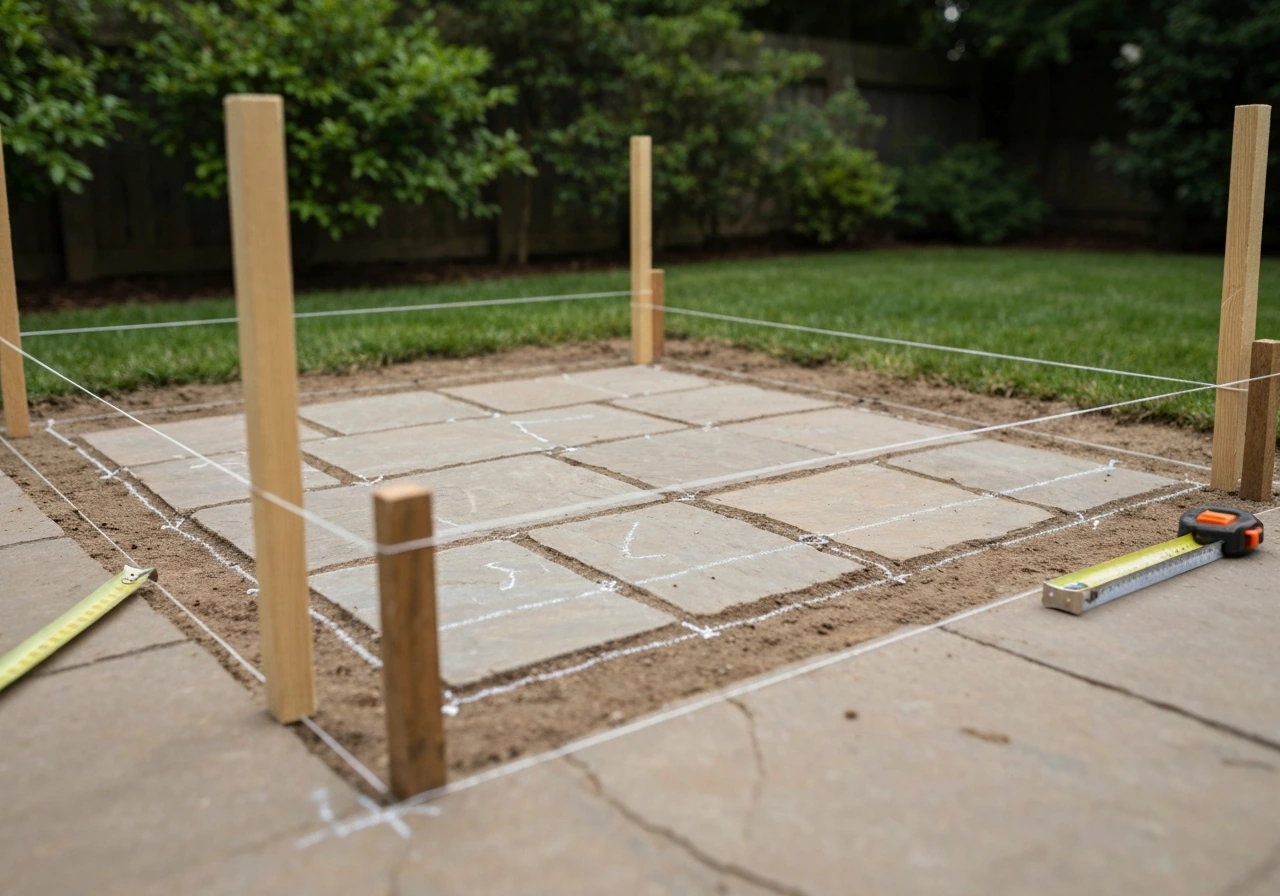
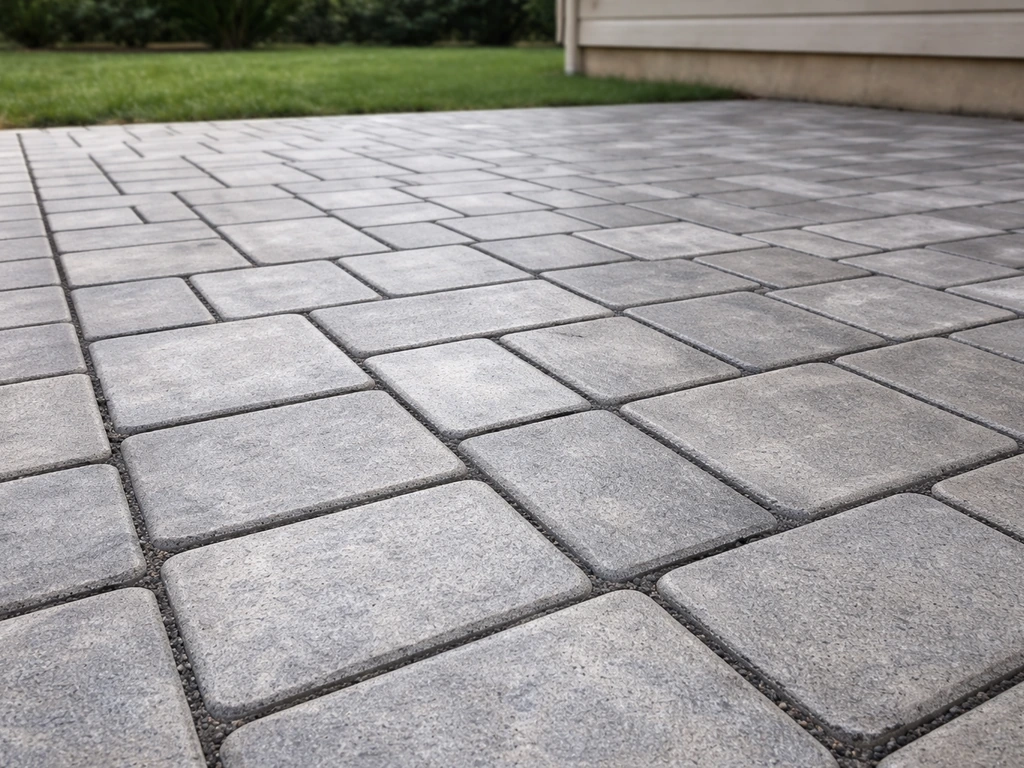
Sketch your patio on paper before you buy anything. After that, plan where you want flowers to go so you can choose colors and plant sizes that fit your patio space. Measure the length and width, then calculate the square footage. Add 10% for cuts and breakage. Common layout patterns for rectangular pavers include running bond (offset rows like brickwork), herringbone (45- or 90-degree interlocking), and stacked bond (grid pattern). For irregular flagstone, most people use a random/mosaic layout, fitting pieces together like a puzzle with roughly consistent joint gaps of half an inch to an inch.
Mark out the patio boundaries with stakes and string lines before you dig. You can also decorate the space between or around your flags by placing flower pots on the patio in a planned layout patio boundaries. This gives you a precise rectangle (or whatever shape you want) to work to and helps you figure out how many full stones fit before you start making cuts.
Tools and materials you'll need
- Plate compactor (rent one for the day, around $80–$120 at most equipment rental places)
- Spade and flat shovel for excavation
- Wheelbarrow
- Landscape rake and hand tamper
- Rubber mallet
- 4-foot level and a long straightedge or screed board
- Tape measure and chalk line
- Stakes and string line
- Angle grinder with a diamond blade (or a wet tile saw) for cuts
- Safety glasses, gloves, and hearing protection
- Garden hose for wetting compacted base and activating polymeric sand
- Your chosen flags or pavers (square footage plus 10%)
- Processed crushed stone or road base gravel (for the main base layer)
- Coarse bedding sand or stone dust (for the setting layer)
- Geotextile landscape fabric (especially important on clay or soft soil)
- Polymeric jointing sand or dry mortar mix (for joints)
- Plastic or steel edge restraints with spikes (for manufactured paver installations)
- Optional: patio sealer appropriate for your stone type
Prep the ground: excavation, base layers, and compaction
This is the step that makes or breaks a patio. A well-built base means your flags stay flat and level for years. A skimped base means you're resetting stones every spring. The base is genuinely the most important part of this whole project.
How deep to dig
For a typical dry-laid flagstone patio on stable soil, you need about 4 inches of compacted crushed stone plus 1 to 2 inches of bedding material plus the thickness of your stones. If your flags are 2 inches thick, that puts your total excavation depth at roughly 7 to 8 inches below finished grade. On softer or clay-heavy soil, you may want 6 inches of compacted base instead of 4. Mark the finished surface height first (use your string lines), then dig down from there.
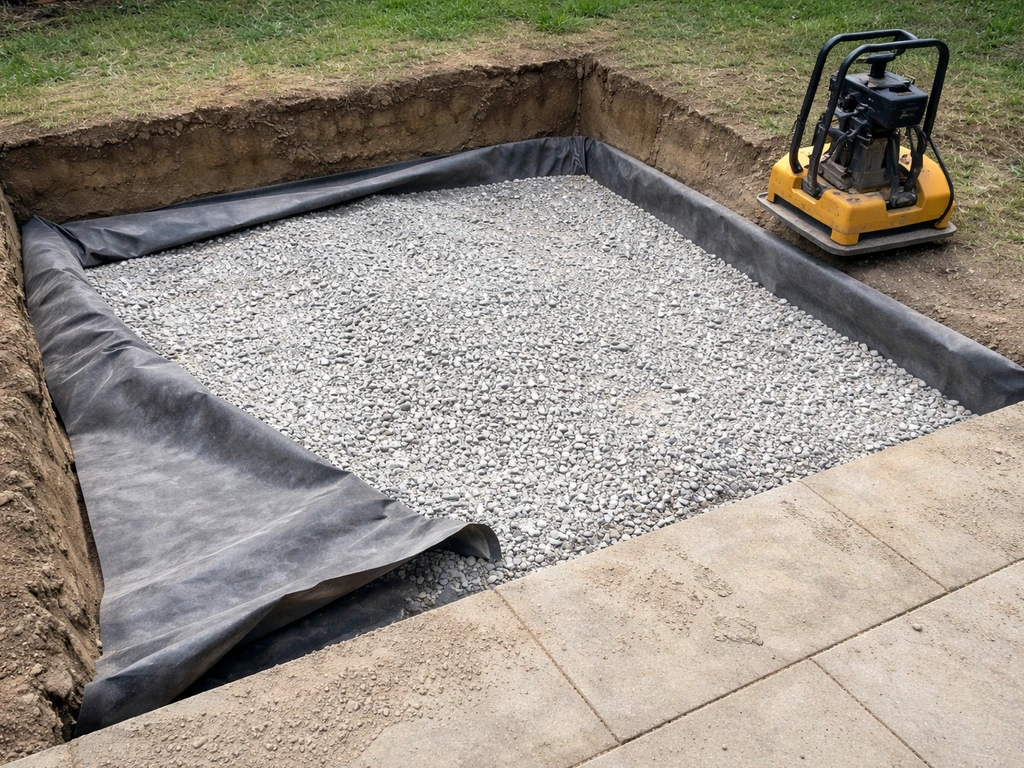
Laying the geotextile fabric
Once you've excavated and the native soil is exposed, lay geotextile landscape fabric across the entire area before you add any gravel. This fabric lets water drain through while stopping soil particles from migrating up into your gravel base over time. On sandy, well-draining soil it's optional, but on clay or any soft/organic soil it's worth doing. Overlap seams by at least 12 inches and run the fabric up the sides of the excavation.
Build the gravel base in lifts
Add your crushed stone in layers (called lifts) no deeper than about 4 inches each. A plate compactor's vibration only penetrates roughly 3 to 4 inches into granular material, so dumping in 8 inches at once and running the compactor over it once doesn't actually compact the bottom half. Add 4 inches, compact it with 4 to 6 passes of the plate compactor, then add the next lift. Western Interlock also advises compacting the base in 4 to 6 inch lifts and making multiple plate-compactor passes to achieve proper sub-base compaction 4 to 6 inch lifts and multiple plate-compactor passes. Two lifts gets you to 8 inches if needed. Use processed crushed stone or road base (sometimes called Class II base, crusher run, or road crush depending on your region), not rounded pea gravel, which doesn't compact and lock together the same way.
The bedding layer
On top of the compacted gravel, add 1 inch of coarse bedding sand or stone dust (also called stone screenings or quarry dust). This thin layer lets you fine-tune the level of each flag as you set it. Screed it flat using a long board dragged across temporary guide rails set at the right height. Don't compact this layer hard before setting the stones, just screed it smooth and level.
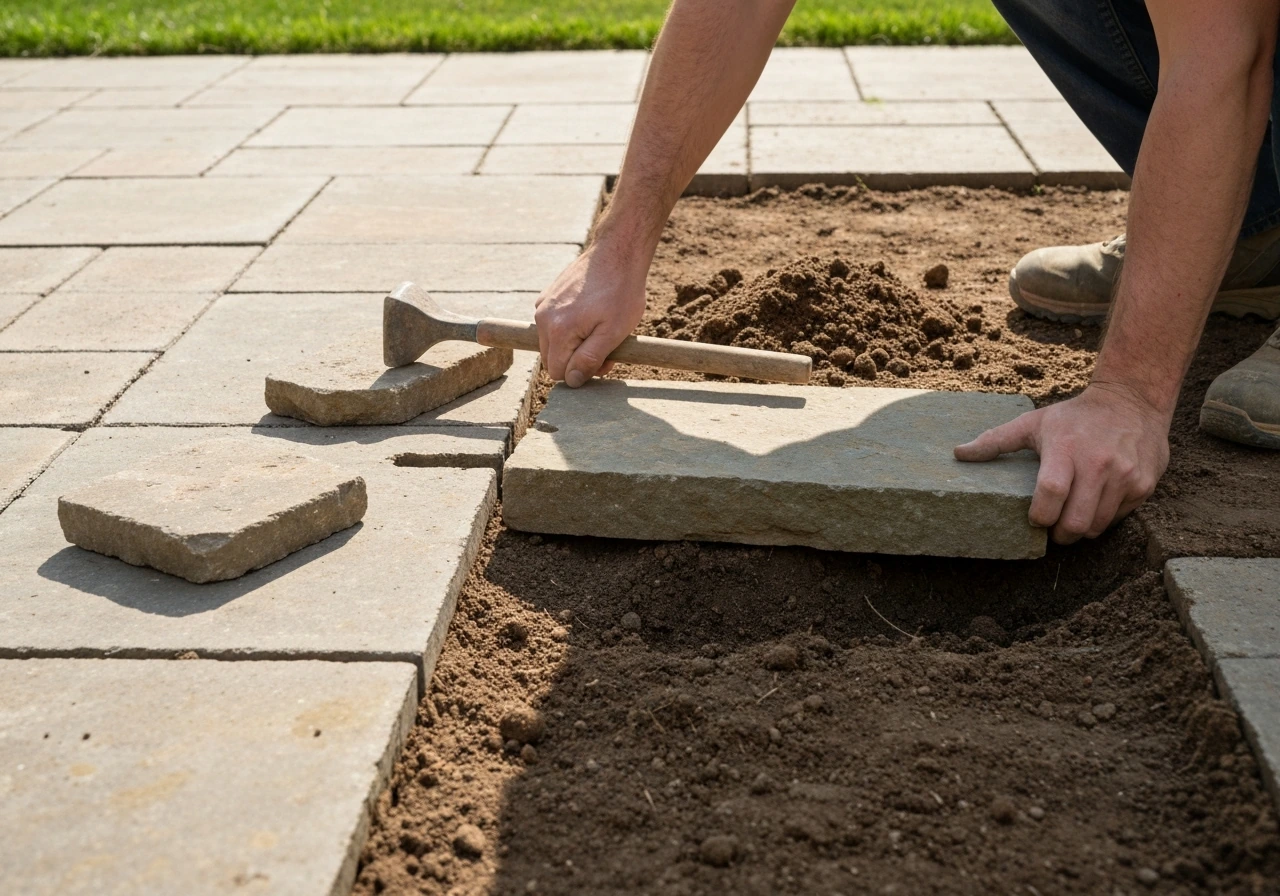
Set and level the flags
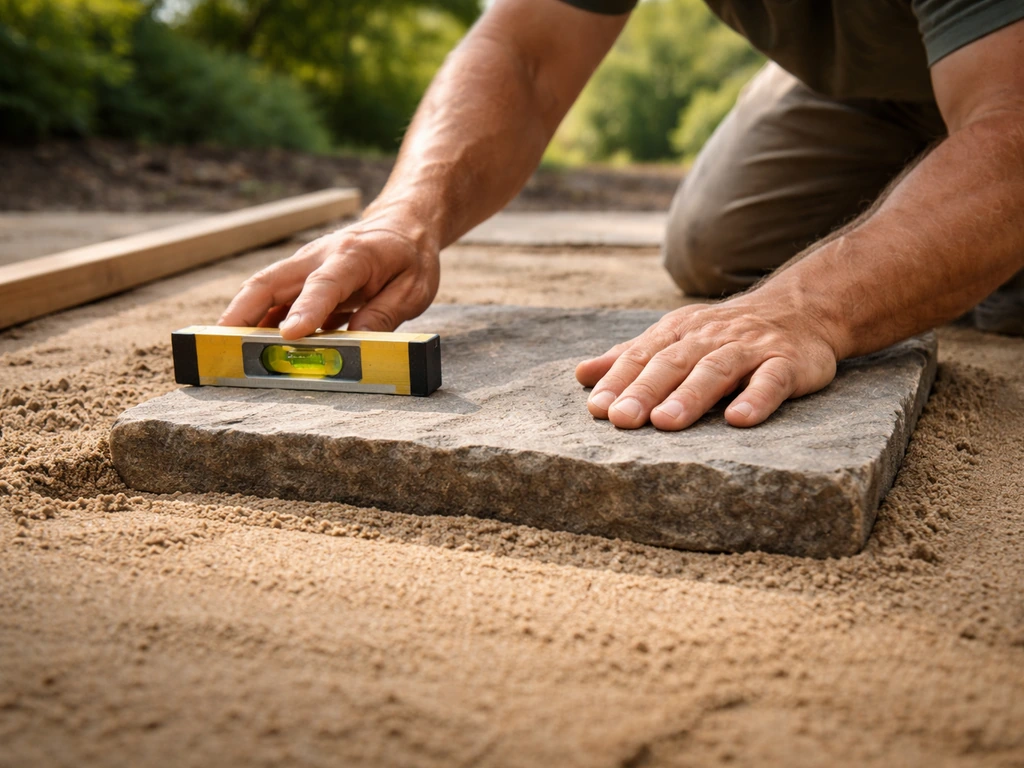
Start at one corner or along one straight edge and work across the patio. Set each flag into the bedding sand, press it down firmly, and check it with your level in both directions. Tap it down with a rubber mallet to seat it. If it rocks, pull it up and either add a little sand under the low corner or scrape some away under the high one. Check the height against neighboring stones with a straightedge. You want all stones within about an eighth of an inch of each other in height to avoid trip hazards.
Maintain your drainage slope
Your patio needs to slope away from any structure (house, wall, fence) to keep water from pooling. The standard is about a quarter inch of drop per foot of horizontal distance. So a 10-foot-wide patio needs to drop about 2.5 inches from the high side to the low side. Set this slope into your string lines before you start laying the bedding layer, and carry it through the entire base prep. You can then style your finished patio by adding flower pots in a way that matches your layout, spacing, and drainage needs flower pots on patio. If you set the base flat and try to slope individual stones later, you'll just end up with an uneven mess.
Cutting flags to fit
For edges and corners, you'll need to cut pieces. For concrete pavers, a wet saw gives the cleanest cut. An angle grinder with a diamond blade also works well and is easier to use on-site. For natural flagstone, you can score a cut line with the angle grinder and then break the stone along the line by placing it over a straight edge and pressing down, similar to scoring and snapping tile. Always wear eye protection when cutting stone, the chips travel fast.
Edge restraints
For manufactured paver installations, plastic or steel edge restraints along the perimeter are important. They keep the edge pavers from spreading outward over time, which would cause the whole field to loosen. Spike the restraints into the compacted base through the bottom flange. For large natural flagstone, the weight of the stones usually keeps the edges stable on its own, especially once the joints are filled, but a restraint never hurts on loose or sandy soil.
Fill joints, finish, and seal
Once all your flags are set and you've double-checked that everything is level and properly sloped, it's time to fill the joints. Here are practical tips for pointing patio flags so your joints are stable, neat, and resistant to weeds fill the joints. You have two main options: polymeric sand (for most dry-laid patios) or mortar (for a harder, more permanent joint).
Polymeric sand: the easiest option for dry-laid patios
Polymeric sand is a polymer-modified graded sand that firms up when you wet it, filling joints up to about 2 inches wide between flags. Sweep it dry across the patio surface and work it into the joints with a push broom. Then blow off the excess with a leaf blower until there's no sand sitting on top of the stones, just in the joints. Mist the joints with water to activate the binders, let it cure as directed (usually 24 hours before traffic). The important rule: never sweep or apply polymeric sand over damp pavers. It will bond to the surface and leave a white haze that's hard to remove. Do this step on a dry day with dry stones.
Note that polymeric sand works well for joints up to about 2 inches wide. If you have very wide gaps, especially with irregular flagstone, you may need to infill with smaller stone chips first or consider a mortar joint instead.
Mortar joints: harder, less forgiving
Mortar joints look crisp and prevent weeds and ants from getting in. But they make future repairs harder because you have to chip out the mortar before lifting a stone. If you go this route, use a sand-mix mortar or purpose-made jointing compound, pack it into the joints with a trowel, tool the surface, and keep foot traffic off for at least 24 to 48 hours. Mortar joints make more sense for fully mortar-set patios (stone bedded in mortar rather than sand) than for dry-laid systems.
To seal or not to seal
Sealing is optional but worth it for natural stone patios where staining is a concern (think outdoor cooking or leaf tannin staining on light limestone). Use a sealer rated for your specific stone type. If you used polymeric sand, wait the full cure time specified by the sand manufacturer before applying sealer. Sealing over uncured polymeric sand can trap moisture and cause haze. For concrete pavers, a penetrating sealer also helps preserve color and resist efflorescence (white mineral bloom).
Drainage, slope, and fixing common problems
Water pooling on the patio
If water sits on your finished patio, the slope is wrong. Either the patio wasn't laid with enough fall (remember, a quarter inch per foot minimum), or one section has sunk and created a low spot. For a new installation, the fix is to pull up the affected stones, adjust the bedding layer height, and relay. For an existing patio, this is one of the most common repair jobs: lift the sunken stones, add or redistribute bedding material, and reset them at the correct height.
Loose or rocking flags
A rocking flag usually means there's a void under part of it, either because the base wasn't fully compacted, an animal burrowed under it, or a tree root shifted the soil. The repair is simple: lift the stone (a flat pry bar works well), add or re-level the bedding material underneath, compact any soft spots, and reset. This is one of the big advantages of the dry-laid method over mortar-set: you can lift and reset individual stones without disturbing the whole patio.
Uneven or raised flags
Flags that have heaved up above the surrounding surface are often caused by frost in cold climates (freeze-thaw cycles push soil up) or tree roots growing underneath. For frost heave, the long-term fix is making sure the base is deep enough to get below the frost line, or at minimum using a free-draining gravel base that doesn't retain water. For root intrusion, you'll need to lift the stone, remove or redirect the root, and rebuild the base before resetting.
Cracked flags
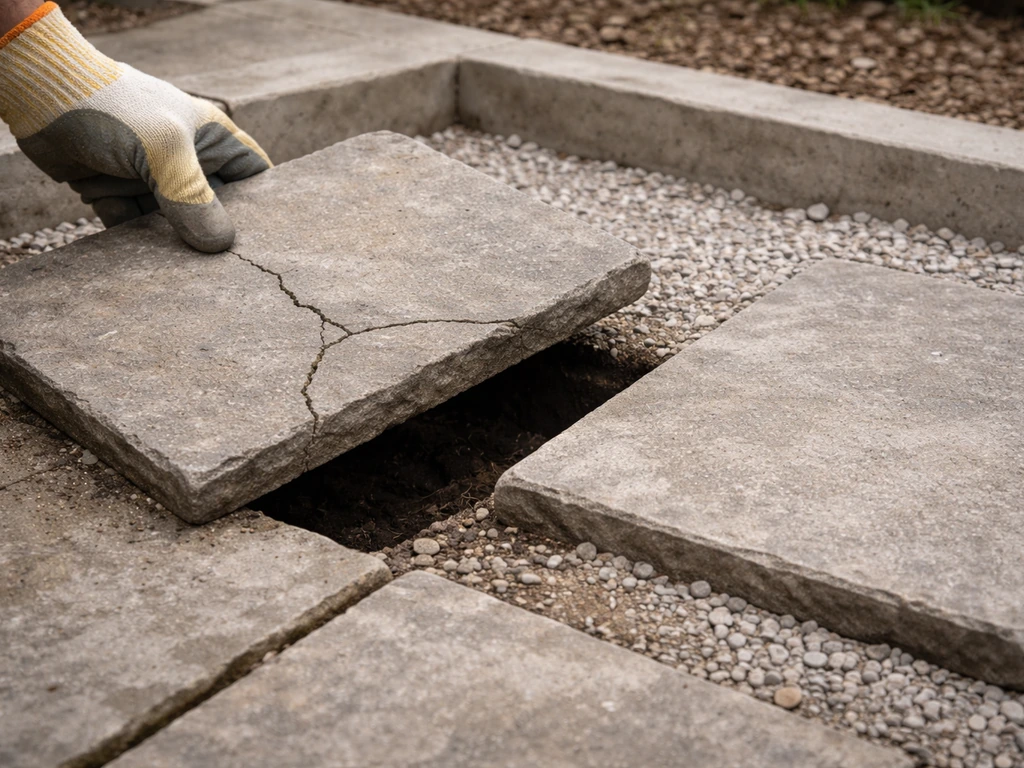
A cracked flag almost always means there was a void underneath it when something heavy pressed on it. Replace the broken piece with a matching stone, rebuild the base under that spot with well-compacted material, and reset. When you're buying your original materials, it's worth saving a few spare flags for exactly this situation.
A quick checklist before you start
- Measure your patio area and calculate material quantities (add 10% for waste)
- Order or buy flags, crushed stone base, bedding sand, geotextile fabric, and jointing sand
- Rent a plate compactor for the day you plan to build the base
- Set out your string lines and stakes at finished height with correct slope (1/4 inch per foot away from the house)
- Excavate to the required depth (usually 7–9 inches below finished surface, depending on stone thickness)
- Lay geotextile fabric, then build the gravel base in 4-inch lifts with 4–6 compactor passes each
- Screed the bedding layer flat at the right height
- Dry-lay all your stones before committing (especially with irregular flagstone), then set and level each one
- Cut edge pieces, install edge restraints if using manufactured pavers
- Fill joints with polymeric sand on dry stones, blow off excess, activate with water
- Wait full cure time before sealing or heavy use
Once your patio is flagged and finished, you'll find the space opens up a lot of possibilities. It's a solid base for outdoor furniture, containers, or even a screened enclosure if you decide to take the project further. To really bring your patio to life, you can also decorate my patio with flowers using planters and color-coordinated blooms outdoor furniture, containers. And because you built it right with a proper base, it should stay flat and level for years without much maintenance beyond an occasional joint top-up and clean.
FAQ
How do I determine the finished height before I start excavating to flag a patio?
Set your string lines at the target finished surface height first, then measure down from that mark when you dig. Check the height at several spots across the patio footprint, not just one corner, so you can keep the drainage slope consistent and avoid ending up with one side too high.
Can I flag a patio directly over existing concrete or pavers?
Usually you should not. Dry-laid flagstone needs a compacted, free-draining base. If you cover an existing slab without a proper base build-up, you can trap moisture, get poor leveling, and end up with repeating sunken or rocking stones.
What’s the safest way to handle drainage if my patio borders a door or a step?
Keep the patio sloped away from the structure, but also make sure the finished surface stays below the door threshold or step tread where water should not flow into the building. If space is tight, you may need to adjust the overall patio elevation and not rely only on individual-stone tweaks.
How do I match a repaired area to the existing joint width and stone thickness?
Measure the surrounding joints and the thickness of a few intact flags, then replicate those exact dimensions in the repair zone. When resetting, confirm the repaired stones sit within the same height tolerance as neighbors using a straightedge across multiple directions.
Do I need geotextile fabric under every patio, even in sandy soil?
In sandy, well-draining ground it is optional, but it is still helpful if you have any organic topsoil, soft spots, or areas where soil could migrate into the base. If you see weeds returning from below or the base seems to erode over time, adding fabric can reduce recurrence.
How many inches of crushed stone do I really need if my patio soil is clayey?
For clay or soft/organic areas, plan for a deeper compacted base, often around 6 inches before bedding. Also prioritize proper compaction and free-draining material, because insufficient base depth is a common cause of spring settlement and repeated repairs.
Why do I see sand washing out of joints after rain, and what should I do?
This is usually a sign the base is not compacted firmly, the bedding layer was disturbed while setting stones, or the wrong jointing material and thickness were used. For dry-laid patios, polymeric sand should be applied only when the pavers are dry and then misted lightly to activate binders, not saturated.
Can I use polymeric sand for wider flagstone gaps?
Polymeric sand typically works best for joints up to about 2 inches wide. If your gaps are wider, pre-fill with smaller stone chips to bring the joint to the right level, or choose mortar jointing for a tighter, more stable fill.
What causes white haze after using polymeric sand, and how can I prevent it?
White haze commonly happens when polymeric sand is applied over damp stones or when excess sand remains on top after activation. Always sweep it off completely until you only see sand inside joints, apply on dry days, and avoid misting too heavily.
Should I compact the bedding sand before I set the flags?
Do not compact it hard. The bedding layer should be screeded smooth and level, then you adjust each flag height by adding sand under low spots or scraping at high spots before seating it firmly.
Why do my flags look level when I place them, but they become uneven later?
Common causes are inadequate base compaction, lifts that were too deep, or localized soft spots from skipped soil removal. Another frequent issue is pressing stones into bedding while dragging them, which can create voids under edges that settle after the first wetting and drying cycles.
How do I prevent weeds without mortaring the whole patio?
Use polymeric sand correctly for dry-laid joints, keep joint widths consistent, and ensure the base drains well so water does not carry seeds into gaps. Also top up joints periodically, especially after heavy rainfall or seasonal settlement.
What’s the best strategy if I need a long-term repair plan for a frost-heave problem?
Treat frost heave as a base design issue, not a stone-placement issue. Rebuild with enough depth to get below the frost action zone, and use a free-draining base so water does not remain trapped under the flags.
Next Articles

How to Decorate a Long Narrow Patio: Layout Tips
Practical DIY layout and decor tips to widen a long narrow patio using zoning, furniture spacing, lighting, greenery, an

How to Decorate a Rectangular Patio Step by Step
Step-by-step plan to decorate a rectangular patio with smart layout, zones, furniture fit, lighting, plants, and seasona
How to Decorate a Patio Wall: DIY Ideas and Mounting Tips
DIY patio wall decor for brick, stucco, wood, concrete, or siding with weatherproof mounting tips and maintenance.