Building a patio enclosure is a weekend-to-two-week project depending on size and complexity, and most homeowners with basic carpentry skills can pull it off. The core sequence is always the same: decide what kind of enclosure you need, check permits, prep your slab or footing, build a frame, install walls (screen, glazing, or solid panels), add a roof, seal every gap, hang doors, and test it.
How to Build a Patio Enclosure: Step-by-Step DIY Guide

Felix Brennan
20 May 2026
If you want step-by-step help with the full process, including how to enclosed patio from layout to weatherproofing, follow the detailed enclosure walkthrough patio enclosures. A well-built enclosure can be screened for bug-free summer evenings, fully glazed for a three-season room, or somewhere in between. The right choice depends on your climate, budget, and how you actually plan to use the space.
Step 1: Define Your Enclosure Type and Goals
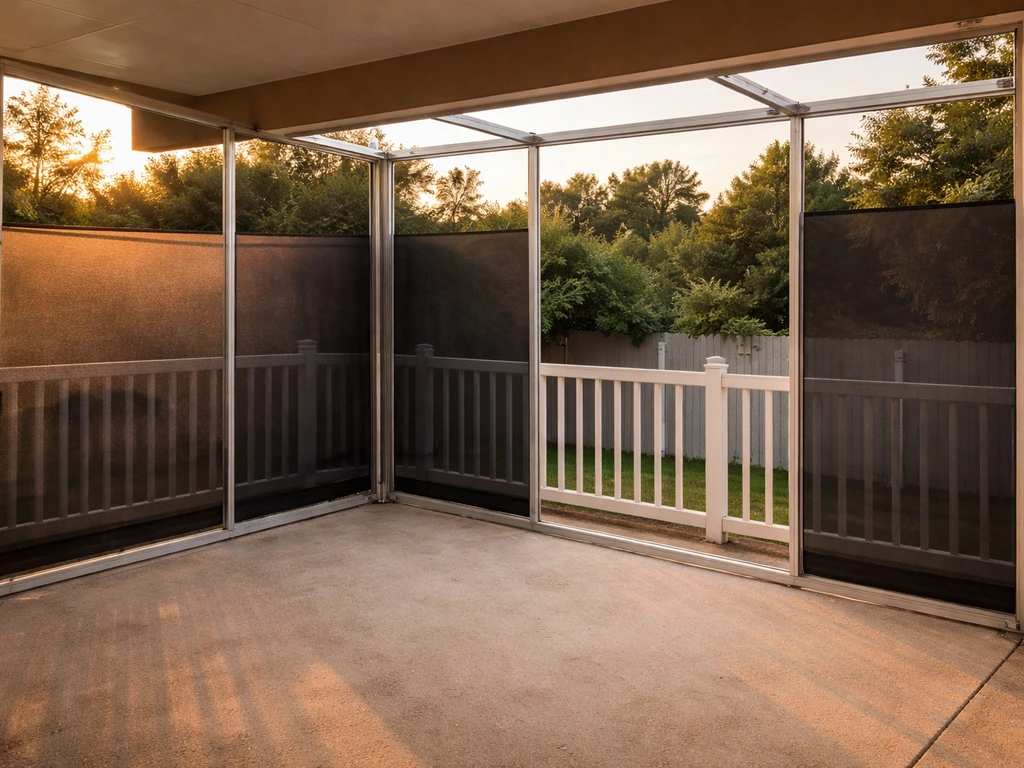
Before you buy a single board, get clear on what problem you're actually solving. A screen-only enclosure blocks insects and gives you that classic porch feel, but it won't stop wind-driven rain or provide meaningful thermal protection. If you live somewhere with hot summers and mild winters, a screen room with solar mesh is probably all you need.
Solar mesh is denser than standard fiberglass or aluminum screen and blocks a higher percentage of UV rays and solar heat, which matters a lot in sunny climates where glare and heat are the main issues. If you want true weather protection, you're looking at a glazed or paneled enclosure with polycarbonate, tempered glass, or vinyl windows, and that moves your project closer to a sunroom or three-season room in terms of complexity and cost.
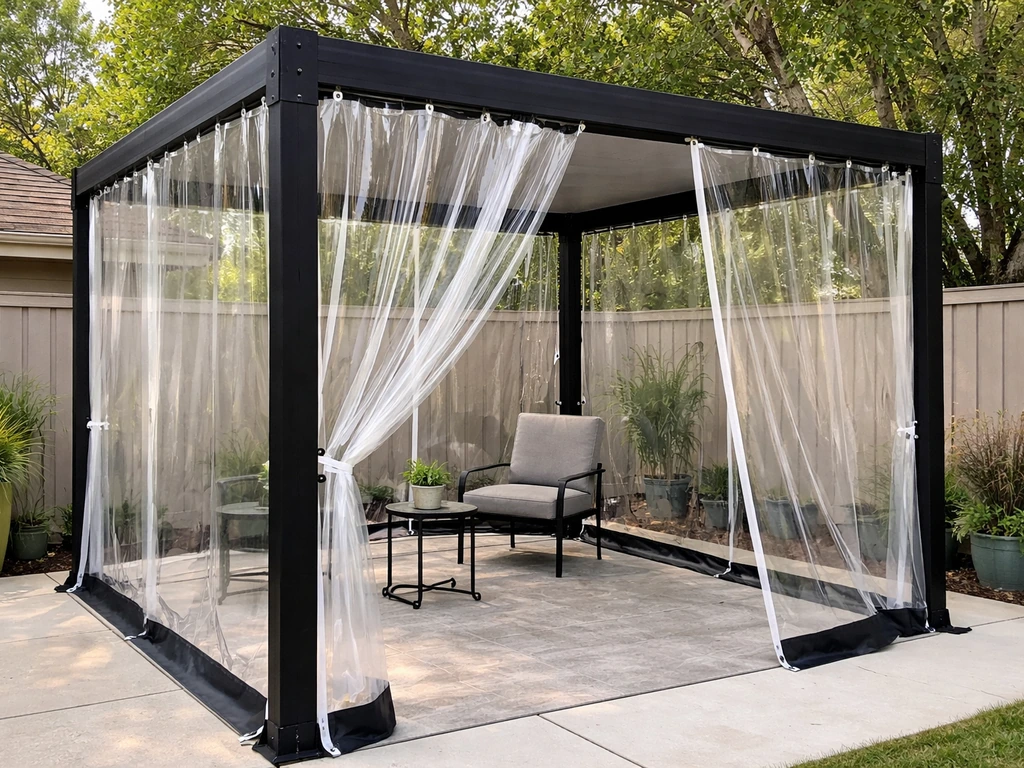
Here's a quick way to think about the options: screen rooms are the most affordable and easiest to DIY, usually running $10 to $25 per square foot in materials. Polycarbonate-panel or vinyl-window enclosures land in the $25 to $60 range. Full glazed sunrooms go higher and typically involve more structural work. There are also hybrid approaches, like a pergola with curtains or removable panels, that work as a lower-cost, semi-temporary solution.
Those won't match the air-tightness of a proper glazed enclosure, but if you're drawn to that route, you'll want to make sure any curtain or panel system uses proper weather barriers and sealed track details to avoid drafts and water intrusion. For a fully DIY approach without major structural work, a screen room or polycarbonate-roof enclosure with screened or glazed side panels hits the sweet spot for most homeowners.
| Enclosure Type | Weather Protection | DIY Difficulty | Approximate Material Cost (per sq ft) | Best Climate Fit |
|---|---|---|---|---|
| Screen only | Insects only | Easy | $10–$25 | Warm, low rain |
| Solar screen | Insects + UV/heat reduction | Easy | $12–$28 | Hot, sunny climates |
| Polycarbonate panel | Rain, wind, some insulation | Moderate | $25–$45 | Most climates |
| Glazed/vinyl window panels | Full weather seal, 3-season | Moderate-Hard | $40–$65 | Cold winters, rain |
| Pergola + curtains/panels | Partial, variable | Easy-Moderate | $15–$40 | Mild climates |
Step 2: Plan Your Layout, Take Measurements, and Sort Out Permits
Measure your patio's full perimeter and note where any obstructions are: existing doors from the house, hose bibs, electrical outlets, downspouts, and grade changes. Sketch a rough floor plan with dimensions. Standard post spacing for screen rooms is 8 to 10 feet on center, and most manufactured screen panel kits are sized around 36-inch or 48-inch widths, so plan your bay widths accordingly. For roof framing, note your local snow load and wind speed requirements.
Local building departments publish climate design criteria that can reference IRC roof and ground snow load and wind speed design values, which you should use when engineering or choosing roof framing for your area note your local snow load and wind speed requirements. [These numbers come from IRC Table R301.
](https://basc. pnnl. gov/resource-guides/managing-snow-loads-roofs-and-decks)2, and your local building department publishes them. Do not skip this step.
Snow load and wind design criteria directly affect how heavy your roof framing needs to be and how your posts must be anchored. A patio enclosure in Minnesota needs meaningfully heavier rafters than one in Florida.
On permits: most jurisdictions require a building permit for a permanent patio enclosure, especially one with a roof. Some allow screen rooms under a simplified process; others treat them like full additions. Check with your local building department before you frame anything. Also check with your HOA if you have one. While you're at it, confirm that your planned enclosure won't block any required egress from the house. IRC R310 governs emergency escape and rescue openings, and you cannot wall off or obstruct those. If your enclosure wraps around a bedroom window or a required exit door, you need to factor that into your design.
- Measure patio length, width, and diagonal (to check for square) before drawing any plans
- Identify existing house doors, windows, and utility penetrations that the enclosure will interact with
- Note grade changes or low spots where water might pool at the base of framing
- Pull local climate design criteria (snow load, wind speed) from your building department
- Apply for a building permit before breaking ground
- Verify HOA approval if applicable
- Confirm you're not blocking any required egress paths or emergency escape openings
Step 3: Materials and Tools Checklist

The exact materials depend on your enclosure type, but here's what a typical screen room or polycarbonate-panel enclosure requires. For framing, pressure-treated lumber (2x4 or 2x6 for posts and top plates, 2x6 or 2x8 for rafters depending on snow load) is the standard choice. Aluminum framing systems are also available and are especially popular for screen rooms because they're lightweight, rust-proof, and accept standard screen spline systems. If you're attaching to the house, you'll need a ledger board with proper lag screws into framing members, not just siding.
- Pressure-treated posts (4x4 or 6x6 depending on height and load), or aluminum extrusions for screen rooms
- Pressure-treated top plates, sill plates, and rafters sized for your local snow/wind loads
- Post base hardware rated for wind uplift (Simpson Strong-Tie ABU or equivalent)
- Joist hanger hardware for rafters at ledger or beam connections
- Ledger board and structural lag screws (for house attachment)
- Screen mesh: fiberglass for standard use, aluminum for durability, solar mesh for hot climates
- Screen spline and screen rolling tool (for screen rooms)
- Polycarbonate panels or tempered glass panels (for glazed enclosures)
- Aluminum Z-flashing, step flashing, and kick-out diverter flashing
- Butyl tape and silicone caulk (exterior grade, paintable)
- Water-resistive barrier (WRB) housewrap if installing solid wall panels
- Self-sealing roofing underlayment for the roof deck
- Exterior-grade screws, stainless or hot-dipped galvanized (corrosion resistance matters outdoors)
- Prehung screen door or sliding door with weatherstripping and threshold seal
- Post base concrete or epoxy anchors if attaching to existing slab
- Level, tape measure, chalk line, circular saw, drill/driver, hammer, caulk gun
- Safety glasses, hearing protection, work gloves
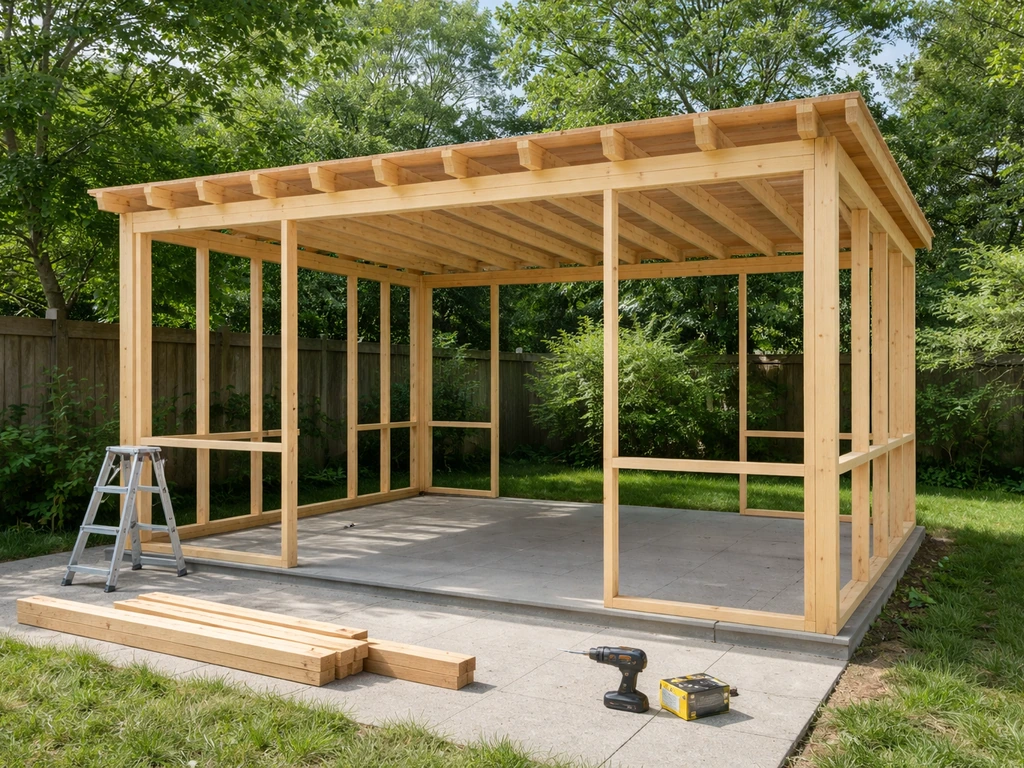
Step 4: Prep the Patio and Build Your Frame Foundation
Start by inspecting your existing slab or patio surface. Look for cracks, significant slopes, or drainage problems. A minor slope away from the house (about 1/8 inch per foot) is fine and actually desirable. A slope toward the house or pooling areas at the perimeter need to be addressed before you frame anything, because water trapped at the base of your posts will rot wood or corrode aluminum over time. If your patio is pavers or gravel, you may need to pour concrete footings at each post location rather than surface-mounting to loose material.
For a concrete slab, attach posts using post base hardware with concrete anchors or epoxy-set anchor bolts. The attachment must be engineered for wind uplift, not just lateral load. This is where your local wind speed data from Step 2 matters. Mark your post locations using a chalk line, double-check for square by measuring diagonals (they should match within 1/4 inch), and drill anchor holes with a hammer drill.
Set the anchor hardware and let any epoxy cure fully per the product spec before loading the posts. For posts on new footings, dig below the frost line in cold climates (your building department will give you the local frost depth), pour concrete, and set anchor hardware while the concrete is wet.
Once anchors are set, plumb and brace each post temporarily before connecting your top plates or beams. Standard wall height for a patio enclosure is 8 feet, but you can drop to 7 feet for a cozier feel or go taller if you're tying into an existing eave. Nail or screw top plates to the posts, check level across the top of the entire frame, and add any intermediate cripple studs or blocking your panel system requires.
If you're attaching a ledger to the house, the ledger should be lag-screwed into rim joists or wall framing members, not just into sheathing. Space lag screws no more than 16 inches apart, stagger them vertically, and seal every penetration with butyl tape before driving.
Step 5: Build the Walls: Screen Panels, Glazing, and Sealing
Screen Panels
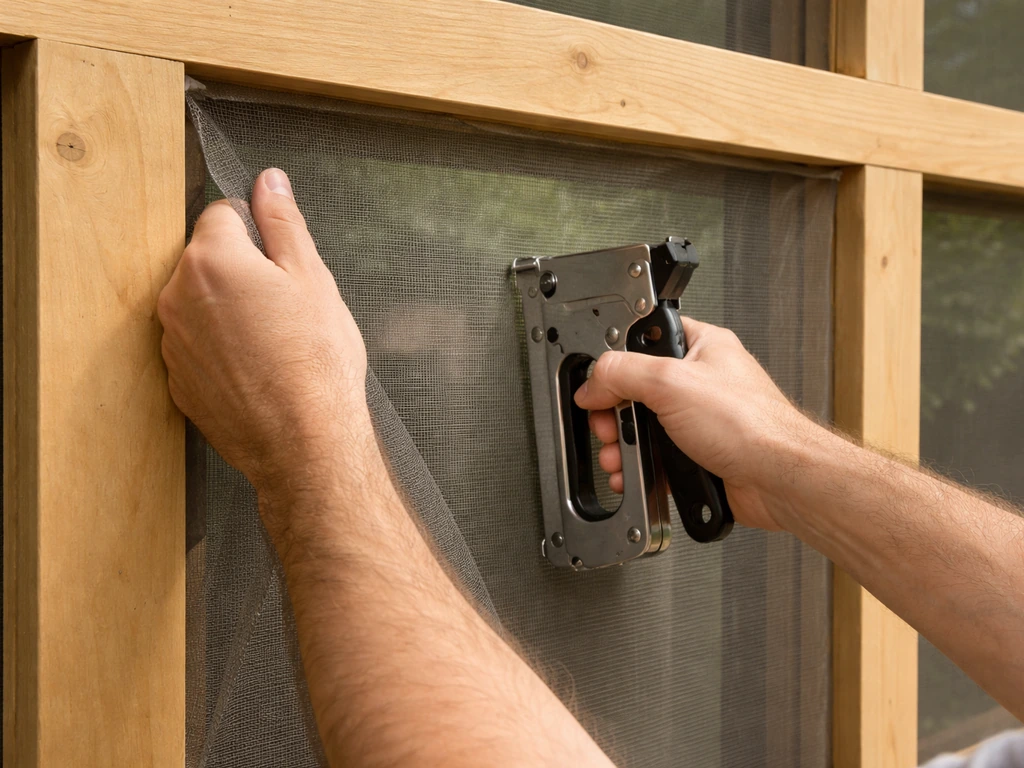
For a screen room, the wall bays between posts get framed with intermediate rails (typically at mid-height and at a low knee-wall height if you want one) and then screened. Stretch screen mesh across each frame bay, hold it in place with spline, and use a screen rolling tool to press the spline into the groove in the frame channel. Pull the screen taut as you go from one side to the opposite side. A saggy screen looks bad and catches wind. Trim excess screen flush with a utility knife after the spline is fully seated. For large bays over 4 feet wide, add a center rail to prevent the screen from bowing under wind load.
Glazing and Panel Walls
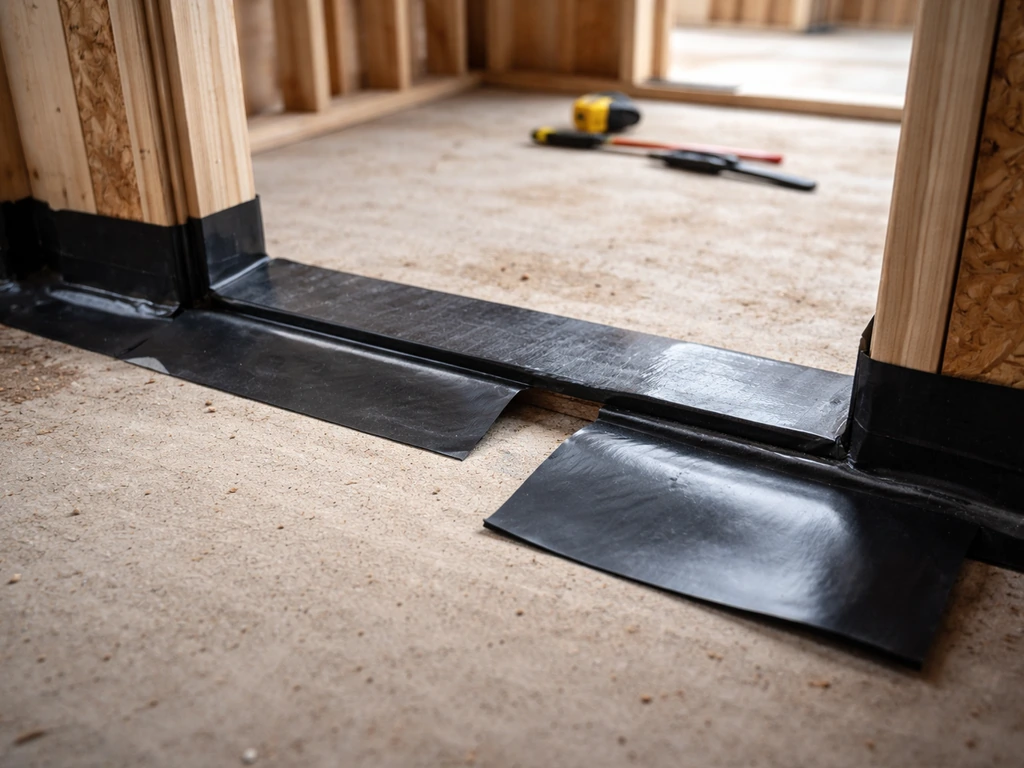
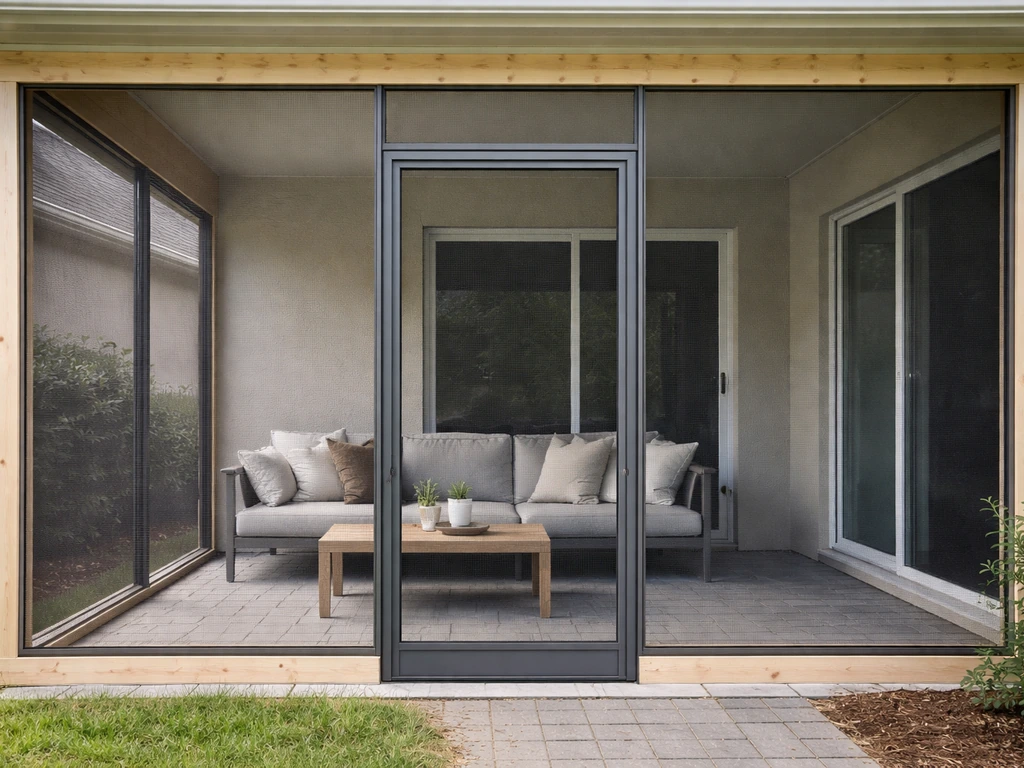
For glazed or polycarbonate enclosures, each wall bay gets a framed opening sized to your panel dimensions. Install a sill flashing at the bottom of each opening first (per ASTM E2112 sequencing: sill first, then jambs, then head flashing on top). This layered approach ensures water sheds down and out rather than being trapped behind framing. Set panels into the opening, shim plumb and level, and secure with the manufacturer's specified fasteners. Run a continuous bead of exterior silicone at the panel-to-frame joint on the outside, and seal the inside joint with a compatible interior sealant. Any gap here becomes a draft and eventually a leak path.
If you're installing vinyl windows in wall bays instead of fixed panels, the same flashing sequence applies. Wrap every rough opening with a WRB housewrap flap and tape it to the wall sheathing before setting the window. This is the most important waterproofing detail in the whole project and the one DIYers most often skip. A window or panel set without proper WRB integration may look fine for a year and then leak into your framing once the caulk cracks.
Step 6: Install the Roof and Weatherproof Every Intersection
The roof is the most structurally critical part of your enclosure. Rafter size and spacing must match your local live load and snow load requirements. In a low-snow climate, 2x6 rafters at 24 inches on center spanning up to 12 feet are commonly adequate. In a heavy-snow region, you may need 2x8 or 2x10 members at tighter spacing. If you're not certain, pull a span table for your lumber species and grade, or ask your building department. Undersized rafters are a safety issue, not just a code issue.
For a shed roof tied to the house, set the ledger at a height that gives you at least 1/4 inch per foot of slope outward for drainage. Lay self-sealing roofing underlayment on the roof deck before any panels or roofing material goes on. If you're using polycarbonate panels for the roof, follow the manufacturer's instructions precisely for overlap, fastener spacing, and edge flashing. Polycarbonate panels rely on properly installed aluminum flashing at ridges and eaves plus silicone sealant at laps to prevent leakage. Use pre-cut closure strips at the eave to block insects from entering the fluted channels while still allowing drainage.
Where your enclosure roof meets the house wall, install step flashing between each rafter and the house wall, then run a continuous piece of counter-flashing over the top. At the downhill end of the roof-to-wall intersection, install a kick-out diverter flashing to route water out into the gutter rather than letting it run behind the siding. This detail is required by current IRC editions and is one of the most common failure points in DIY patio enclosures. Water that runs behind siding at a roof-wall joint causes rot, mold, and eventually structural damage. Get this right on installation and you'll avoid a major headache later.
Make sure roof runoff routes away from the base of your enclosure. Add gutters and downspouts to the enclosure eave if it doesn't tie into existing gutters. Downspouts should discharge at least 6 feet away from the slab edge, or into a buried drain line. Water pooling at the foundation of your framing shortens the life of every component.
Step 7: Hang Doors, Add Hardware, and Finish the Details
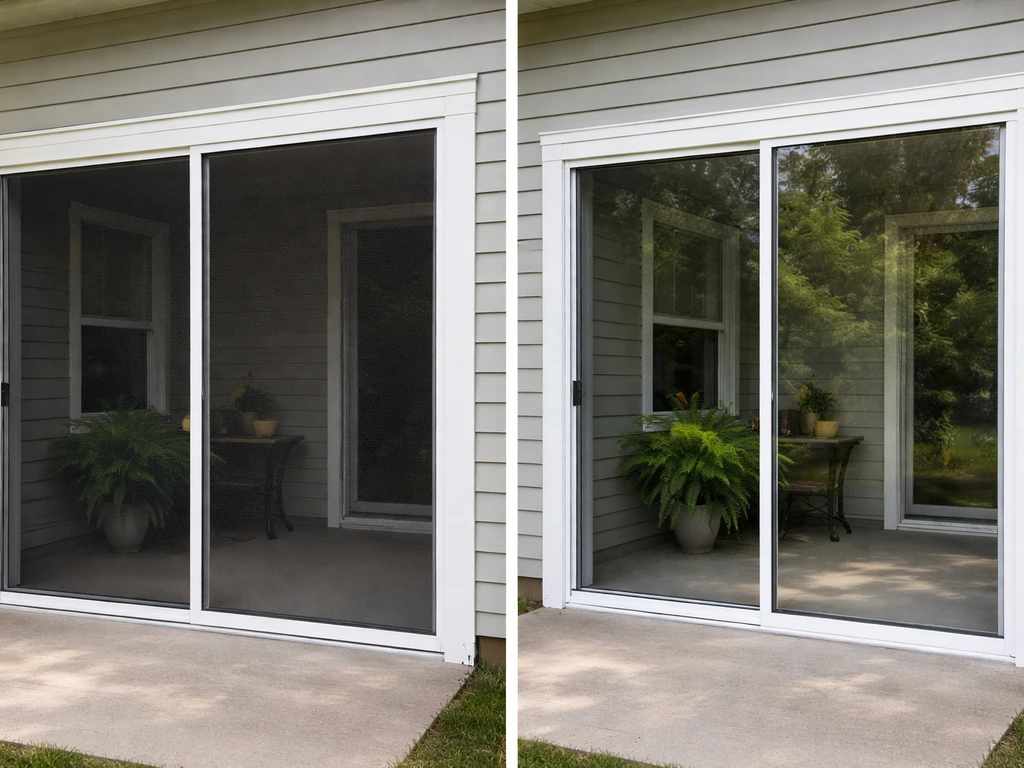
Door placement should work with your traffic flow and not block any required house egress. For a screen room, a standard 32-inch or 36-inch prehung screen door is the easiest option. For a glazed enclosure, a sliding patio door or hinged French door with a proper threshold assembly is a better weather seal. Regardless of door type, the threshold seal is where most air infiltration happens in a finished enclosure.
Install a door sweep that compresses firmly against the threshold and use weatherstripping on both jambs and the head. For paired doors or sliders, add an astragal seal at the meeting stile to close the gap between the two panels. That gap is a direct path for drafts and even wind-driven rain.
After doors are hung and swinging properly, go around the entire perimeter of the enclosure and caulk every joint where dissimilar materials meet: frame to slab, frame to siding, panel edges, door trim, window trim, and any penetrations for electrical conduit or ceiling fan wiring. Use exterior-grade paintable caulk for painted surfaces and clear silicone for glass or polycarbonate. Do a final walk-around looking for any gaps larger than 1/16 inch. If you can see daylight through it, air and eventually water will find it.
Finishing touches that make the space actually feel like a room: add an exterior-rated ceiling fan for air circulation (this alone dramatically changes comfort in hot weather), install weatherproof lighting at the ceiling or on the walls, and consider adding electrical outlets on a GFCI-protected circuit if you plan to use the space regularly. If your enclosure is glazed and faces south or west, external or internal solar shades on the windows help manage heat gain without sacrificing the view.
Step 8: Test It, Then Keep It Working Year-Round
Post-Build Testing
Before you call the project done, test it deliberately. Run a garden hose along the roof-to-wall junction and watch for any water getting behind the siding or into the frame. Check the base of each post after the first rain for pooling or wicking. Walk the interior perimeter on a windy day and feel for drafts at every seam, door frame, and panel edge. It's much easier to add caulk or adjust weatherstripping now than after you've added furniture and flooring.
Seasonal Maintenance
Every spring, inspect the roof-to-wall flashing and kick-out diverter for debris and verify they're still properly sealed. Clean gutters and check that downspouts are flowing freely. Inspect all caulk joints and re-apply wherever you see cracking or separation. Screen panels should be checked for tears or loose spline, especially if you had any wind events over winter. For polycarbonate roofs, clear any debris from between the panels and the flashing, and check that closure strips at the eave are intact. In cold climates, make sure snow isn't allowed to build up on the enclosure roof beyond the design load. If you sized your rafters for 20 psf ground snow load and you get a 30-inch snowfall, clear the roof.
Every fall before the first freeze, close any seasonal openings, re-check door sweeps and threshold seals, and make sure drainage is clear so ice doesn't form against the frame base. If your enclosure is screen-only, you may want to add temporary clear vinyl panels or plastic sheeting over the screen bays to extend usability into cooler months. That's a budget-friendly way to make a screen room feel more like a three-season space without a full rebuild. If your main goal is cost control, you can also compare this approach with budget-focused options in how to enclose a patio on a budget budget-friendly way to make a screen room feel more like a three-season space without a full rebuild.
Comfort Upgrades Worth Adding
Once your enclosure is built and tested, there are several upgrades that move it from functional to genuinely comfortable. A ceiling fan or two is the single highest-impact addition for both summer cooling and air circulation. Solar screens on south- and west-facing walls reduce heat gain significantly, and because solar mesh is denser than standard screen, it still provides good visibility while cutting glare.
If you want to stretch the usable season in a cooler climate, a small electric or propane patio heater paired with the sealed enclosure creates a comfortable space well into fall. For airflow flexibility in a fully glazed enclosure, consider operable hopper windows in the upper wall sections so you can get cross-ventilation without opening the main doors.
If you're still deciding how involved to get, there's a real spectrum from a quick temporary solution using removable panels or curtains all the way up to a fully permitted, glazed three-season room. Most DIYers land somewhere in the middle: a properly framed, screen or polycarbonate enclosure with a solid roof, a good door, and careful sealing. That version is absolutely within reach for a capable homeowner, usually completable in one to two weekends for a standard 200 to 400 square foot patio, and it delivers a space you'll actually use year after year.
FAQ
Can I build a patio enclosure without pouring new footings or anchors into concrete?
Sometimes, if your slab is engineered and sound, you can use post base hardware with concrete anchors or epoxy-set bolts into the existing slab, but you still need uplift-rated hardware for wind. If the patio sits on loose pavers or an overburden base, surface-mounting posts usually fails because water and movement loosen connections over time.
How do I choose between a screen room and a polycarbonate enclosure for real-world comfort?
Use screens if your main goal is insect control and shade, accept that wind-driven rain and drafts will still happen. Choose polycarbonate or glazing if you need to block wind and reduce heat loss, especially when evenings get cool. If glare is your biggest issue, solar mesh on a screen room can make a bigger difference than people expect, even without a fully glazed build.
What’s the biggest mistake people make when installing WRB and windows or panels?
The common failure is installing tape and sealant at the opening without integrating the housewrap so water can run back out, not behind it. Wrap the rough opening with a properly taped WRB flap before you set the window or panel, and don’t rely on silicone alone to fix a missing or improperly directed water path.
Do I really need gutters and downspouts if the roof is only over the enclosure?
Yes, if roof runoff would otherwise fall onto the enclosure slab edge or near the post bases. Even small leaks or splashback can rot treated lumber and corrode aluminum framing. A good rule is directing discharge at least several feet away from the slab perimeter, or into a drain line designed for surface runoff.
How do I prevent drafts at doors in a screened or glazed patio enclosure?
Focus on the threshold and contact points. Install a door sweep that compresses consistently, add weatherstripping to jambs and the head, and for sliders or paired doors add an astragal seal at the meeting stile. Air leaks often look minor, but they create noticeable drafts and can also pull rain during wind.
What roof-to-wall flashing detail matters most for preventing long-term damage?
The roof-wall intersection is the usual failure zone. You need step flashing between each rafter and the house wall, plus a continuous counter-flashing over the top, and a properly placed kick-out diverter at the lower end so water exits toward the gutter instead of running behind siding.
How do I account for ceiling fans and electrical inside the enclosure safely?
Plan wiring before you close up ceiling panels or screens, use exterior-rated fixtures, and put outlets on a GFCI-protected circuit. Also confirm clearance and support, especially if you mount to roof structure rather than thin finish framing, because a ceiling fan adds dynamic load.
Is it safe to build an enclosure in a snowy region using the same lumber sizes as in warmer states?
No. Snow load requirements change the needed rafter size, spacing, and sometimes deflection performance. Use your local design criteria, size rafters accordingly, and do not assume that “it looks sturdy” is enough. Clearing snow beyond the design assumptions also matters for safety.
Can I extend a screen-only enclosure into colder seasons with temporary panels?
You can, but treat them as weather-control add-ons, not a replacement for proper flashing and sealing. Use temporary clear vinyl panels or plastic sheeting with edge sealing and allow for ventilation so moisture doesn’t get trapped. Secure everything so wind cannot lift it and turn it into a leak path.
How can I verify my enclosure will withstand wind beyond just the roof framing?
Don’t stop at roof members. You also need uplift-rated post anchoring hardware, adequate bracing while you assemble, correctly fastened top plates and ledger connections, and sealed joints where wind can pressurize the structure. After installation, a windy-day draft check helps you catch perimeter and door leaks early.
Next Articles
How to Enclose a Patio Temporarily: DIY Step by Step
Step-by-step DIY options to temporarily enclose a patio, measure, install safely, weatherproof, and remove without damag
How to Enclose a Patio: DIY Steps, Costs, and Options
DIY guide to enclose a patio with screen, glass, or vinyl. Costs, steps, materials, and common mistakes.
Do It Yourself Patio Enclosures: Step by Step Guide
Step-by-step guide to DIY patio enclosures and screen enclosures, from planning and framing to doors, sealing, and upkee