You can enclose a patio temporarily in a single day using outdoor curtains, clear vinyl panels, removable screen systems, or freestanding panel frames, depending on whether your main goal is blocking bugs, wind, sun, or keeping out rain. Most setups cost between $100 and $600 in materials, require no permanent drilling or concrete work, and come down cleanly at the end of the season. The key is matching the right material and anchoring method to your specific patio layout and the problem you're actually trying to solve.
How to Enclose a Patio Temporarily: DIY Step by Step

Felix Brennan
19 May 2026
Start here: what's your goal, and which style fits it?
Before you buy anything, get honest about what you need the enclosure to do. Bugs, wind, rain, privacy, and sun each call for a different solution, and picking the wrong one wastes money and effort. Here's how to match your goal to an approach.
| Your main goal | Best temporary enclosure style | Key material to look for |
|---|---|---|
| Bug control (mosquitoes, gnats) | Removable screen panels or roll-down screen curtains | 18x14 fiberglass insect screen or 20x20 No-See-Um mesh |
| Wind and cold air | Clear vinyl roll-up curtain panels | 20 mil or 30 mil clear PVC vinyl, wind-rated to 70 mph |
| Rain and weather coverage | Clear vinyl + overhead shade sail or temporary roof panel | 20-30 mil vinyl, waterproof shade sail rated for wind loads |
| Privacy from neighbors | Opaque outdoor curtains or vinyl-coated polyester panels | Phifertex-style vinyl-coated fabric with partial transparency |
| Sun and UV shading | Shade sail or outdoor drop curtains | UV-resistant fabric, properly tensioned with quality hardware |
| All-season combo (bugs + weather) | Full-perimeter clear vinyl curtain system on a track | 30 mil clear vinyl on curtain track with grommet attachment |
Once you know your goal, pick one enclosure style and commit to it before measuring. Trying to do everything with a single $80 solution rarely works well. If you're thinking about a more permanent build, there are dedicated guides on how to build a patio enclosure and how to build a shelter over a patio that go deeper on structural framing. For now, let's focus on what you can realistically install this weekend.
Your material options at a glance
There are five main material categories for temporary patio enclosures. Each has real tradeoffs in cost, install time, durability, and how well it does its specific job.
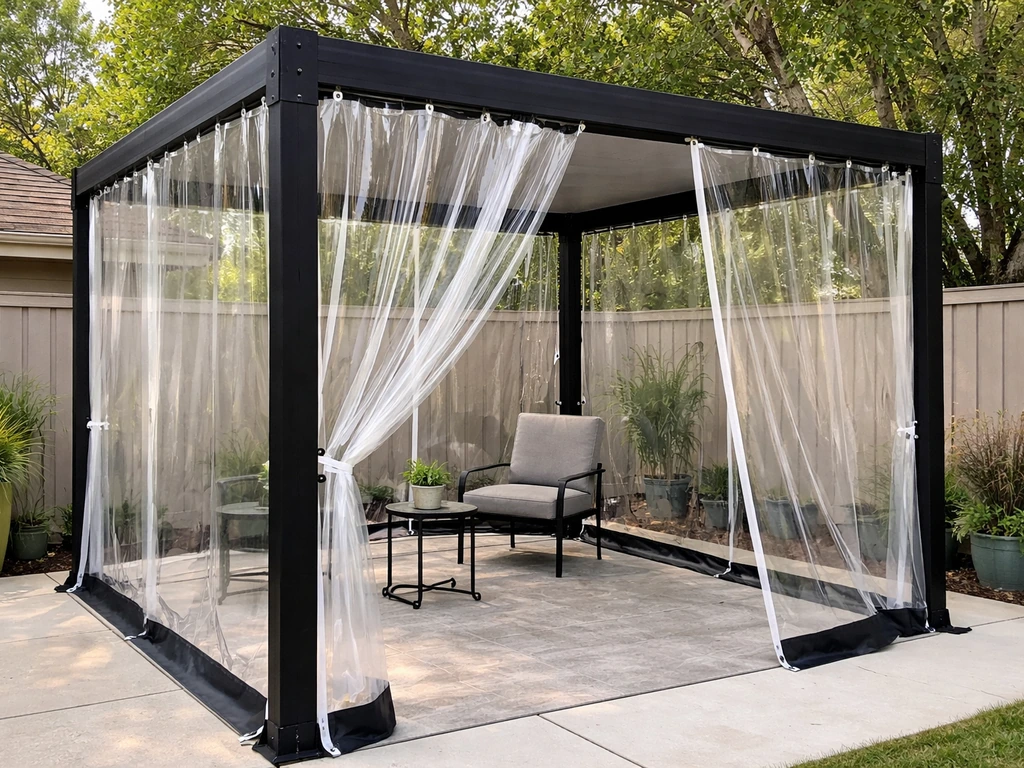
Clear vinyl curtain panels
This is the most versatile temporary option for weather protection. Clear PVC vinyl comes in 20 mil and 30 mil thicknesses. The 20 mil is lighter and easier to handle for one person; the 30 mil is stiffer, holds up better in cold temperatures, and provides a stronger wind barrier. Quality clear vinyl systems from suppliers like PYCAwnings or ALCO are rated for wind loads of 70 mph, are mildew-resistant, and UV-resistant, and they can be rolled up and stored at the end of the season. They attach via grommets to a track or rope system, and they seal well enough to block wind-driven rain, cold drafts, and even pollen.
Outdoor fabric curtains
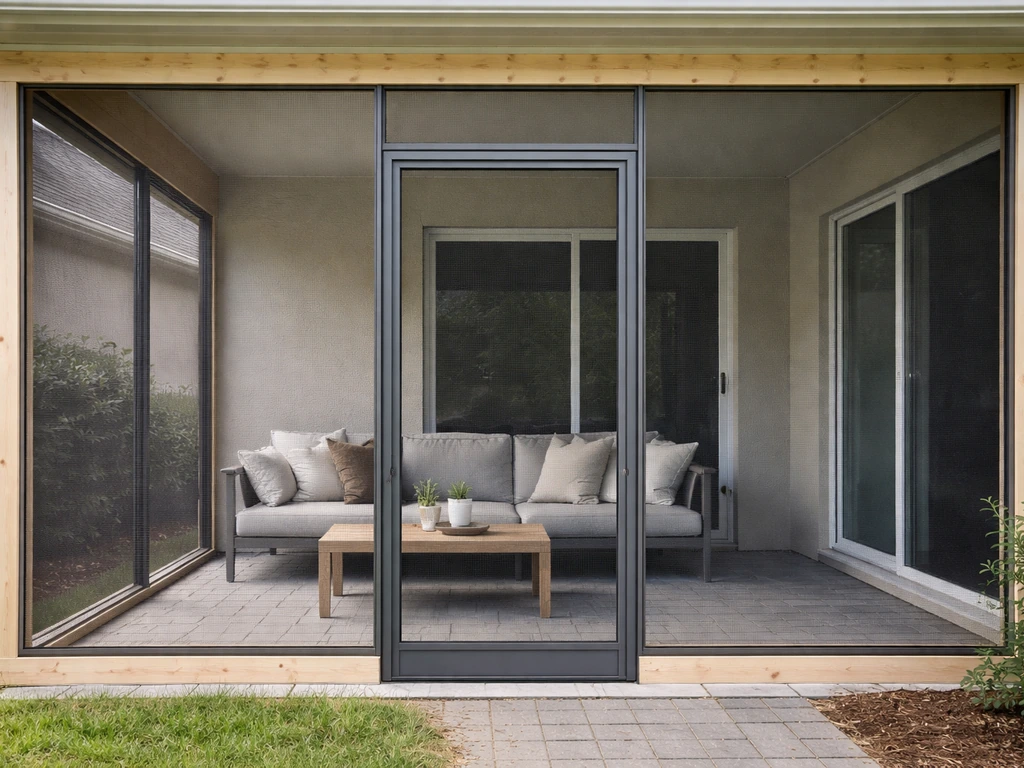
Outdoor curtains made from vinyl-coated polyester (like Phifertex fabric) are a good middle-ground option for privacy and partial weather protection. They block wind and UV rays while allowing some airflow and light through. They're easier to wash, lighter to handle, and often more visually appealing than clear vinyl. They won't seal out rain the way clear vinyl does, but for a covered patio where you mainly want privacy and wind reduction, they work well. Run them on an outdoor curtain track or tension rod system mounted to your existing structure.
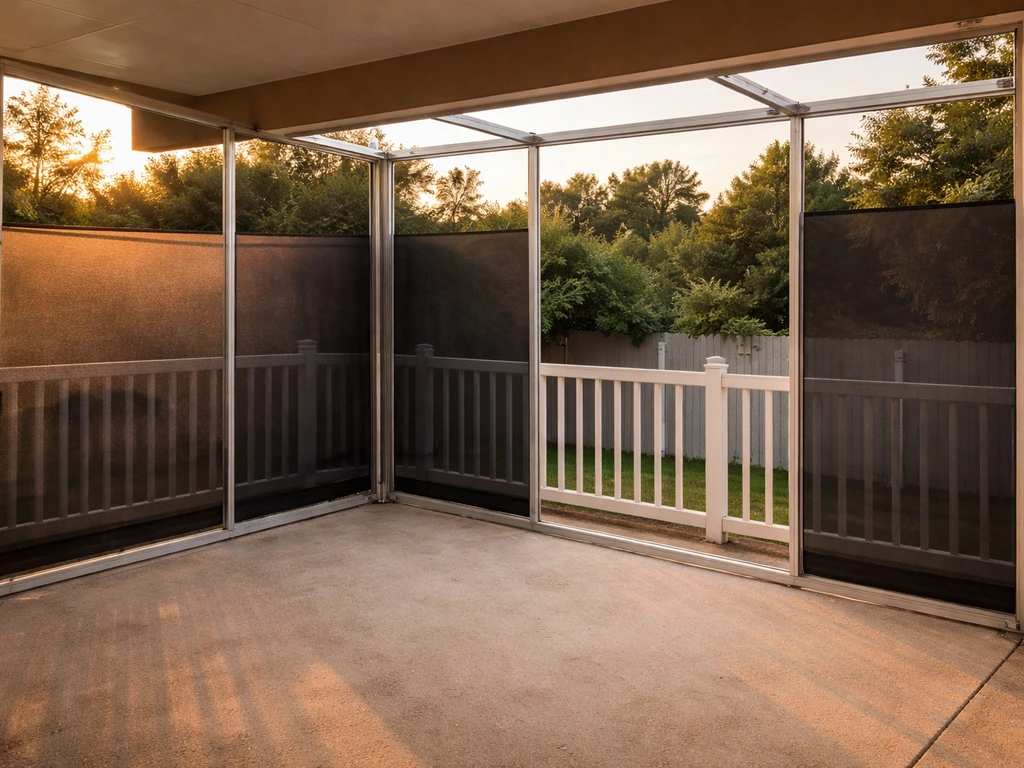
Insect screen panels
For bug control, you want actual insect screen mesh, not just fabric. An 18x14 fiberglass mesh is the standard pool and patio screen, durable and easy to see through. If you're dealing with tiny gnats or no-see-ums, step up to a 20x20 mesh like Phifer's No-See-Um screen, which is woven tight enough to block most of the smallest flying insects while still allowing airflow. You can buy pre-framed screen panels that clip or tension into an existing frame, or you can stretch mesh into a DIY frame made from pressure-treated lumber or PVC pipe.
Freestanding panel frames
If your patio doesn't have an existing roof, beam, or wall to attach things to, a freestanding frame is your path. These are typically PVC or powder-coated steel frames that you build or buy as a kit, weight down with sandbags or base plates, and then cover with screen, vinyl, or fabric panels. They're more work to set up, but they're truly portable and work on concrete, pavers, or even grass. They also take down completely, leaving no trace.
Shade sails and temporary overhead structures
Shade sails and temporary overhead tarps don't enclose the sides, but they're an important part of a complete temporary enclosure strategy when you need rain or sun coverage above you. If your goal is to build a shelter over patio, treat the overhead cover as the first step, then add side curtains or screen panels to complete the enclosure roof layer. A shade sail needs to be installed with tension in mind, blank" rel="noopener noreferrer">positioned based on wind speed and direction at your location. The hardware matters a lot here: quality sail hardware is engineered for sustained tension plus dynamic wind loads, and wind gusts can multiply forces by 3 to 5 times the static load. Cheap corner hardware fails fast. Use this as a roof layer, then combine it with side curtains or screens for full enclosure.
Plastic sheeting
Standard plastic sheeting (4 to 6 mil poly sheeting from a hardware store) is an ultra-budget option for short-term weather coverage, but treat it as a temporary fix measured in days, not months. It tears in wind, degrades quickly in UV, and looks rough. If you need to cover a patio this weekend for an event or a single storm, it works. For anything lasting more than a couple of weeks, spend a little more and get actual 20 mil clear vinyl.
How to measure and plan your layout
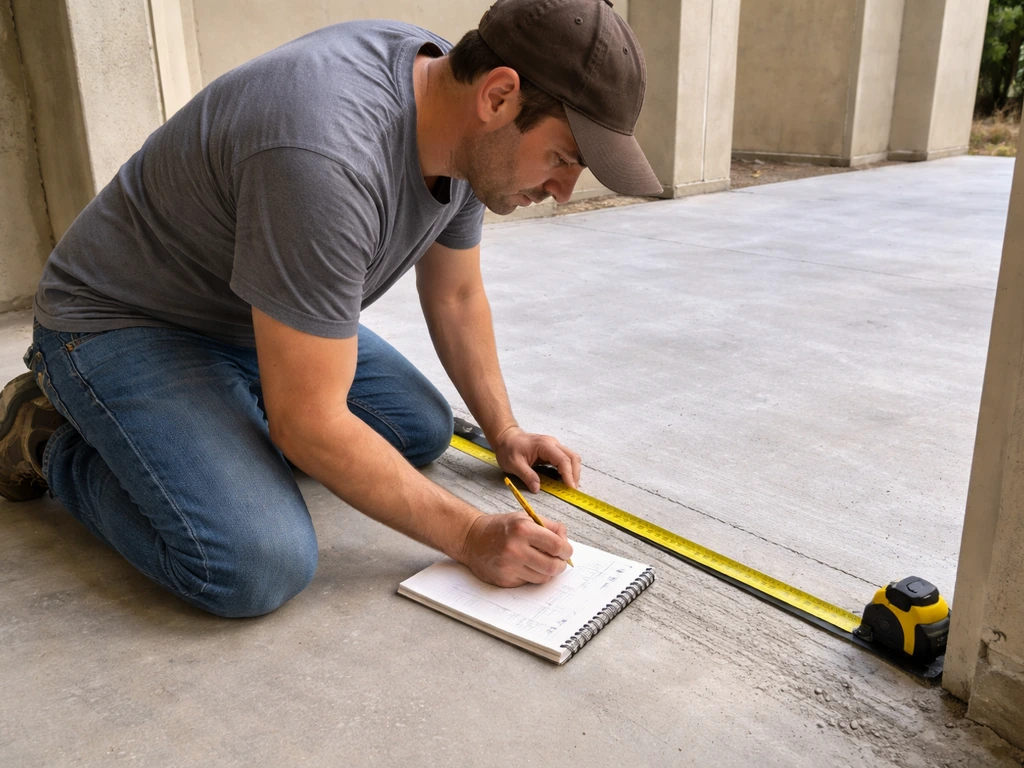
Good measuring is 80% of a clean install. Rushing this step is where most DIY enclosure projects go sideways, so take your time here.
- Measure the full perimeter of your patio opening, including every gap between posts or walls you want to cover. Write down the width and height of each individual opening, not just the total.
- Note your attachment points. Are you connecting to existing posts, a beam, a wall, or do you need freestanding support? Mark what material each attachment point is made of (wood, masonry, metal) because it affects your hardware choices.
- Account for overlap on posts and walls. Curtain panels should lap onto support posts by at least 1.5 inches on each vertical side to eliminate gaps where bugs or wind sneak through.
- Plan your panel layout. Wider openings are easier to cover with multiple overlapping panels than one giant sheet, especially in wind. Plan panel widths of 4 to 8 feet for manageable handling.
- Check your ceiling or overhead structure for the track or rod attachment points. Outdoor curtain tracks mount to joists, beams, or existing structural members, not just drywall or fascia.
- Measure twice and sketch it out. A simple hand-drawn diagram with all dimensions labeled saves a lot of return trips to the hardware store.
Step-by-step installation
Step 1: Mount your track, rod, or header

For curtain or vinyl panel systems, start at the top. Mount your curtain track or tension rod at the ceiling or beam line first, before touching any panels. For a wood structure, use lag screws driven into structural members, not just surface screws into fascia. For masonry (concrete block, brick), you'll need masonry anchors or tapcon screws, and this is one area where it's worth getting the hardware right even if you're going temporary. A track that pulls out of the wall under wind load is a safety problem.
Step 2: Hang and position your panels
Attach your curtain or vinyl panels to the track using their grommets or hook hardware. For grommet-style panels, make sure your grommet spacing is 8 inches maximum on center. In higher wind areas or for hurricane-grade systems, 6-inch grommet spacing is the standard. Loosely spaced grommets let panels billow and tear. Once hung, adjust each panel so it overlaps adjacent panels and posts by at least 1.5 inches on all sides.
Step 3: Anchor the bottom of panels
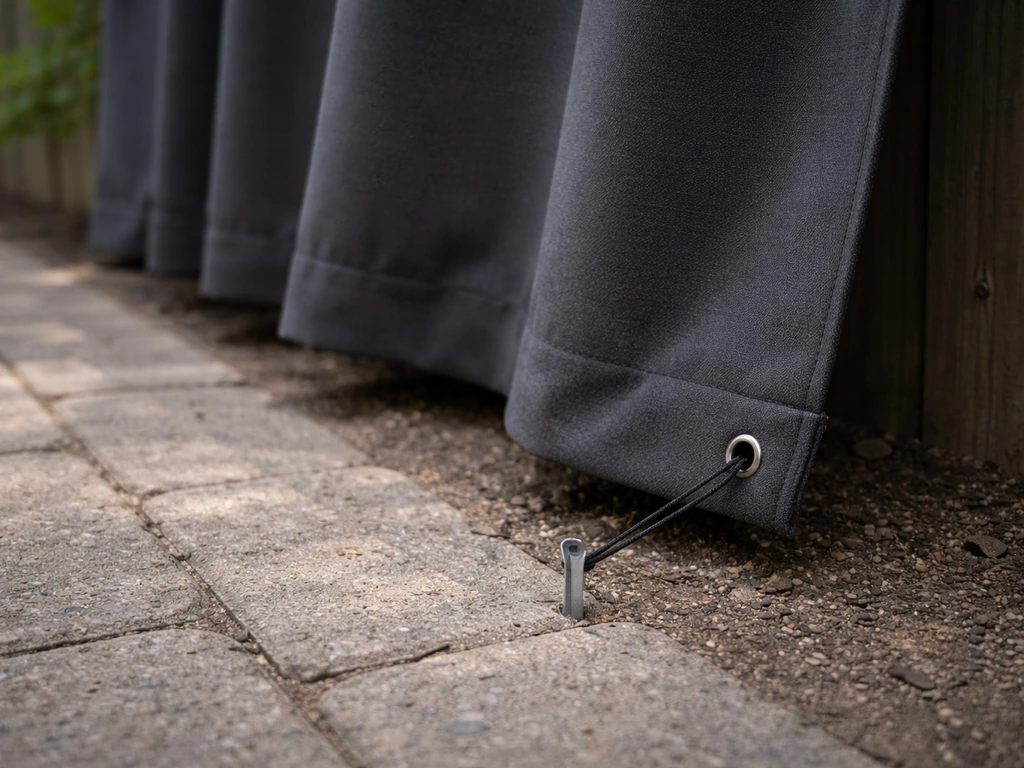
This step gets skipped constantly, and it's the reason enclosures fail in wind. Panels that are only secured at the top act like sails. Options for the bottom include weighted hems (sew or clamp weights into the hem), bungee cord tie-downs to deck hardware, snap fasteners to a bottom rail, or hook-and-loop tape to a deck edge. For freestanding frame setups, the entire base needs to be weighted or staked. On a concrete or paver patio, use sandbag-style weights or water-fillable base weights rated for the frame size.
Step 4: Seal gaps and weatherproof
Walk around the perimeter of your installed enclosure and look for gaps at corners, post-panel overlaps, and the bottom hem. Temporary magnetic strip closures, hook-and-loop tape, or simple binder clips can close gaps without damaging anything. For the floor line, a draft excluder-style foam tube or a weighted sandbag along the bottom hem seals out ground-level drafts and insects. Don't over-engineer this; a few inches of overlap and a bottom weight handles most situations.
Step 5: Test it before you're done
Before you call it done, simulate some stress. Push on the panels, tug a few grommets, and if it's a windy day, watch how the structure behaves in a gust. If panels are flapping or the frame is rocking, add more anchor points or weights before leaving it unattended. Check that all entry points open easily from both sides, and that there's no trip hazard from hardware, cables, or anchoring at floor level.
Anchoring and support: what actually works without a permanent install
Temporary anchoring is the part of this project that separates an enclosure that survives the season from one that ends up in a heap after the first real storm. Here are the methods that actually hold.
- Clamps and C-clamps: Heavy-duty ratchet clamps or structural C-clamps can attach curtain tracks, support rails, and frame members to existing beams, posts, or railings without any drilling. Use rubber-padded clamps to protect wood finishes. Rate your clamps for the load, not just convenience.
- Sandbag base weights: For freestanding frames, 30 to 50 lb sandbags per corner leg is a reasonable starting point for average wind exposure. In consistently windy areas, double that. Water-fillable weights work too but can spill or leak, so sandbags are more reliable.
- Stand-off frames: A stand-off frame is a simple pressure-treated wood or metal frame that leans against an existing wall or structure and transfers load into the ground rather than into the wall. You anchor the frame base to the patio surface with heavy lag anchors into concrete or paver joints, and the frame holds your panels. No structural attachment to the house required.
- Temporary posts with base plates: A 4x4 or metal post in a heavy-duty base plate (the kind used for temporary construction fencing) can create a freestanding post line at the open edge of your patio. Weight the base plates with ballast blocks. This gives you genuine post-to-post panel spans without digging holes or pouring concrete.
- Bungee and tie-down systems: For lightweight fabric curtains and shade sails, heavy-duty bungee cords and ratchet tie-down straps anchored to existing deck hardware or patio furniture anchor points can work as a supplemental bottom-tensioning system. Don't rely on these alone for full enclosures in windy areas.
- Hook-and-loop tape to existing structure: 2-inch heavy-duty outdoor hook-and-loop tape applied to a clean, dry surface can hold lightweight screen panels flat against door frames, window frames, or posts. Not wind-rated, but perfectly functional for bug control in calm conditions.
Cost, time, and how much DIY skill this actually takes
Let's be honest about what you're getting into, depending on which approach you choose.
| Enclosure approach | Approximate material cost | Install time (solo) | DIY skill level |
|---|---|---|---|
| Outdoor fabric curtains on tension rods | $80–$200 | 2–4 hours | Beginner |
| Clear vinyl curtains on curtain track | $200–$500 | 4–8 hours | Beginner to intermediate |
| Removable insect screen panels (pre-framed) | $150–$400 | 3–6 hours | Beginner to intermediate |
| DIY screen frame with mesh | $100–$250 | 4–8 hours | Intermediate |
| Freestanding frame with vinyl or screen panels | $300–$700 | 6–10 hours | Intermediate |
| Shade sail overhead + side curtains combo | $250–$600 | 4–8 hours | Intermediate |
Custom-ordered clear vinyl panel systems from specialty suppliers will cost more, typically $400 to $800+ for a full patio perimeter depending on size, and may have lead times of 1 to 3 weeks. If you need something this week, focus on systems you can source at a local hardware store or order with fast shipping. Full screened-in porch enclosures built by a contractor can range from a few thousand dollars to well over $10,000, so even a $500 DIY temporary setup represents real savings. HomeGuide estimates a 2026 screened-in porch cost range and notes that pricing varies depending on whether the enclosure is attached or freestanding and what enclosure material you choose screened-in porch costs in 2026.
As for renting versus buying: for most temporary enclosure projects, renting doesn't make much sense because the materials (curtains, vinyl, screen) don't really exist in a rental market. You can rent scaffolding or a scissor lift if your patio ceiling is very high and you need help installing overhead components. For tool rental, a rotary hammer for masonry anchors is worth the $30 to $50 daily rental if your attachment points are concrete or brick.
If budget is a serious constraint, there's a dedicated guide on how to enclose a patio on a budget that covers cost-cutting approaches in more detail, including DIY kits and material substitutions that still hold up through the season. If you're trying to keep costs down, follow a simple approach for how to enclose a patio on a budget. If you want a clear path to results, follow a step-by-step guide on how to enclose a patio without overspending.
Maintaining your enclosure during the season
A temporary enclosure that's ignored quickly becomes a damaged one. A little maintenance every few weeks keeps things clean, functional, and storable at the end of the season.
- Clear vinyl panels: Rinse with clean water regularly to remove dust and debris. For actual dirt or mildew spots, use a mild soap solution and a soft cloth. Never use abrasive pads or harsh solvents, which permanently scratch and cloud the vinyl. Dry panels before rolling them up, every single time.
- Fabric curtains: Most outdoor fabrics can be hosed down and left to air dry in place. Remove and hand-wash with mild detergent if mildew appears. Don't machine-dry; heat warps the fabric and damages water-resistant coatings.
- Screen mesh panels: Vacuum or brush off debris. Repair small tears with screen patch tape immediately, before they spread. Check the frame corners and spline (the rubber cord that holds mesh in the frame) after any strong wind event.
- Hardware and anchors: Check all clamps, grommets, track hardware, and base weights after any significant storm. Tighten anything that has shifted. Corrosion on uncoated hardware is a real issue by mid-season in coastal or humid climates, so check and replace any rusted fasteners.
- Bottom hems and seals: Re-tuck or re-tape any bottom seals that have shifted. Insects find the smallest gaps, so a quick walk-around inspection every couple of weeks pays off.
Taking it down and storing it cleanly
This is where a lot of people make a mistake that costs them at the start of the next season. Storing dirty, wet, or folded-incorrectly panels is how you end up with cracked vinyl, moldy fabric, and tangled hardware.
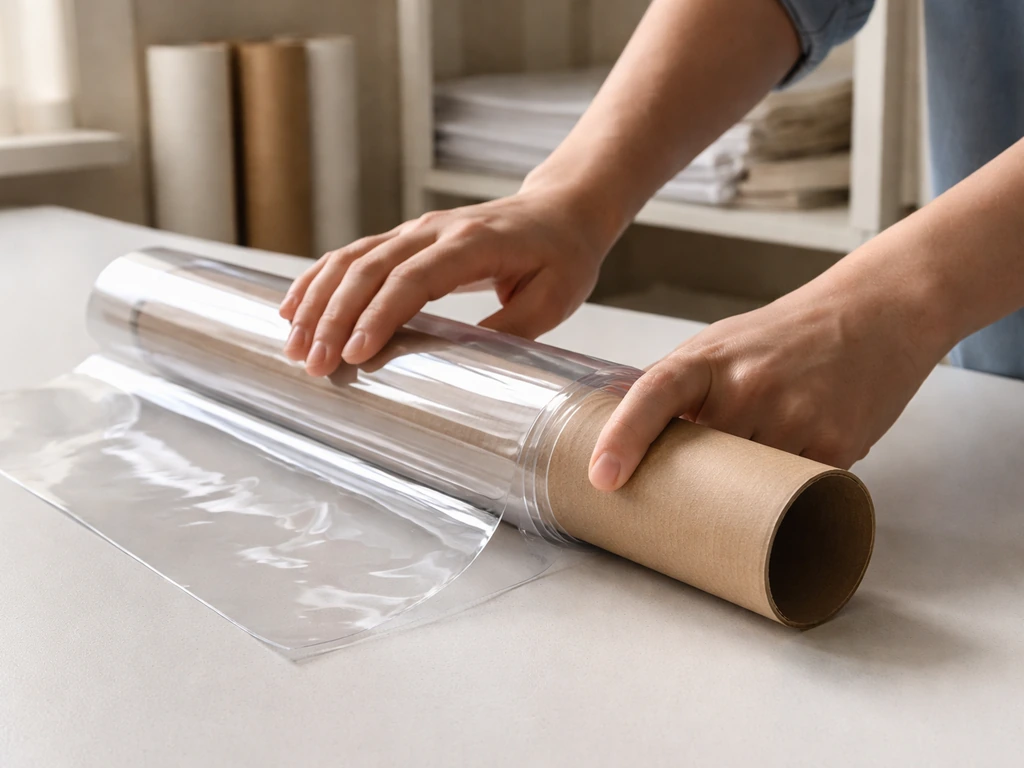
- Pick a dry day for takedown. Clear vinyl especially should only be rolled up when it is clean and completely dry. Rolling up damp vinyl traps moisture and causes mildew to develop in storage.
- Clean everything before storing. Rinse panels, let them air dry fully, and wipe down all hardware. This is much easier to do at takedown than at the start of next season.
- Roll vinyl panels, don't fold them. Sharp fold lines in clear vinyl create stress cracks over time. Roll each panel around a cardboard tube or foam pool noodle and secure with Velcro straps.
- Label and organize hardware. Put all clamps, hooks, tracks, and fasteners in labeled zip-lock bags or a small bin. You will not remember how it all went together six months from now.
- Store panels flat or rolled in a cool, dry location out of direct sunlight. A garage shelf, storage bin, or under-bed storage works well. Avoid storing in a hot attic, which degrades vinyl and elastic components.
- Inspect before you put it away, not when you take it out. Note any tears, broken grommets, or corroded hardware while it's fresh in your mind and you can see the damage. Make a shopping list for next spring.
Safety, codes, and the failure points that actually hurt people
Wind is your biggest structural risk
Wind loads on a temporary enclosure are not trivial. The projected frontal area of your panels drives drag force, and a 10-foot-wide by 8-foot-tall vinyl panel presents 80 square feet of surface to the wind. Even at moderate wind speeds, that force multiplies significantly in gusts. Quality clear vinyl systems are certified to 70 mph wind loads, but only when installed correctly with proper grommet spacing, bottom anchoring, and secure track attachment. An under-anchored panel in a 40 mph gust becomes a projectile. Don't skip the anchoring steps.
Egress and trip hazards
Make sure every person who could be on your patio can exit quickly in an emergency. If your enclosure has a single entry point, it needs to open easily from the inside without tools or complex unclipping. Avoid running anchor cables, bungee cords, or tie-downs across walkways at ankle height. Mark any low anchor points with bright tape if they're in a traffic area, and remove trip hazards at the floor level before hosting guests.
Permits and HOA rules
In many jurisdictions, even temporary structures may require a permit. Some cities, including several in Texas, require a building permit for any patio or porch cover whether it's attached or freestanding. Tampa, for example, specifically addresses removable vinyl and acrylic wind-break panels as part of residential permit categories. Temporary or not, if your enclosure is visible from the street or common areas, your HOA may regulate the material type, color, or installation method. Check your local building department website and your HOA's architectural guidelines before you install, especially if you're going with a more structured frame setup. A curtain hung inside an existing covered patio is very unlikely to require a permit. A freestanding frame structure that changes the visual footprint of your property is a different story.
Common failure points to avoid
- Track or rod mounting into non-structural surfaces: Curtain tracks screwed only into fascia boards or thin trim pull out under load. Always drive fasteners into structural members.
- Skipping bottom anchoring on vinyl panels: Unanchored panel bottoms billow, strain grommets, and eventually tear in wind. Always secure the bottom edge.
- Using indoor hardware outdoors: Standard curtain rods, brackets, and hooks corrode or fail UV exposure within one season. Buy hardware rated for outdoor use.
- Oversized single panels: One giant 20-foot-wide vinyl sheet is much harder to handle, much more prone to wind damage, and much harder to store than four 5-foot panels covering the same space. Smaller panels are always smarter.
- Ignoring mildew at storage: Mildew that sets in on vinyl or fabric during off-season storage is very hard to remove fully and degrades the material faster. Clean and dry everything before it goes into storage.
- Assuming temporary means safe to ignore in a storm: If a major storm is approaching, take down lightweight temporary enclosures or tie them down with additional anchoring. A well-rated vinyl system may hold at 70 mph, but freestanding frames and fabric curtains usually won't.
Your next steps
Start by writing down your single biggest goal (bugs, wind, rain, privacy, or sun) and your patio's basic dimensions. Then choose one material approach from the options above that fits your budget and timeline. If you have an existing covered patio with posts and a beam, you're in the easiest position: measure your openings, order curtain track and panels sized to fit with 1.5-inch overlaps on each post, and plan a half-day install. If you're starting from scratch on an open patio, budget for a freestanding frame plus weighted bases and plan a full day. Either way, prioritize anchoring at the top and bottom of every panel, check your HOA rules before ordering, and make a clean storage plan before the season ends. Done right, a temporary enclosure gives you a genuinely comfortable outdoor room without a permanent commitment or a major budget.
FAQ
I want to block rain, but I prefer curtains. Will outdoor curtains fully protect a patio?
If your main concern is rain but you want to keep visibility, choose clear vinyl with a real bottom seal (weighted hem, bottom rail clamps, or a draft-tube along the floor line). Curtain fabric will reduce wind and glare, but it typically lets water blow through at the seams and bottom edge, especially during gusts.
How do I know if my vinyl panel anchoring is strong enough for windy weather?
Use grommets or fasteners rated for your panel thickness and install spacing. As a rule of thumb, more wind exposure means tighter grommet spacing (down to 6 inches on center for higher-wind/higher-load setups) and stronger top track anchoring, otherwise the system can billow even if the vinyl itself is thick.
My patio doesn’t have solid beams where I can mount a track. What should I do?
If you only have a ceiling edge or fascia with weak structure, avoid lagging into trim. You need to attach to studs, beams, or masonry cores, not decorative boards. For weak surfaces, use a freestanding frame or add an engineered secondary rail that spans structural members so the track cannot pull out.
What’s the safest way to weigh down a freestanding patio enclosure on pavers?
For a freestanding frame on pavers or concrete, water-fillable base weights or sandbag-style weights work better than light patio furniture weights. Match the base weight to the frame size and panel height, and set the frame level, then re-check plumb after the first windy day.
How can I stop drafts and insects from getting in around the bottom edge?
Don’t rely on overlap alone. Close the seams with magnetic strips, hook-and-loop tape, or overlapping zipper-style closures if your kit includes them. Then add a bottom draft seal (weighted hem or foam tube) because most insect entry and cold air leaks happen at the floor line, not the top seams.
What should I consider so guests can exit quickly if the enclosure is closed?
If you need an emergency exit, plan for quick access before you hang panels. Ideally, use one side opening with a simple release method (hook-and-loop, magnets, or a latch that can be operated from inside) and keep entry hardware above typical ankle height so it cannot snag a person moving fast.
Can I use a temporary clear vinyl enclosure in summer without getting too hot or humid?
Yes, but only if the heat plan matches the material. Clear vinyl can trap heat like a greenhouse, and it can also become a cold-damp surface at night. To avoid condensation, install a simple vent gap strategy (partial closures on one side or a top vent panel) or add intermittent airflow so the enclosure does not stay sealed and wet.
Is it safe to use a shade sail as the top layer of a temporary patio enclosure?
You can, but treat overhead shade hardware as a wind-load system. Use only hardware designed for your sail size and your location’s gust patterns, keep the sail tension properly set, and assume gust forces can be several times the static load. Then pair the overhead cover with side panels so wind does not “funnel” under loose edges.
Which part usually causes temporary enclosures to fail in real storms, the top mounts or the bottom seal?
Some people skip bottom closures because it feels minor, but wind drives airflow under the bottom edge and increases flapping. Add a weighted hem or clamp system, then walk the perimeter to confirm there are no daylight gaps at corners and overlaps.
Do I usually need a permit for a temporary patio enclosure, and how do I check?
Start by confirming your local rules and HOA preferences using the simplest comparable setup. Curtain-only solutions inside an existing covered area are least likely to trigger permitting, while a freestanding frame that changes the property’s visible footprint is more likely to. If in doubt, ask the building department what qualifies as a temporary enclosure versus a porch cover.
How do I calculate panel size so overlaps stay consistent after installation?
Buy your components based on measured opening width and overlap plan. If you plan 1.5-inch overlaps on sides and posts, order enough panel width to keep overlaps consistent after hanging, and avoid panels that end up too short because you cannot “make up” lost overlap later without visible gaps.
What’s the best way to store temporary patio panels so they last next season?
A practical storage rule is to keep panels clean, fully dry, and not folded tightly against themselves. For vinyl, roll on a clean core to prevent creases, store out of UV, and avoid trapping moisture because it accelerates mildew and vinyl stiffness over time.
Next Articles
How to Enclose a Patio: DIY Steps, Costs, and Options
DIY guide to enclose a patio with screen, glass, or vinyl. Costs, steps, materials, and common mistakes.
Do It Yourself Patio Enclosures: Step by Step Guide
Step-by-step guide to DIY patio enclosures and screen enclosures, from planning and framing to doors, sealing, and upkee

How to Decorate a Long Narrow Patio: Layout Tips
Practical DIY layout and decor tips to widen a long narrow patio using zoning, furniture spacing, lighting, greenery, an