You can enclose a patio with plastic by mounting a track or channel system to your existing posts or frame, then hanging or sliding clear vinyl panels or rigid polycarbonate sheets into place, sealing the edges, and adding a door panel for entry. The whole project is beginner-friendly, takes a weekend or two, costs anywhere from $200 to $1,500 depending on size and materials, and the result is a usable three-season (or even four-season) outdoor room that blocks wind, rain, and cold without walling off the view.
How to Enclose a Patio With Plastic: Step by Step DIY

Felix Brennan
1 Jul 2026

Choose the right enclosure style first
Before you buy anything, you need to decide which type of plastic enclosure fits your patio. The two main approaches are flexible clear vinyl panels and rigid plastic sheets, and they suit different situations. A third option, vinyl roll-up curtains on a track system, sits somewhere in between: it gives you seasonal flexibility because you can roll them up when the weather is nice.
Flexible clear vinyl panels are the most popular DIY choice. You hang pre-cut or custom-sized vinyl sheets from a header track using grommets, zippers, or snaps, and the panels overlap at the seams. They're affordable, easy to take down seasonally, and they look clean when done right. The key quality variable is the type of vinyl. Pressed and polished clear vinyl (sometimes called press-polished) is noticeably clearer and holds its shape better than rolled vinyl, which tends to wrinkle, yellow faster, and look wavy. For a patio enclosure you actually want to sit in and look through, pressed-polished is worth the extra cost.
Rigid plastic panels, either twin-wall polycarbonate or clear acrylic sheet, are a more permanent solution. Glass patio enclosures work a lot like rigid clear panel systems, so the same measuring, anchoring, and sealing ideas apply. Polycarbonate is incredibly tough (roughly 200 times stronger than glass by impact resistance) and handles hail, wind, and temperature swings well. Acrylic offers slightly better optical clarity (up to about 90% light transmission) and holds up longer against UV yellowing without a protective coating.
Polycarbonate without a UV-protective coating can start to haze or yellow in as little as 3 to 5 years outdoors, so always buy UV-coated polycarbonate sheets. Both materials work great; acrylic is the better pick for clarity and long-term outdoor durability, while polycarbonate wins on impact resistance and cost.
| Material | Clarity | UV Durability | Impact Resistance | Best For | Approx. Cost |
|---|---|---|---|---|---|
| Pressed-polished clear vinyl | Excellent | Good (UV-treated) | Flexible, puncture-resistant | Seasonal/removable enclosures | $3–$8 per sq ft |
| Rolled clear vinyl | Fair (waves/wrinkles) | Lower | Flexible | Temporary or budget setups | $1–$3 per sq ft |
| UV-coated polycarbonate (twin-wall) | Good | Excellent (coated) | Outstanding | Permanent enclosures, wind/hail zones | $4–$10 per sq ft |
| Clear acrylic sheet | Excellent (~90%) | Excellent | Moderate (can crack) | High-clarity permanent panels | $5–$12 per sq ft |
If you want something closer to a glass-walled room, rigid panels (acrylic or polycarbonate) are the direction to go, and you may also want to explore how to enclose a patio with glass or with windows for even more permanent options. If you want flexibility and easy seasonal takedown, clear vinyl with a track system is the practical winner for most DIYers.
Materials and supplies you'll need
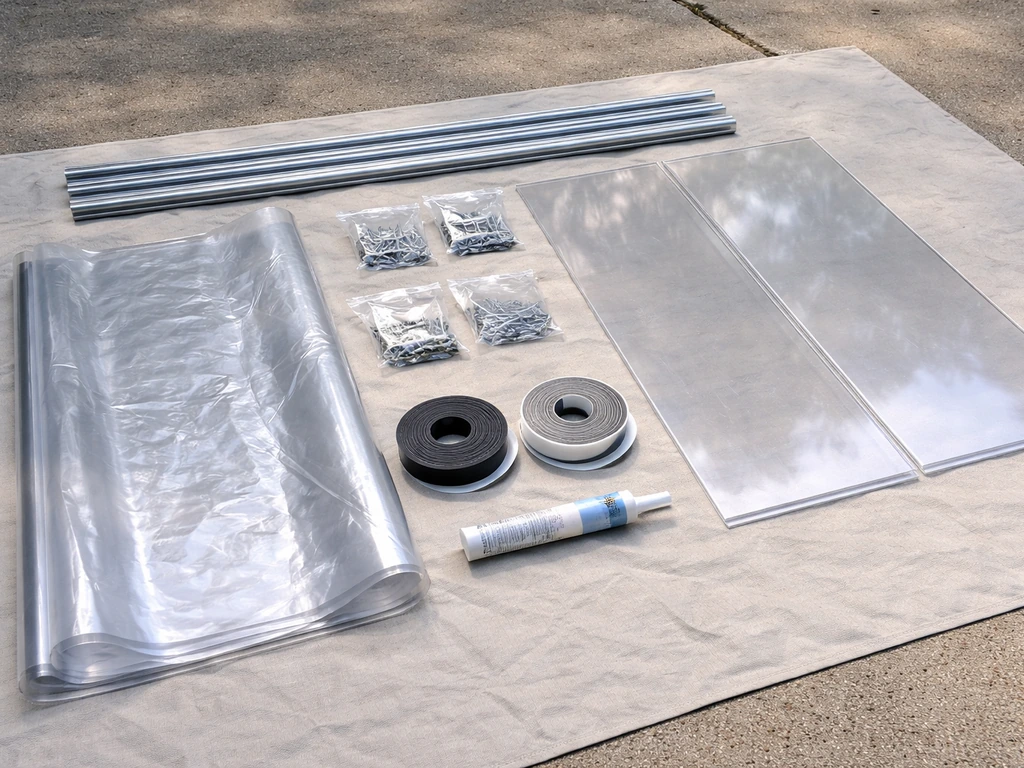
The exact list depends on which system you choose, but here's a comprehensive starting point that covers both flexible vinyl and rigid panel installations. You won't need everything on this list, just the items that apply to your chosen approach.
- Clear vinyl panels or rigid plastic sheets (sized to your openings, UV-treated)
- Header track or top U-channel (aluminum or PVC, matches your panel thickness for rigid; snap/hook track for vinyl)
- Bottom U-channel or ground track (for rigid panels; optional weight bar for vinyl)
- Side U-channels or vertical posts with routed slots (for rigid panels)
- Grommets, snaps, or zipper tape (for flexible vinyl systems)
- Aluminum self-tapping screws or stainless steel wood screws (rust-resistant is a must)
- Concrete anchors or masonry screws if attaching to a concrete or brick surface
- Weatherstripping or foam tape for sealing channel gaps
- Aluminum foil tape (solid, for sealing tops of twin-wall polycarbonate flutes)
- Venting/vent tape (non-woven, breathable, for sealing bottoms of twin-wall polycarbonate)
- Silicone caulk (clear, exterior-grade) for seam sealing
- Door panel or pre-made zippered door panel (for vinyl systems) or framed door unit (for rigid systems)
- Tape measure, pencil, and level
- Drill with masonry and wood bits
- Circular saw or jigsaw (for cutting rigid panels; score-and-snap works for thin acrylic)
- Utility knife and straightedge (for trimming vinyl)
- Rubber mallet
- Safety glasses and work gloves
- Ladder
One thing worth emphasizing: buy UV-treated vinyl or UV-coated rigid panels every time. It costs a little more upfront but saves you from replacing cloudy, brittle panels in just a couple of years. Also, use stainless steel or aluminum fasteners anywhere that touches the outside. Regular steel screws will rust through your channels and stain the panels.
Planning: measure carefully, then measure again
Accurate measurement is the most important step in this whole project. Flexible vinyl has almost no tolerance for error because it can't be shimmed or adjusted the way wood framing can. If your panels are even half an inch too short, you'll get a gap that lets in cold air and bugs. Porch Protection Services also recommends that curtain panels lap onto support posts by about 1.5 inches on each vertical side, and notes a 1 3/8 inch header track depth for their system-specific fit. If they're too wide, they won't hang flat.
How to measure your openings
- Measure each opening individually. Even if openings look identical, they often vary by a quarter inch or more, especially on older patios.
- For flexible vinyl systems with a track: measure the opening width from the inside face of one post to the inside face of the other. Your panels should overlap each support post by about 1.5 inches on each side, so add 3 inches total to that measurement for each panel.
- Measure the height from the underside of the header track (or roof edge) down to the floor or sill. For vinyl, subtract about half an inch from the floor so the panel doesn't drag and collect dirt.
- For rigid panel systems using U-channels, measure the clear opening and then subtract the depth of the two opposing channels to get your panel cut size. A standard U-channel has a channel depth of about 3/8 to 1/2 inch, so subtract that from both the width and height.
- Sketch out a layout drawing with all measurements labeled. Mark where you want the door opening before ordering materials.
Layout, door placement, and anchoring approach
Decide where your door or entry point goes early, because it affects how you lay out the panel sequence. For most patios, a centered door or a door positioned near one side of the main opening works well. With vinyl systems, the door is usually a separate zippered panel that you install in the same track as the other panels. With rigid panel systems, plan on framing a standard door-width opening (32 to 36 inches) with vertical posts and using a hinged or sliding door unit.
How you anchor your frame depends on what your patio is made of. For concrete, use masonry screws (Tapcon-style) or expansion anchors rated for the load. Pre-drill with a hammer drill and a carbide-tipped bit at least 1. 25 inches into the concrete.
For wood decking, use lag screws into the structural framing below. For brick, masonry anchors work the same way as concrete. If you already have existing posts (common on covered patios), you're ahead of the game: you just need to attach channels or tracks to those posts using self-tapping screws into aluminum or standard wood screws into wood posts.
A common alternative to fully rigid walls is to enclose a patio with lattice around posts, then add panels or curtains for weather protection. Plan for wind load too. In open or coastal areas, use more fasteners with shorter spacing, and consider adding a mid-rail horizontal support across tall openings over 7 feet high.
Step-by-step installation
Here's how the actual build goes. I'll walk through a flexible vinyl track system first (the most common DIY approach), then cover the key differences for rigid polycarbonate or acrylic panels.
Flexible vinyl panel installation with a header track
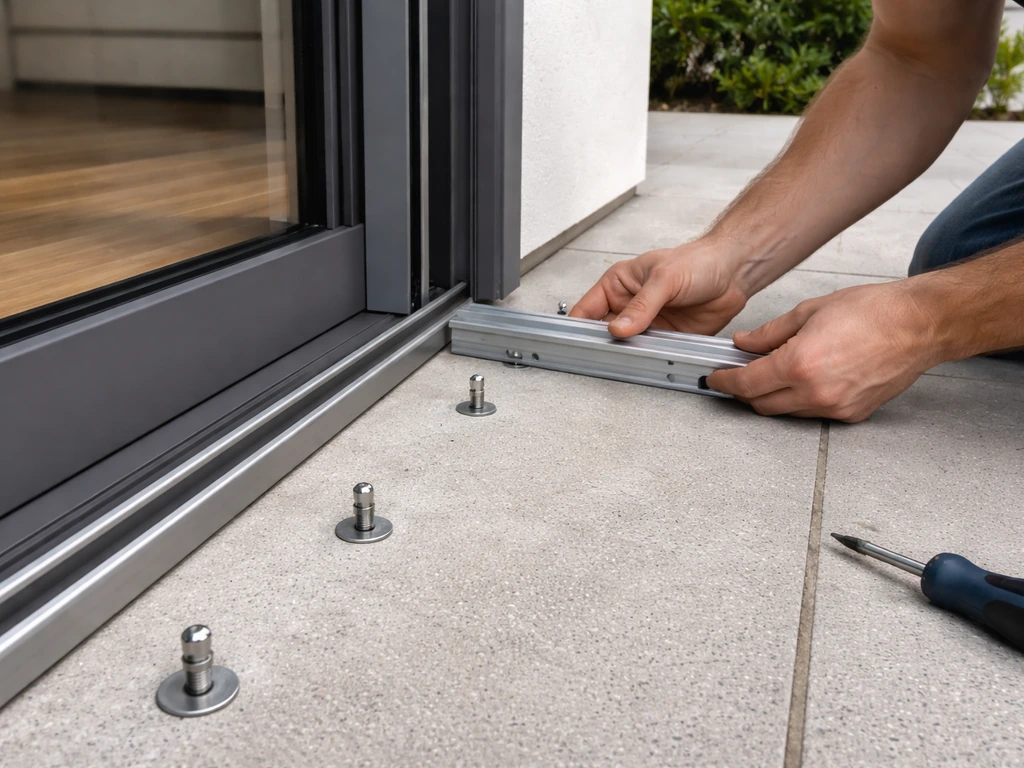
- Install the header track first. Hold the track against the underside of your roof edge or header beam, check it's level with a level, and screw it in place. Space fasteners every 12 to 16 inches for solid attachment. For concrete or brick headers, pre-drill and use masonry anchors.
- Install vertical side tracks (if using them) along each post or wall edge. These keep panel sides from flapping in the wind. Screw them flush to the post face at 12-inch intervals.
- If using a bottom track or weight bar, install it at floor level. A bottom track keeps the vinyl taut at the base. Alternatively, you can sew or clip a weighted bar (a length of metal or PVC pipe) into a hem at the bottom of each panel to hold it down.
- Cut your vinyl panels to size using a sharp utility knife against a straightedge. Always cut slightly large and trim back, not the other way around.
- Install grommets along the top edge of each panel if they aren't pre-installed. Standard grommet spacing is every 12 to 16 inches. Follow the grommet kit instructions and reinforce the grommet holes with a webbing tape backing to prevent tearing.
- Hang the panels by sliding grommets onto hooks in the header track, or snap them into a snap-track system. For overlapping seams, lap each panel over the next by 2 to 4 inches and use snap fasteners or hook-and-loop tape along the overlap to keep them sealed.
- Install the door panel last. A pre-made zippered door panel hangs in the same track and uses a zipper tape seam at one or both sides for entry. Make sure the zipper runs the full height of the opening and the pull tab is accessible from both sides.
- Tension each panel by pulling gently downward and securing the bottom hem to the base track or attaching the weight bar. The panel should hang flat without waves or sag.
Rigid polycarbonate or acrylic panel installation with U-channels
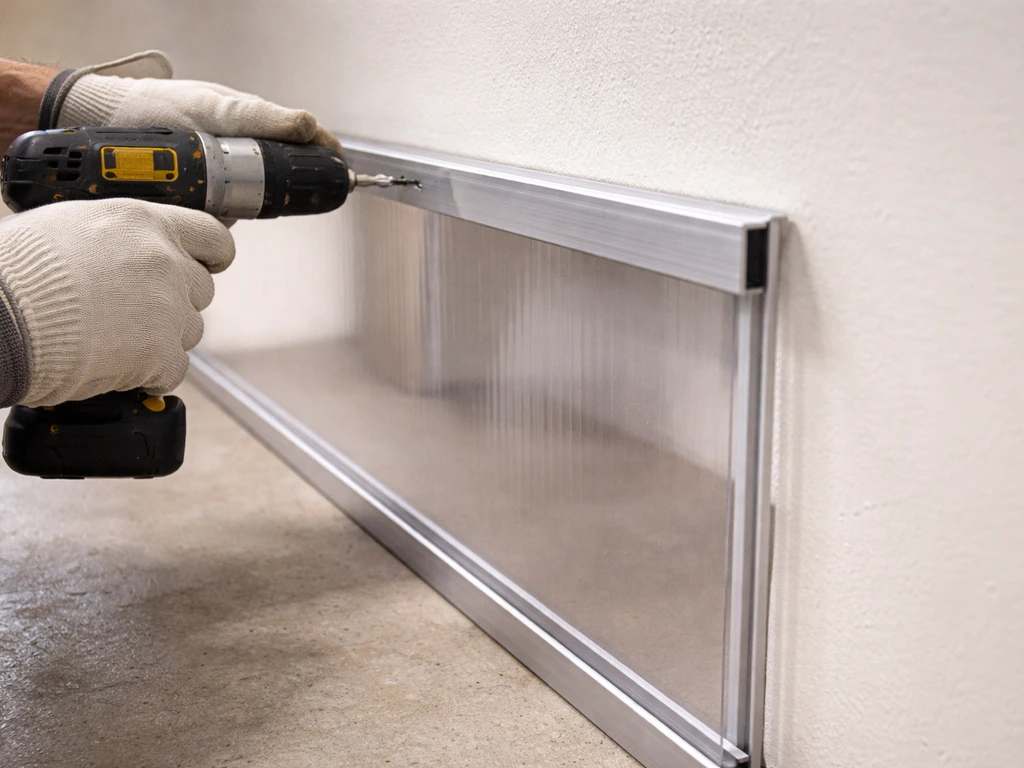
- Install the top U-channel first along the header, screwing through the back of the channel into your structural surface. Then install the bottom channel at floor level.
- Install vertical U-channels or side-mount channels along each post. If working with multiple panels side by side, use H-channel (double-sided) between panels to capture both edges.
- Seal one end of each twin-wall polycarbonate flute (the top edge) with solid aluminum foil tape before installation to prevent moisture and insects from entering the channels. Seal the bottom edge with breathable vent tape, not solid tape, to allow condensation to drain out. Drill small weep holes in the bottom U-channel every 12 inches to let any trapped condensation escape.
- Slide each panel into the top channel first (it needs about 3/4 inch of clearance there), then tilt it down into the bottom channel. Don't force it. The panel should slide freely to allow for thermal expansion.
- Begin installing panels on the side of the enclosure that faces away from your prevailing wind and rain direction. Work toward the windward side. This way each successive panel laps the previous one in the direction that sheds water, not collects it.
- Do not leave any panel in place without all its fasteners installed. Unsecured panels in even moderate wind can act as sails and damage the whole enclosure.
- Seal the top of the U-channel joints with clear exterior-grade silicone caulk. Seal mitered corner joints the same way.
- For acrylic panels, leave a 1/8-inch expansion gap at each edge inside the channel. Acrylic expands and contracts with temperature changes, and without that gap it can crack at the edges over time.
Weatherproofing and ventilation
A plastic enclosure that's perfectly sealed will become a sauna in summer and a condensation chamber in cool weather. You need to build in ventilation from the start, not as an afterthought. To keep air moving and prevent moisture problems, many people also plan for how to enclose a patio with windows or operable sections.
Sealing the seams
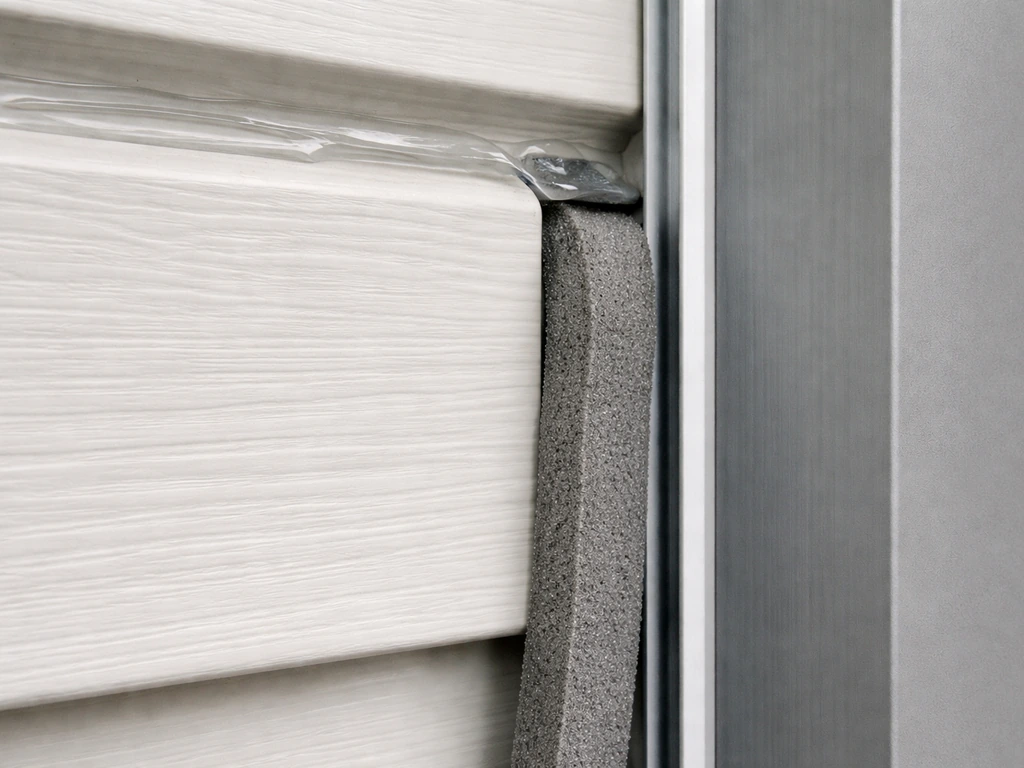
For vinyl panels, apply foam weatherstripping tape behind the vertical overlap seams where panels meet posts. Run a bead of clear silicone caulk at the top edge where the vinyl meets the header track. At the bottom, a threshold seal (foam or rubber) pressed against the vinyl hem stops ground-level drafts. For rigid panels, seal all channel joints with clear silicone and use foam tape inside the channels to prevent rattling and air gaps. The door bottom seal is critical: a door sweep or vinyl wiper seal at the base of the door panel keeps rain from blowing underneath.
Managing airflow and condensation
Leave at least one operable vent panel. In a vinyl system, designate one or two panels to roll up or clip open. In a rigid panel system, plan at least one operable vent or awning window. Some enclosure system designs include a solid fabric vent panel above the door specifically for airflow management; this is a smart detail to copy.
In twin-wall polycarbonate enclosures, the breathable vent tape at the bottom of each panel combined with weep holes in the bottom channel handles panel-level condensation drainage. But you'll still get surface condensation on cold nights: the fix is airflow. Even leaving a one-inch gap at the top of a vinyl panel on mild days dramatically reduces moisture buildup inside the enclosure.
In climates with big temperature swings, consider whether a full seal is even what you want. Many homeowners are happiest with a roll-up vinyl system that can be partially opened on warm days and fully closed for rain or cold. The Reddit community of DIY porch enclosure builders consistently notes that vinyl enclosures perform great in calm weather but benefit hugely from roll-up capability when wind picks up. That ability to vent rather than resist is what makes the enclosure actually last.
Cost, timeline, and keeping it in good shape
Realistic budget and time estimates
| Enclosure Type | Material Cost (200 sq ft patio) | Hardware and Track | Total Estimated Cost | Install Time |
|---|---|---|---|---|
| Rolled clear vinyl + basic track | $200–$400 | $50–$100 | $250–$500 | 1 day |
| Pressed-polished vinyl + snap/track system | $400–$800 | $100–$200 | $500–$1,000 | 1–2 days |
| Twin-wall polycarbonate + U-channel | $600–$1,200 | $150–$300 | $750–$1,500 | 2–3 days |
| UV acrylic sheet + U-channel | $800–$1,500 | $150–$300 | $950–$1,800 | 2–3 days |
These are DIY material costs only. If you're hiring help for framing or concrete anchoring, add $200 to $500 for labor. The biggest cost variable is how much of a frame you're starting with. A covered patio with existing posts cuts your project time and cost significantly compared to building a freestanding structure from scratch.
Cleaning your plastic panels
Clear plastic panels look great when clean and terrible when dirty. Fortunately, maintenance is easy if you do it regularly. For all plastic types, start with a rinse from a garden hose (no pressure washer; the high pressure can damage UV coatings). Then wash gently with lukewarm water and a small amount of mild dish soap, using a soft cloth or sponge.
Never use paper towels, abrasive pads, or dry wiping on clear plastic: they scratch. For acrylic and polycarbonate, avoid ammonia-based cleaners (like many glass cleaners), acetone, alcohol, or any petroleum-based solvent. These dissolve or cloud the surface fast. If your panels develop light scratches or haze over time, a plastic-specific polish or wax product will restore most of the clarity.
For vinyl panels, rainfall does most of the routine cleaning work. Every few months, hose them down and wipe with mild soapy water. If mildew appears (common in humid climates), a diluted solution of water and white vinegar applied with a soft cloth clears it without damaging the vinyl. Rinse thoroughly after.
Seasonal takedown and re-tensioning
One of the real advantages of a vinyl panel system is the ability to take panels down for summer and re-hang them in fall. When storing vinyl panels, roll them gently (don't fold), keep them out of direct sunlight, and store at room temperature if possible. Extreme cold makes vinyl brittle and prone to cracking when unrolled.
At re-installation, inspect all grommets for tearing, check snap fasteners for corrosion, and re-tension the panels by re-seating the bottom weight bar or clips. Rigid polycarbonate and acrylic panels are typically left in place year-round, but inspect the silicone caulk seams each spring and re-caulk anywhere that's cracked or pulled away. Check that all fasteners are tight. Polycarbonate's static charge tends to attract dust and particles, so a spring cleaning wash before the season is worth doing.
Repairs to know about
- Small tears in vinyl: seal immediately with clear vinyl repair tape from both sides to prevent the tear from spreading
- Cracked acrylic panel edge: remove the panel, trim back to a clean edge, and re-install with a fresh expansion gap; a crack usually means the panel was installed too tight
- Yellowing polycarbonate: if it's UV-coated and still yellowing before 5 years, the coating may have been compromised by cleaning with ammonia products; replace affected panels
- Loose or rattling panels in wind: add more fasteners, tighten existing ones, and add foam tape inside channels to eliminate play
- Condensation pooling at the base of twin-wall polycarbonate: check that weep holes in the bottom channel aren't clogged with debris and clear them with a small wire
Your next steps
The best way to move forward is to walk your patio with a tape measure today and sketch your openings with dimensions. Decide on flexible vinyl or rigid panels based on whether you want a seasonal setup or something more permanent. If you're unsure, flexible pressed-polished vinyl with a quality snap track is the lower-commitment option that still looks great.
Order panels with grommets pre-installed or with grommet spacing specified (you can usually choose your own spacing from custom vinyl suppliers), and pick up your track hardware, UV-stable fasteners, and silicone caulk at the same time. Most people find that getting all the materials staged before starting makes the actual installation go in a single focused weekend.
If you're leaning toward something more structural, exploring how to enclose a patio with walls or even a glass or window-based enclosure might be worth a look as comparison points before you commit.
FAQ
Do I need permits or HOA approval to enclose a patio with plastic panels?
Often you do, especially if you’re adding a door, changing exterior appearance, or creating a more permanent enclosure. Check your local building code for zoning setbacks and any requirements for egress, and confirm with your HOA whether the plastic panels or frames must match approved colors and hardware.
What’s the best way to measure for clear vinyl if I’m worried about shrinkage or small fit issues?
Measure each opening in multiple spots (width and height at top, middle, and bottom). Add a small planning margin for overlap at seams and confirm your system’s required overlap spec before ordering, because vinyl generally can’t be stretched like fabric and half-inch gaps can become noticeable drafts.
Can I install plastic panels directly on wood posts, or do I need a specific track type?
You can mount to wood posts, but use the right mounting path. Plan on attaching an aluminum track/channel or a properly rated header rail, then secure it into structural framing below (not just surface trim) so wind load doesn’t loosen the channels over time.
How do I handle gaps at the bottom if my patio floor is uneven?
If the surface isn’t level, a flat foam or rubber threshold seal may leave pinholes. Use a compressible bottom seal and test-fit the panels before final tightening. For larger irregularities, consider adding a simple adjustable threshold or leveling strip so the hem sits evenly.
Is polycarbonate or acrylic better if I live in an area with heavy hail?
Polycarbonate is the safer choice for hail and impact resistance. Acrylic can crack more easily under direct hits, even though it can look slightly clearer, so if hail risk is a concern, prioritize UV-coated polycarbonate and impact-rated mounting hardware.
Will clear plastic yellow faster if it’s installed in direct sun all day?
Direct UV exposure is the main cause of yellowing, so UV-treated or UV-coated materials matter most. Even with UV protection, consider limiting exposure by using a roll-up style where practical or shading the enclosure from the harshest sun angle, especially on the west and south sides.
Why do my vinyl panels keep wrinkling or bowing after installation?
Wrinkling usually comes from incorrect tensioning, wrong panel type (rolled vinyl tends to wrinkle more), or uneven overlap alignment. Re-check that grommets and snap fasteners are seated consistently, then re-tension the bottom weight bar or clips so the hem hangs straight rather than pulling to one side.
How much ventilation should I build in, and where should it go?
You generally want an inlet and an outlet so warm moist air can escape. Place operable vent sections high and or near the top, and use lower venting or breathable bottom provisions when using rigid systems with weep drainage. Leaving small gaps only at mild conditions is helpful, but rely on real airflow vents for shoulder seasons and cold nights.
Can I keep the enclosure fully sealed during winter storms?
A fully sealed enclosure helps with wind and precipitation, but trapped moisture and temperature swings can cause condensation and surface issues. If your design allows it, use controlled ventilation strategies (for example, operable vent panels) during longer cold periods to reduce persistent dampness, then seal tightly when high winds arrive.
What should I use to seal where the plastic meets the track or header?
Use clear silicone at the interfaces where movement is limited and you want a durable seal. Avoid generic adhesives that can become brittle in cold or fail under UV, and do a quick test bead in a hidden area to confirm it bonds well to the plastic and doesn’t cloud clear panels.
How do I prevent mold on the vinyl if I’m in a humid climate?
Plan on periodic rinsing and gentle washing, mildew grows fastest when water sits and airflow is low. If mildew appears, use a mild vinegar-water solution on a soft cloth, then rinse thoroughly. Also make sure your vent panel is operable so the enclosure can dry between storms.
Can I use a pressure washer to clean panels and track systems?
Avoid pressure washing, it can damage UV coatings and force water into edges and seams. Use a garden hose rinse and gentle hand washing, especially around grommets, snaps, and track joints where water and dirt can accumulate.
What’s the safest door seal setup to stop drafts and rain blow-through?
Use both a door sweep or vinyl wiper at the bottom and a tight side seal where the door meets the frame, then verify the threshold seal compresses evenly. Test with a light water spray or a windy day check, because small underside gaps are where most leaks happen.
How should I store vinyl panels between seasons to avoid cracks?
Roll instead of fold, keep them out of direct sunlight, and store in a room-temperature area when possible. Extreme cold can make vinyl brittle, so unroll gently and inspect grommets for tearing and hardware for corrosion before rehang.
What’s a common mistake that causes premature failure of a plastic patio enclosure?
Using non-UV-treated materials or non-corrosion-resistant fasteners. Rust stains and metal expansion can loosen tracks, and degraded UV surfaces become cloudy quickly. Also, skipping ventilation is a frequent long-term issue, condensation can reduce clarity and accelerate seal failure.
Next Articles
How to Enclose a Patio With Walls: DIY Step by Step
Step-by-step DIY guide to enclose a patio with walls, covering planning, materials, weatherproofing, and installation

How to Decorate a Long Narrow Patio: Layout Tips
Practical DIY layout and decor tips to widen a long narrow patio using zoning, furniture spacing, lighting, greenery, an

How to Decorate a Rectangular Patio Step by Step
Step-by-step plan to decorate a rectangular patio with smart layout, zones, furniture fit, lighting, plants, and seasona