You can build a patio misting system yourself in a weekend for a few hundred dollars, and it will cool your outdoor space by 15 to 25 degrees Fahrenheit when sized and installed correctly. The key is matching your nozzle spacing, pump pressure, and tubing to your specific patio size and climate. Get those three things right, and you end up with a cool, dry mist that evaporates before it hits anything. Get them wrong, and you get a wet patio and a frustrated afternoon. This guide walks you through the whole process from measuring your space to flipping the system on for the first time.
How to Build a Patio Misting System Step by Step

Felix Brennan
9 Jun 2026
Plan and measure your patio before you buy anything
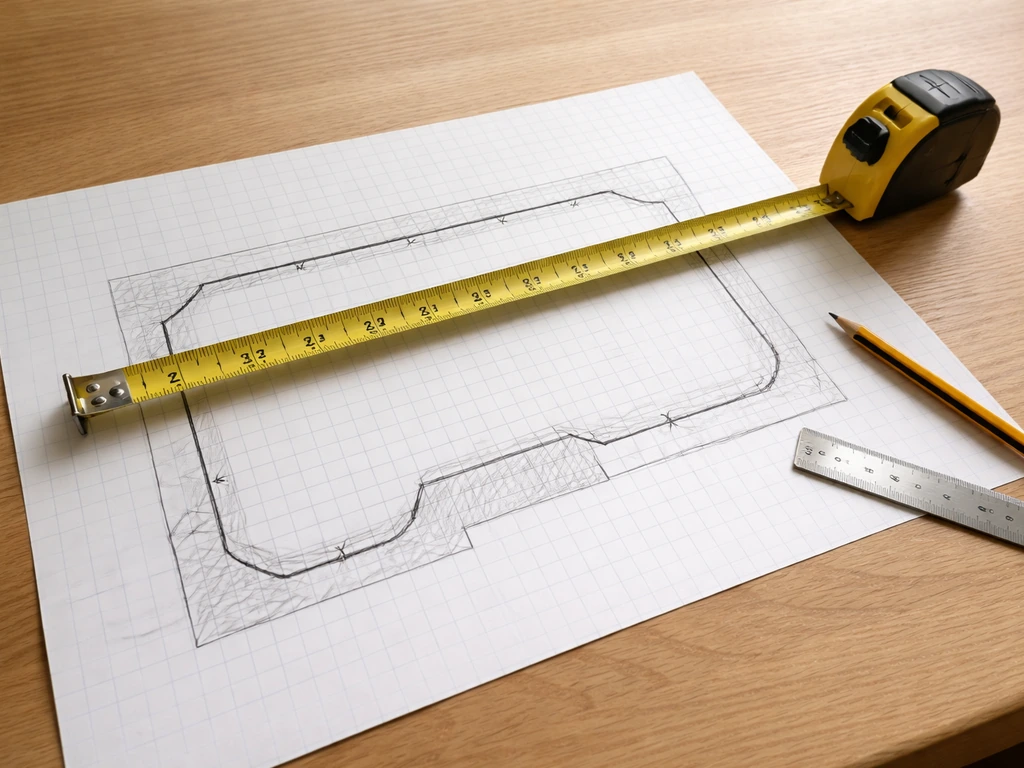
Start by sketching your patio on graph paper or a simple notes app. You need four measurements: total linear footage of the perimeter (or canopy/beam edges where you'll mount the mist line), the ceiling or mounting height, the square footage of the seating area you want to cool, and the location of your nearest hose bib or water supply. These numbers drive every decision that follows.
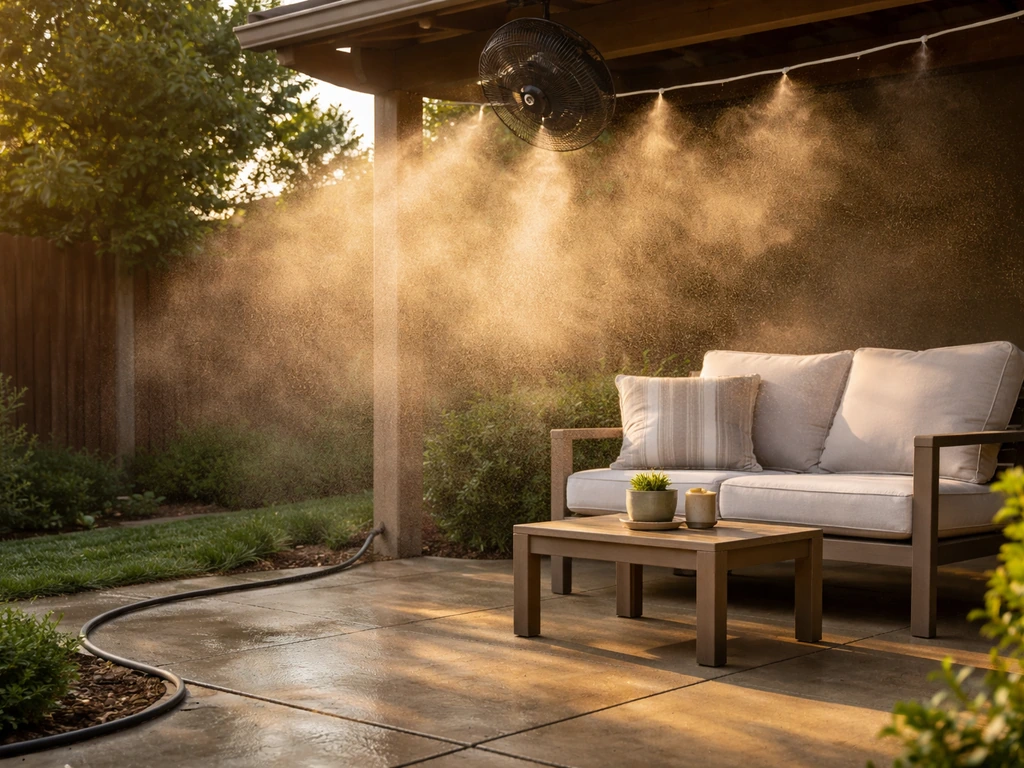
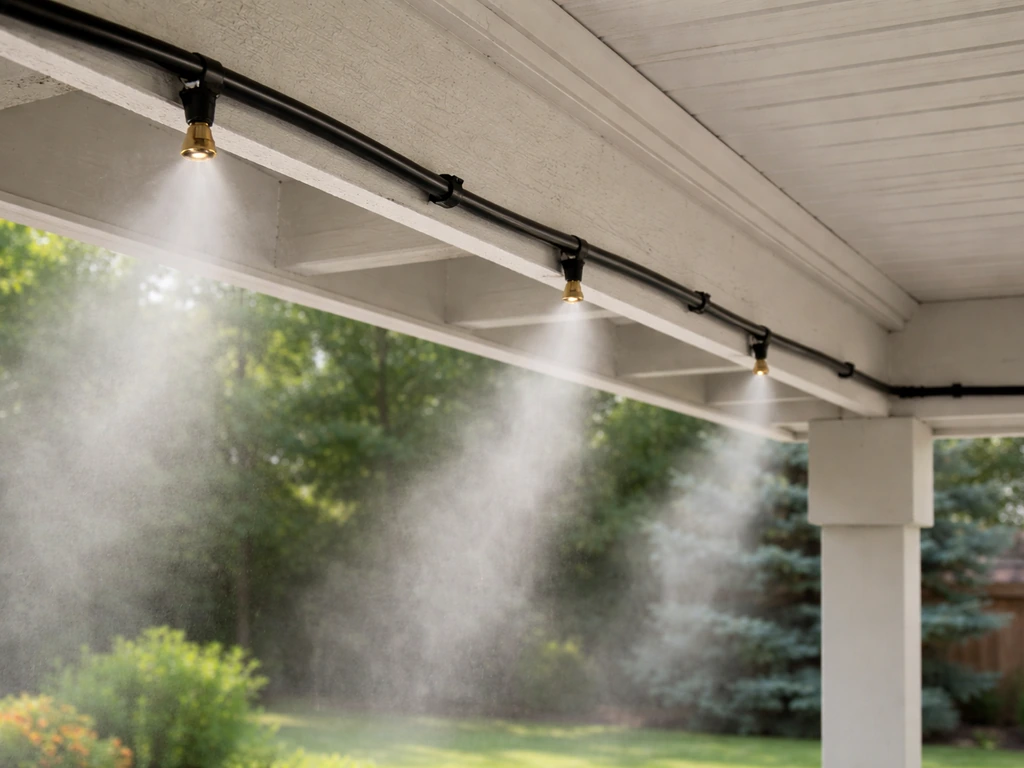
Mounting height matters more than most people expect. Nozzles mounted at 8 to 12 feet above the ground give mist droplets enough air time to evaporate before landing on furniture and people. If your patio has a lower pergola or cover at 7 feet or less, you'll need smaller orifice nozzles that produce a finer droplet (more on that in the component section). For enclosed or screened patios specifically, lower mounting heights are common, so plan conservatively on nozzle size from the start.
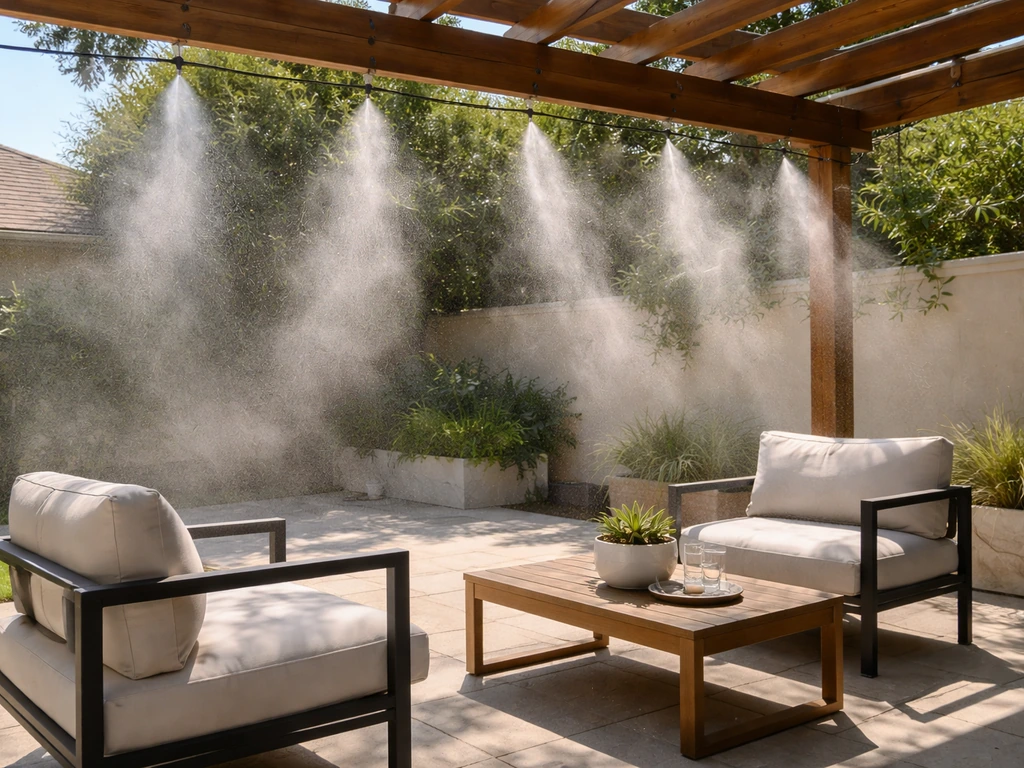
Mark where you want mist coverage on your sketch. This doesn't need to be the entire patio. Focus on seating zones and areas where people spend the most time. A typical residential patio layout uses nozzles spaced 24 to 36 inches apart along the mist line, with a practical cooling radius of roughly 12 to 16 feet per nozzle cluster depending on pressure and orifice size. Use those numbers to estimate how many nozzles you need before you price out components.
Also note where your outdoor electrical outlet is located. You'll need a GFCI-protected outlet within reach of your pump or timer. If there isn't one nearby, either have one added by an electrician before you start or factor in an outdoor-rated extension cord with GFCI protection as a temporary measure.
Choosing the right components
This is where most DIY misting projects go sideways, because people buy a kit without understanding how the parts interact. Let's go component by component.
Nozzle type and orifice size
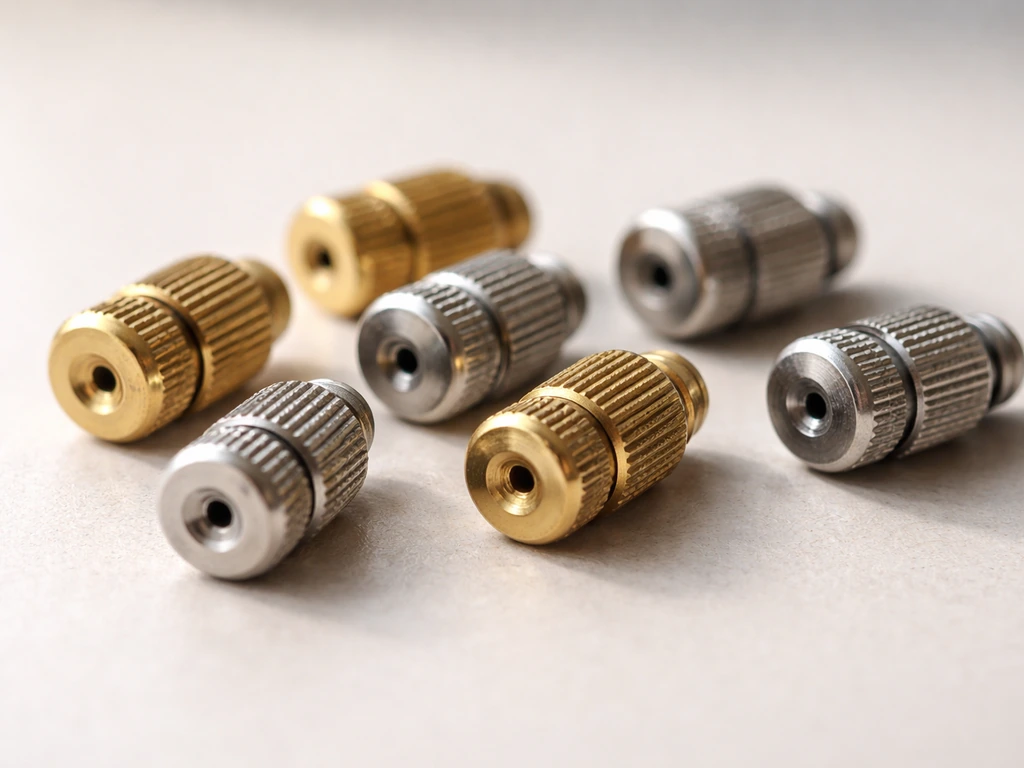
Nozzles come in brass or stainless steel, with orifice sizes typically ranging from 0. 006 inches to 0. 020 inches. Smaller orifices produce finer droplets (30 to 80 microns is the target range for true evaporative cooling) but require higher pressure to function correctly.
Larger orifices push more water through at lower pressure but create bigger droplets that are more likely to wet surfaces. For enclosed or shaded patios, especially in humid climates, go smaller on the orifice. A wet patio in high humidity is a real risk when the mist can't evaporate fast enough. Stainless steel nozzles cost a bit more but resist mineral buildup and last significantly longer than brass in areas with hard water.
Fogco notes that its misting nozzles are available in brass or all stainless steel, with orifice sizes from . 006 to . 020 inches and flow rates around 0. 010 to 0.
045 GPM for sizing nozzle counts Stainless steel nozzles cost a bit more.
Pump and pressure
Low-pressure systems run on standard garden hose pressure (30 to 70 PSI) and work with larger orifice nozzles. They're cheaper and easier to set up, and products like the DIG EXL Series foggers are designed around exactly this range. Mid-pressure systems run 100 to 250 PSI and produce noticeably finer mist. High-pressure systems above 500 PSI are more common in commercial settings and require specialized pumps and tubing rated for those loads. For most residential patio builds, a mid-pressure pump in the 100 to 250 PSI range hits the sweet spot: fine enough mist to cool without wetting, durable enough for daily use, and still DIY-friendly to install.
Tubing
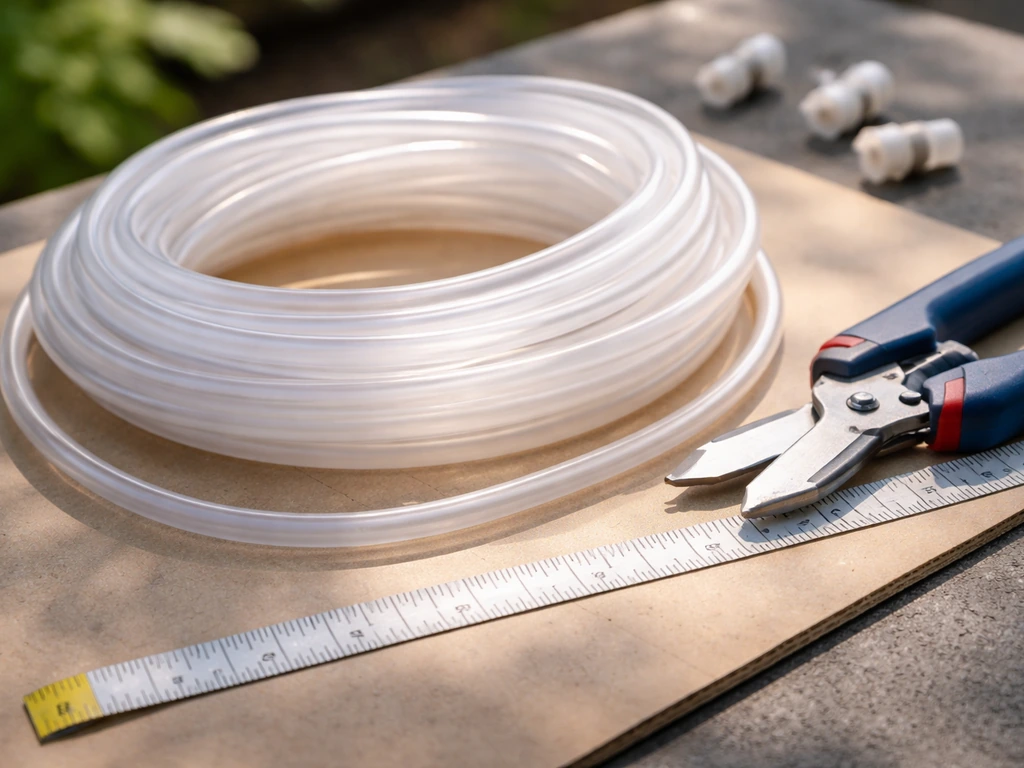
Use UV-stabilized tubing rated for your pump's maximum pressure. Standard 3/8-inch low-density polyethylene misting tubing, like DIG's OB07 line, includes at least 2% UV inhibitor and handles typical low-to-mid pressure setups. For mid-pressure systems, look for nylon tubing rated up to 1000 PSI for a safety margin well above your operating range. Some PE tubing options max out around 230 PSI, so read the spec sheet before buying. The rule is simple: your tubing's rated max PSI must exceed your pump's output pressure by a meaningful margin, not just match it.
Fittings
Use compression fittings or push-to-connect fittings that match your tubing diameter. For 3/8-inch tubing, most misting kits include compatible fittings, but if you're building a custom layout, buy extra tee fittings for branching and end caps to terminate unused runs. Brass fittings are the standard choice for mid-pressure setups. Make sure any nozzle insert fittings match the nozzle thread size (1/8-inch NPT is the most common for residential nozzles, 1/2-inch base for some fogger series).
Filtration
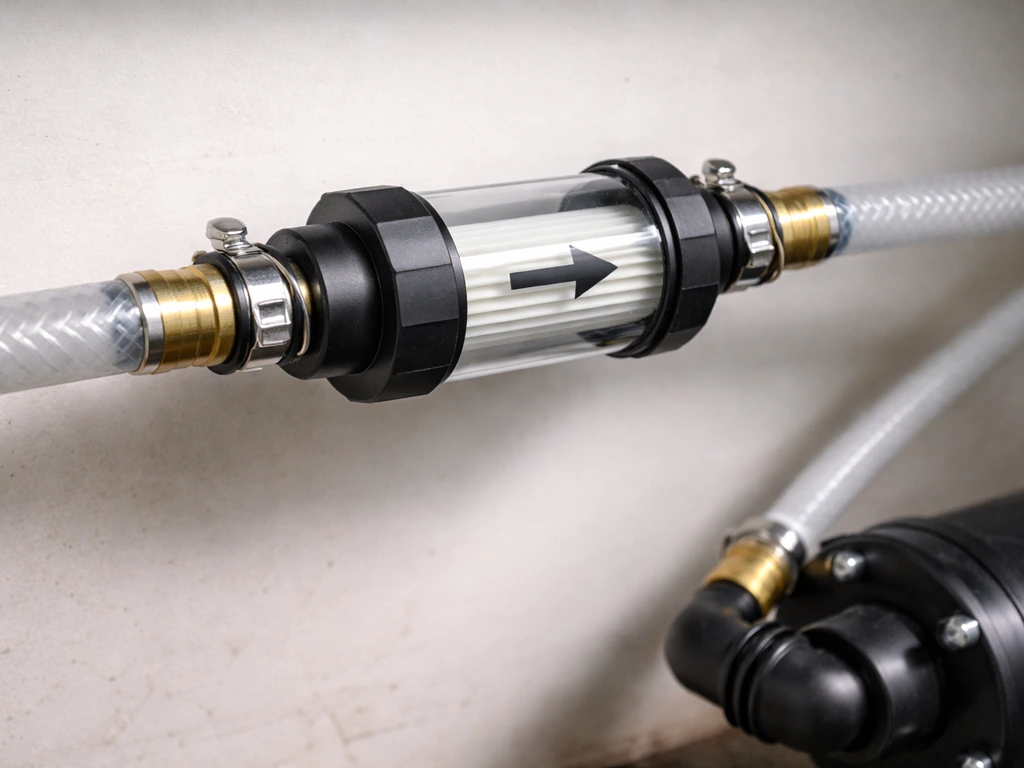
A sediment filter before the pump or at the water inlet is non-negotiable. Nozzle orifices are tiny, and unfiltered water will clog them within a few weeks. A 50-micron inline filter at the water source protects everything downstream. Some systems include a filter in the kit. If yours doesn't, add one. If you're in a hard water area, consider a second filter or a scale inhibitor to reduce mineral deposits on nozzle tips over time.
Design your layout and calculate water and pressure needs
With your measurements and component choices in hand, you can now calculate how much water your system will actually use and confirm your pump can handle it.
Start with nozzle flow rate. blank" rel="noopener noreferrer">At 40 PSI, a typical mid-range residential nozzle flows around 0.37 to 0.63 GPH. At 100 PSI, the same nozzle class might flow 0.59 to 1.00 GPH. Multiply your chosen nozzle's GPH (at your target operating pressure) by the total number of nozzles you plan to install. That total GPH is the minimum flow rate your pump must deliver. Add 20% as a buffer. For example, 12 nozzles at 0.63 GPH each equals 7.56 GPH total, and your pump should comfortably supply at least 9 GPH at your target pressure.
For nozzle spacing on your layout, use 24 to 36 inches between nozzles as your starting point, adjusting for mounting height. At lower mounting heights (8 feet or less), tighter spacing around 24 inches gives better coverage before droplets reach seating level. At 10 to 12 feet, you can stretch to 36 inches. Run the mist line along the perimeter beams or canopy edge first, then add a secondary interior run if your patio is deeper than 12 feet. This dual-run layout is common on larger screened enclosures and gives much better center-of-patio coverage than a single perimeter line.
Sketch the tubing route on your plan, marking every nozzle location, every tee fitting, every end cap, and the location of the filter, pump, and water source connection. This sketch becomes your shopping list and your installation guide.
How to build and install the system, step by step
- Gather all materials before you start: misting tubing cut to measured lengths, nozzles, tee and elbow fittings, end caps, a filter assembly, a pump (if using mid or high pressure), mounting clamps or zip ties, and a hose-to-tubing adapter for the water supply connection.
- Mount your filter at the water supply point, either directly on the hose bib or inline after a shutoff valve. This is the first thing water touches, and it protects everything downstream.
- Run the main tubing line along your planned route before attaching anything. Use clamps, U-brackets, or heavy-duty zip ties to secure it to your patio beams or fascia at 12-inch intervals. Keep the tubing tight against the structure so it doesn't sag or swing when pressurized.
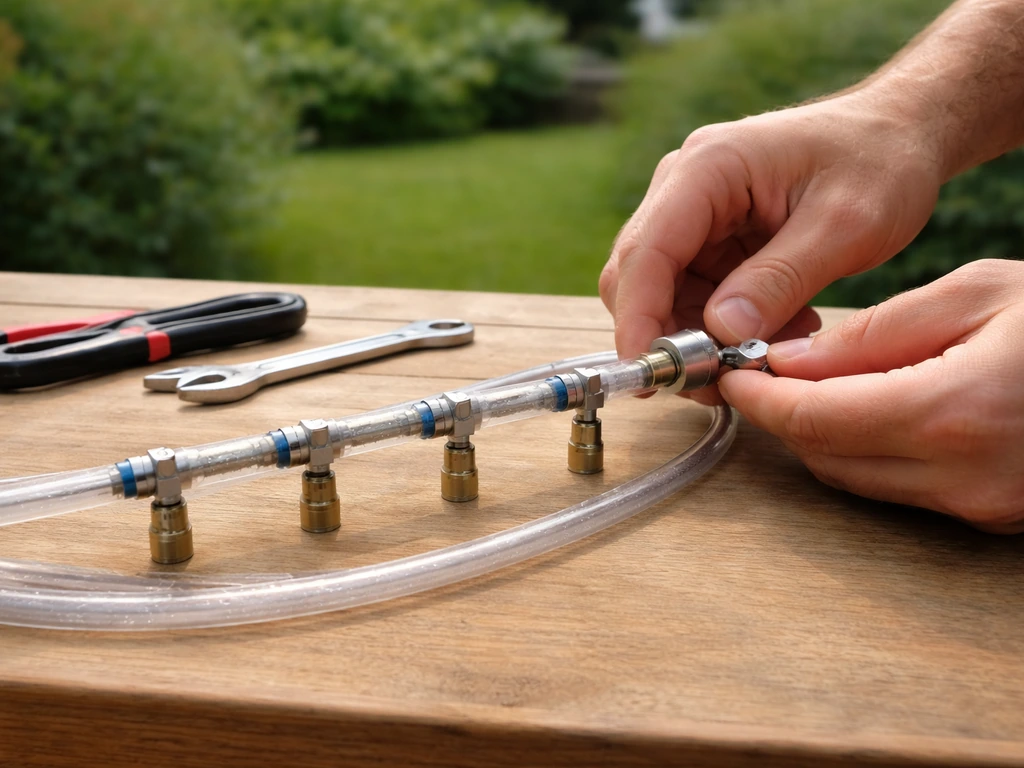
- Install tee fittings at each nozzle location by cutting the tubing and inserting the compression tee. Push the tubing firmly into each fitting until it seats fully. Give it a gentle tug to confirm it's locked in place.
- Thread each nozzle into its tee fitting insert. Hand-tight is usually enough for threaded nozzles, but add a quarter-turn with pliers and use Teflon tape on the threads to prevent slow seeps. Don't overtighten or you risk cracking the fitting.
- Cap the end of the main run with an end cap fitting. If you have multiple branches, cap each branch end.
- Connect the tubing inlet to your pump outlet (for mid-pressure systems), then connect the pump inlet to the filter outlet, and connect the filter inlet to the hose bib with a standard hose-to-filter adapter.
- Plug the pump into your GFCI-protected outlet. Do not pressurize the system yet.
- Turn on the water supply slowly. Walk the entire line and inspect every fitting for drips before turning on the pump. Fix any loose connections now, while the system is at low pressure.
- Turn on the pump (or allow line pressure to build if you're using a low-pressure hose-supplied system). Walk the line again and look for drips, fine sprays from fittings, and nozzle mist patterns. Each nozzle should produce a fine, cone-shaped mist. If a nozzle drips or streams instead of misting, it's either clogged or the pressure is too low.
- Test for 15 minutes at operating pressure before declaring the install done. Any slow leaks that weren't visible initially will show up within this window.
Plumbing details, drainage, and keeping leaks out for good
Install a manual shutoff valve between the hose bib and the filter. This lets you isolate the system completely for maintenance or winterization without having to turn off water to the whole house. A ball valve costs a few dollars and saves a lot of hassle over the system's lifetime.
Backflow prevention is required by code in most areas. An anti-siphon valve is the simplest solution for a residential misting system. Install it at least 6 inches above the highest point in your tubing run. Keep in mind that a basic anti-siphon valve is not a full mainline backflow device, so if local code requires a dedicated backflow preventer, check with your municipality before finalizing your setup.
On enclosed or screened patios, condensation and accumulated mist can drip from the tubing line itself, especially in humid conditions. Slope the tubing runs slightly (even 1/4 inch per foot is enough) toward a drain point or low-end cap that you can open to flush the line. This is especially important for winterization. When you shut the system down for the season, open that low-point cap, shut off the water supply, and let gravity drain the line completely before temperatures drop below freezing.
Leak prevention comes down to three things: proper fitting insertion (fully seated every time), Teflon tape on all threaded connections, and using tubing rated above your operating pressure. Never use fittings or tubing that are rated at exactly your operating pressure with no margin. A 250 PSI kit should use tubing rated for at least 300 PSI. The extra rating isn't paranoia, it's accounting for pressure spikes when the pump cycles on.
If you ever get a persistent drip at a compression fitting, the most common cause is a slightly undersized tubing cut or a nick on the tubing end. Cut back about an inch past the damaged section and reinsert into the fitting. Compression fittings don't forgive rough cuts.
Controls, weather protection, and running the system safely
The simplest control option is a mechanical timer on the hose bib. Set it to run during peak heat hours (typically 11am to 4pm in summer) and you're done. Digital timers with multiple daily schedules give you more flexibility and are only marginally more expensive. If you want on-demand control, a solenoid valve wired to a simple wall switch or wireless remote lets you trigger the system from your patio chair. More sophisticated setups use a temperature or humidity sensor to trigger the pump automatically when conditions hit a set threshold, which is especially useful on screened enclosures where conditions can vary significantly from outside.
Every pump in a misting system must be plugged into a GFCI-protected outlet. This is not optional. Water and electricity are in close proximity in this setup, and a GFCI outlet trips immediately if current finds an unintended path. If your outdoor outlet isn't GFCI protected, have one installed or use a portable GFCI adapter. Never run an extension cord under the mist zone where it can get wet.
For weather protection of the system itself, the UV-stabilized tubing handles direct sun well. The pump is a different story. If your pump isn't rated for outdoor exposure, house it in a small weatherproof enclosure or under a covered area out of direct rain. Most residential mid-pressure pumps have at least basic weather resistance, but check the spec sheet for your specific unit.
At the end of every season (or whenever temperatures will drop below freezing), fully winterize the system: shut off the water supply, depressurize the lines, drain from the lowest point, and remove nozzles to store indoors. Nozzles left full of water in a freeze cycle crack or clog almost every time. Drain the backflow preventer too by locating its drain screws and opening them until the device is empty. This 30-minute winterization saves you from replacing components every spring.
Quick component comparison for different patio setups
| Setup Type | Recommended Pressure | Nozzle Orifice | Tubing Type | Best For |
|---|---|---|---|---|
| Low-pressure hose-supplied | 30–70 PSI | 0.012"–0.020" | 3/8" UV PE tubing (rated 230+ PSI) | Small patios, beginner builds, minimal investment |
| Mid-pressure pump system | 100–250 PSI | 0.008"–0.012" | Nylon tubing (rated 300–1000 PSI) | Most residential patios, enclosed/screened spaces, humid climates |
| High-pressure pump system | 500–1000 PSI | 0.006"–0.008" | High-pressure nylon (rated 1000+ PSI) | Large patios, very fine mist needed, low-humidity climates |
A few things that trip people up (and how to avoid them)
- Buying nozzles before confirming pump pressure: nozzles designed for 500 PSI won't mist properly at 60 PSI. Match them from the start.
- Skipping the inline filter: clogged nozzles are almost always a filtration failure upstream.
- Installing on a fully enclosed patio without accounting for humidity: in high-humidity climates, oversized orifices mean wet furniture. Go smaller on the orifice and let the finer droplets do the work.
- Not leaving a drain point in the line: if you can't drain the system, you can't winterize it, and you'll be replacing fittings every spring.
- Forgetting Teflon tape on threaded connections: it takes 60 seconds and eliminates 80% of threaded joint leaks.
- Using a non-GFCI outlet because the nearest protected one is inconvenient: the inconvenience of running a proper circuit is far less than the risk of electrical shock near water.
If you want to go deeper on specific parts of this project, there are related guides covering DIY patio mister builds from a simpler single-line approach, how to install misters on existing patio structures, and how to fabricate individual mister components from scratch. Those are worth reading if you're deciding between a full custom build versus a targeted add-on to an existing setup. But for most homeowners building a complete system from the ground up, this guide covers everything you need to get from blank patio to cool, comfortable outdoor space. If you want step-by-step help with the full process, use this guide as your starting point for how to build a patio mister.
FAQ
How do I choose nozzle orifice size if my patio is covered but not enclosed, and humidity varies?
Start by assuming you need fine droplets, then size down the orifice for shaded or partially enclosed areas where evaporation slows. As a practical decision rule, if people report any wetting near seating after your first run, reduce orifice size or increase spacing slightly rather than raising pressure first, because pressure changes can push more water before it evaporates.
Can I run the mist line continuously on a long schedule, or should I cycle it to reduce wetness?
Cycling helps prevent accumulation on structural surfaces and reduces the odds of drips from condensation. If you have a manual timer, run shorter blocks (for example, 15 to 30 minutes) with a gap long enough to let surfaces dry, then adjust based on how quickly the patio returns to a dry feel.
What water pressure should I actually target at the pump and not just at the hose bib?
Measure or verify pressure where the pump operates, because pressure can drop across filters, fittings, and long tubing runs. If your pump spec expects a certain inlet range, plan for losses, and choose tubing and fittings that limit restrictions, otherwise you may end up with poor mist quality or inconsistent droplet size.
How do I prevent clogging if I have hard water or water with sediment?
Use a sediment filter, but also plan for maintenance. Replace the inline filter on a predictable interval (often every few weeks in dusty conditions), and consider flushing the system with water before storing it. If scale builds on nozzle tips, a scale inhibitor or a second finer filter can reduce mineral deposits more effectively than only upgrading the nozzles.
Do I need to remove nozzles before winter, or is draining enough?
Draining is necessary, but removing nozzles is strongly recommended because a small amount of trapped water inside nozzle assemblies can freeze and crack or permanently clog them. Store nozzles indoors dry, and drain the backflow preventer using its drain screws so it is empty before freezing weather.
Why does my system sometimes leak at a compression fitting even when I tightened it correctly?
The most common cause is a tubing end that is slightly deformed, nicked, or cut at an angle. Recut the tubing square, remove about an inch past any damaged area, then fully seat the tubing and apply Teflon tape only on threaded connections (not on the compression seal surface).
What is the best way to route the tubing so mist does not drip from the line on screened patios?
Ensure the tubing has a consistent slope toward a drain or low-end cap, even if it is only a small grade like a quarter inch per foot. Also avoid high spots created by mounting ties, because pooled condensation in those low areas can drip when the system cycles off.
How do I estimate total water use beyond multiplying nozzle GPH by nozzle count?
Your simple estimate gives a baseline, but actual use depends on how long the timer runs and whether the pump cycles. Add allowance for ramp-up and any intermittent schedules, then track real usage by checking the hose bib meter or a temporary water meter during your first few runs to confirm the pump and your water supply can handle the load.
Is it safe to use a garden hose splitter or tee to share water with another outdoor device?
Usually not for a misting system, because shared flow can drop pressure when the other device runs, which can change mist quality and increase wetness risk. If you must share a water source, isolate the mist line with its own shutoff and confirm pressure stability under the worst-case demand scenario.
What should I do if my pump is rated for mid-pressure but my tubing is only rated for lower PSI?
Do not run them together. Tubing max PSI must exceed pump output with meaningful margin to handle pressure spikes during pump cycling. If you are unsure, match tubing and fittings to the highest pressure your system could see, then verify the kit’s specs include that rating rather than assuming.
Can I attach the system to a roof gutter or mount above the patio in a way that seems convenient?
Avoid relying on gravity-fed water, and avoid routing the system where runoff or pooling water can contact electrical components. If you want overhead routing, keep all electrical and pump connections in a weatherproof, covered location, and maintain proper anti-backflow placement so water cannot siphon into plumbing.
How do I test my system the first time to confirm it will cool without making the patio wet?
Run it briefly and inspect three zones: near the nozzles, at seating height, and at the far end of the coverage area. If you see visible puddling or consistent wet streaks, adjust nozzle spacing and orifice size before extending runtime, because longer runtimes magnify accumulation even if droplets evaporate initially.
Next Articles

How to Make Misters for Patio: DIY Build and Install Guide
Step-by-step DIY guide to build and install patio water misters, from parts and setup to testing, spacing and troublesho
How to Install Misters on a Patio: Step by Step Guide
Step-by-step DIY guide to install patio misting systems: plan coverage, mount nozzles, connect lines, tune pressure, pre
Do It Yourself Patio Misters: A Build-Ready Guide
Build-ready guide to DIY patio misting: pick system, place nozzles, install plumbing, filter and maintain for safe cooli