You can make a patio misting system in an afternoon using a standard garden hose spigot, 3/8-inch poly tubing, brass compression fittings, and threaded mist nozzles spaced every 2 feet along your roofline or pergola rafters. Mount the line at least 8 feet high (10 to 12 feet is ideal), keep the first nozzle 2 feet away from the house wall, add a sediment filter right at the spigot, and connect everything with a pressure regulator if you're running off household water pressure. That's the core of it. Everything below explains exactly how to do each step, what to buy, and how to avoid the mistakes that cause wet floors, clogged nozzles, and wasted water.
How to Make Misters for Patio: DIY Build and Install Guide

Felix Brennan
27 May 2026

DIY Parts vs. Ready-Made Kits: Which Way Should You Go?
The first decision is whether you build the system from individual components or buy a packaged kit. Both work well, but they suit different situations. A ready-made kit is the faster path. You get pre-cut tubing, a set number of nozzles, fittings, and sometimes a pump, all matched to work together. A portable kit with a booster pump and 20 nozzles, for example, can cover a mid-size patio and runs with minimal assembly. For a 500-square-foot patio, expect to spend around $1,200 for a solid mid-range kit that includes roughly 20 nozzles and a robust pump. Budget kits at low pressure cost less but produce larger droplets and tend to feel wetter rather than cooling the air cleanly.
Building from parts gives you more control over line length, nozzle placement, and pressure class. If your patio has an unusual shape, a screened enclosure, or you're adding misters to an existing structure, sourcing your own components lets you tailor the system precisely. The trade-off is time spent matching parts and calculating flow.
Systems are generally grouped into three pressure classes: low pressure (line pressure, 40 to 60 PSI), mid pressure (around 160 to 300 PSI with a booster pump), and high pressure (800 to 1,000 PSI with a dedicated pump). Higher pressure atomizes water into finer droplets, which evaporate before hitting surfaces and cool the air more effectively. Low-pressure systems are cheaper but work best in dry climates with good airflow.
If you're in a humid region or want truly dry mist, invest in at least a mid-pressure pump.
| System Type | Typical PSI | Approx. Cost (DIY) | Best For | Downsides |
|---|---|---|---|---|
| Low pressure (hose bib) | 40–60 PSI | $30–$150 | Dry climates, simple setups, tight budgets | Larger droplets, surfaces can get wet |
| Mid pressure (booster pump) | 160–300 PSI | $300–$800 | Most residential patios, screened enclosures | Needs pump, slightly more setup |
| High pressure (dedicated pump) | 800–1,000 PSI | $800–$2,000+ | Large patios, commercial look, very fine mist | Highest cost, more complex install |
For most homeowners with a standard covered patio or pergola, a mid-pressure kit or a DIY mid-pressure build hits the sweet spot. If you're exploring a fully custom build, the process covered in this guide applies to building a patio misting system from parts, which gives you the most flexibility for screened or enclosed patio setups. If you want to take the next step, follow the full instructions in this guide for how to build a patio misting system from parts. If you want the most flexibility and control, follow the patio misting system from parts approach so you can match components to your layout.
Plan Your Coverage and Nozzle Placement First
Measure your patio before you order anything. Sketch it out on paper and note the length of the roofline, rafters, or pergola beams where you'll run the misting line. You need this to calculate tubing length and nozzle count.
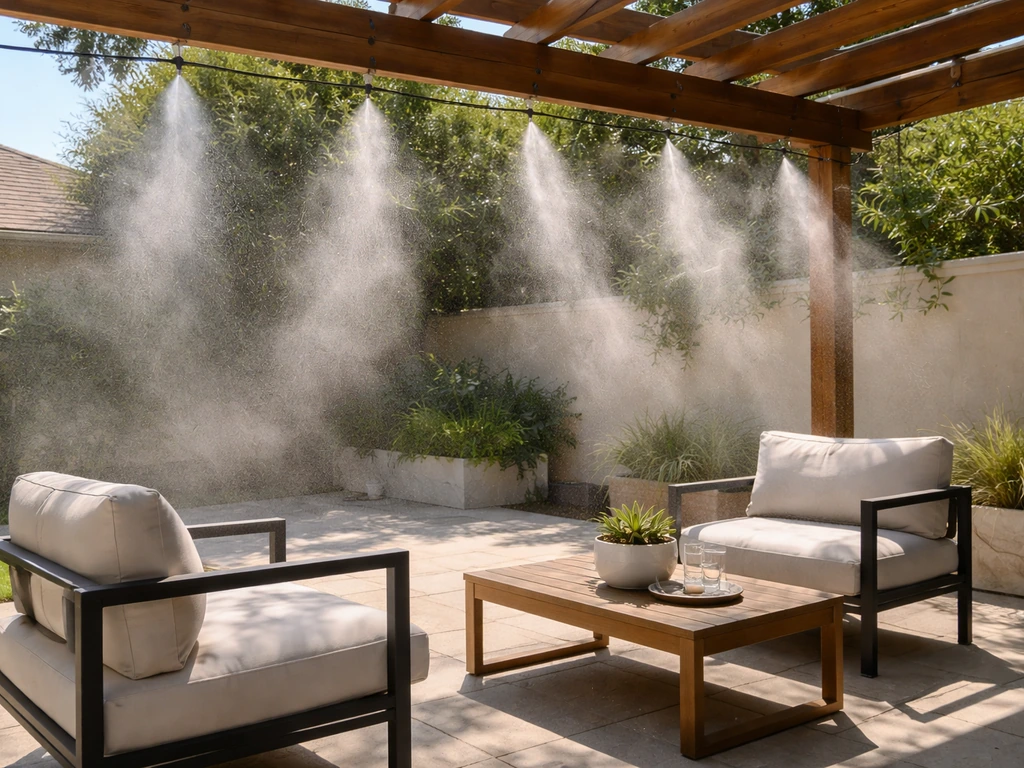
The standard spacing rule is one nozzle every 2 feet along the line, with the first nozzle sitting 2 feet away from the house wall. So a 20-foot run of tubing along a roofline would need roughly 9 to 10 nozzles. For wider patios that need interior misting lines (not just a perimeter line), space parallel runs at least 6 feet apart in open spaces, at least 12 feet apart under a roof with open sides, and at least 14 feet apart if one or more sides are enclosed. That last number matters for screened patios especially, since airflow is restricted.
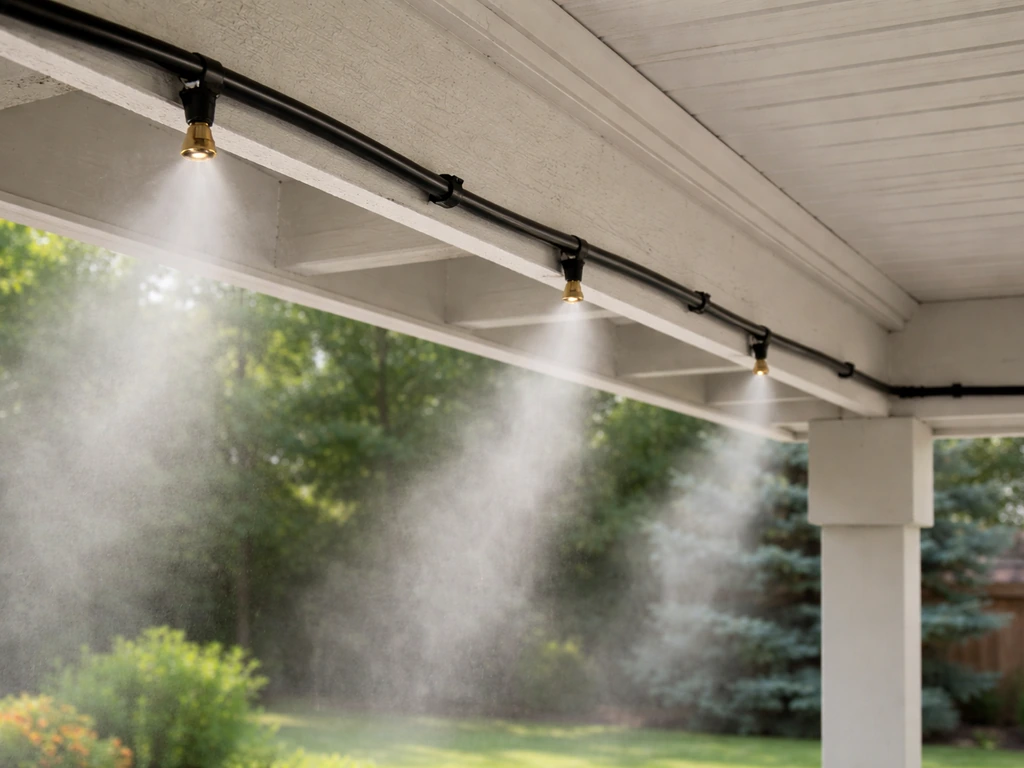
Mount height is critical. Nozzles below 8 feet almost always wet the floor and people sitting nearby. The sweet spot is 10 to 12 feet. At that height, the mist has enough air travel time to evaporate before reaching sitting level, and you get 6 feet of clearance from any solid surface in the direct spray path. Aim nozzles slightly inward and downward toward the center of the patio, not directly at walls, screens, furniture, or electrical outlets. If your covered patio has ceiling fans or lights, keep nozzles at least 3 feet away from any electrical fixture.
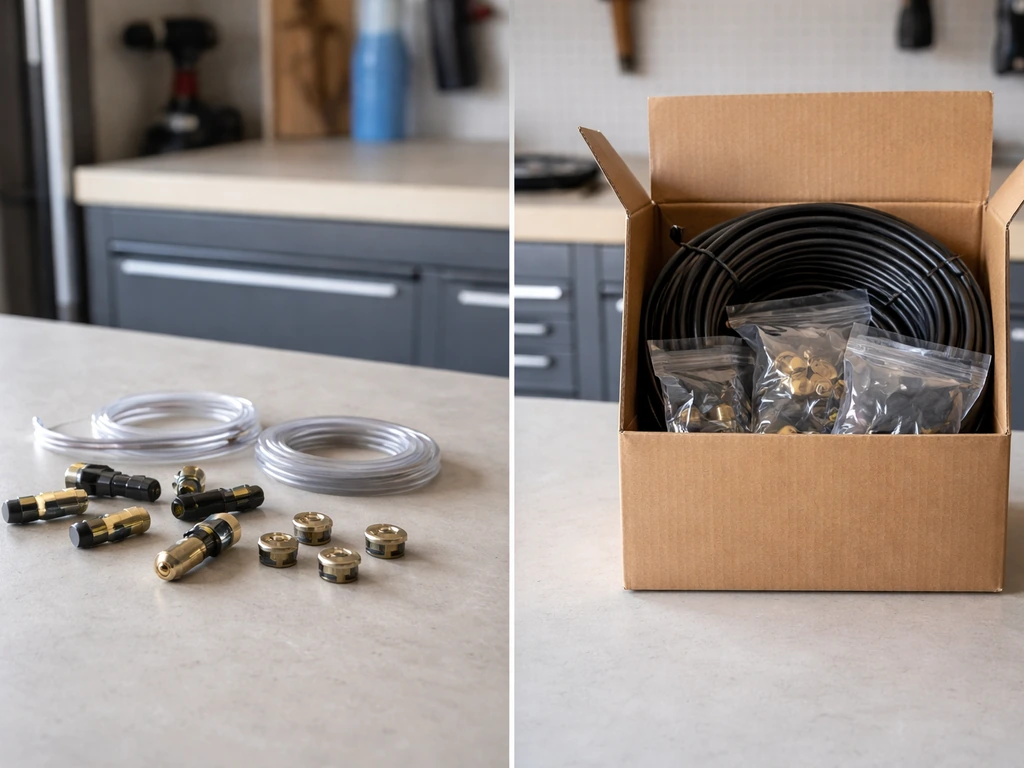
What You Need: Parts and Materials List
Here's what to gather before you start building. Quantities depend on your measurements, but this covers every category you'll need.
- Misting nozzles: Brass or stainless steel threaded nozzles with an orifice of .006 inch (0.15 mm) for fine mist at mid/high pressure. Anti-drip check-valve nozzles are worth the small premium because they stop dripping when the system shuts off. Buy a few extras.
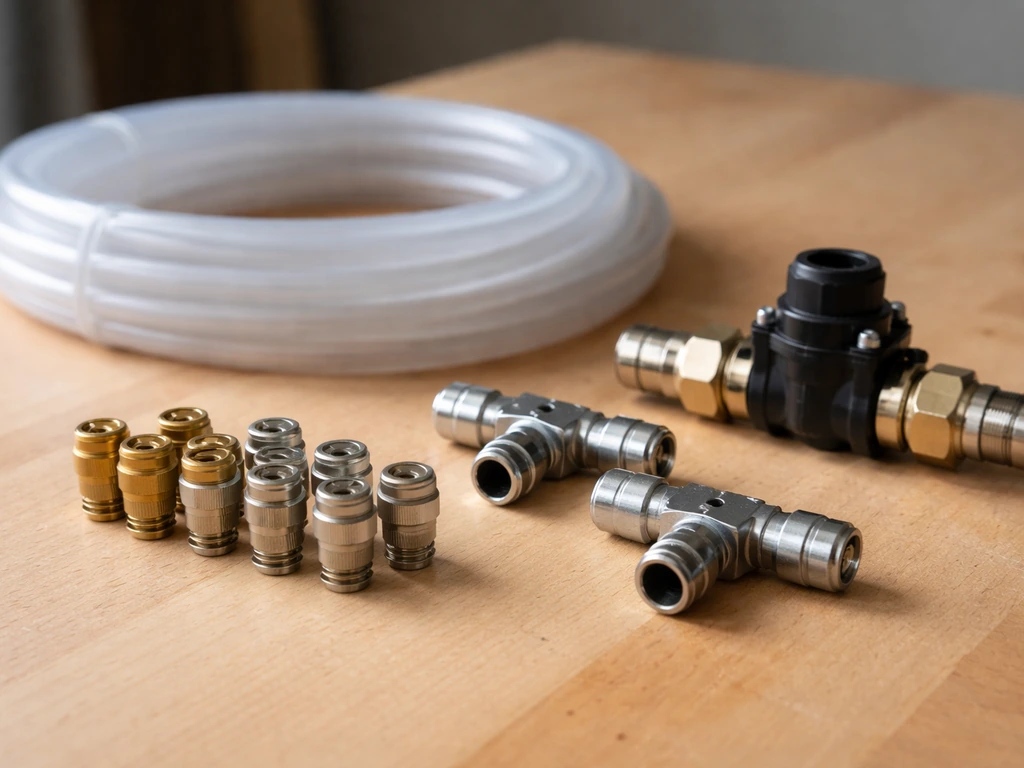
- Poly tubing: 3/8-inch OD for main supply runs, especially any run over 15 feet between the pump and the misting line. 1/4-inch OD works for shorter connector sections. Longer runs in 1/4-inch tubing lose too much pressure.
- Compression fittings and tee fittings: Brass compression tees for each nozzle location, plus elbows and end caps. Stainless fittings last longer in humid climates.
- Pressure regulator: A regulator matched to your target PSI range. For low-pressure hose-bib setups, a 40–60 PSI inline regulator. For mid-pressure pump setups, the pump usually includes one.
- Sediment filter: A 5-micron inline filter installed at the water source, before the pump and misting line. This is the single biggest thing you can do to prevent clogged nozzles.
- Backflow preventer: Required if you're hard-connecting to a home water line. It keeps mist-system water from siphoning back into your drinking supply.
- Solenoid valve (optional but recommended): Lets you automate on/off with a timer. Inlet solenoids are included in better mid-pressure kits.
- Liquid-filled pressure gauge: Helps you verify actual operating pressure at the manifold.
- Line clamps or mounting clips: UV-resistant clips sized for your tubing, spaced roughly every 18 to 24 inches to keep the line tight and level.
- Hose adapter: A standard 3/4-inch garden hose thread-to-compression adapter to connect your tubing to the spigot or pump inlet.
- Teflon tape and thread sealant: For all threaded connections.
- Tools: Tubing cutter or sharp scissors, drill with a 1/4-inch bit for mounting clip pilot holes, adjustable wrench, and a marker for layout.
Build and Mount the Misting Lines
Step 1: Mark Your Layout
Using your sketch and measurements, mark nozzle locations on your roofline beam, rafter, or pergola top rail with a marker. Remember: first mark at 2 feet from the house wall, then every 2 feet after that. At each mark, you'll install a compression tee fitting in the tubing.
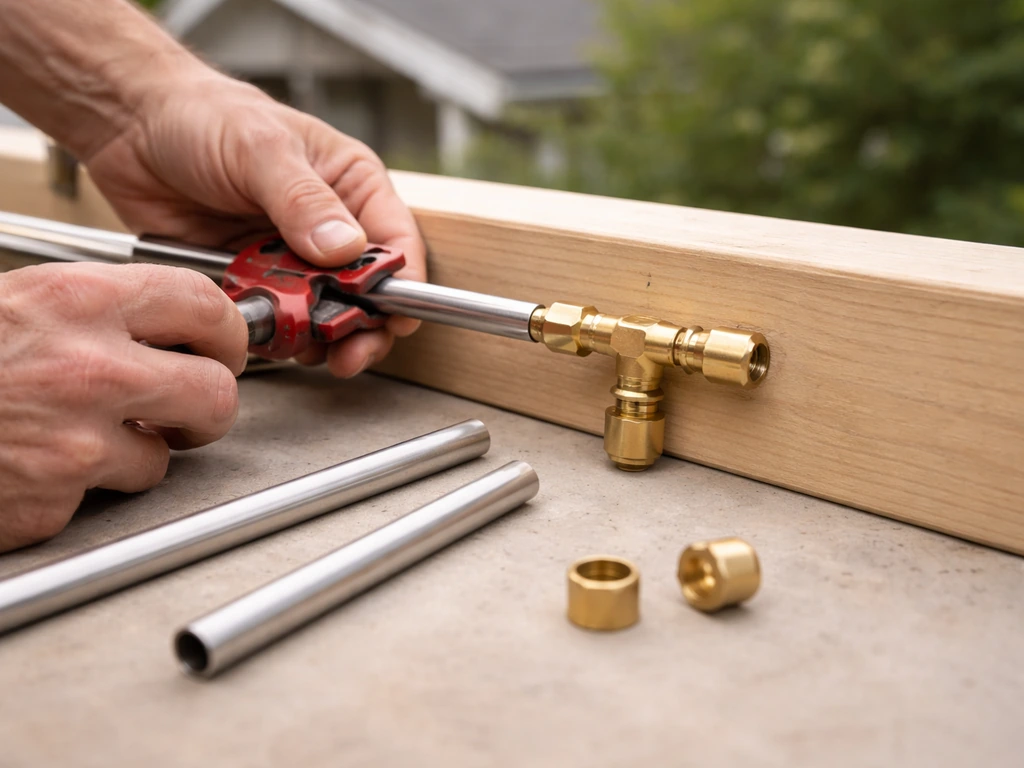
Step 2: Cut and Assemble the Tubing
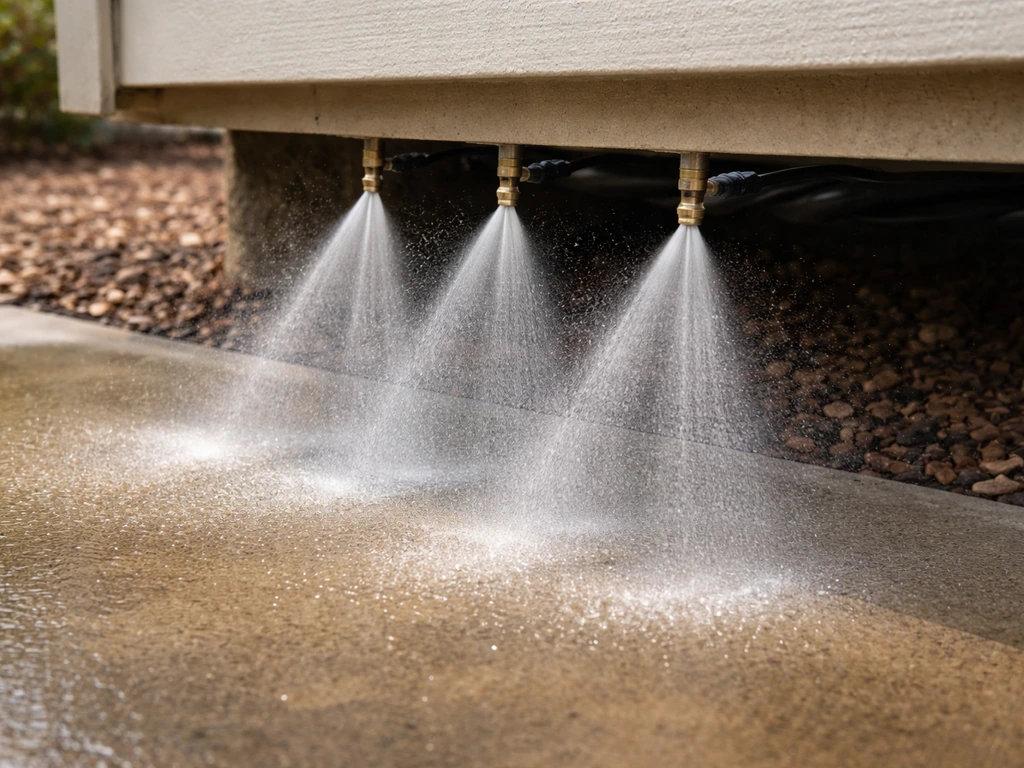
Cut your 3/8-inch tubing to the full run length. At each nozzle location, cut the tubing and insert a compression tee. Tighten the tee's compression nuts firmly by hand, then a half-turn with pliers. Don't overtighten or you'll crack the fitting. Thread a nozzle into the tee's side port using Teflon tape on the threads. Hand-tighten the nozzle, then snug it down with a wrench, just until it stops moving. Cap the end of the last section with an end cap fitting.
Step 3: Mount the Line
Attach mounting clips to your beam or rafter every 18 to 24 inches using small screws or saddle clamps. Snap the tubing into the clips, keeping it level and tight against the structure. For a cleaner look on a finished pergola, you can run the tubing in a channel or paint it to match. Make sure no section of tubing sags between clips because pooling water in low spots causes dripping and freezing damage in winter.
Step 4: Angle the Nozzles
Rotate each nozzle so it angles slightly inward and downward (roughly 30 to 45 degrees below horizontal, aimed toward the center of the patio space). Nozzles aimed straight down hit the floor. Nozzles aimed horizontally toward a wall create wet walls and furniture. The goal is to shoot the mist diagonally across open air so it evaporates before reaching anything solid.
Connect to the Water Supply and Prevent Problems
Making the Water Connection
For a low-pressure hose-bib setup, the order of components from spigot to misting line is: spigot, then backflow preventer, then sediment filter, then pressure regulator, then the misting line. Use hose-thread adapters to connect each component. Wrap every threaded joint with two layers of Teflon tape before threading on a fitting. For a mid or high-pressure pump setup, the pump typically goes between the filter and the misting line, with the pump inlet fed by a short hose from the spigot.
Pressure and Flow Matching
Each nozzle consumes a specific amount of water flow depending on its orifice size and operating pressure. A . 006-inch orifice nozzle running at 1,000 PSI flows roughly 0. [Aeromist’s nozzle specifications sheet lists operating pressures and flow characteristics by orifice size](https://aeromist.
com/wp-content/uploads/2023/02/Aeromist-Misting-Nozzle-Specifications. pdf), including example entries such as a . 006 orifice table entry with droplet and flow data at stated PSI. 04 gallons per minute.
At 60 PSI from a hose bib, flow per nozzle drops significantly. The reason this matters: if you put too many nozzles on a single low-pressure line, you drop pressure at each nozzle and get uneven, drippy mist. Check your pump's flow chart (most manufacturers publish one) and confirm your total nozzle count stays within its capacity.
If your supply run is longer than 15 feet, use 3/8-inch tubing for that section rather than 1/4-inch, or you'll lose pressure before the water even reaches the misting line.
Preventing Leaks
Most leaks come from one of three places: undertightened compression fittings, missing or thin Teflon tape on threaded nozzle connections, or tubing that wasn't pushed all the way into the fitting before tightening. Before pressurizing the full system, hand-check every fitting. When you turn on water for the first time, walk the entire line slowly and look for drips. Tighten any leaking compression fitting by a quarter-turn increments. If a nozzle connection is leaking, turn off the water, add more Teflon tape, and reinstall.
Protecting Against Clogging
The 5-micron sediment filter at the water source catches the debris and mineral particles that clog .006-inch nozzle orifices. If your home has hard water, consider adding a simple inline carbon or scale-inhibitor filter as well. Anti-drip nozzles with built-in check valves also help by preventing mineral-laden water from sitting in the nozzle orifice and evaporating to leave a scale deposit when the system is off.
Test Your System, Adjust the Mist Pattern, and Fix Common Problems
First-Run Flush and Testing
Before you screw nozzles in for the first time, run water through the assembled tubing for two to three minutes with the nozzle ports open (or with the end cap off). This flushes out any tubing debris, metal filings from fittings, and manufacturing residue that would immediately clog a fresh nozzle. Once you've flushed the line, install the nozzles and turn the system back on at full pressure. Watch the mist pattern from each nozzle for about 60 seconds.
What Good Mist Looks Like
Every nozzle should produce a fine, cone-shaped spray that visibly dissipates in the air within 2 to 3 feet. You should feel a cooling effect when standing 4 to 6 feet below the line without feeling wet. If the floor directly under a nozzle is getting wet, the nozzle is either too low, angled too steeply downward, or the pressure is too low to atomize the droplets properly.
Troubleshooting
| Problem | Likely Cause | Fix |
|---|---|---|
| Uneven mist (some nozzles weak) | Too many nozzles for pump capacity, or long small-diameter supply run | Reduce nozzle count or upgrade to 3/8-inch supply tubing |
| Wet floor/surfaces under nozzles | Nozzle mounted too low, angled wrong, or low pressure producing large droplets | Raise line height, re-angle nozzles, or upgrade pressure class |
| Clogged nozzle (no spray) | Mineral buildup or debris in orifice | Remove nozzle, soak in white vinegar for 30 min, rinse, reinstall or replace |
| Dripping when system is off | Standard nozzles without anti-drip check valves | Replace with anti-drip nozzles, or add inline check valve |
| Leak at fitting | Undertightened compression nut or missing Teflon tape | Tighten compression nut 1/4 turn; re-tape threaded joints |
| Low pressure throughout system | Pressure regulator set too low, clogged filter, or undersized pump | Check regulator setting, clean/replace filter cartridge, verify pump rating |
Maintenance and Winterizing for Year-Round Protection
Regular Season Maintenance
Once a month during misting season, remove and inspect two or three nozzles at random. If the spray pattern looks distorted or weak, soak the nozzle in white vinegar for 30 minutes, rinse with clean water, and reinstall. Replace the sediment filter cartridge at the start of each season and again mid-season if you're in a hard-water area. Check all compression fittings after the first 30 days of use since tubing can slightly relax under pressure cycles and fittings can loosen a little.
Winterizing the System
If temperatures in your area drop below 32°F (0°C), water left in the tubing, fittings, and especially the backflow preventer will freeze and crack components. Freeze damage to a backflow preventer is expensive to fix and can cause the device to fail water-quality inspections. Don't skip this step.
- Shut off the water supply to the misting system at the source valve.
- Disconnect the inlet hose from the spigot to drain any water back through the supply line.
- Open the lowest nozzle or remove the end cap to let gravity drain remaining water from the tubing.
- If you have a pump, disconnect the tubing on the discharge side and store the pump indoors.
- For a thorough blowout, connect a low-pressure air compressor (30 to 50 PSI is enough) to the inlet end of the misting line and blow air through for 30 to 60 seconds to push out any remaining water from the tubing and nozzle ports.
- Remove the backflow preventer from the line and store it indoors, or wrap it with insulating foam pipe wrap if it must stay in place.
- Store nozzles in a zip-close bag indoors if freezing temperatures will persist for weeks. Nozzle orifices that freeze with water in them can crack.
- In spring, flush the line again before reinstalling nozzles, reinstall the filter cartridge, reconnect the backflow preventer, and test for leaks before running the full system.
If you're in a mild climate that only dips below freezing occasionally, the minimum step is disconnecting and draining the system before a freeze event. For regions with hard winters, the full blowout routine every fall is the only reliable way to avoid cracked fittings, burst tubing, and a failed backflow preventer in the spring. Taking 30 minutes now saves a full rebuild next year.
Quick Reference: Materials Checklist and First-Run Routine
Before you head to the hardware store, use this checklist to make sure you have everything. Fill in your own measurements where noted.
- 3/8-inch poly tubing: total patio perimeter run length, plus 10% extra (measure your roofline in feet)
- Misting nozzles (.006-inch orifice, anti-drip): one per every 2 feet of run, plus 3 spares
- Compression tee fittings: same count as nozzles
- Compression end cap: 1 per line end
- Compression elbows: count your corners
- 5-micron inline sediment filter: 1
- Backflow preventer (hose-thread type): 1
- Pressure regulator (matched to your PSI target): 1
- Mounting clips (UV-rated, sized for 3/8-inch tubing): 1 per every 18 to 24 inches of run
- Hose-thread to compression adapter (3/4-inch FHT to 3/8-inch compression): 1
- Teflon tape: 1 roll
- Solenoid valve and timer (optional): 1 if automating
- Liquid-filled pressure gauge: 1 (recommended for mid/high-pressure setups)
For the first-run routine: flush the bare tubing before installing nozzles, then turn on the system and walk the full line to check for leaks, check each nozzle's spray pattern, adjust nozzle angles as needed, and verify the floor stays dry after 5 minutes of operation. If everything checks out, you've got a working misting system. Mark your filter replacement date on the filter housing with a marker and you're set for the season.
FAQ
Why does my mist get weaker toward the far end of the line?
If you see uneven mist, the first thing to check is nozzle count and pressure capacity. Even with the right hardware, too many nozzles on a low-pressure hose-bib line can cause the first few nozzles to mist well and the rest to dribble. Compare your total nozzle flow to the regulator or pump chart, then reduce nozzles or step up to a mid-pressure pump.
How can I stop wet floors when running my patio misters?
No. If the floor is getting wet, either the nozzles are too low, angled too steeply downward, or the droplets are too large for your pressure. Raise the nozzles toward 10 to 12 feet, rotate each nozzle slightly inward and down (about 30 to 45 degrees below horizontal), and verify the pump or regulator is set within the nozzle’s intended pressure range.
What mounting height is safest for avoiding overspray onto people and surfaces?
Use at least 8 feet and ideally 10 to 12 feet. If you have to mount lower, spacing becomes more important and you may need higher pressure to create finer droplets that evaporate sooner. Also keep the first nozzle a couple feet off the house wall to avoid direct wetting of siding and window trim.
Can I add misting lines in the middle of my patio, not just along the edges?
Yes, but plan for water distribution. For interior lines, spacing rules change because airflow is reduced, especially under a roof with open sides or inside a screened enclosure. Keep parallel runs wide apart (about 6 feet in open areas, 12 feet under roofs with open sides, 14 feet for enclosed/screened sides) so mist can evaporate before it accumulates.
What should I do if one nozzle sprays much weaker than the others?
Start with a line flush before installing nozzles, then confirm individual nozzle performance after assembly. If one nozzle is weak after flush, remove it and inspect the orifice for scale or debris, then soak in vinegar for about 30 minutes and reinstall. If multiple nozzles are affected, revisit filtering and flushing time before pressing the system back into service.
Do I really need a full blowout every winter?
If you disconnect and drain before freezing temperatures, that can prevent most damage in mild climates. If you live where freezing is common, the reliable option is a full blowout routine every fall, because water can remain in low points, tees, and especially the backflow preventer.
My nozzles clog quickly. What upgrades help most?
Use a sediment filter that’s appropriate for small nozzle orifices and replace the cartridge on schedule, especially at the start of the season. If you have hard water, add an inline scale-inhibitor or carbon-style filtration. Also consider anti-drip nozzles with built-in check behavior to reduce scale deposits when the system is off.
Where should I look first when I find a leak after pressurizing?
Leaks usually come from compression fittings that were not fully seated, or threaded joints where the tape layer is thin. Re-check that tubing was pushed fully into compression fittings before tightening, then tighten leaking compression fittings in small quarter-turn increments. For threaded connections like nozzle ports, add two layers of Teflon tape and reinstall.
Does tubing size matter if my hose run is long?
Use 3/8-inch tubing for the longer supply section when your run exceeds about 15 feet. Smaller tubing can lose pressure before the misting line, which leads to uneven atomization and drippy output near the far nozzles.
How do I aim nozzles around lights or ceiling fans?
Verify electrical clearances and air patterns before you commit. Keep nozzles at least 3 feet away from any electrical fixture and aim diagonally across open air rather than straight toward walls, screens, furniture, or outlets. If you have ceiling fans, make sure the airflow won’t blow mist directly onto the fixture area.
Is a low-pressure DIY mister good enough for humid climates?
Yes, but plan for pressure and wet feel. Budget or low-pressure systems often produce larger droplets that feel wetter and may not evaporate cleanly in humid conditions. If you want a drier cooling effect, choose at least a mid-pressure setup and confirm nozzle flow and total capacity match your pump or regulator output.
Next Articles
How to Install Misters on a Patio: Step by Step Guide
Step-by-step DIY guide to install patio misting systems: plan coverage, mount nozzles, connect lines, tune pressure, pre
Do It Yourself Patio Misters: A Build-Ready Guide
Build-ready guide to DIY patio misting: pick system, place nozzles, install plumbing, filter and maintain for safe cooli

How to Decorate a Long Narrow Patio: Layout Tips
Practical DIY layout and decor tips to widen a long narrow patio using zoning, furniture spacing, lighting, greenery, an