To close in a patio for winter, you have three realistic paths: hang temporary clear vinyl curtains or tarps for quick wind and rain blocking (a weekend project under $300), add removable polycarbonate or screen panels to an existing framed patio for a true 3-season enclosure (a few days of DIY work, roughly $500–$2,000 in materials), or build a fully framed, weatherproofed enclosure with insulated panels and a proper door if you want the space usable in genuinely cold weather (a bigger project, but very doable as a DIY build). If you need more than quick curtains, planning a step-by-step enclosure is a great way to handle how to winterize a patio beyond temporary covers. Which one makes sense depends on how cold your winters get, what your patio structure already looks like, and how much time and money you want to spend.
How to Close in a Patio for Winter: DIY Guide

Decide how you want to close the patio first
Before you buy a single screw, get clear on what you actually need the enclosure to do. A lot of homeowners waste money jumping straight to a full build when a set of clear vinyl curtains would have solved their problem, or they hang some curtains and feel frustrated when they still can't sit out there in 30-degree weather. Here is a quick breakdown of the three tiers.
| Option | What it blocks | What it doesn't do | Rough DIY cost | Time to install |
|---|---|---|---|---|
| Temporary curtains/tarps | Wind, light rain, some cold | Won't insulate; limited in heavy snow/ice | $100–$300 | A few hours |
| 3-season panel enclosure | Wind, rain, bugs, moderate cold | Not insulated; not tied to HVAC | $500–$2,000 in materials | 1–3 days |
| 4-season/sunroom-style enclosure | All weather, year-round comfort | Requires insulation, HVAC connection, likely permits | $5,000+ materials (DIY) | 1–2 weeks+ |
If your winters are mild (temps mostly above 40°F), a good set of clear vinyl curtains or a removable panel system will make the patio comfortable. If you're dealing with real cold, hard freezes, and wind chills, you need at minimum a 3-season enclosure with sealed panels, and ideally some kind of supplemental heat source inside. A full 4-season sunroom with insulation and HVAC is a serious construction project that often triggers permits and comes closer to a home addition than a patio upgrade. The steps in this article focus on the first two tiers, since those are the ones most DIYers can actually tackle themselves in a weekend or a long week.
Quick winterizing options: curtains, tarps, and fast fixes
If cold weather is already here or you need a solution this week, start with temporary options. These aren't just stopgaps. Many homeowners use clear vinyl curtains year after year and never feel the need to build anything more permanent.
Clear vinyl curtains
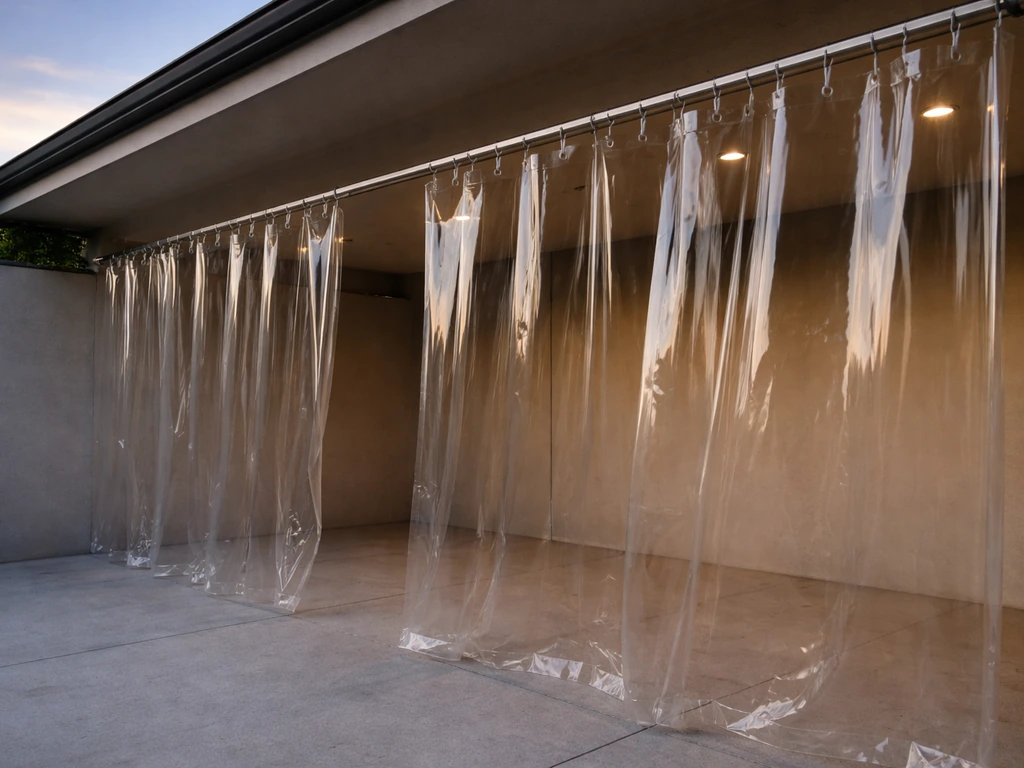
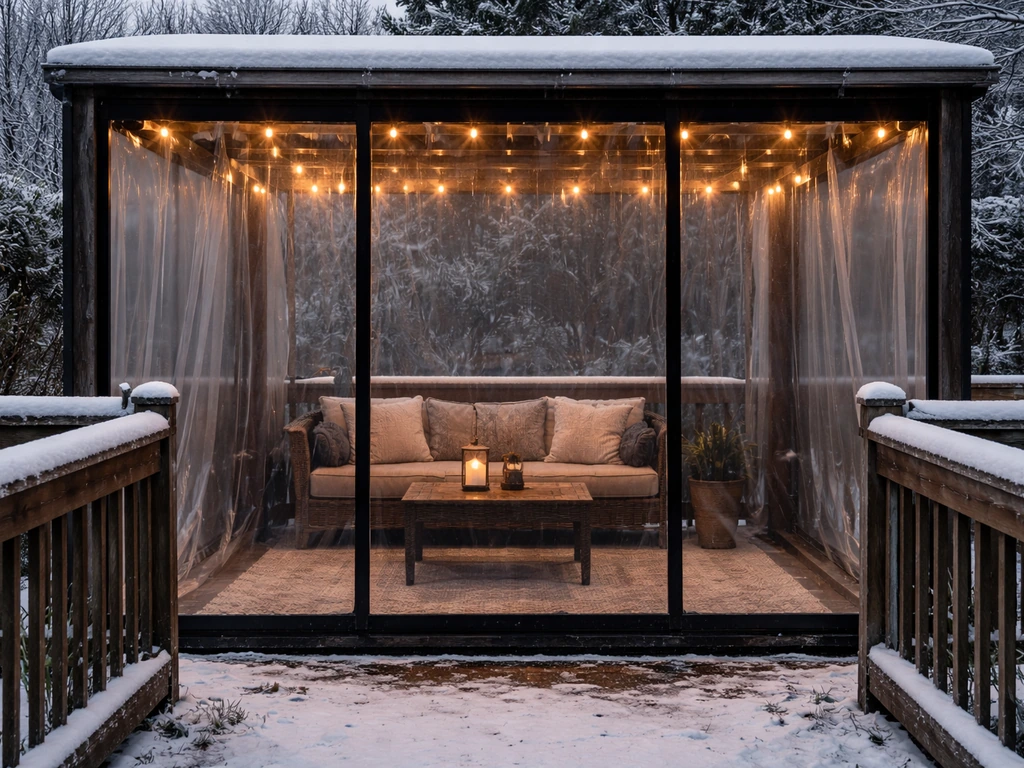
Clear vinyl panel curtains are the fastest upgrade you can make. They hang from a track or rod system along the open edges of your patio, and because they're transparent, they let in sunlight while blocking wind, rain, and snow. Look for panels with grommets at the top (easy to hang) and weighted hems at the bottom, which keep the panels from billowing in gusty conditions. Retractable track systems are a step up: the panels slide along a ceiling-mounted track and can be pushed to the side when the weather is nice. Zipper-channel systems, where panels zip to each other along vertical edges, create a nearly weathertight seal and are worth the extra cost if wind is a serious issue in your area. One practical tip: if you order new vinyl panels in late fall, let them warm to room temperature for at least 24 hours before trying to install them. Cold vinyl gets stiff and can crack if you force it, and hanging them in very windy conditions makes the job much harder than it needs to be.
Tarps and outdoor fabric panels
Heavy-duty vinyl tarps attached with bungee cords, zip ties, or snap fasteners work as a budget-level barrier, but they block light and look utilitarian. They're better suited for a utility porch or a situation where you just need to keep snow and wind off your furniture for a few months. If aesthetics matter, stick with clear vinyl panels or outdoor rated curtain fabric designed for weather resistance.
Hardware that actually holds up
Whatever temporary system you use, the hardware matters more than most people expect. Lightweight curtain rods bend and sag under the weight of vinyl panels; use heavy-duty stainless or powder-coated aluminum track systems instead. Make sure grommet holes are reinforced (not just punched) so they don't tear out in the wind. For any track-mounted system, screw the track into solid framing members, not just into drywall or thin fascia boards.
Planning a true winter enclosure: measurements, materials, and layout
If you want something more permanent, take the time to plan it properly before buying anything. A half-hour of measuring and sketching will save you multiple trips to the hardware store and panels that don't fit.
Measure your patio opening
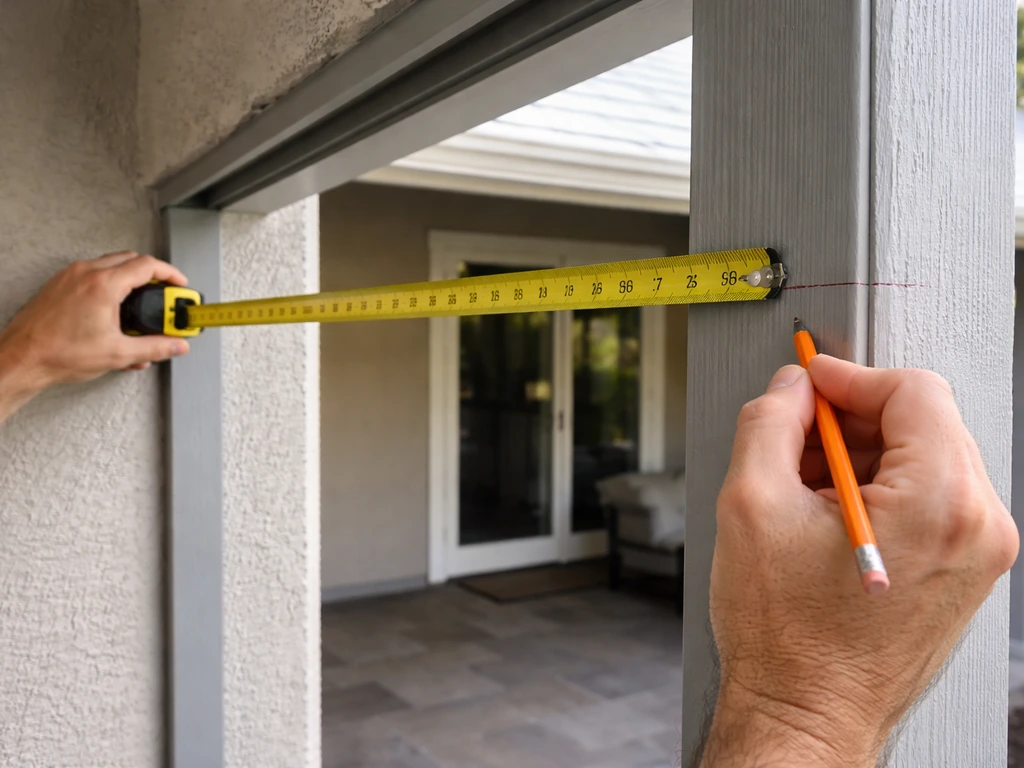
- Measure the total width of each open side of your patio from post to post or from house wall to post.
- Measure the height from the floor (or existing sill) to the underside of the roof or beam above.
- Note any slopes in the ceiling or floor that will affect how panels or frames need to be cut.
- Mark where you want the door to go. Ground-floor enclosures typically need a door at least 2 feet 4 inches wide for egress compliance. A standard 32-inch or 36-inch door is the practical choice.
- Identify where you want ventilation, either operable windows in your panels, vents near the top of the wall, or a screened upper section to allow air movement.
Choose your panel material
For a DIY 3-season enclosure, twin-wall polycarbonate panels are the most practical choice. The 8mm or 10mm twin-wall panels are lightweight, cut with a circular saw or utility knife, and provide meaningful insulation compared to single-pane options. They let in light, are nearly unbreakable, and handle thermal expansion better than glass. Leave at least a 1/4-inch expansion gap at each edge for sheets up to 12 feet long, and use a U-profile or H-profile aluminum extrusion to hold the panels in place rather than gluing them into framing. Solid 4mm polycarbonate is another option, thinner and slightly less insulating but fine for milder climates. Glass is heavier, more expensive to cut and install, and requires tempered safety glazing in most code applications near doors or at low heights. Screens alone work for blocking bugs and light wind but offer almost no winter protection, which is why screened porches are often described as a seasonal rather than a winter solution.
Map your layout before you build
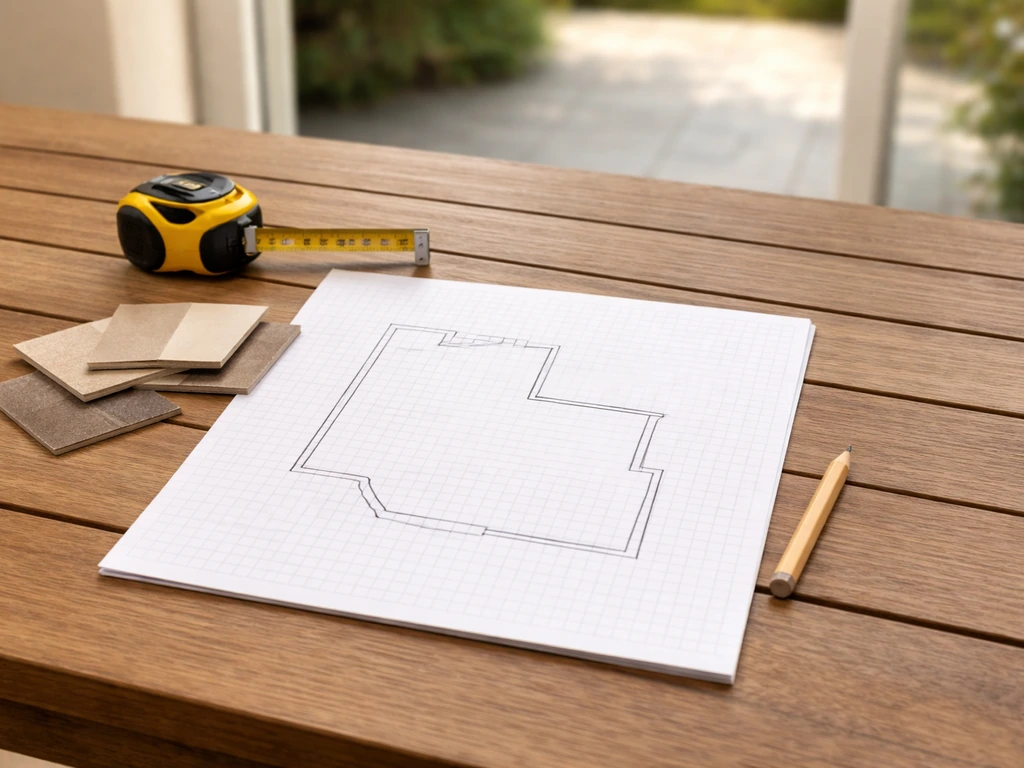
Sketch each open wall of the patio to scale on paper. Knowing how to close in a patio starts with careful measurements so your panels and door line up correctly how to close in patio. With a clear plan for how to enclose a patio for winter, you can choose the right panels, door placement, and sealing details so the enclosure fits and performs well. Mark the door location and the direction it swings, making sure it has room to open fully without hitting furniture or the house wall. Mark any areas where you want operable windows or vents. Plan your framing bays so the polycarbonate panels span between vertical studs without needing seams in awkward places. Standard polycarbonate sheets come in 4-foot widths, so framing at 24-inch or 48-inch on center makes life easier. If your patio has existing posts, you'll be filling in between them.
How to build the enclosure: step-by-step for the most common approaches
Approach 1: Filling in between existing posts with framed panels
This is the most common DIY scenario: you have a covered patio with roof posts already in place, and you want to fill in the open sides with framed walls and glazing panels.
- Build a pressure-treated bottom plate (sill) between each pair of posts. Set it flat on the concrete or deck surface and anchor it with concrete screws or through-bolts. This is your base for the wall frame.
- Cut vertical 2x4 studs to fit between the bottom plate and the beam above, spacing them 24 inches on center. Toenail or use metal framing connectors to secure them top and bottom.
- Install a treated top plate along the beam or roof framing, securing it solidly. If you're attaching to an existing beam, use structural lag screws into the beam itself.
- Frame in your door rough opening. A 36-inch door needs a rough opening of about 38 inches wide. Add a header (doubled 2x6 is typically sufficient for a non-load-bearing patio wall) across the top of the door opening.
- Install polycarbonate panels into aluminum U-profiles or H-profiles along the vertical stud faces. Snap the panels into the profiles, making sure the expansion gap is maintained at the top and sides of each sheet.
- Hang a pre-hung exterior door in the rough opening. Use pressure-treated shims to plumb and level it, then secure the hinge side first.
- Seal the perimeter where the frame meets the existing posts, beam, and slab using a flexible exterior sealant, not rigid caulk alone.
Approach 2: Track-mounted removable panel system
If you want something you can remove in spring, a track-mounted panel system is the way to go. Install aluminum ceiling tracks and floor tracks between your existing posts. Polycarbonate panels or framed screen panels slide into the tracks and can be removed and stored when winter is over. This approach requires no major framing work. The key is getting the tracks perfectly level and plumb, and making sure the panels fit snugly without rattling. A zipper-channel system for the panel-to-panel seams dramatically improves the wind and water seal compared to panels that just butt against each other.
Approach 3: Converting an existing screened porch for winter
If you already have a screened-in porch, you're halfway there. Screened porches block bugs and light rain but don't cut it in real winter cold. The upgrade is to add a glazing layer: either slide clear vinyl panels or polycarbonate panels into tracks mounted just inside or outside the existing screen framing, or replace the screen panels entirely with glazed panels for the winter months. Many screen porch owners keep both sets of panels and swap them seasonally. This is much faster and cheaper than building from scratch and is a very common DIY path. If you want to go further and make the space truly 4-season, you'd need to add insulation and connect to a heat source, which starts to cross into sunroom territory.
Weatherproofing details that actually stop drafts and moisture
This is the part most DIY guides skip over, and it's where winter enclosures succeed or fail. A frame that looks solid can still let in cold air and water through a dozen small gaps. If your goal is to soundproof a patio, focus on sealing gaps and improving the mass and airtightness of the enclosure materials cold air and water.
Sealing the frame
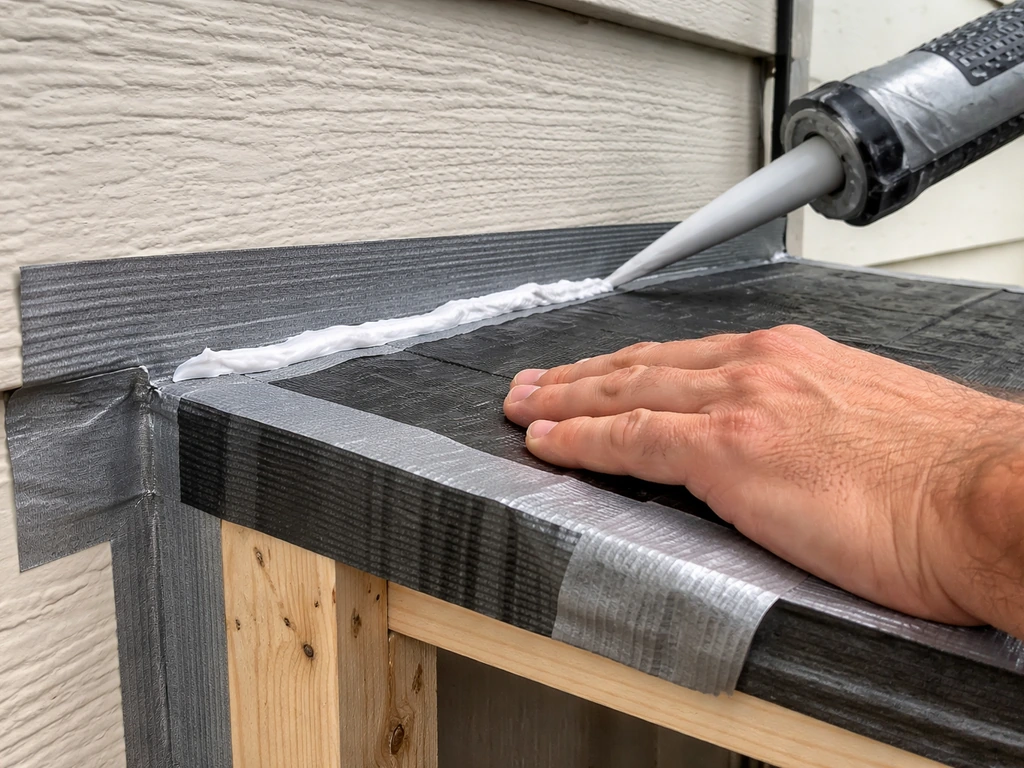
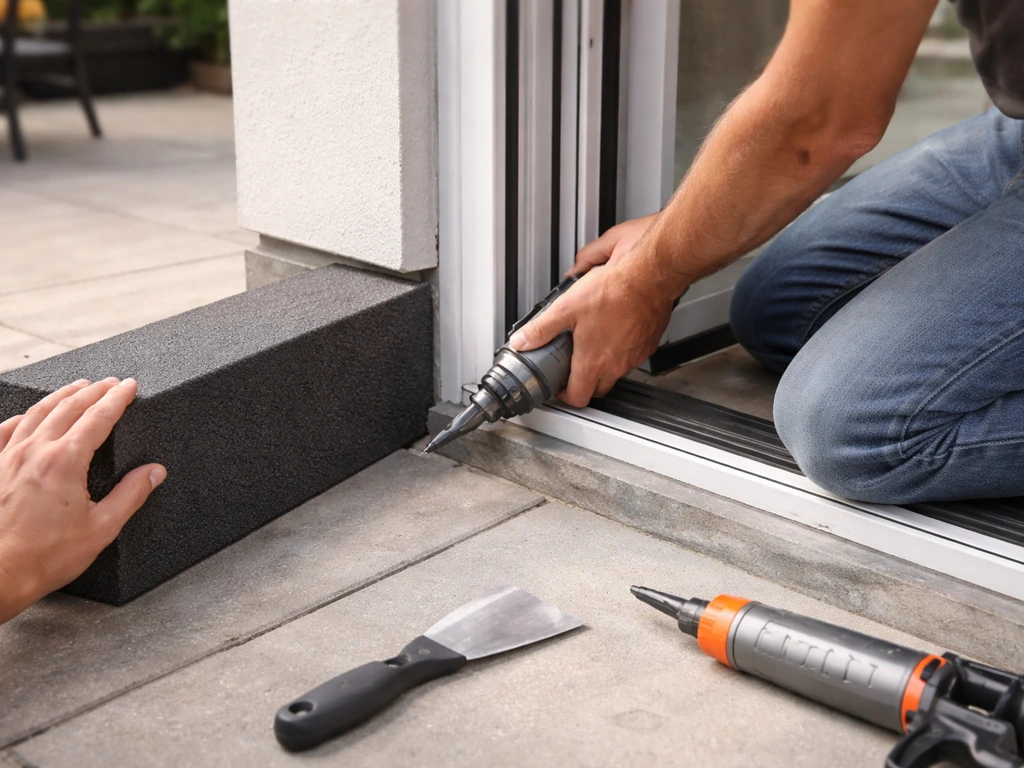
Seal every joint where two different materials meet: where the frame meets the house wall, where the roof line meets the top plate, where posts meet the new framing. Use a flexible exterior-grade sealant (not standard latex caulk, which cracks in freeze-thaw cycles). Backer rod in larger gaps before sealing. At the base of the walls where they meet the slab, use a foam sill gasket under the bottom plate before you fasten it down, or seal after the fact with a peel-and-stick weatherstrip.
Flashing and water management
Any horizontal joint above your panels is a leak waiting to happen, especially where the enclosure meets the house wall. Install self-adhering flashing tape at the top of the wall-to-house connection, lapping it up the house wall and over the top plate. Fine Homebuilding also recommends using self-adhering underlayment at roof-wall intersections and provides practical lapping and handling guidance for proper installation Install self-adhering flashing tape at the top of the wall-to-house connection, lapping it up the house wall and over the top plate.. If you're adding a new roof section or lean-to roof, flash the ridge line with step flashing and counter-flashing the same way you would for a window or skylight. Do not seal weep holes at the bottom of window frames or panel tracks. Those small gaps look like a mistake but are intentional drainage paths. Blocking them causes water to back up inside the frame and rot it from the inside. The biggest causes of enclosure leaks are flashing done out of order, missing flashing at the top corners of window or door openings, and caulk applied over gaps that should have been flashed instead.
Ice dams (for cold-climate readers)
If you're in a northern climate that gets regular snow and freeze-thaw cycles, ice dams on the patio roof can drive water back under the roofing material and into the structure. The code standard in most northern regions requires ice-and-water shield membrane extending at least 24 inches past the interior warm wall of the structure. If your patio roof doesn't have this, adding it before closing in the walls is worthwhile.
Managing condensation inside the enclosure
When you close in a patio, you create an interior space that traps warm, moist air against cold glazing. The result is condensation on your panels, especially polycarbonate. This is a material and ventilation issue, not a sign that something is broken. To manage it, make sure you have some ventilation in the enclosure: operable windows, a small ridge vent, or even side vents near the top of the wall. Moisture needs somewhere to go. Polycarbonate's twin-wall structure can also trap moisture inside the channels if the open ends aren't sealed with U-profile and micro-mesh tape. Seal the top open end of every polycarbonate sheet with U-profile and the tape, but leave the bottom end with a U-profile that has small weep holes or a vented cap so any trapped moisture can drain out.
Safety, permits, and keeping it in good shape through winter
Do you need a permit?
For temporary curtain systems, almost certainly not. For a framed enclosure with walls and a door, it depends on your municipality, but in most areas any permanent or semi-permanent structure that encloses a space requires a permit. Permit requirements typically address egress (that 2'4" minimum door we mentioned), glazing type (tempered glass near doors and at low heights is usually required), and how the structure attaches to the house. Skipping a permit on a screened or glazed patio enclosure is a risk: it can complicate home sales, void homeowner's insurance claims, and result in a removal order. Pull the permit. It's usually inexpensive and straightforward for a basic patio enclosure.
Heating and safety inside the enclosure
A 3-season enclosure is not insulated, so any heat you add will dissipate quickly. An electric space heater, a wall-mounted infrared heater, or an outdoor-rated propane heater can make the space comfortable for a few hours at a time. Never use a propane heater in a tightly sealed enclosure without ventilation; carbon monoxide builds up fast in a sealed space. Keep a CO detector in any enclosed patio where you use combustion heating. For a truly warm 4-season space, you need full insulation and an HVAC connection or a dedicated mini-split system, which moves this into the category of a home addition project.
What to check after the first cold snap
- Look for condensation pooling on the floor or dripping from panel edges; if you see it, check that the polycarbonate sheet ends are properly sealed and that you have adequate ventilation.
- Check every sealant joint for cracking or separation after the first hard freeze. Flexible sealants hold up; rigid caulk often does not.
- Inspect the flashing at the house wall connection after the first rain or snow. Any wet spots inside indicate a flashing gap.
- Test that weep holes in panel tracks and window frames are clear and draining. Probe them with a thin wire if you're not sure.
- Check that the door still opens and closes smoothly. Wood swells in moisture; if your door is sticking, adjust the hinges or lightly plane the edge.
- Clear snow off the patio roof after heavy storms, especially if the roof is a flat or low-pitch design not engineered for snow load.
Your next steps, in order
- Decide which tier of enclosure you need (temporary curtains, 3-season panels, or full 4-season build) based on your climate and budget.
- Measure all open sides of your patio and sketch a layout with door and vent locations marked.
- Check with your local building department about permit requirements before buying materials.
- Order materials (polycarbonate panels, aluminum profiles, framing lumber, flashing tape, sealant, door) so they arrive before you start framing.
- Build the frame and install panels on the largest walls first, then fit the door, then seal all perimeter joints.
- Install any ventilation openings or operable panels.
- Do a weatherproofing check after your first rain: look for leaks at every flashing joint, weep hole, and panel edge.
- Add supplemental heat if needed and make sure you have CO detection if using any combustion heat source.
If you find yourself wanting to go deeper on any single part of this project, the planning and materials side of a full patio enclosure build, how to properly insulate a patio space for year-round use, or even how to reduce noise and drafts from outside, each of those is its own rabbit hole worth exploring separately. But for most homeowners, the framed polycarbonate panel approach described here hits the sweet spot: real winter protection, a manageable DIY build, and a space you'll actually use. For the chemicals involved in DIY patio closures, OSHA’s Hazard Communication Standard (29 CFR 1910.1200) requires chemical labels and SDSs, so keep SDS/label information available and follow handling precautions blank" rel="noopener noreferrer">keep product SDS/label information available. If you want a more permanent setup, you can enclose a patio for winter using removable panels or a fully framed, weatherproof build with insulated glazing.
FAQ
How do I decide if I need clear vinyl curtains or a framed 3-season enclosure?
If your goal is mainly blocking wind and light rain, curtains usually work. If you routinely experience hard freezes, you will want sealed, framed panels (like twin-wall polycarbonate) because curtains still leak air around edges and at roller/rod ends. A quick check is to hold a hand near the curtain perimeter on a windy day, if you feel strong airflow you are likely past what curtains can handle for winter comfort.
Can I just overlap or caulk the curtain edges to make them airtight?
Avoid relying on caulk or thick seals with temporary vinyl curtains, because vinyl expands and contracts and the bond can fail in freeze-thaw cycles. For curtains, focus on a tight attachment method (weighted hems, side overlaps, and good track alignment) rather than trying to create a permanent airtight seal with sealant.
What’s the correct way to hang vinyl panels if my patio roof posts are not perfectly level?
Start by verifying level for the track or rod system, not the posts. Use a string line and shims or adjustable mounting brackets so the curtain panels hang straight, otherwise you will get uneven gaps at the bottom and sides that leak cold air. Plan for minor post variation by leaving a small trim allowance where panels meet the floor track.
Should I seal the weep holes on window frames or panel tracks to stop drafts?
No. Those small openings are intentional drainage paths. If you block them, water that gets behind flashing or condensation can back up and rot framing from inside. Instead, reduce drafts by improving the top flashing connection and using weatherstripping where the frame meets the enclosure walls.
Why is my polycarbonate enclosure collecting condensation even when it feels sealed?
Condensation often happens because warm, moist indoor air contacts cold glazing, and it can be trapped inside polycarbonate channels if the sheet ends are not handled correctly. Confirm every sheet has the correct U-profile at both ends, with the top ends sealed (so moisture does not intrude) and the bottom ends vented or provided with weep/vented caps so moisture can drain out.
Is it safe to use a space heater inside a patio enclosure for winter?
Only with ventilation. For any heater that uses electricity, you still need airflow so you do not create excessive humidity and condensation. For propane or any combustion heater, the enclosure must not be tightly sealed without designed ventilation, and you should install a carbon monoxide detector near sleeping or occupied areas.
Do I need a permit to close in a patio with framed polycarbonate panels?
Usually, yes for permanent or semi-permanent enclosures, but rules vary by municipality. Common triggers include creating a new enclosed room footprint, changing exterior openings, and the way the structure attaches to the house. If you are unsure, ask your local building department whether your design is treated as an addition, a porch enclosure, or an accessory structure.
How do I prevent water intrusion at the top of the walls where the enclosure meets the house?
Treat that top connection like a roof-to-wall flashing detail. Use self-adhering flashing tape properly with correct lapping order so water sheds outward, and pay special attention to wall-to-house transitions and top corners around doors or windows. Caulking over a gap is not a substitute for flashing when water is driven by wind and ice.
What should I do about an ice dam problem on my patio roof before installing panels?
If your patio roof is missing ice-and-water shield coverage, install it before closing in the walls so meltwater does not back up and penetrate under roofing layers. A typical standard in cold regions is extending coverage at least about 24 inches past the interior warm wall line, but confirm local requirements for your roof system.
Will a 3-season enclosure trap enough heat to be comfortable all day?
Often it will be comfortable for short periods, especially on sunny days, but it is not insulated, so heat loss is rapid at night and during wind. If you want day-long comfort, plan on supplemental heat and manage humidity buildup from cooking or showers if the enclosure connects to the home.
How can I reduce rattling or wind noise in track-mounted panel systems?
Rattling usually comes from panels that are not fully snug, tracks that are slightly out of level, or seam gaps. Ensure panels fit without bowing, use a quality zipper-channel or appropriate seam system for panel-to-panel joints, and tighten track mounts into solid framing members so the track does not flex in gusts.
What’s the minimum door clearance to avoid problems with code and usability?
Many areas require at least a 2-foot-4-inch clear egress opening for exterior doors, but the required swing clearances, glazing rules, and tempered-glass locations can vary. Measure not just the door width, but also the arc of the swing so it clears furniture and does not hit interior posts or panel frames.
DIY guide for how to soundproof a patio: find leaks, seal gaps, add barriers, enclosure upgrades, and weatherproof mater
Step-by-step DIY checklist to winterize your patio: coverings, flooring, drainage, furniture, cushions, screens, and spr

Practical DIY layout and decor tips to widen a long narrow patio using zoning, furniture spacing, lighting, greenery, an