You can meaningfully reduce noise on a patio, but you cannot make it silent. A well-executed DIY soundproofing project using solid barriers, gap sealing, and acoustic absorption can realistically cut perceived noise by 5 to 10 dB, which is enough to turn a loud, stressful space into a genuinely comfortable one. That's the honest starting point. The steps below will walk you through exactly how to get there for an open patio, a covered patio, a screened room, or a full enclosure.
How to Soundproof a Patio: DIY Steps That Actually Work

Felix Brennan
29 Apr 2026
Reality check: what outdoor soundproofing can actually do
Outdoor acoustics work differently from indoor acoustics. Inside a room, you can trap and absorb sound because the space is enclosed. Outside, sound wraps around barriers, diffracts over the top, and travels through any gap. Even professional highway noise barriers, built from solid concrete, typically achieve only 3 to 5 dB of reduction for listeners who aren't directly shielded behind them. A 10 dB reduction is considered a halving of perceived loudness, so even modest improvements are genuinely worth pursuing. The takeaway: manage expectations, target the right techniques, and you will notice the difference.
Distance is your most powerful free tool. Doubling your distance from a noise source drops the sound pressure level by about 6 dB, which most people describe as clearly noticeable. If you have any flexibility in where you place seating, use it. Everything else you do builds on top of that baseline.
High-frequency noise (traffic squeal, power tools, high-pitched voices) is easier to block and absorb than low-frequency rumble (bass, heavy trucks, HVAC units). Barriers and dense materials do well against mid-to-high frequencies. Bass passes through almost everything, so if your primary complaint is a neighbor's subwoofer, temper your expectations accordingly.
Find the noise path: source, frequency, and weak points

Before you buy a single panel or roll of material, spend 10 minutes mapping your noise problem. Stand in the middle of your patio with your eyes closed and identify the direction the noise is loudest. Then walk the perimeter and listen for where it peaks. That's your primary flanking path, and it's the one to address first.
Ask yourself three questions about the noise: Where is it coming from (road, neighbor, HVAC, pool equipment)? What pitch does it sit at (low rumble, mid-range voices, high-frequency whine)? And when is it worst? A road at the front of the property at rush hour calls for a completely different fix than a neighbor's AC unit that runs at night. Matching the solution to the problem saves you time and money.
Next, find your weak points. Any opening where air moves is an opening where sound moves. OSHA's guidance on industrial noise control reinforces this directly: any gap that passes air passes a significant amount of noise. On a patio, the usual suspects are open sides with no barrier, the gap under a screen door, gaps between fence boards, the space between a patio roof and the house wall, and any penetrations for wiring or pipes. Mark them. They're your priority list.
Blocking and sealing: barriers, solid panels, and gap-proofing
Mass is the foundation of sound blocking. The heavier and denser a barrier is, the less sound passes through it. For a patio, this translates to solid fence panels, masonry walls, dense wood privacy screens, or mass-loaded vinyl (MLV) panels rated at 1 lb per square foot or more. A single-layer wooden fence with gaps between boards does almost nothing acoustically. A solid, continuous 6-foot privacy fence with no visible light gaps does measurably more.
Height matters more than most people realize. A barrier only works if it interrupts the direct line of sight between the noise source and your ears. If you can see the source of the noise over or around your fence, sound is getting to you with minimal attenuation. Aim for a barrier tall enough that you can't see the noise source from your seated position. For most patios, that means 6 to 8 feet on the noisy side.
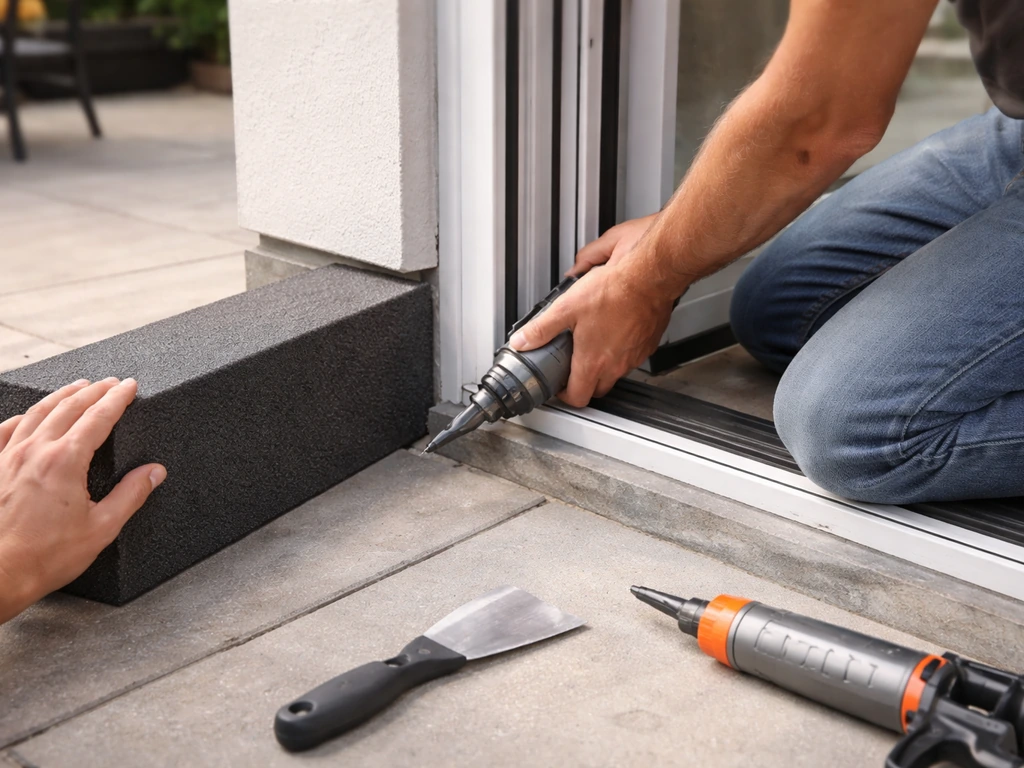
Gaps are the enemy. Research on highway noise barriers shows that even a continuous gap of up to about 8 inches at the base typically costs you no more than about 1 dB of reduction, but larger or multiple gaps compound quickly and can erase most of your barrier's benefit. Seal the bottom of fence panels with a rubber gasket strip or bury the base in a gravel-filled trench. Seal corners where panels meet with overlapping construction. The goal is no visible light when you look along the barrier from inside.
Gap-sealing checklist

- Door sweeps on all screen doors and solid patio doors (look for a flat rubber sweep, not a brush sweep, for better acoustic sealing)
- Weatherstripping around door frames and operable windows in an enclosed patio
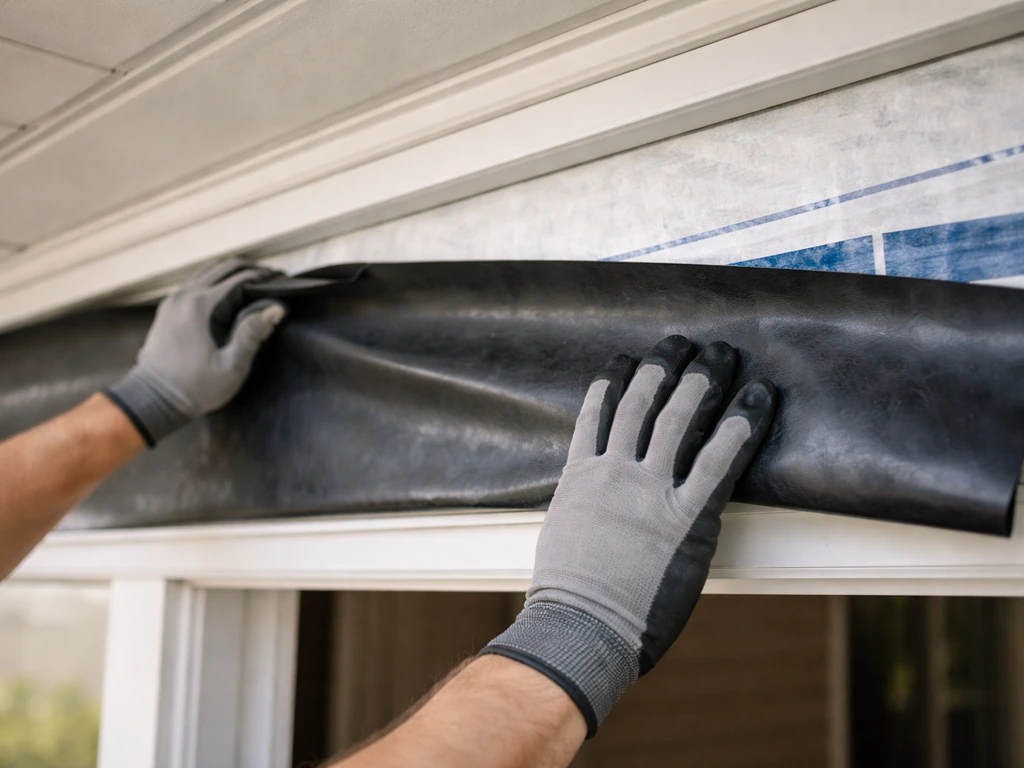
- Acoustic caulk or backer rod in gaps where the patio roof meets the house wall
- Foam backer rod in wide gaps between fence or panel sections before caulking
- Rubber gasket strip along the bottom of any solid privacy screen or panel
- Grommeted mass-loaded vinyl overlapping at seams if used as a flexible barrier
Absorption and decoupling: adding indoor-like acoustic control outdoors
Barriers block direct sound, but hard surfaces (concrete, brick, stucco, glass) bounce sound around within your patio and make it louder than it needs to be. Absorption cuts that reflective noise. Outdoors, absorption materials have to survive rain, UV exposure, mold, and temperature swings, so you can't just staple standard acoustic foam to a wall and call it done. You need outdoor-rated alternatives.
Outdoor acoustic curtains, sometimes sold as soundproof curtains or mass-loaded vinyl curtains with a fabric face, are the most practical absorption upgrade for a patio. Hang them on the noisy side using a sturdy curtain rod or track system. Look for products rated at a minimum of 1 lb per square foot with a weather-resistant outer face. They won't achieve studio-level absorption, but they meaningfully reduce reflections and add some transmission loss, especially in a covered or enclosed space.
Soft furnishings absorb more than people expect. Thick outdoor rugs, padded furniture cushions, and fabric-covered panels all contribute to reducing the reflective noise environment on a patio. None of these are dramatic fixes on their own, but layered together they make a real difference in how the space feels acoustically. Think of it as turning a tile bathroom into a carpeted living room: the same sounds feel softer and less intrusive.
Decoupling means breaking the physical connection through which vibration travels. On a patio, the most practical application is isolating the structure from a noise source. If you have a loud rooftop HVAC unit or a pump near the patio, mounting it on anti-vibration pads or rubber isolators stops low-frequency structure-borne noise from traveling through the slab or framing into your space. This is one of the highest-ROI fixes when mechanical equipment is part of your noise problem.
Soundproofing upgrades by patio type
Different patio setups have different acoustic weak points and different upgrade paths. Here's how to approach each one.
Open patio
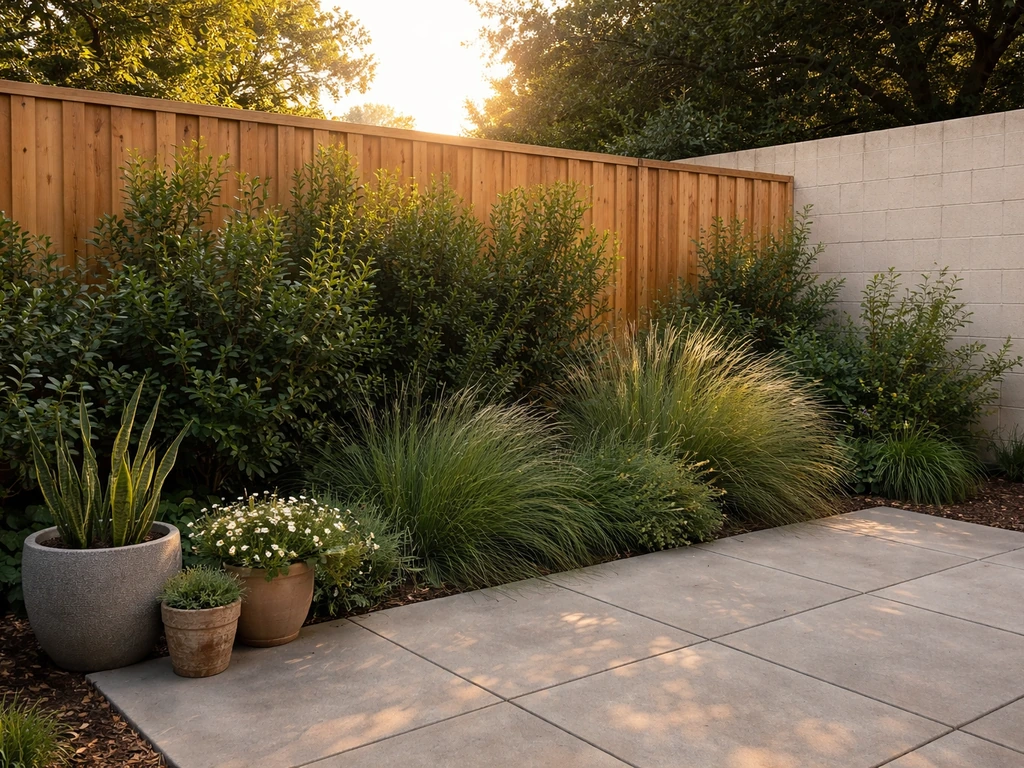
An open patio has no enclosure, so you're working purely with barriers and landscaping. Your best moves are installing a tall solid privacy fence or masonry wall on the noisy side, positioning dense plantings (arborvitae, holly, boxwood hedges) as a secondary absorption layer behind the barrier, and maximizing distance between your seating area and the noise source. Plantings alone contribute almost nothing to blocking sound, but a dense hedge behind a solid fence adds a meaningful absorption layer for mid and high frequencies. If a full fence isn't possible, tall freestanding privacy panels made from composite lumber or mass-loaded vinyl-covered frames are a renter-friendly alternative.
Covered patio
A covered patio (pergola, attached roof, or patio cover) already has overhead protection, but the sides are usually open. The roof itself can become an acoustic asset if you insulate it properly. Adding rigid mineral wool or closed-cell spray foam insulation between the roof decking and a finished ceiling board cuts both sound transmission and thermal transfer. This pairs well with the projects covered in our guide on how to insulate a patio. This also means choosing the right insulation approach for your patio type, whether it's open, covered, screened, or enclosed how to insulate a patio. On the sides, hang outdoor acoustic curtains or install removable solid panel sections on the noisiest sides. These can be designed to fold or slide for good-weather days.
Screened patio
Screening does nothing for sound, because standard insect screen is essentially acoustically transparent. But a screened patio gives you a structural frame you can work with. Upgrading to a denser screen material helps slightly. More impactful is adding removable solid panels to the lower half of screen bays on the noisy side, sealing the screen door with a proper sweep, and insulating the roof cavity. If you're considering converting or enclosing the screened patio further, the approach overlaps with what we cover in our guide on how to close in a patio and is worth reading together with this guide.
Enclosed patio
An enclosed patio (one with solid or glazed walls) is the configuration where indoor acoustic techniques actually translate. Here, you can apply weatherstripping to all openings, insulate walls and the ceiling cavity, install solid-core doors with proper sweeps, and add mass-loaded vinyl behind wall finishes. This is the patio type where the effort-to-result ratio is best, because enclosing the space means your barriers actually contain the noise reduction rather than letting it diffuse outside. If you're in the process of enclosing for a season, the guides on how to enclose a patio for winter and how to close in a patio for winter both touch on the structural work that sets you up for acoustic improvements too. If you are enclosing for a winter season, this pairs well with our step-by-step on how to close in a patio for winter.
Outdoor-safe materials and installation tips
Not every acoustic material survives outdoors. Standard acoustic foam, fiberglass batts without a vapor barrier, and paper-faced drywall will degrade within one season if exposed to moisture. Choose materials rated for exterior or semi-exterior use, and protect everything you install from direct water exposure.
| Material | Best Use | Outdoor Durability | Approx. Cost |
|---|---|---|---|
| Mass-loaded vinyl (MLV), 1 lb/sq ft | Flexible barrier panels, fence overlays, wall underlays | Good if protected from UV; use outdoor-rated MLV or cover with fabric | $1–$2 per sq ft |
| Composite or PVC solid privacy panels | Permanent side barriers, fence replacements | Excellent; won't rot or warp | $20–$50 per linear ft installed |
| Outdoor acoustic curtains | Covered/enclosed patio walls, pergola sides | Good; look for mold-resistant, UV-rated fabric | $30–$80 per panel |
| Rigid mineral wool board (e.g., Rockwool Comfortboard) | Insulated ceiling/wall cavities, protected from weather | Good when fully encapsulated; not for exposed use | $1–$2 per sq ft |
| Closed-cell spray foam insulation | Roof deck underside, wall cavities | Excellent once cured; vapor- and water-resistant | $1–$3 per sq ft (DIY kit) |
| Rubber door sweeps and weatherstripping | Screen doors, patio doors, panel gaps | Excellent; replace every 3–5 years | $10–$30 per door |
| Dense plantings (arborvitae, holly, boxwood) | Secondary absorption behind solid barriers | Excellent; permanent once established | $30–$80 per plant; needs time to mature |
For installation, a few rules apply across all these materials. First, overlap seams rather than butting them flush whenever you're using flexible materials like MLV or curtain panels. Even a 2-inch overlap prevents flanking paths that butt-joined seams create. Second, fasten barriers solidly so they don't rattle in wind, because a vibrating panel re-radiates noise rather than blocking it. Third, seal the perimeter of any panel before you declare it done. Run a bead of paintable acoustic caulk along every edge where a panel meets a frame, wall, or post.
Weatherproofing and acoustic performance go together here. A solid panel that's also well-sealed against wind and rain is inherently a better acoustic barrier than a leaky one. If you're already doing work to weatherize your patio (as covered in our guide on how to winterize a patio), that's a natural time to add acoustic caulk and sweep upgrades at the same time, since you're already dealing with the same gaps and penetrations.
DIY plan and priorities, plus renter-friendly and budget options
Here's the sequence we'd follow on a typical patio project, ordered from highest impact to most involved. You don't have to do all of these; pick the ones that match your noise source, your patio type, and your budget.
- Maximize distance: move seating as far as possible from the noise source. Free, immediate, 6 dB per doubling of distance.
- Seal all gaps: add door sweeps, weatherstripping, acoustic caulk at every gap you found in your noise-path survey. Cost: $30–$100 in materials, a few hours of work.
- Install a solid privacy barrier on the noisy side: a 6-to-8-foot composite or wood privacy fence, or freestanding privacy panels with MLV backing. This is the single biggest structural upgrade. Cost: $500–$2,500 depending on length and material.
- Insulate the roof cavity if you have a covered or enclosed patio: rigid mineral wool or closed-cell foam between the roof and a finished ceiling. Cost: $200–$800 DIY.
- Hang outdoor acoustic curtains on the noisy side walls: especially effective on covered and enclosed patios. Cost: $100–$400.
- Add soft furnishings and outdoor rugs to reduce reflective noise inside the patio. Cost: $50–$300.
- Install anti-vibration pads under any mechanical equipment close to the patio. Cost: $20–$80.
Renter-friendly and temporary options
If you rent, or if you want a solution you can take with you or remove seasonally, focus on freestanding panels, curtains on portable curtain rods, and heavy outdoor rugs. Freestanding privacy screens made from composite slats or bamboo (not acoustically great but better than open air) can be weighted down with planter bases or staked without post footings. Outdoor curtains on a freestanding curtain rod frame create a soft barrier on the noisy side without any permanent fastening. These won't match a built-in fence for performance, but they're a legitimate starting point and can be upgraded later.
Budget expectations at a glance
| Scope | What's Included | Estimated DIY Cost | Expected Noise Reduction |
|---|---|---|---|
| Basic (weekend project) | Gap sealing, door sweeps, weatherstripping | $30–$150 | 2–4 dB |
| Intermediate | Basic + freestanding privacy panels or acoustic curtains | $300–$800 | 4–7 dB |
| Full upgrade (homeowner) | Intermediate + solid fence, insulated roof cavity | $1,000–$3,000+ | 7–12 dB |
| Enclosed patio overhaul | Insulated walls, solid doors, MLV, full gap sealing | $2,000–$6,000+ | 10–20 dB |
After you've made your improvements, test the result by ear in the same seated position you measured from before. If you had a decibel meter app running before you started (free apps on any smartphone give a useful ballpark), run it again. A 5 dB improvement will feel noticeably quieter. A 10 dB improvement will feel dramatically quieter. If you're not where you want to be, go back to your noise-path map and find the next unsealed gap or the next unblocked flanking path. Outdoor soundproofing is iterative, and each round of fixes builds on the last.
FAQ
How can I measure whether my patio soundproofing is actually working?
Use a decibel meter app only as a relative tool, not an exact guarantee. Take readings from the same spot, same time of day, and with the same background noise level (traffic lull versus rush hour can swing results). If your goal is “how to soundproof a patio,” prioritize a consistent change, for example 5 dB lower at the same seated position, rather than chasing small number differences.
What should I do differently if the noise is mostly bass or low rumble?
If the noise source is low-frequency (subwoofer, heavy HVAC, idling trucks), focus first on mass plus decoupling. Add dense barriers (MLV or solid fence sections) and reduce vibration transfer from nearby equipment with rubber isolators or anti-vibration pads. Soft upgrades like rugs will help reflections, but they do little for bass compared with blocking and isolation.
Why does my patio still sound loud even after I added a fence or panels?
Soundproofing often fails when gaps are overlooked even if the barrier looks solid. Re-check the perimeter (corners, panel-to-post joints, and the bottom edge) and also the “small” pathways like cable or pipe penetrations. A single unsealed conduit hole can become a flanking route, so seal penetrations with appropriate outdoor sealant and confirm there are no visible light leaks when sighting along the barrier.
Can I soundproof a patio with only trees or hedges?
Planting helps most for mid to high frequencies and only as a secondary layer behind a real barrier. Treat dense hedges or trees as reflection dampening, not as the primary sound blocker. If you rely on landscaping alone, expect minimal improvement for traffic or neighbor noise, especially for low-frequency sounds.
What are good renter-friendly ways to soundproof a patio?
Yes, but it works best when paired with a structure-based strategy. For a rental or temporary setup, use movable heavy options (freestanding mass-loaded vinyl–type curtains on a sturdy rod, or weighted composite/MLV-covered panels) plus sound-absorbing floor treatments. Just remember that without sealing and a true barrier line, temporary solutions usually deliver smaller improvements than built-in fencing.
How do I find the source of flanking noise on my patio?
Check flanking paths around and through the barrier, not just the direction you hear the noise. Common culprits are the ends of the fence (where sound can wrap around), the space between patio roof beams and the house wall, and the underside of any screen door. Walk the perimeter again and listen at the “quietest” seating point, then rotate 90 degrees and listen for where the sound spikes.
Is roof insulation actually effective for reducing patio noise?
Insulating a covered patio roof helps, but only if the insulation is installed in a way that also reduces air leakage and vibration transfer. Seal roof penetrations, seams, and the perimeter framing. If you add insulation while leaving gaps around vents, wiring, or the roof-to-wall junction, you can end up paying for material without getting full acoustic benefit.
Can I use indoor acoustic foam or fiberglass outdoors on a patio?
Interior-grade acoustic foam is a bad outdoors choice because it degrades under UV and moisture, and it can also blow away or lose performance when exposed to wind. Use outdoor-rated acoustic curtains or mass-loaded vinyl with a weather-resistant face, and keep any absorptive materials in a protected placement where rain will not saturate them repeatedly.
What barrier improvements give the biggest results first, height or extra layers?
Prioritize the route that gives you the most coverage in the “line of sight” between the noise source and your seating. If you can see the source above or around your barrier, increase height or extend the barrier on the ends. For many patios, moving from a 4 to 6 foot solution and sealing the top and corners gives a bigger step-change than adding soft furnishings first.
If I close my patio for winter, will it also help soundproof it?
Yes, but do it as part of a full weatherproofing strategy. Soundproofing depends on tight edges, so insulating and sealing seasonal closures (sweeps, caulk at perimeter seams, and gap-free panel fits) also reduce noise leakage. If you’re closing for winter, treat it as both thermal and acoustic work, and verify latches and weatherstripping are functional, not worn or loose.
What installation mistakes most commonly ruin outdoor soundproofing?
If you install a barrier that doesn’t stop wind-driven movement, it can rattle and re-radiate noise. Fasten panels to prevent vibration, and use proper overlapping seams instead of butt joints so you don’t create repeatable flanking gaps. After installation, test in windy conditions if possible, and look for any movement when you lightly push the barrier.
How do I choose the right fix based on the type and timing of noise?
If the noise is a neighbor’s speech, slamming gates, or music with clear vocals, barriers and sealing are usually the fastest wins. If it’s HVAC or mechanical noise that runs in cycles, isolate the equipment vibration first (pads/isolators) and then block the air pathways around the unit. Matching the solution to “type plus timing” is usually what prevents wasting money on barriers that don’t target the dominant mechanism.
Next Articles
How to Winterize a Patio: Step-by-Step DIY Checklist
Step-by-step DIY checklist to winterize your patio: coverings, flooring, drainage, furniture, cushions, screens, and spr

How to Decorate a Long Narrow Patio: Layout Tips
Practical DIY layout and decor tips to widen a long narrow patio using zoning, furniture spacing, lighting, greenery, an
How to Decorate a Rectangular Patio Step by Step
Step-by-step plan to decorate a rectangular patio with smart layout, zones, furniture fit, lighting, plants, and seasona