
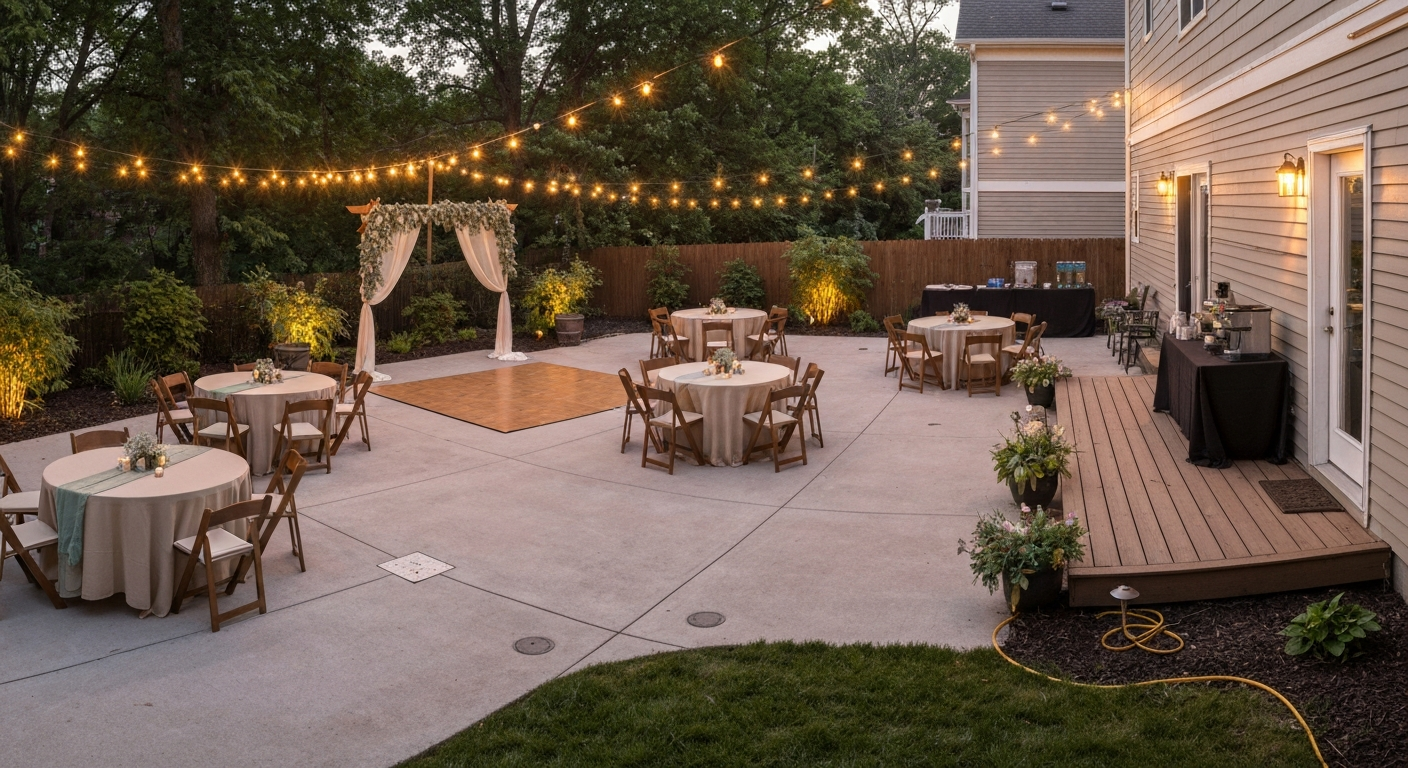
You can absolutely host a beautiful wedding on your residential patio or deck without hiring an event company to do it for you. With a solid measuring session, a realistic budget, the right temporary structures, and a few safety checks, a 300 to 600 square foot patio can comfortably seat 20 to 40 guests for a ceremony and light reception. This guide walks you through every layer of the project: planning and permissions, layout, lighting, flooring, florals, climate control, and day-of execution. Whether you're working with a simple concrete slab, a screened enclosure, or a raised wood deck, there's a workable approach for each setup.
How to Decorate a Patio for a Wedding: DIY Plan & Checklist

Felix Brennan
16 Jul 2026
Who this guide is for and what it covers
This is written for homeowners who want to host a wedding or intimate celebration on their own outdoor space and handle as much of the setup as possible themselves. You don't need construction experience to follow it, but you do need to be willing to measure carefully, read a few local regulations, and put in a couple of weekends of prep work. We cover the ceremony space, reception layout, draping, arches, tents, lighting and power, seating, tablescapes, flooring treatments, floral placement, pest and climate control, and the photography-friendly finishing touches that actually show up in photos. If you've already explored how to decorate a patio deck or how to stage an outdoor patio for everyday use, a lot of these instincts carry over, you're just scaling up the detail level and adding safety requirements specific to hosting a crowd.
Quick planning checklist before you touch a single decoration
Run through this list at least eight weeks before the event. Skipping any item tends to create expensive last-minute scrambles.
- Measure your patio footprint and calculate guest capacity (see the next section for exact formulas).
- Set your total budget and break it into categories: structure, lighting, decor, seating/tables, florals, and contingency.
- Check your HOA rules for event hosting, tent installation, and exterior lighting or fabric attachments.
- Contact your local building or fire department to ask whether a tent or temporary structure of your planned size requires a permit.
- Notify neighbors at least four weeks out, especially if amplified music or evening lighting is involved.
- Verify your homeowner's insurance covers events with this many guests, or add a short-term event policy rider.
- Confirm your deck or patio structure is in good repair and understand its load limits before renting heavy furniture or adding a dance floor.
- Create a day-of timeline working backward from the ceremony start time.
- Build a materials shopping list with dimensions, quantities, and specific product ratings (outdoor-rated cords, GFCI outlets, NFPA 701-certified fabrics).
- Identify which tasks you'll DIY, which you'll rent equipment for, and which genuinely require a licensed pro (electrical panel connections, structural modifications).
Measuring your space and figuring out how many guests will actually fit
Pull out a tape measure and sketch your patio to scale on graph paper. Measure the full perimeter, note any fixed obstacles (built-in grills, columns, planters, downspouts), and mark where doors open and where any steps or grade changes are. You need clear numbers before you can plan anything else.
For a standing ceremony, plan on roughly 6 square feet per guest, which is comfortable without being cramped. For seated dining, you need 10 to 12 square feet per person when you factor in chair pull-out clearance and server circulation. A 400 sq ft patio with 50 sq ft blocked by a fixed structure gives you 350 usable sq ft, enough for about 35 seated guests at round tables, or a 40-person standing ceremony with room for an aisle.
Aisle width matters more than people expect. A comfortable ceremony aisle should be at least 5 feet wide, and 6 feet is better if guests will be seated on folding chairs with no gap between the chair and the aisle. Map the aisle first, then calculate remaining seating on each side. Leave a minimum 36-inch clearance path around all table edges to meet basic accessibility and egress guidance, and keep at least one 48-inch clear path to each exit point.
| Use | Space per Person | Example: 400 sq ft (usable 350 sq ft) |
|---|---|---|
| Standing ceremony | 6 sq ft | ~58 guests max |
| Seated ceremony (chairs only) | 8 sq ft | ~43 guests |
| Seated dining (round tables) | 10–12 sq ft | ~29–35 guests |
| Cocktail/mixed standing + seating | 7–8 sq ft | ~43–50 guests |
| Dance floor addition (subtract first) | 15–20 sq ft total block | Reduces capacity by ~1–2 tables |
Permits, notifications, insurance, and when to bring in a pro
Most homeowners assume a backyard wedding is totally unregulated. That's mostly true for small gatherings with no structures, but once you add a tent or canopy, the rules change. Under the 2021 International Fire Code (IFC Chapter 31), many jurisdictions require a permit for any single tent over 400 square feet, or any combined tent area over 700 square feet without a 12-foot fire break between them. Even if your tent is under threshold, fire marshals in many counties require that the tent or canopy fabric be certified to NFPA 701 (the standard for flame-propagation resistance in textiles). When you buy or rent a canopy, ask the supplier for the NFPA 701 test certificate. If you're buying a cheap pop-up canopy online, it may not carry that certification, which can matter even for a private event if a neighbor complains or an incident occurs.
For electrical work: the National Electrical Code (NEC Article 210.8) requires GFCI protection on virtually all outdoor receptacles in dwelling units. If you're plugging string lights, fans, or portable speakers into outdoor outlets, those outlets should already be GFCI-protected. Temporary wiring setups for events fall under NEC Article 590, which allows temporary lighting and power for up to 90 days but still requires all the safety provisions of permanent wiring, including GFCI protection on outdoor circuits. If you're considering a generator as a backup power source, keep it at least 20 feet from any structure or opening, never run it under a tent or enclosed porch, and use only outdoor-rated, properly rated extension cords per CPSC guidance. Any direct connection from a generator to your home's electrical panel requires a licensed electrician and a code-compliant transfer switch or interlock, this is not a DIY shortcut.
Call your homeowner's insurance carrier four to six weeks out. Standard HO policies don't always cover guest injuries at a large gathering. A one-day event liability policy typically costs $100 to $200 and gives you $1 million in coverage. It's one of the best dollars-per-risk purchases on this list. If you're in an HOA, check the CC&Rs specifically for clauses about events, exterior decor, temporary structures, and lighting, some require approval 30 days in advance.
Building your budget: what to DIY, what to rent, and what to just buy
A reasonable DIY patio wedding for 30 to 40 guests can come in between $1,500 and $4,000 total, depending on your region and how much you already own. The biggest budget decisions are lighting, seating, and any temporary overhead structure. Here's a sample breakdown to give you a starting framework, adjust up or down based on your guest count and existing inventory.
| Category | DIY / Owned | Rent | Buy/Hire | Estimated Range |
|---|---|---|---|---|
| Tent or canopy (if needed) | No — size/safety limits apply | Best option for large tents | Buy small pop-up canopies | $0–$400 rental / $80–$200 buy |
| String lights / bistro lights | Yes — DIY install | — | Purchase and keep | $60–$200 for 200–400 ft |
| Tables (round 60-inch) | — | Rent ($8–$15 each) | — | $80–$200 for 6–10 tables |
| Chairs (folding/chiavari) | — | Rent ($1.50–$6 each) | — | $60–$300 for 40 chairs |
| Arch or arbor | DIY build: $40–$120 | Rent: $80–$200 | — | $40–$200 |
| Linens and draping fabric | Yes — sew or tie | — | Purchase fabric yardage | $50–$200 |
| Florals and greenery | DIY arrange | — | Buy from wholesaler/market | $100–$400 |
| Outdoor rugs / aisle runner | Yes | — | Purchase | $30–$150 |
| Lighting power / extension cords | Yes — GFCI required | — | Buy outdoor-rated cords | $30–$80 |
| Day-of help (setup/teardown) | Yes if possible | — | Hire 1–2 helpers | $0–$200 |
| Event liability insurance | — | — | Required purchase | $100–$200 |
Always keep 10 to 15 percent of your total budget unallocated as a contingency. Weather damage to rented linens, a broken string-light strand the morning of the event, or a last-minute chair rental increase will eat that buffer fast. Budget for the contingency first, not last.
Picking a theme and color palette
The best patio wedding themes work with the existing architecture of the space rather than trying to disguise it. A brick patio suits rustic, garden, and Mediterranean themes. A modern concrete slab looks great with minimalist geometric arches and cool-toned greenery. A screened enclosure or covered deck translates beautifully into a garden-party or bohemian indoor-outdoor feel. Choose one anchor color, one complementary accent, and one neutral, then repeat those three across your linens, florals, ribbon, and lighting. More than three colors almost always reads as cluttered outdoors, where natural light and varying shadow intensify everything.
Summer and warm-weather palettes
For summer weddings, lean into warm whites, soft sage, dusty rose, and terracotta. These colors photograph well in afternoon light (roughly 4,000 to 6,000 K daylight color temperature) and age gracefully as shadows shift. Avoid pure bright white tablecloths in direct afternoon sun, they blow out in photos and show every grass stain. For more ideas on warm-weather styling, see our guide on how to decorate your patio for summer. Ivory or warm linen tones are more forgiving and look intentional.
Tropical and lush green themes
If you're interested in a tropical direction, large-leaf plants like bird of paradise, elephant ear, and split-leaf philodendron do most of the visual heavy lifting without expensive florals. Pair them with bold accents, mango orange, fuchsia, or cobalt, and keep linens simple in white or natural canvas. A tropical patio setup translates remarkably well to a screened enclosure, where the plants can line the perimeter without wind damage. If you've been thinking about creating a tropical patio for everyday use, a wedding is actually a great excuse to invest in those anchor plants, since they stay useful long after the event.
Boosting color on a neutral patio
If your patio is concrete gray or beige pavers with no natural warmth, color needs to come from layers: an outdoor rug under the dining area, colored fabric chair sashes, potted flowers at varying heights, and warm-toned string lights overhead. String lights with a color temperature of 2700 K (very warm white, almost amber) add enormous warmth to a cool-toned space and photograph beautifully for evening receptions. Adding color to an outdoor patio doesn't require painting anything, fabric, plants, and light do most of the work in a short-term setup.
Layout and flow: mapping out the ceremony and reception
Ceremony and reception layouts on a residential patio almost always require a flip, you use the space for the ceremony, then rearrange it for dining. Plan for that transition explicitly, and assign helpers to execute it. The ceremony-to-reception flip typically takes 20 to 30 minutes if furniture is staged and labeled in advance.
Ceremony layout basics
Place the arch or altar at the far end of the patio from the entry point so guests walk toward it. The aisle runs center from entry to altar, at least 5 feet wide. Rows of chairs (or benches) flank each side with a 6-inch gap between rows for leg room and a 12-inch gap between chair backs of adjacent rows (about 32 to 36 inches per row total). Keep the back two rows of chairs loosened up for late arrivals and for guests with mobility needs, designate one end-of-row chair on each side as wheelchair-accessible space with no chair blocking the access. Orient the arch so it's backlit by open sky or a garden view rather than a wall or fence, which photographs much better.
Reception layout: dining, bar, and dance areas
For the reception, move ceremony chairs to the perimeter or stack them off to the side, and bring in round 60-inch tables (which seat 8 comfortably or 10 in a pinch). Position the bar or beverage station at the edge of the space near an exit or secondary entry so it doesn't create a traffic bottleneck at the main path. If you're adding a small dance area, designate a 10 by 10 foot minimum zone (100 sq ft) cleared of all furniture, even a modest dance space feels generous if it's truly clear. Keep the dance zone away from the bar line so people aren't crossing each other constantly. The food/catering station or buffet goes along one wall or fence line to keep it out of the circulation path.
Sightlines matter for both ceremony and photography. Stand at the spot where your photographer will position themselves and check: is the arch framed by something interesting, or is there a chain-link fence, air conditioner, or trash area in the background? Use potted plants, fabric panels, or a tension drape to mask problem backgrounds. This takes an hour to plan in advance and saves you from editing disasters in every photo.
Patio vs. deck: specific adjustments for each surface
Whether you're on a ground-level concrete or paver patio or on a raised wood or composite deck, the decorating approach is similar in principle but different in safety details. Both can be beautiful, the adjustments are mostly about load, fastening, and surface protection.
Ground-level patio specifics
Concrete and paver patios have essentially unlimited load capacity for typical event furniture, so weight is rarely a concern. Your main issues are surface protection, tripping hazards from uneven pavers, and anchoring temporary structures to hard ground. Use rubber furniture pads under all chair and table legs to prevent scratching sealed concrete or displacing individual pavers. For tent or arch stakes going into ground adjacent to the patio, probe the area first for irrigation lines and electrical conduit, most residential irrigation runs 6 to 12 inches deep and is easy to pierce with a tent stake. Outdoor rugs on concrete or pavers need anti-slip pads underneath and should be taped at the edges with double-sided outdoor rug tape to prevent trip hazards.
Raised deck specifics
Raised wood or composite decks require more attention to load and fastening. The IRC sets a minimum live load for exterior decks at 40 psf (pounds per square foot), and some jurisdictions apply a 1.5x factor that brings design load up to 60 psf for certain balconies and elevated decks. For a typical residential deck, 40 psf means a 200 sq ft deck section can theoretically support 8,000 pounds distributed uniformly, which is more than enough for furniture and guests, but concentrated loads from a hot tub, a stacked equipment case, or large potted trees on small footings can exceed that locally. Spread loads with pavers or rubber mats under heavy planters. If your deck is older or you have any doubt about its structural condition, have a contractor inspect the ledger connection and post footings before the event.
For deck surface protection, place furniture pads under all metal chair legs, they gouge composite decking quickly. Avoid dragging anything. If your deck has a waterproof membrane (common on rooftop decks or decks over living space), do not drive stakes, screws, or anchor bolts through it without consulting the membrane manufacturer. Use non-penetrating ballast weights or freestanding arch/tent bases instead of anchoring to the deck surface.
Railing decoration on decks
Deck railings are one of the most visible decorating surfaces for a raised deck, but they're also structural safety elements. Never attach heavy items (large floral urns, weighted lanterns, heavy draping) by hanging them over or from the top rail cap in a way that shifts the load outward. Use railing clips or zip-tie mounts that attach to the balusters and keep weight directed downward along the post. Lightweight eucalyptus garland, ribbon, small potted herbs, and string lights all work beautifully and add negligible load. If guests will be leaning on or pressing against railings (which they will), make sure the railing meets IRC height requirements, 36 inches minimum for decks under 30 inches off grade, 42 inches for higher elevations, and that it hasn't been weakened by rot or loose hardware.
Step access and egress
Wedding shoes and deck stairs are a classic combination for twisted ankles. If your deck has open-riser stairs, temporarily cover the risers with a thin plywood panel so heels don't catch. Light the stair treads specifically, a small solar step light or a strip of warm LED tape under the nosing makes a huge visibility difference after dark and is one of the simplest safety upgrades you can add in under an hour.
Temporary structures: arches, draping, tents, shade sails, and screened enclosures
These are the elements that transform a patio from 'nice backyard' to 'wedding venue.' You don't need all of them, pick what the space actually needs.
DIY arch or arbor
A simple arch can be built from two 10-foot PVC pipes (1.5-inch diameter), two cross-connectors, and a curved or straight top pipe, assembled in under two hours for around $40 to $60 in materials. Secure the uprights in 5-gallon buckets filled with 60 pounds of sand or quick-set concrete, this gives you a stable, freestanding base that doesn't require drilling into the patio. For a more rustic look, 4x4 cedar posts with a natural wood crossbeam work beautifully and can be resused as garden structures after the event. Dress the arch with eucalyptus, dried pampas grass, ribbon, or lightweight fabric draping secured with zip ties or floral wire.
Draping and fabric panels
Fabric draping from overhead structures (pergola beams, porch ceilings, or tent frames) creates the single biggest visual transformation per dollar spent. Use sheer polyester voile or chiffon in white or ivory, both are lightweight, resist wrinkling, and can be gathered into swags or twisted into elegant panels. When purchasing, confirm the fabric has an NFPA 701 flame-propagation rating or treatment certificate if you're using it under a tent or enclosed structure, as many local fire codes require this even for private events. For attachment, use S-hooks, cup hooks screwed into pergola beams, or clip rings on a tension wire. Never drape fabric over or near open flame candles, use flameless LED candles under draped areas.
Pop-up canopies and tents
Pop-up canopies in the 10x10 to 10x20 foot range (100 to 200 sq ft) are under the IFC permit threshold in most jurisdictions and work well for covering a head table, bar station, or ceremony area. Always stake them or attach guy-wires to ballast weights, wind is the number one cause of canopy collapses at outdoor events. For larger coverage (400 sq ft and above), a pole tent or frame tent rental from an event company is the safer and often code-compliant choice. Ask your rental company for the NFPA 701 certificate for the tent fabric at the time of rental.
Shade sails
Shade sails can cover large areas elegantly without the enclosed feel of a tent. They must be anchored to structural, load-rated points: lag-screwed into wall studs, attached to purpose-built posts set in concrete, or mounted to rated pad eyes on masonry. Do not attach tensioned shade sails to light fascia trim, gutter brackets, or unsupported cladding, those connections fail under wind load. Use corrosion-resistant stainless steel hardware (pad eyes, shackles, and turnbuckles), provide a minimum 3 to 5 degree slope for water drainage, and release tension if rain or storms are forecast.
Screened enclosures: the underrated wedding venue
If your patio is already screened or you're willing to add temporary screen panels, you gain enormous advantages: bug-free dining, wind protection for candles and napkins, defined walls for draping and lighting attachment, and a contained space that photographs as a cohesive room. A screened patio or enclosure dramatically reduces your climate and pest control burden, which is one of the biggest pain points for outdoor summer weddings. You can attach string lights, garland, and fabric draping directly to screen frame members using command strips or small S-hooks, just keep loads light (under 5 pounds per attachment point).
Lighting and power planning
Lighting does more for wedding atmosphere than almost any other element. The goal is layered light: ambient overhead light, task light at dining tables, accent light on the arch and floral arrangements, and path lighting for safety. Plan your layers on paper first, then calculate your power draw.
String lights and bistro lights
G40 or S14 outdoor string lights at 2700 K are the workhorse of patio wedding lighting. They're warm, flattering on skin, and photograph beautifully. A 200-foot run of LED G40 bulbs draws approximately 40 to 60 watts total, a single 15-amp outdoor circuit can handle multiple runs without tripping. Run strings in a grid or zigzag overhead pattern at roughly 8 to 10 feet above floor level: low enough to be intimate, high enough to clear standing guests. Use outdoor-rated extension cords with the correct ampacity for your load. Indoor-only cords or undersized cords are a fire hazard and violate CPSC guidance for outdoor use.
Candles, uplights, and accent lighting
Use flameless LED pillar candles at table centerpieces and under any draping, they're indistinguishable from real candles in photos and eliminate fire risk. For real candles used in lanterns or hurricane vases, ensure they're fully enclosed and never placed near fabric. Battery-powered uplights placed at the base of the arch, behind large potted plants, and at the corners of the patio add dramatic warmth with zero wiring. Rechargeable uplights typically last 8 to 12 hours on a full charge, test runtime two nights before the event.
Lighting for photography
If a photographer is involved, discuss your lighting plan with them in advance. For accurate skin tones and color reproduction in wedding photos, use fixtures with a CRI (Color Rendering Index) of 90 or higher. Warm white string lights at 2700 to 3200 K create a beautiful ambient look for evening shots. If the photographer will be shooting during daylight transition (golden hour into dusk), they'll likely be working with mixed color temperatures, ask them whether they want a consistent warm-white dominant light throughout or a mix of temperatures. Avoid mixing very warm (2700 K) and cool daylight (5000 K+) sources in the same frame, as it creates difficult color-correction challenges.
Seating, tables, and tablescapes
Round 60-inch tables seat 8 to 10 and create the best conversation flow for receptions. Rectangular 6-foot folding tables work for food/beverage stations and gift or favor tables. For chairs, chiavari chairs rent for about $4 to $6 each and look polished in photos. White folding chairs run $1.50 to $2.50 each and are perfectly presentable with a simple sash or ribbon tied at the back.
For tablescapes, keep centerpieces under 14 inches tall or over 24 inches tall so they don't block eye contact across the table. A low arrangement of garden roses, eucalyptus, and candles in a wooden tray reads beautifully and is easy to DIY with wholesale blooms. Place a small bud vase at each place setting to fill out the table without crowding the centerpiece. Linen overlays in your accent color over a neutral base tablecloth add dimension without cost, a yard of fabric from a wholesale supplier costs $2 to $5 per yard and a 60-inch round table needs about 5 yards for a full floor-length drop.
Flooring and surface treatments
If your patio surface is in good shape, an outdoor rug under the dining area and a separate aisle runner are usually enough. For step-by-step tips on arranging rugs, runners, and dance flooring, see our guide on how to stage outdoor patio. For the aisle, a 2x15 foot outdoor jute or cotton runner costs $20 to $50 and secures with carpet tape at both ends. For dance floors on concrete, interlocking foam or vinyl floor tiles (about $2 to $4 per square foot) create a defined zone and protect the surface. On wood or composite decks, removable vinyl plank tiles can cover weathered sections and create a cohesive look without permanent installation.
If you want to disguise a cracked or stained concrete slab completely, consider a large outdoor rug (8x10 or 9x12) as the main floor treatment under the dining area, and use potted plants strategically to draw the eye away from areas you can't cover. Outdoor paint or concrete stain is an option for more permanent improvement, but it requires 72-plus hours of dry time and isn't realistic if you're decorating the week before the wedding.
Florals, greenery, and plant placement
The most cost-efficient floral strategy for a DIY patio wedding is: one large statement arrangement at the arch (spend the most here), simple low centerpieces at tables (spend moderately), and loose greenery for everything else. Greenery, eucalyptus, fern fronds, Italian ruscus, ivy, costs a fraction of florals and fills space beautifully. Buy from a local wholesale flower market or a Costco Business Center the morning of setup day for the freshest product.
Potted plants in matching containers (terracotta, woven baskets, or painted concrete) work as both decoration and privacy screens. Line the perimeter of the patio with 3 to 5 gallon potted plants at varying heights to create a lush edge without blocking light. After the wedding, they go back to their regular spots in your garden. This is the most reuse-friendly decorating investment you can make.
Keep floral arrangements in water sources (floral foam, test tubes, or vases with water) as long as possible before placing them. On a hot summer day, cut flowers in dry foam will wilt within two to three hours in direct sun. Place arrangements in the shade until 30 minutes before guests arrive, then move them to their display positions.
Climate control and pest management
Heat and bugs are the two most common reasons outdoor weddings become uncomfortable. Address both in your plan, not as an afterthought.
Fans and cooling
Outdoor standing fans or misting fans placed at the corners of the patio keep air moving and make a 90-degree day feel 10 to 15 degrees more comfortable. For a covered or screened porch, a ceiling fan in the 52 to 60-inch range handles most of the work. If you're using a tent and expect heat, rent a tent fan designed for that purpose, standard household fans don't move enough air in an enclosed tent. Position fans to move air across the space rather than blowing directly at guests.
Pest control
Apply a yard perimeter spray (permethrin-based is highly effective for mosquito reduction) three to five days before the event, then again the day before if rain has occurred. Add DEET-free mosquito repellent in small labeled bottles as part of your guest favor or amenity station, guests appreciate it and it keeps them from quietly suffering. Citronella torches and candles have limited effectiveness in open spaces, but they're worth using as a secondary measure. A screened enclosure eliminates the pest problem almost entirely, which is one of the strongest practical arguments for investing in screening before a summer event.
Heaters for cooler evenings
If your event extends into the evening in a cooler climate, add one propane patio heater per 100 to 150 square feet of seating area. Keep heaters away from any overhead fabric, tent walls, or draping by at least 3 feet on all sides. Never use propane or gas heaters inside a screened enclosure without adequate ventilation, use electric infrared heaters for enclosed or semi-enclosed spaces instead.
Day-of timeline and setup checklist
Work backward from your ceremony start time. This example assumes a 4:00 PM ceremony with a reception to follow.
| Time | Task |
|---|---|
| Day before | Charge all rechargeable lights; test all string light runs; fill flower water sources; confirm tent/canopy is staked and secure |
| 7:00 AM day-of | Furniture delivery and placement; lay outdoor rugs and aisle runner |
| 8:00 AM | String light installation and power testing; GFCI outlet check |
| 9:00 AM | Arch/arbor setup and fabric draping |
| 10:00 AM | Table linen placement and centerpiece staging (covered until event) |
| 11:00 AM | Fresh floral pickup and arrangement; place in shade until closer to event |
| 12:00 PM | Bar station setup; signage placement; chair placement for ceremony |
| 1:00 PM | Final walkthrough: check all power, lighting, safety, tripping hazards, step lighting |
| 2:00 PM | Move florals to final positions; final styling and photography staging |
| 3:00 PM | Personal prep / buffer time |
| 4:00 PM | Ceremony |
| 4:30 PM (approx) | Ceremony-to-reception flip: move chairs, bring in round tables, add reception decor layer |
| 5:00 PM | Reception begins |
Staging for photography: the details that actually show up in photos
Wedding photos are the lasting artifact of all this effort, so a few staging details make a disproportionate difference. Clear visual clutter from any surface that will appear in background shots, garden hoses, utility meters, mismatched chair cushions, and extension cords are the most common culprits. Route all visible cords along fence lines or under rugs, or use cord covers in a neutral color.
Create at least one dedicated 'portrait station', an area with a beautiful backdrop (the arch, a flowering shrub, a draped fabric panel) and good soft light (open shade, not direct sun), where the couple and family can take portraits. Late afternoon shade or a north-facing wall provides the softest, most flattering natural light. For evening receptions, position one or two warm-toned uplights (2700 to 3000 K, CRI 90+) to backlight the arch and key decorative elements. These show up in photos as golden warmth and make the space look magazine-ready with minimal investment.
Step back and photograph the fully staged space yourself the day before the event, ideally at the same time of day the wedding will take place. This preview exercise almost always reveals something you'll want to adjust: a fence panel that dominates the background, a trash can visible from the ceremony aisle, or a gap in the lighting that leaves one table darker than the others. It's the most useful hour you can spend in the final days of setup.
After the event: teardown and protecting your patio
Plan teardown as seriously as setup. Remove all temporary anchors, stakes, and hardware from the patio surface and lawn immediately after the event, leaving metal stakes in grass overnight is a mowing hazard and leaving anchor bolts in wood decking traps moisture. Check your deck surface for any gouges from furniture legs and treat them promptly with a compatible sealant or touch-up product. If you used tent weights or ballast on a membrane deck, inspect the membrane surface for any compression damage.
Store rental items in a protected area (garage or covered porch) if the pickup is scheduled for the next day. Outdoor fabric, rugs, and decorative items should come inside overnight to prevent dew damage. Potted plants that were moved for staging should go back to their regular light conditions within 24 hours. With a clean teardown, your patio comes out of the event in the same condition it went in, and you're set up to enjoy it for the rest of the season.
FAQ
What are the must-do planning steps before decorating a patio or deck for a wedding?
Run a planning checklist: 1) Measure usable square footage and calculate capacity (use 10–12 sq ft per seated guest for reception seating; more for dance/food stations). 2) Check structural capacity—prescriptive deck live-load is typically 40 psf; consult local code or a structural engineer if >40 psf expected or concentrated loads (hot tubs, dense seating). 3) Confirm permits: tents/membrane structures often require permits (many AHJs trigger at 400 sq ft or aggregated >700 sq ft) and flame-certificates for fabrics (NFPA 701). 4) Budget and timeline: set budget categories (structure, lighting/electric, seating, decor, flowers, contingency) and a timeline with milestones at −8, −4, −2, −1 weeks and day-of. 5) Site logistics: power access, water, restroom plan, trash, parking, noise restrictions and neighbors. 6) Safety: emergency egress, fire extinguisher access, and GFCI-protected outdoor power per NEC.
How do I estimate guest capacity and layout for a patio wedding?
Measure the clear, unobstructed area. Use these planning densities: ceremony seating — 6–8 sq ft per person (tighter rows); reception seated dinner — 10–12 sq ft per guest; cocktail or standing reception — 6–8 sq ft. Draw a simple scaled diagram (graph paper or digital) showing ceremony axis, aisle (3–4 ft min), altar/arch, guest chairs in blocks, a 5–8 ft wide service path for servers, and a 6–8 ft clearance around any cooking/serving area. Reserve 8–12 ft for a small dance area or configure for staggered buffet flow if space is tight.
What are practical theme and color suggestions for patio weddings (including summer and tropical ideas)?
Choose a base palette and 1–2 accent colors. Summer: light linens (ivory, blush) with coral or sea-glass accents; use lightweight fabrics and natural jute or rattan textures. Tropical: lush green foliage, banana or palm leaves, bright accents (turquoise, magenta, sunny yellow) and bamboo or woven elements. Color-boosting tricks: use saturated napkins, colored sashes on chairs, vibrant uplighting or LED strips, and concentrated floral clusters to punch color. Keep palette cohesive across linen, flowers, and lighting for camera-friendly results.
How should I arrange ceremony and reception flow on a small patio or deck?
Place the ceremony at the most visually appealing focal point (view, pergola, screened enclosure). Keep aisle width 3–4 ft; stagger chair rows to maintain sightlines. For reception, cluster round tables (36–60 in) or banquet tables along one axis to keep service aisles open (4–5 ft between tables). Locate food/drink/lighting near power and away from high-traffic egress. If space is very tight: consider a cocktail-style reception or split ceremony/reception locations (ceremony on patio, reception in yard).
What adjustments should I make for patios versus raised decks?
Patio (ground-level): easier load and anchoring options, simpler access for rentals and flooring overlays, fewer structural concerns. Raised deck: verify load capacity (40 psf baseline; check local amendments that may apply 1.5× factors), avoid concentrated loads at one spot, do not attach heavy, tensioned structures to fascia or unsupported cladding, and protect waterproof membranes—prefer non-penetrating ballast anchors. For both: use guardrail safety and define egress points clearly.
Which temporary and semi-permanent structures work best for DIY patio weddings?
Options: 1) Pop-up canopies (easy, affordable) — choose certified, outdoor-rated models and stake to structural anchor points. 2) Shade sails — tensioned, attractive; anchor to structural posts or concrete with stainless hardware and slope for drainage. 3) Freestanding arches and wooden pergolas — DIY-friendly, good focal points. 4) Tensioned frame tents or small frame canopies — check local permit thresholds. 5) Screened enclosures (existing) — decorate inside without new weatherproofing. Always use rated anchors, corrosion-resistant hardware, and avoid fastening to fragile surfaces that can be damaged.
Next Articles
How to Stage Outdoor Patio: Layout, Decor, and Lighting
Step-by-step guide on how to stage an outdoor patio with layout, furniture, decor, lighting, shade, and listing-ready ti
How to Decorate Your Patio for Summer: Step by Step
Step-by-step patio summer decor plan with furniture, lighting, textiles, zones, and maintenance tips for lasting comfort
How to Add Color to an Outdoor Patio: DIY Guide
Step-by-step DIY guide to add lasting color to concrete, pavers, wood, and metal patio surfaces with prep, cure, and mai