To insulate a patio, you need to do three things in the right order: air-seal every gap and crack first, then add insulation to the roof/ceiling and walls, and finally address doors, windows, and the floor edge. Skip the air sealing and your insulation will underperform badly, because conditioned air leaking out through cracks accounts for 30% or more of heating and cooling costs. Whether your patio is a simple covered slab, a screened enclosure, or a sunroom-style space you want to use year-round, the same basic principle applies: stop the air movement first, then slow the heat transfer. Once you have sealed the main leaks, use a winterization checklist to tackle the patio roof, walls, doors, and slab edge so the space stays usable through winter winterize a patio.
How to Insulate a Patio: DIY Step-by-Step Guide

Step 1: Clarify your patio setup and what you actually want to achieve
Before you buy a single roll of insulation, get clear on what kind of patio you have and what "warmer" means to you. These two things determine everything about your material choices, your budget, and how much work is ahead.
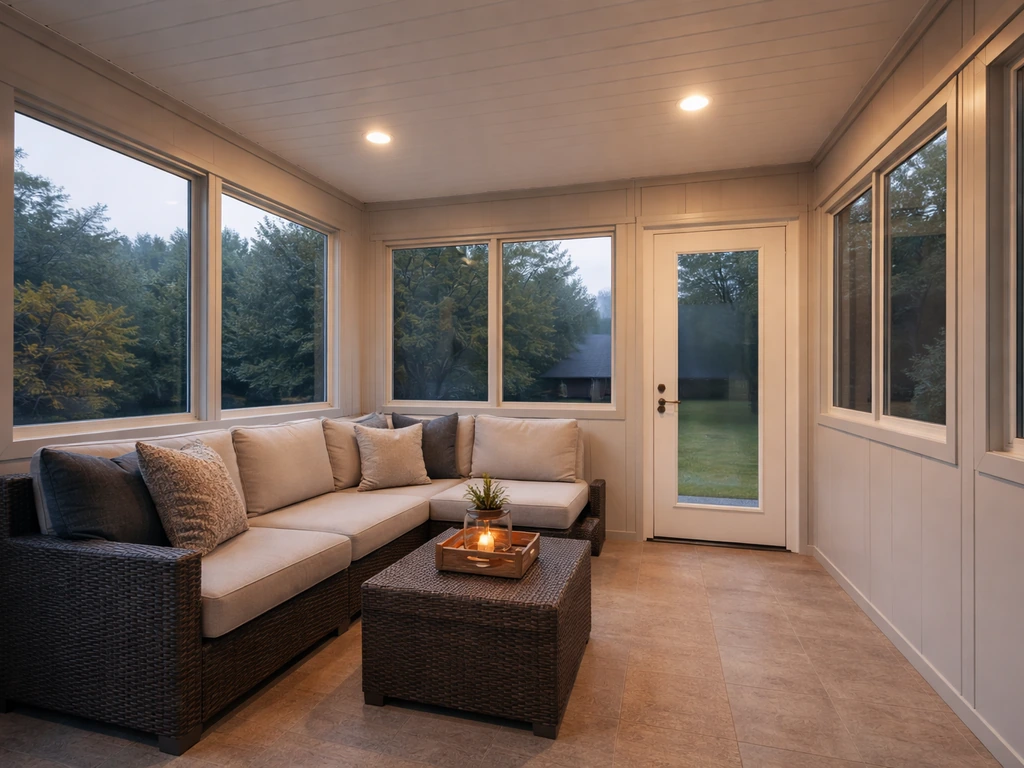
Start by categorizing your space. An open patio (just a slab with maybe a pergola) needs full enclosure before insulation makes any sense. A screened patio already has a frame to work with, but screens do almost nothing for heat retention. A covered or roofed patio has ceiling insulation opportunities right away. A fully enclosed patio or sunroom is the closest thing to a room addition and can be insulated much like interior walls.
Then decide on your comfort goal. Are you trying to extend the season by a few months, staying usable down to around 40°F? Or do you want a true four-season space you can heat to 65°F or 70°F on the coldest days? The first goal might mean adding rigid foam under the roof, upgrading screen panels to solid walls, and hanging a good-quality patio door. The second goal means treating this almost like a room addition with continuous insulation, a real air barrier, and mechanical heating. Knowing which camp you're in saves you from over-engineering or under-building.
- Open patio: needs walls and a roof before insulation is possible
- Screened patio: has framing but almost zero thermal value; needs panel upgrades and ceiling insulation
- Covered/roofed patio: ceiling insulation and air sealing are your biggest wins
- Fully enclosed patio or sunroom: treat like interior walls; full insulation and air barrier system applies
Also think about your climate zone. In mild climates (USDA zones 8-10), a couple of inches of rigid foam and good weatherstripping might get you all the way to your goal. In colder zones (4-7), you'll need higher R-values, a proper vapor management strategy, and more attention to condensation risk. We'll flag those differences as we go.
Step 2: Find where you're losing heat before you fix anything
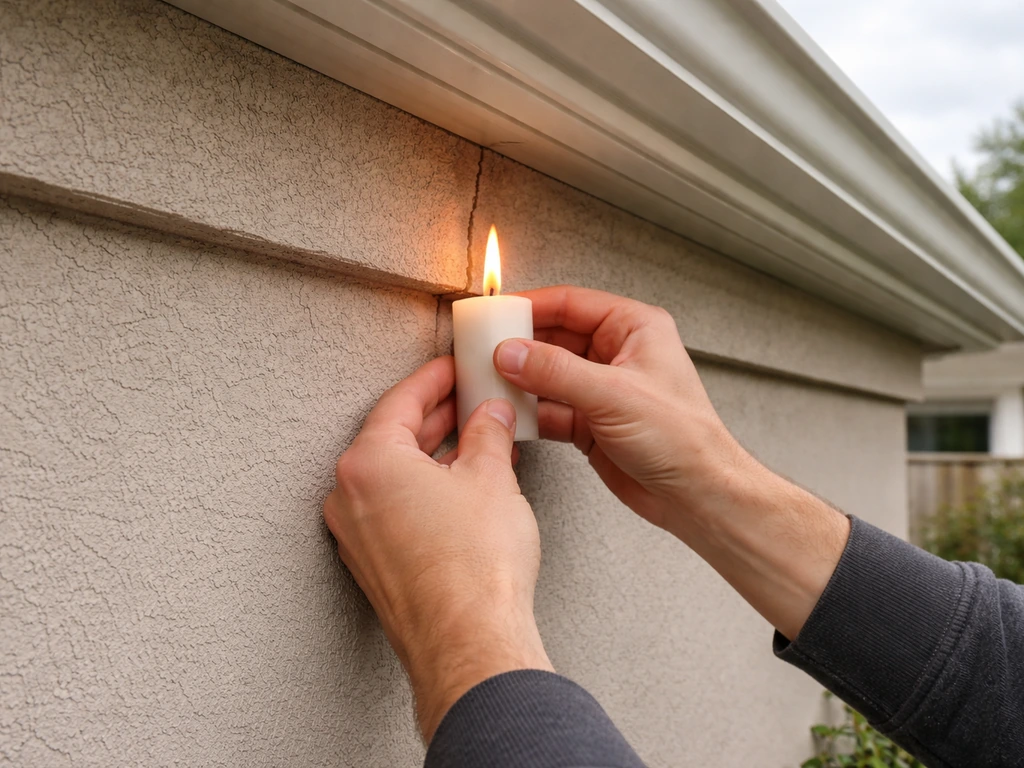
Walk around your patio on a cold, windy day with a candle or a thin strip of tissue paper held near any joint, gap, or penetration. Flickering flame or tissue movement tells you air is moving. That's your enemy. The most common heat-loss spots on a patio enclosure are also the ones that get skipped most often.
The most common problem areas
- Where the patio roof or ledger board meets the house wall: this joint is almost always open to the attic or wall cavity behind the siding
- Around post bases where posts sit on a concrete slab: cold air travels right up through gaps between post and slab
- Screen panel frames: the frames themselves are thin aluminum or wood with no insulation value and gaps at every corner
- Where electrical conduit or wiring exits a wall or ceiling: these penetrations are rarely sealed
- Under and around door frames, especially sliding patio doors
- At the slab edge where the concrete meets the house foundation or exterior wall framing
- Any skylight or roof penetration if your covered patio has one
For electrical boxes and wire penetrations specifically, it's worth noting these are a major hidden leakage path. Air moves freely through hollow wall cavities and out through any unsealed box opening. Sealing around the wire penetrations inside the box and between the box face and the wall surface closes this off. blank" rel="noopener noreferrer">ENERGY STAR's DIY inspection checklist also recommends a simple paper test at doors and windows: close a dollar bill or sheet of paper in the door, then pull it. If it slides out easily, the gasket or weatherstripping is failing. If you really want hard data on overall leakage, a building energy auditor can run a blower door test that measures your air leakage in CFM50 (cubic feet per minute at 50 pascals of pressure), but the visual and candle inspection gets you 90% of the way there for a DIY patio project.
Step 3: Choose the right insulation and enclosure materials for outdoor use
Not every insulation product belongs in a patio enclosure. Fiberglass batts, for example, lose nearly all their R-value when wet, and a patio wall is far more exposed to humidity and condensation than an interior wall. Here's how the main options stack up for this specific application.
| Material | R-Value per Inch | Moisture Resistance | Best Use in Patio | Notes |
|---|---|---|---|---|
| Rigid EPS foam | R3.2–R4.4 | Good (2–5 perms) | Ceiling, walls, slab edge | Affordable, easy to cut, some vapor permeability helps walls dry |
| Rigid XPS foam | R4.6–R5.0 | Excellent (~0.3 perms at 2 in.) | Ceiling, walls, below-grade slab edge | More vapor-impermeable; limit drying potential if used thick |
| Foil-faced polyiso | R6.5+ | Very low permeance (~0.03 perms) | Ceiling/roof deck, radiant barrier combo | Needs air gap on foil side to work as radiant barrier; best in hot/sunny climates |
| Closed-cell spray foam (ccSPF) | R5.8–R6.9 | Excellent, acts as air barrier | Gaps, penetrations, hard-to-reach spots | Expensive per sq ft but doubles as air sealant; avoid open-cell below grade |
| Open-cell spray foam (ocSPF) | R3.6–R4.5 | Poor for wet/exposed areas | Interior wall cavities only if fully protected | Do NOT use below grade or in exposed outdoor panels |
| Fiberglass/mineral wool batt | R3.1–R4.3 | Poor if exposed to moisture | Only if fully enclosed with vapor/air barrier on cold side | Requires careful moisture management; not ideal for semi-open patios |
For most patio enclosure projects, rigid foam boards (EPS or XPS) are the practical workhorse. They're easy to cut with a utility knife and straightedge, available at any home center, moisture-resistant, and provide decent R-value in a thin profile. Foil-faced polyiso shines on roof/ceiling applications in sunny climates where it can reflect radiant heat, but remember: the foil side must face an air gap of at least 3/4 inch to do anything useful as a radiant barrier. If you lay it flat against a surface with no air space, you lose the radiant benefit and are just getting the R-value of the foam core.
Closed-cell spray foam in a can (the kind you buy at a hardware store) is your best friend for sealing irregular gaps, penetrations, and the junction where your ledger meets the house. It's not the same as professionally-applied spray foam, but for air sealing joints and gaps under 2 inches wide, it works extremely well. For larger cavities, rigid foam cut to fit and then caulked around the edges is more cost-effective.
Enclosure framing and panel materials
If you're upgrading from screens to solid insulated panels, your framing material matters. Pressure-treated 2x4 lumber works well for walls in contact with or near the slab. For a thermally-efficient wall cavity, 2x4 framing at 16 inches on center gives you room for 3.5-inch batts (around R-13 to R-15) if you also include an exterior rigid foam layer, which is the better outdoor approach. The rigid foam acts as the weather-resistant sheathing and adds R-value without a moisture penalty. For the exterior surface, fiber cement board, LP SmartSide, or similar products outperform plain OSB for outdoor durability.
Step 4: Air sealing and weatherproofing, done before insulation goes in
This is the step most DIYers skip or do too lightly, and it's the main reason insulated patios still feel drafty. Air sealing and insulation are not the same thing, and insulation without air sealing is like wearing a sweater full of holes. Do the sealing first, then install insulation over it. Before you insulate, the U.S. Department of Energy advises sealing air leaks and making necessary roof or other repairs so the insulation can perform as intended.
- Seal the ledger-to-house joint with closed-cell spray foam, working it fully into the gap between the ledger board and the house rim or wall. Then tape over it with a high-quality flashing tape (3M 8067 or similar) for a durable, weatherproof result.
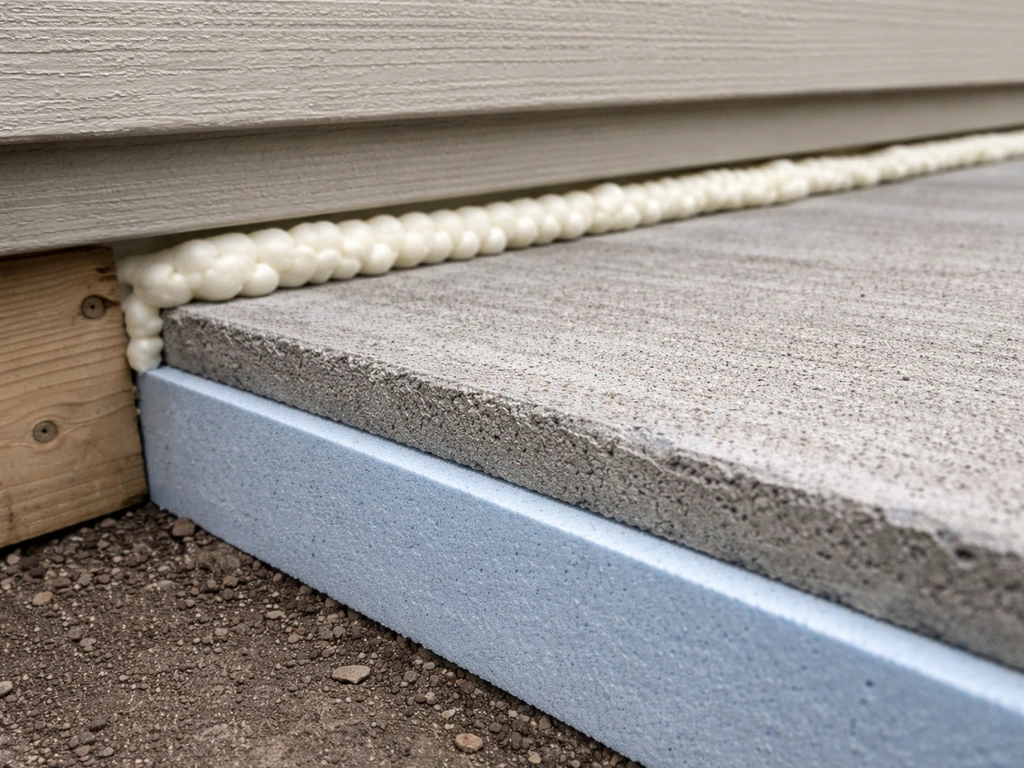
- Seal all post base gaps at the slab with exterior-grade caulk rated for concrete-to-wood applications. Backer rod first for gaps wider than 1/4 inch, then caulk over it.
- Seal electrical wiring penetrations from inside. Use fire-rated foam or caulk inside the wall cavity around each wire, and if possible, install airtight outlet/switch covers on any boxes in exterior walls.
- Seal around door and window rough openings before finishing. Spray foam fills the gap between the frame and the rough framing, but don't overfill or you'll bow the frame. Use low-expansion foam for windows and doors specifically.
- Install a continuous air barrier layer. For walls being drywalled or sheathed, a layer of housewrap or rigid foam board taped at all seams functions as your air barrier. Tape every seam with compatible tape. Every seam. This is not optional if you want real performance.
- Check and seal the ceiling/roof connection to the house wall. Any gap where the patio roof framing meets the house should be sealed before insulating above it.
- Seal around any electrical or plumbing penetrations in the ceiling framing with fire-rated caulk or foam before installing ceiling insulation.
On vapor management: the rule of thumb is that your vapor control layer goes on the warm side of the insulation, meaning toward the interior in cold climates. In mixed or hot climates, vapor management strategy shifts. The key principle, backed by building science research, is that an air barrier does more to control moisture movement than a vapor retarder alone, because most moisture moves with air, not by diffusion through materials. Get the air sealing right and you've solved most of your condensation risk at the same time. If you're using foil-faced polyiso or thick XPS on the exterior of your walls, be aware these are nearly vapor-impermeable, which means the wall assembly needs to be able to dry to the interior rather than the exterior. Don't trap moisture between two vapor-impermeable layers.
Step 5: How to insulate the patio roof or ceiling
The ceiling or roof is almost always your biggest heat-loss surface, and it's the place where insulation gives you the most noticeable return. How you tackle it depends on whether your patio has an open rafter/beam ceiling or a finished flat soffit underneath.
Open-rafter or exposed-beam ceiling
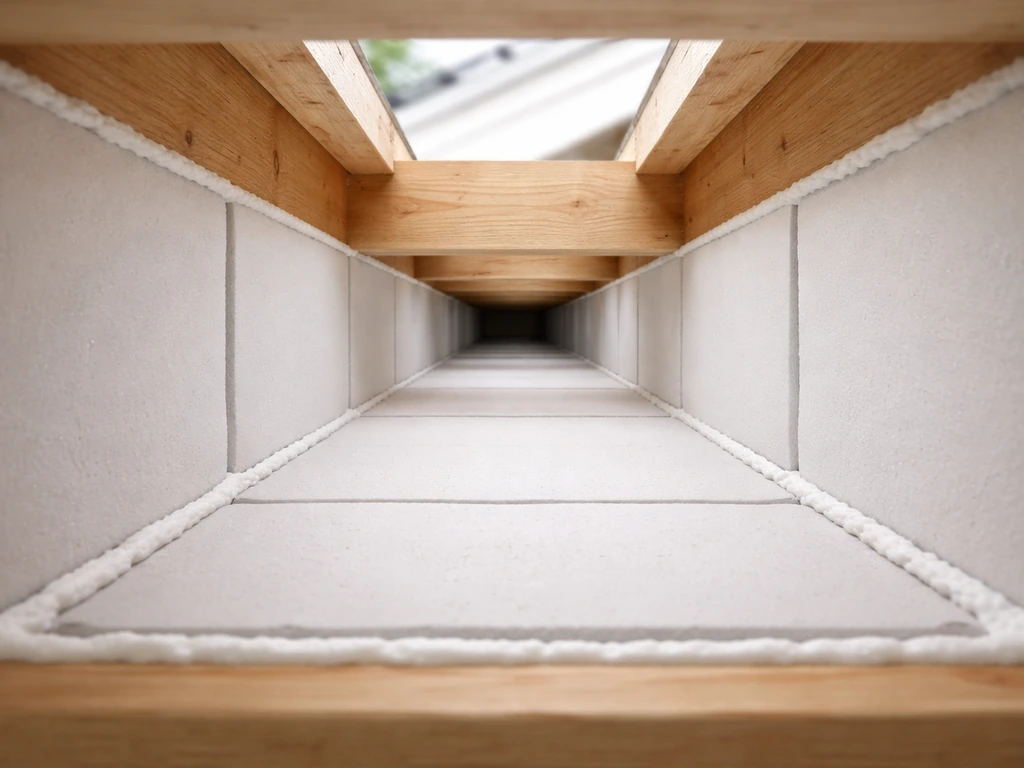
If you can see the rafters from below and there's a roof deck above them, you have two options. The simpler approach is to cut rigid foam panels to fit between the rafters and friction-fit them in place, then seal around all four edges with foam or caulk. Use 2 inches of polyiso (about R-13) or 3 inches of EPS (about R-10 to R-13) for a meaningful improvement. Then cover with a finish layer of 1/2-inch plywood or tongue-and-groove boards if you want a clean look. The better approach for cold climates is to add continuous rigid foam above the roof deck, over the sheathing, before re-roofing or as a roof repair upgrade. This eliminates thermal bridging through the rafters entirely.
Flat or finished soffit ceiling
If there's a flat soffit ceiling below the rafters with a void space above, treat it like a mini-attic. Lay rigid foam boards in that space, making sure to air-seal around the perimeter where the wall top plate meets the ceiling first. Then add a second layer of foam with staggered seams to eliminate thermal bridging at joints. Aim for at least R-19 total in cold climates (zones 4-7), which is about 4 inches of XPS or 3 inches of polyiso. Foil-faced polyiso installed with the foil facing down toward the interior air space is a strong choice here, combining conductive and radiant resistance. Don't push insulation hard against any ventilation baffles or eave vents if your roof has them.
Materials and tools checklist for the ceiling
- Rigid foam panels (EPS, XPS, or foil-faced polyiso): quantity based on square footage plus 10% waste
- Long straightedge or T-square and utility knife for cuts
- Spray foam (low-expansion) and/or acoustical sealant for perimeter gaps
- Seam tape compatible with your foam type (foil tape for polyiso, housewrap tape for EPS/XPS)
- 1x or 2x furring strips and screws if creating an air gap for radiant foil
- Safety glasses and gloves
- Measuring tape, pencil, and dust mask (rigid foam cuts generate small particles)
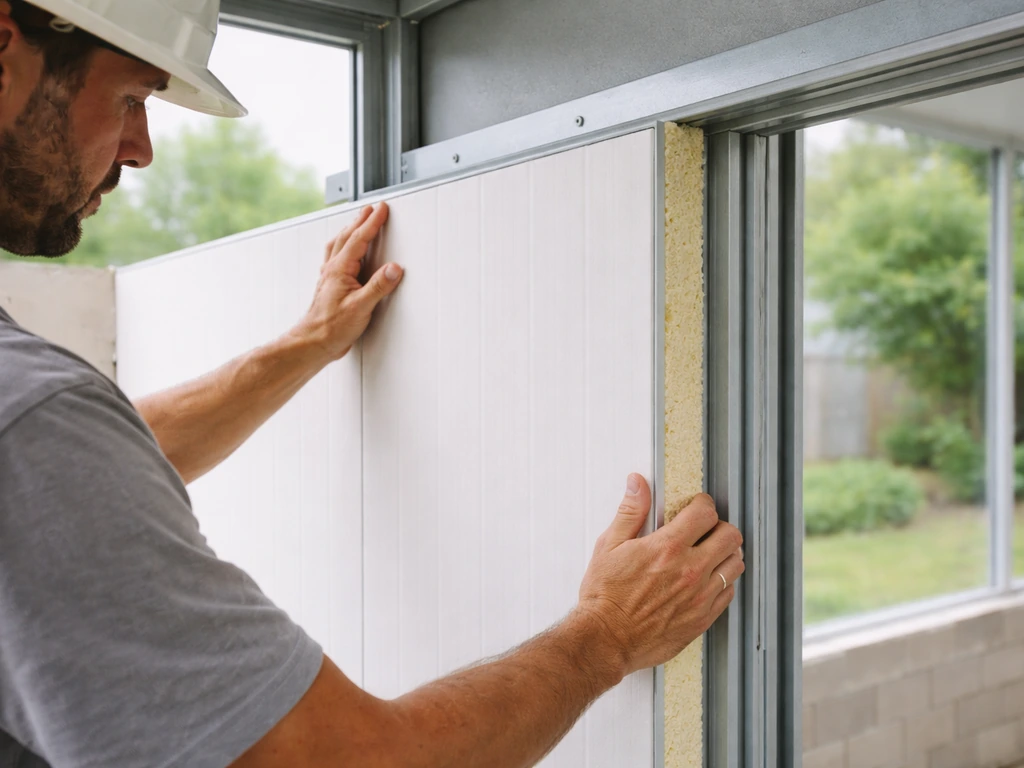
Step 6: Insulate patio walls and upgrade from screen panels
Screens are essentially zero thermal resistance. Even a tight screen enclosure loses heat almost as fast as if the walls weren't there. If you're serious about comfort below 50°F, you need to upgrade at least some panels to a solid insulated wall or high-quality glazing. To close in a patio for winter, focus on adding a real air barrier first, then insulate the roof, walls, doors, and slab edge so drafts are stopped how to close in patio for winter.
Option A: Solid insulated wall panels built in the existing screen frame
- Measure each screen bay opening. Standard screen bays in a patio enclosure are typically 36-48 inches wide and up to 84 inches tall.
- Build or buy insulated panels that fit the opening. A simple DIY panel is 2x2 or 2x3 framing with 1.5-inch or 2-inch rigid foam filling the cavity, then finished on both sides with 1/4-inch plywood or hardie board. This gives you roughly R-10 with no thermal bridging if you use a continuous foam layer.
- For a better assembly, face the exterior side of the panel with 1 inch of rigid XPS foam (R-5) and sheathing, then fill the stud cavity with R-13 mineral wool batt, and finish the interior with a thin drywall or moisture-resistant panel. This hits about R-18 in a 3.5-inch wall.
- Seal the panel into the frame opening with a foam backer rod plus exterior caulk around all four edges. This joint is where most wall-panel air leakage happens.
- Install a ventilated ridge or operable panel somewhere in the enclosure. All-solid walls with no ventilation path create humidity buildup, especially in spring and fall.
Option B: Polycarbonate or EPS-core SIP-style panels
Pre-manufactured insulated patio panels (often polycarbonate twin-wall or aluminum-framed SIP panels) are available from patio enclosure companies and give you a faster path to an insulated wall with some daylighting. Twin-wall 16mm polycarbonate runs about R-2.5, which is modest but combined with good air sealing is noticeably better than screens. Aluminum-framed SIP panels can reach R-10 or higher. These are the right call if you want to keep a light, airy look without full drywall construction. Just be aware that aluminum framing is a thermal bridge and will cause cold spots at the frame itself in very cold climates.
Wind blocks and supplemental wall options
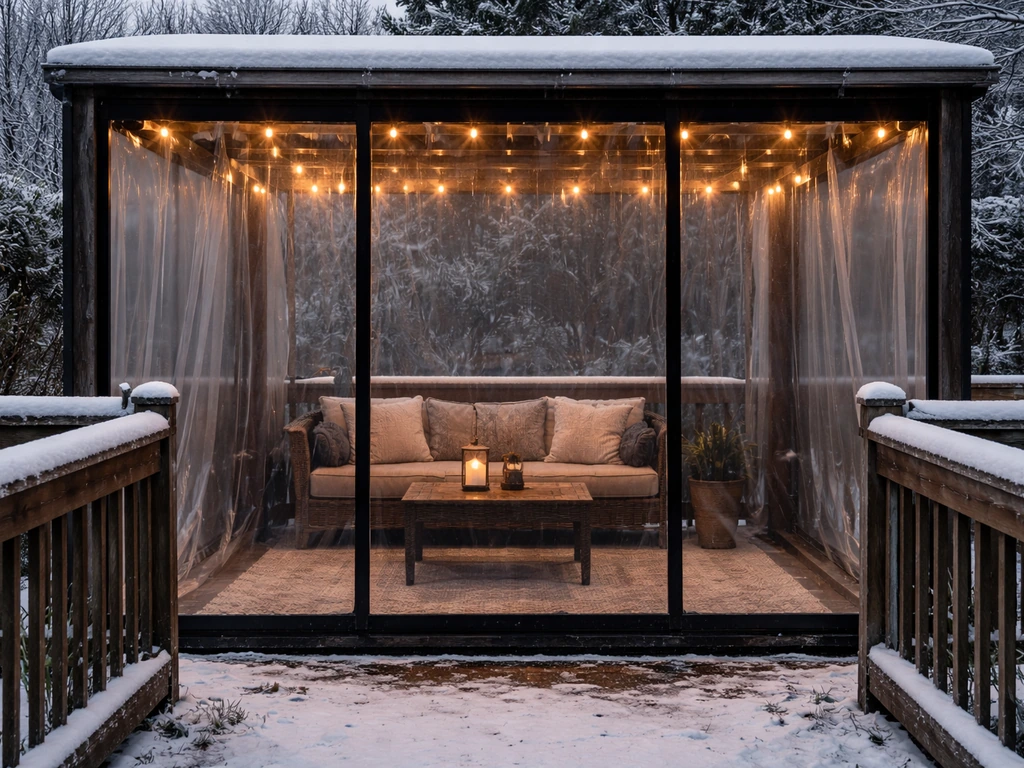
If full wall replacement isn't in your budget right now, heavy outdoor curtains (lined canvas or insulated panel curtains rated for outdoor use) hung ceiling to floor on the inside of the screen frame cut wind dramatically and add 1-2°F of effective warmth for very little money. Exterior wind-blocking shade cloth in the 90% blockage range on the windward side of the enclosure can also drop perceived cold significantly. These aren't insulation substitutes but they make a real difference as gap fillers while you plan the bigger upgrade. If you're also thinking about enclosing or winterizing the patio more fully, many of these wall and panel approaches connect closely to broader patio enclosure projects.
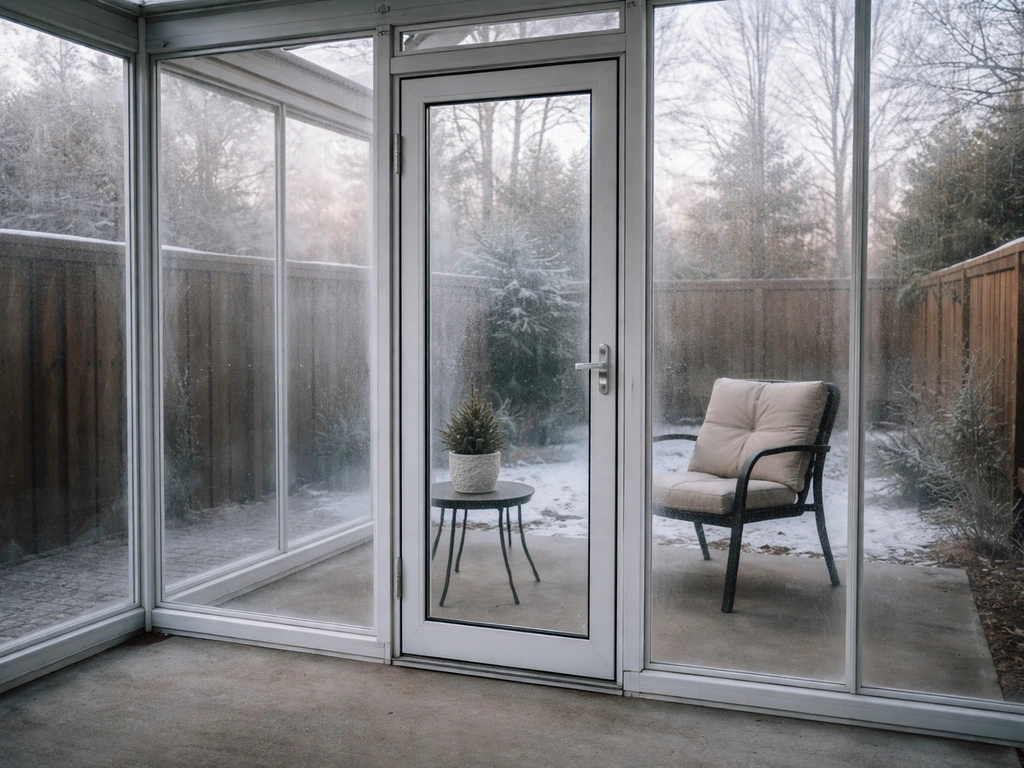
Step 7: Insulate doors and windows, then finish with floors, edges, and troubleshooting
Patio doors
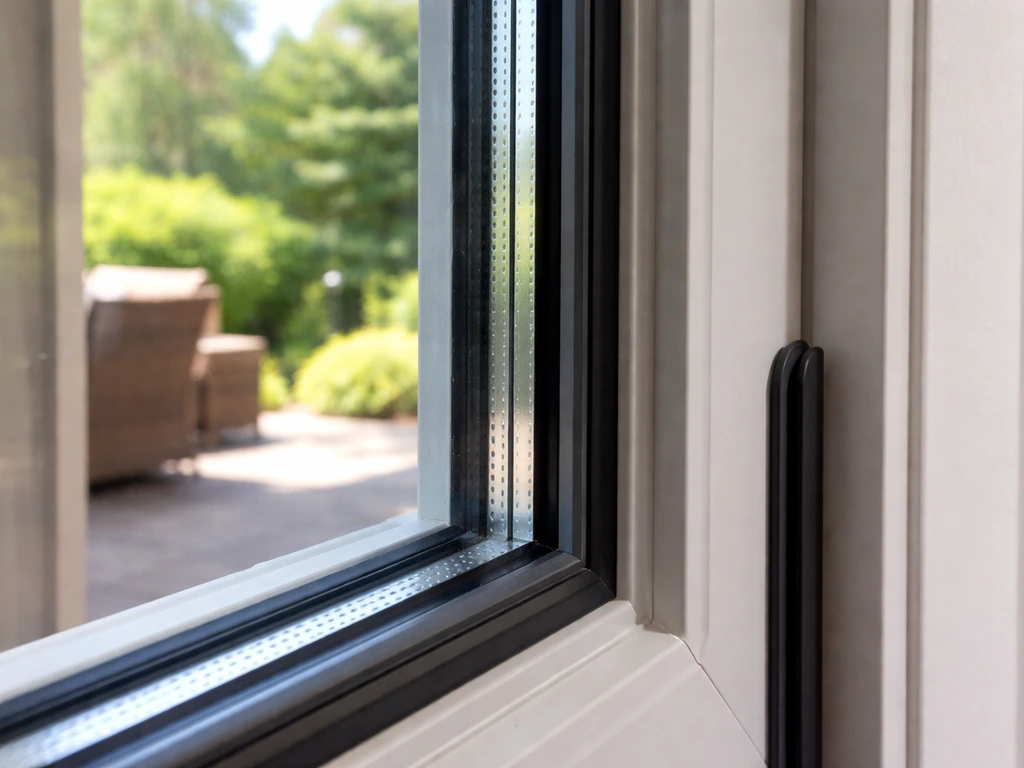
Sliding patio doors are thermal nightmares if they're old or cheaply made. For a step-by-step approach to the whole enclosure, including patio door details like these, see how to close in patio as the related next option. A single-pane sliding door can have an effective U-factor of 0.8 or worse. If replacement isn't possible right now, start with the gasket. Most sliding door companies sell replacement bottom sweep and side pile weatherstripping for under $30. Check the door corners carefully: this is where the weatherstripping is most likely to fail or pull away from the corner seal piece. Add a door bottom sweep with a felt or rubber wiper that contacts the threshold firmly but doesn't drag so hard it wears the finish. For additional insulation on cold nights, a magnetic-edge thermal curtain or a removable insulated panel (built from 1-inch polyiso faced with fabric) can be stored nearby and placed over the door. It sounds low-tech but it cuts drafts dramatically.
For new door installations, look for a minimum of double-pane glazing with a low-E coating. In cold climates, a double-pane low-E door with argon fill runs about U-0.30, compared to U-0.65 for standard double-pane. That difference is felt immediately. Vinyl or fiberglass door frames have dramatically less thermal bridging than aluminum frames.
Windows
The same logic applies to any fixed or operable windows in the enclosure. Air seal around the frame first with low-expansion foam in the rough opening gap, then check the glazing itself. If you have single-pane glass and replacement windows aren't in the budget, interior window insulation film kits (shrink-to-fit, applied with a hair dryer) create a dead air space that roughly doubles the thermal resistance of the glass. They're temporary but effective for one winter season at very low cost.
The slab edge and floor
Concrete slabs conduct cold aggressively. If your patio floor is a concrete slab that runs to the exterior edge, insulating that edge makes a meaningful difference in how cold the floor feels underfoot and in overall heat loss. Vertical rigid foam (XPS is best here for ground-contact moisture resistance) on the exterior of the slab edge, extending from grade level down at least 12-18 inches, is the standard approach in climates with cold winters. ENERGY STAR guidance for slab-edge insulation suggests no more than 25% of the slab edge should be uninsulated in Climate Zones 4 and 5. On the interior, you have two options: install 1-inch XPS foam board over the slab, then 3/4-inch tongue-and-groove sleepers and a floating floor over that, or use interlocking foam floor tiles (EVA foam, 1/2 to 5/8 inch thick) as a comfortable, removable layer. The sleeper-and-floor approach gives you R-5 or better underfoot and completely changes how the space feels.
Troubleshooting common insulation problems
Condensation on interior wall or ceiling surfaces usually means warm interior air is contacting a cold surface, which points to either inadequate insulation thickness or, more commonly, air leakage bypassing the insulation. Fog on the inside of the glass or walls on cold mornings means outside air is getting in, or indoor humidity is high with no ventilation. Solution: check your air sealing again at every seam and penetration, and add a small operable vent or ERV if you're running a heater in an airtight space.
Overheating in direct summer sun is a different problem but worth planning for now. Foil-faced polyiso on the ceiling with the foil facing down into the room reflects radiant heat back up in summer, which helps. A properly vented ridge or operable windows for cross-ventilation is essential. Don't build a fully sealed, heavily insulated patio in a sunny climate without planning for heat removal in summer, or you'll trade one problem for another.
Water intrusion after rain usually means the roof-to-house transition flashing was done incorrectly or the ledger seal failed. Check the step flashing and counter-flashing at the top of the patio roof where it meets the house wall. This area should have metal step flashing lapped over a continuous base flashing, then caulked with a flexible sealant rated for outdoor use. Foam alone at this joint will crack within a year or two in climates with freeze-thaw cycles.
If the patio still feels drafty despite insulation and air sealing, the culprit is almost always the ceiling-to-wall top plate joint or the door threshold. Get down low with your candle or tissue paper and check the floor perimeter on a windy day. Cold air is heavy and pools at floor level, so drafts often enter at the base of the wall, not at eye level where most people check. Sealing the bottom plate of every wall to the slab with foam or caulk closes one of the most overlooked leakage paths in any patio enclosure.
Once your insulation is in and working, you'll likely find you want to push the space further, whether that's adding heat, improving soundproofing, or completing a full year-round enclosure. Soundproofing a patio starts with reducing air leaks and using dense, well-sealed layers where sound can enter. The insulation work you've done here is the foundation for all of it, and every improvement you layer on top will perform better because the thermal envelope underneath is solid.
FAQ
Can I insulate an open patio without fully enclosing it?
Usually no. Insulation depends on stopping air movement, and an open patio keeps exchanging indoor and outdoor air. If you can add at least a roof enclosure plus wind-blocking walls, you can then insulate, but with open sides you will mainly pay for material that warms nothing.
What insulation thickness should I aim for on a patio ceiling?
Use a target total R-value based on your climate, then translate it to materials. A common DIY cold-climate target is around R-19 total for roof/ceiling, which often means multiple foam layers and careful seam staggering, not a single thick layer that leaves gaps.
Should I choose fiberglass batts instead of rigid foam for patio walls?
Generally avoid standard fiberglass batts unless you have a robust, dry assembly. Patio enclosures see more humidity and condensation potential, and wet fiberglass loses its effectiveness. Rigid foam or closed-cell spray foam air sealing is typically more reliable for exterior-adjacent patio spaces.
How do I know if I sealed enough before installing insulation?
Do a second round of leak checks after sealing but before insulation goes in. Re-run a candle or tissue-paper test at every penetration (electrical boxes, cable entries, plumbing sleeves), and confirm there is no movement at seams where different materials meet.
What’s the best way to handle electrical boxes when insulating?
Treat box penetrations as a primary air-leak source. Seal the perimeter where the box meets framing and seal around wire entries in the box (using appropriate fire-rated materials where required), otherwise your insulation can end up surrounded by uncontrolled airflow.
Is it better to install a vapor barrier on the warm side, or rely on the air barrier?
For most patio retrofits, prioritize the air barrier because moisture movement often follows air leaks more than it follows diffusion. Vapor-control layers still matter, especially in colder zones, but avoid creating a double-barrier wall assembly that traps moisture between two nearly vapor-impermeable layers.
Can I use foil-faced polyiso without an air gap?
If you want the radiant barrier benefit, foil-faced polyiso needs an air space, typically at least 3/4 inch on the foil side. If you press it directly against a surface with no air gap, you mostly get the foam’s R-value and should plan thickness accordingly.
Will insulating the slab edge always fix cold floors?
Insulating the slab edge helps a lot when you have an exterior-adjacent concrete edge that conducts cold, but it will not fully solve discomfort if the floor system is also missing an insulating layer. For best comfort, consider an interior foam board plus sleepers, or a removable interlocking foam tile layer depending on how you use the patio.
Why does my insulated patio still feel drafty?
The top two usual causes are floor perimeter leaks (base of wall to slab) and the ceiling-to-wall top plate joint, or air getting in at door threshold details. Cold air pools low, so do your check near the floor, not only around eye-level gaps.
Do sliding patio doors really make that much difference?
Yes, especially for older or cheaply built units. A poorly sealed sliding door can dominate heat loss, even if you insulate the walls and roof. Start with weatherstripping and a properly contacting bottom sweep, then upgrade glazing and the frame if you can.
What should I do about condensation on walls or near the glass?
Condensation usually means warm indoor air is contacting a colder surface, caused by insufficient insulation thickness or air leakage that bypasses the insulation. Re-check sealing at seams and penetrations, and if the patio is airtight, add controlled ventilation (a small operable vent or an ERV) to manage indoor humidity.
Can I insulate in summer sun without making the patio too hot?
You can, but you must plan for heat removal. In sunny climates, consider radiant heat control on the ceiling (for example, reflective foil orientation as appropriate) and ensure you can vent the space with a ridge vent or operable openings for cross-ventilation, otherwise you may trade winter comfort for summer overheating.
How do I prevent water intrusion at the house-to-patio transition?
Don’t rely on foam alone at the ledger or roof-to-wall joint. Verify proper step flashing and base flashing lapping at the transition, use flexible outdoor-rated sealant at correct interfaces, and check freeze-thaw prone areas for cracked caulk or failed flashing continuity.
Should I get a blower door test before spending on insulation?
Not always, but it can be valuable if you suspect major hidden leakage. A blower door provides a quantified leakage rate (CFM50), which helps you prioritize the biggest leakage zones. For most DIY projects, candle/tissue checks plus a careful seam-by-seam air seal pass covers the majority of issues.

DIY guide to close in your patio with screening or walls, covering steps, permits, costs, materials, and weatherproofing
Step-by-step DIY guide to enclose your patio for winter with panels, doors, sealing, condensation control, and a build c
Step-by-step DIY options to close a patio for winter, from quick wind curtains to full screened enclosures and sealing t