For small holes and tears, a self-adhesive screen patch takes about five minutes and holds up well for a season or two. For anything bigger, or when the spline (the rubber cord that locks the screen into the frame) has dried out and loosened, you need to pull the old screen, cut fresh material, and roll new spline into the channel. Either way, this is a genuinely beginner-friendly repair that costs under $20 in most cases and takes an afternoon at most.
How to Patch Patio Screen: Step-by-Step Repair Guide

Felix Brennan
1 Jul 2026
Diagnosing what kind of damage you're dealing with
Before you buy anything, spend two minutes figuring out exactly what you're working with. The fix depends entirely on the damage type, and misdiagnosing it leads to wasted materials or a repair that fails in a month.
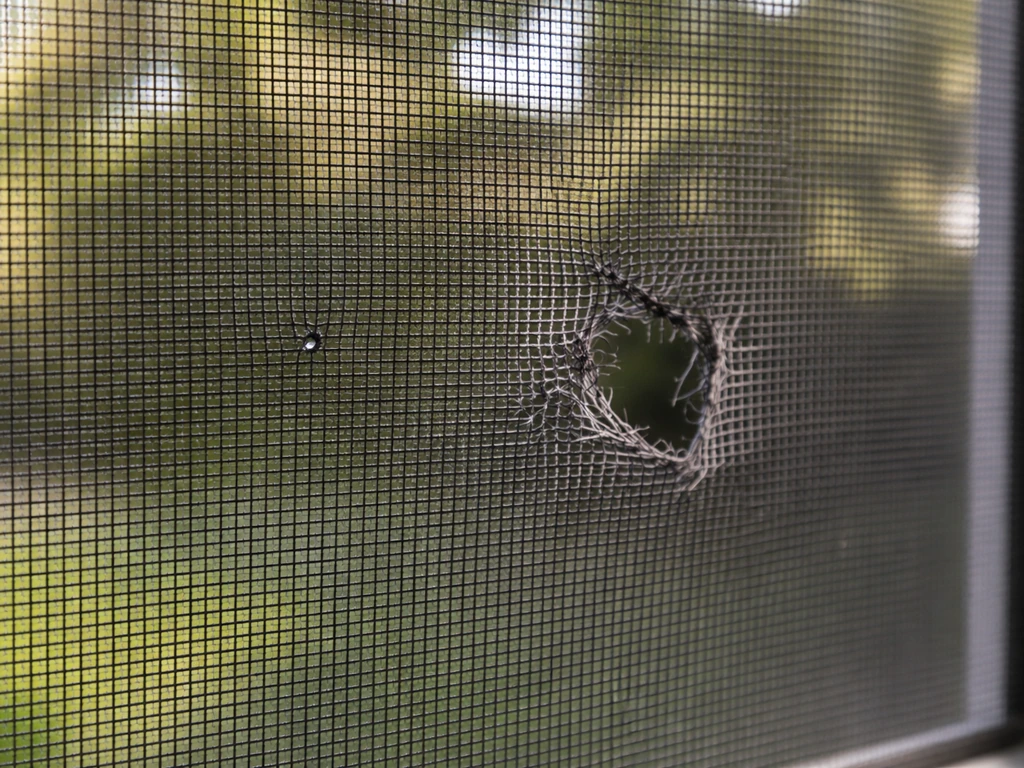
- Small hole or pinhole tear: A puncture or cut that's still contained, with the surrounding mesh intact and the spline seated firmly in the channel all the way around. This is the easiest fix.
- Large tear or multiple holes: Any damage wider than about two inches, or several smaller holes close together. A patch won't hold cleanly here; you'll need to replace the whole panel section.
- Sagging or baggy screen: The mesh has gone slack. This almost always means the spline has dried, shrunk, or pulled out of the channel in one or more spots, even if the mesh itself isn't torn. Pushing the screen back and re-splining is the fix.
- Screen detached at a seam or corner: The spline has fully popped out in a section, usually at a corner. The screen may look fine, but it's no longer locked in. You'll need to reseat the spline.
- Bent or damaged frame: If the frame itself is warped or cracked, a screen repair won't hold tension properly. This is less a patching job and more a frame replacement situation.
Run your finger along the spline channel all the way around the panel. If you feel any spots where the cord sits loose, is missing, or has gone brittle and crumbly, plan on replacing the spline during your repair even if the hole itself is small. Old spline is the number one reason a screen repair fails within a season.
Materials and tools to grab before you start
The good news is that everything you need is available at any home improvement store, and the total cost for a typical single-panel repair runs $10 to $25 depending on whether you need a full roll of screen fabric or just a patch kit.
Screen material options
For a standard patio screen enclosure, fiberglass insect screening is the most common and forgiving choice. It's flexible, easy to work with, resists corrosion, and costs around $0.20 to $0.30 per square foot in bulk rolls. Aluminum screen is stiffer, slightly more durable against physical impact, and holds its shape better in high-heat climates, but it's less beginner-friendly because it kinks easily if you pull it crooked. If you have pets or kids, consider a heavier-duty option like PetScreen or TuffScreen for full panel replacements since they resist puncture far better. Just note that thicker materials like these require one spline size smaller than you'd normally use, because the added fabric thickness takes up space in the channel.
Spline sizing
Spline is the rubber or vinyl cord that gets pressed into the frame's groove to lock the screen in place. Getting the diameter right matters. The two most common sizes for standard patio screen frames are 0.140 inch (9/64") and 0.160 inch. If you're not sure which one your frame uses, pry out a short piece of the old spline and bring it to the store, or measure the groove width with a caliper. You want the spline to fill the channel snugly without having to force it in or leave it rattling loose. Common available diameters range from 0.125 up to 0.250 inch, so there's a size for nearly every frame.
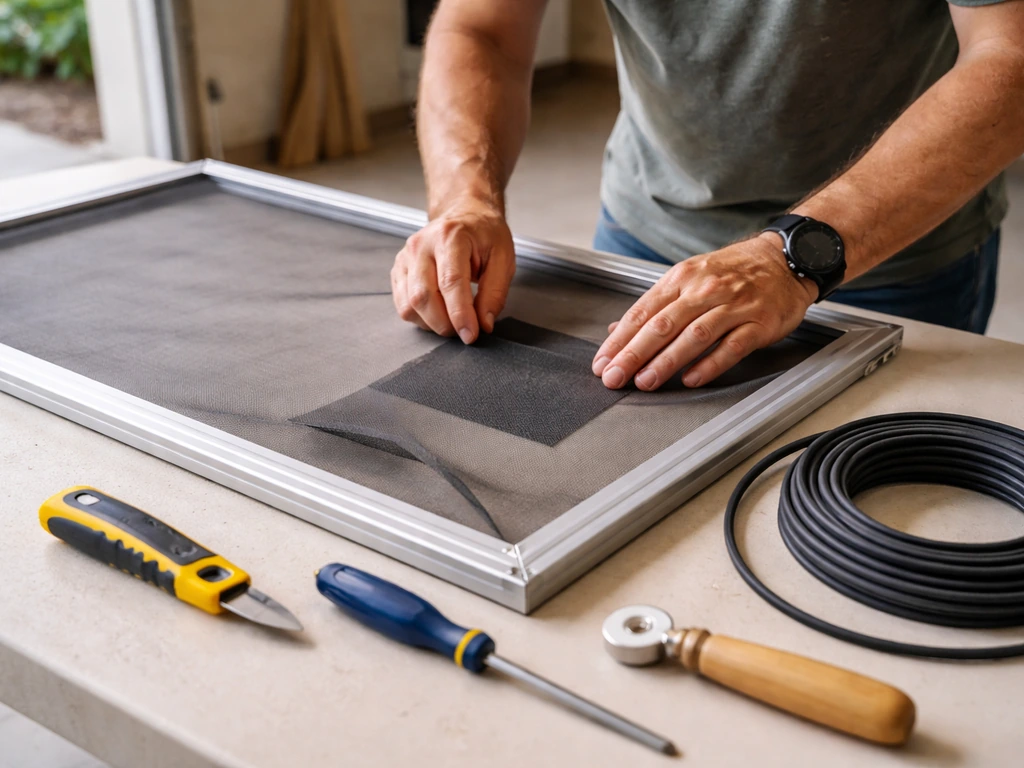
Full materials and tools list
- Screen fabric (fiberglass or aluminum roll, cut at least 2 to 3 inches larger than the opening on all sides)
- Replacement spline in the correct diameter (buy slightly more length than your panel perimeter)
- Spline roller tool (a double-ended tool with a concave wheel on one end and a convex wheel on the other)
- Flathead or slotted screwdriver (for prying out old spline)
- Utility knife or sharp scissors (for trimming excess screen)
- Tape measure
- Self-adhesive screen patch kit (for small hole repairs only)
- Work gloves (especially for aluminum screen, which has sharp edges)
- A clean flat surface or workbench to lay the frame on
Patching small holes and tears quickly
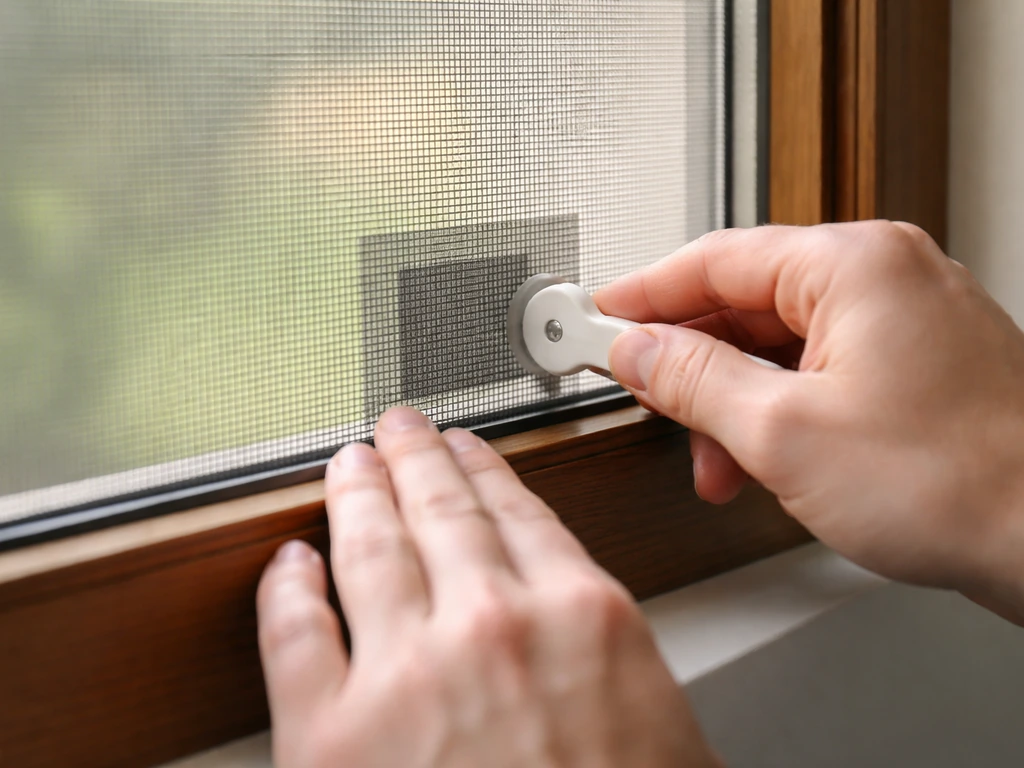
If your damage is a hole smaller than about two inches across and the spline is still seated firmly around the whole frame, a patch repair is fast and holds up well. Here's exactly how to do it.
- Clean the area around the hole with a damp cloth and let it dry completely. Dirt and moisture prevent adhesive patches from bonding.
- If you're using a self-adhesive patch kit, cut the patch so it extends at least half an inch beyond the hole in every direction. Rounded corners help it stay down longer than square corners.
- Peel the backing and press the patch firmly onto the screen, smoothing from the center outward to push out any air bubbles. Press hard along the edges.
- If you don't have a patch kit, you can cut a piece of matching screen fabric slightly larger than the hole and use a small amount of clear waterproof adhesive (like a dab of clear silicone or screen repair glue) to bond it over the damage. Press it flat and let it cure fully before reinstalling the panel.
- Once the patch is set, hold it up to the light to confirm the hole is fully covered with no gaps around the edges.
- Reinstall the panel and check tension. If the screen feels loose even after patching, the spline may need attention regardless.
Patches are a solid temporary-to-medium-term fix, especially if you're heading into bug season and need a quick solution right now. But if the screen is already showing age, sagging in other spots, or the patch area has any pulling at the mesh, plan a full panel replacement before next season. After you remove the old material and spline, you can use a panel kit or cut a new screen panel to size for a clean, long-lasting patio fit replace a whole screen panel.
Replacing a whole screen panel or section
When the tear is large, the damage is in multiple spots, or the whole screen has gone slack, you're doing a full rescreening of that panel. If you are wondering how to replace a patio screen panel, this is the same full-rescreening approach used for most enclosures full rescreening. This sounds more involved than it is. With a helper and the right tools, a standard patio panel takes about 30 to 45 minutes.
- Remove the panel from the frame if possible. Lay it flat on a workbench or clean floor. Working flat gives you much better control than trying to do this while the panel is vertical.
- Use a flathead screwdriver to pry the old spline out of the channel. Work from a corner and pry gently along the length. If the spline is old and brittle, it may crumble; that's fine, just get it all out. Set it aside if it's still flexible and in one piece, but budget to replace it with fresh spline regardless.
- Pull out the old screen fabric once the spline is removed.
- Inspect the spline channel. Remove any debris, broken spline bits, or residue. A clean groove is essential for a tight install.
- Cut your new screen material so it overhangs the frame opening by at least 2 to 3 inches on all four sides. Don't cut it to exact size yet.
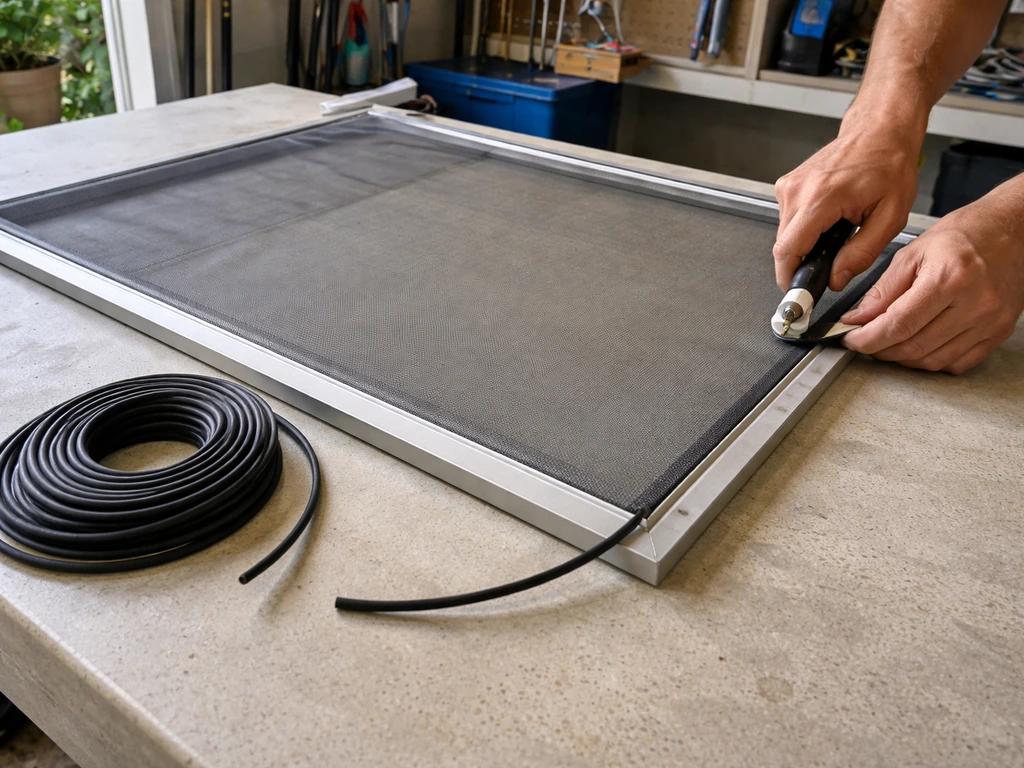
- Lay the screen over the frame, centering it so the overhang is roughly even on all sides. If you have a helper, have them hold the screen taut across the panel while you work.
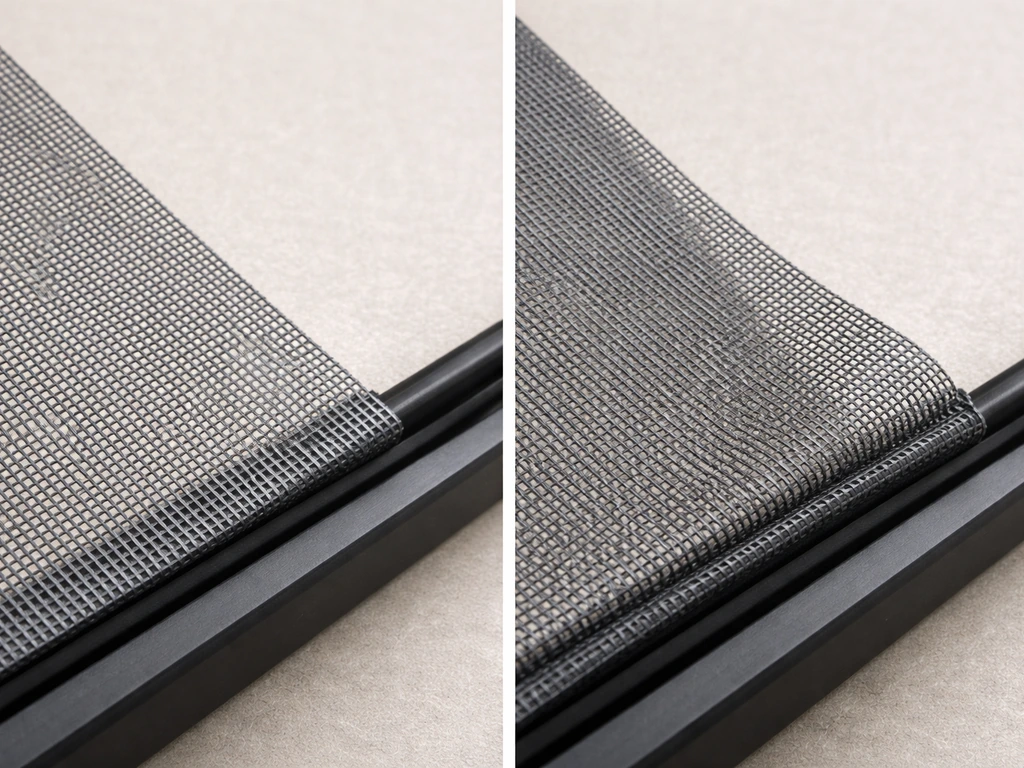
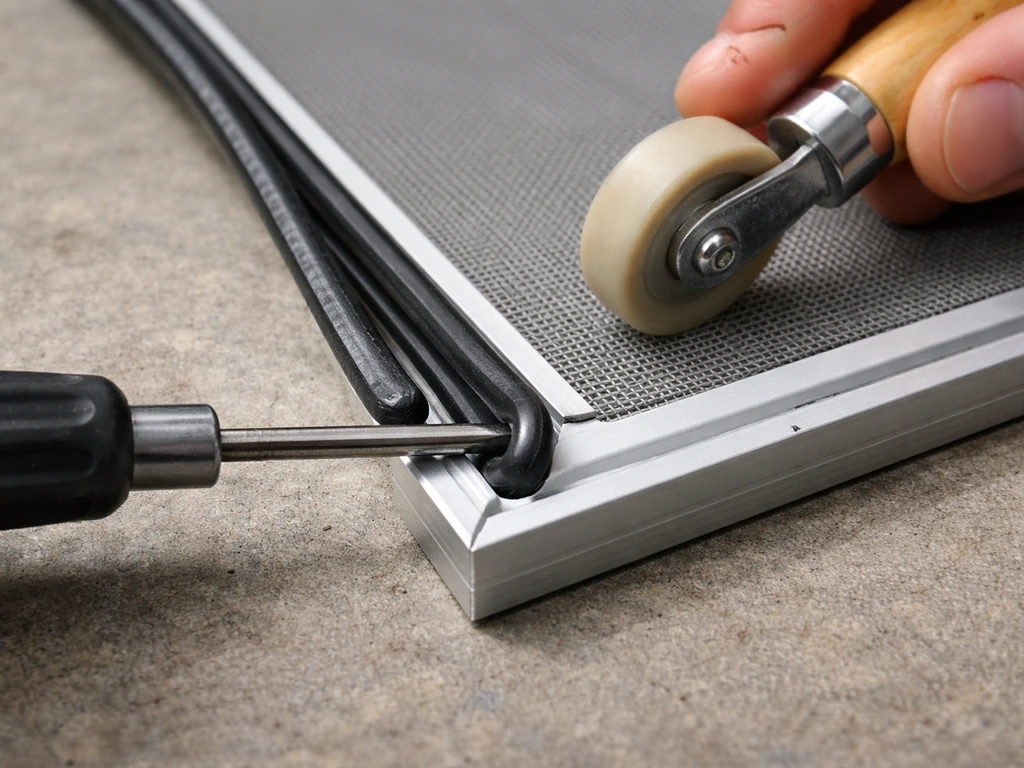
- Start at one corner. Using the convex (rounded) wheel of your spline roller, press the screen down into the spline channel at the corner. Then switch to the concave wheel to begin pressing the spline cord into the channel over the screen.
- Work along one full side first, rolling the spline firmly into the groove. Keep the screen pulled lightly taut as you go, but don't stretch it aggressively or it will pucker when you get to the opposite side.
- Move to the opposite long side, gently pulling the screen snug and rolling in the spline. Then do the two shorter ends. The screen should be getting noticeably tighter as you go.
- At corners, use the tip of a flathead screwdriver to press the spline fully into the corner where the roller can't quite reach. Don't gouge the screen; use light, controlled pressure.
- Trim the excess screen with a utility knife. Hold the blade against the outside edge of the spline channel and cut along it in one smooth pass. A fresh blade makes this much cleaner.
- Check the finished panel by pressing lightly in the center. It should feel taut like a drum, not saggy. If there are any soft spots or puckers, press the spline more firmly in that area or lift and redo that section.
If you're replacing multiple panels or dealing with a large screened porch, the process is the same for each panel. The main thing that trips people up is cutting the new screen too small before installation. Always leave that overhang and trim afterward.
Getting the spline right so it actually holds
Spline is where most DIY screen repairs fall apart, either because the wrong size was used, it wasn't pressed fully into the groove, or the old spline was reused when it should have been replaced. Here's how to handle it correctly. Once the spline and screen are seated, you can close in a patio with screen by securing the panel to the frame and sealing any gaps for a tight, bug-free enclosure.
Removing old spline without damaging the frame
Insert a flathead screwdriver at a corner of the channel and gently pry upward to lift the spline cord out. Once you have a small section free, you can often pull the rest out by hand. The Home Depot’s window-screen repair guide notes that spline can be loosened and removed with a slotted or flathead screwdriver pry, and you can sometimes retain bent old spline if it’s flexible and can be shifted back into place if you have a small section free, you can often pull the rest out by hand.. Work slowly near aluminum frames since aggressive prying can bend the channel walls and make reseating new spline harder.
Choosing and seating the new spline
Match the spline diameter to your channel as closely as possible. Standard fiberglass screening typically uses 0.140 or 0.160 inch spline. Thicker screen materials like PetScreen require one size smaller because the extra fabric thickness effectively narrows the channel. When rolling the spline in, angle the roller tool slightly toward the outside edge of the frame rather than straight down. This keeps tension on the screen and reduces the chance of tearing the mesh as you press. Keep the roller moving at a steady pace and apply firm, even pressure. The screen should visibly tighten as the spline locks in. If the spline is popping back out as you roll, it may be the wrong size (too small) or the groove has damage.
Corners are the weak point
Spline loosening in corners is the most common reason a screen goes slack over time. When you're pressing the spline in at corners, use the tip of your screwdriver to push it fully into the channel bend. It should sit flush or just below flush, not proud of the surface. If it keeps pulling out at a corner, try cutting the spline at the corner and starting a fresh piece rather than running one continuous length around a tight bend.
Finishing up, weatherproofing, and keeping it from happening again
Final checks after your repair
- Run your finger along the entire spline channel to confirm it's fully seated with no raised or loose sections.
- Inspect each corner closely. These are the most likely spots for gaps or incomplete seating.
- Hold the panel up to light and look for any untrimmed screen threads, gaps at the edges, or spots where the spline hasn't locked the screen flat.
- Check overall tension by pressing gently in the center. Consistent resistance across the panel means you got it right.
- Reinstall the panel in the frame and give it a light push in a few spots. There should be no movement or flex beyond normal screen give.
Weatherproofing the repair
For most fiberglass and aluminum screen repairs, no additional weatherproofing is needed. The spline itself seals the screen into the frame adequately. If you're in a high-humidity or coastal climate and you're concerned about the spline channel, a very light bead of clear silicone along the exterior edge of the spline (not over the screen mesh) can help prevent moisture intrusion and slow spline degradation. Don't overdo it since this makes future repairs harder.
How to prevent damage and extend screen life
- Clean screens with mild soap, a soft brush, and a gentle rinse. Avoid pressure washers entirely. High-pressure water can tear mesh, loosen spline, and bend aluminum frames with one wrong pass.
- Rinse screens from the inside out so debris doesn't get forced deeper into the mesh.
- Inspect your spline every spring and fall. If it feels dry, cracked, or pulls out easily, replace it before it fails completely.
- Trim back any tree branches or shrubs close enough to scrape the screen during wind. Physical impact is the leading cause of pinholes and small tears.
- Add a door closer if your screened enclosure has a swinging screen door. Doors slamming in wind cause more frame-level damage than most homeowners realize.
- If you have pets, consider upgrading vulnerable lower panels to PetScreen or a similar heavy-duty mesh. It costs a little more but eliminates repeated repairs.
- After any major storm, do a full visual sweep of the enclosure before the next bug season. Small tears from storm debris spread quickly once the season starts.
A patched patio screen handled correctly really does hold for a full season or more. If you decide to rescreen your patio for more lasting results, the same spline and seating techniques apply at the panel level rescreening project. And if you find yourself repairing the same section repeatedly, or if most of the panels are showing age, it's worth considering a full rescreening project rather than spot fixes. The skills from this repair translate directly to a whole-porch rescreening, just at a larger scale.
FAQ
How do I tell if I should patch the screen or replace the whole panel?
If the mesh around the hole is pulling, wrinkled, or you feel looseness anywhere besides the cut area, plan on replacing that panel. A quick test is to gently tug the mesh on all sides of the damage, if it shifts or separates from the spline channel, the underlying panel is already failing, not just the patch point.
Can I patch a screen if the spline is loose but the hole is small?
It usually won’t last. The screen patch may seal the opening, but slackness from bad spline will let the mesh flex and reopen the patch. Replace any brittle or missing spline first, then apply the patch (or rescreen if multiple spline sections are loose).
What if I don’t know the spline size, can I “make it fit” with a slightly different diameter?
Avoid forcing the wrong size. If the spline is too small, it will pop out as the screen flexes, if it’s too large, you can distort the groove and make future seating difficult. The best approach is to measure groove width with a caliper or remove a short piece of the old spline to match the store diameter.
How do I prevent the mesh from tearing when I roll the spline in?
Use firm, even pressure and angle the roller tool slightly toward the frame edge, keep the roller moving steadily, and don’t try to seat the first section too quickly. If the mesh starts to bunch, stop, lift back the spline section if possible, straighten the mesh, then resume.
What should I do if the spline keeps popping back out after I install it?
Treat it as a sizing or groove problem. Check three things: spline diameter (likely too small), whether the groove is damaged or flattened (you may need to clean out debris and re-seat), and corner seating (corners often need shorter fresh runs so the bend isn’t under stress).
Is it okay to reuse old spline if it looks mostly fine?
For most repairs, no. Even if it still sits in the channel, old spline can become brittle again and lose its hold quickly. Replacing spline is especially important if you see crumbly edges, visible cracks, or gaps in the channel as you run your finger around the frame.
How should I handle corners and tight bends so the spline stays flush?
Seat the spline by pushing it into the channel bend using the screwdriver tip until it sits flush or slightly below flush. If it keeps pulling out, cut the spline at the corner and start a fresh piece so you are not relying on one continuous length to conform to a sharp radius.
Do I need any sealant or weatherproofing around the patch or spline?
Usually no. The spline lock is what seals the screen into the frame. If you’re in a coastal or very humid area, you can apply a very light bead of clear silicone along the exterior edge of the spline only (not onto the mesh) to slow moisture intrusion, but heavy application can complicate future repairs.
After patching, how long should I wait before using the patio screen area?
Give it a brief settling time after rolling spline or pressing patch edges, then inspect from different angles for lifting corners or gaps. If the screen is under tension or you’ll be walking near it, wait until the spline is fully seated and the mesh looks evenly tightened, typically several minutes to an hour depending on temperature.
What are common mistakes that cause patched screens to fail within a month?
The most common issues are using the wrong spline diameter, not pressing spline fully into the groove, reusing brittle old spline, and cutting the screen patch or new panel too small (leaving no proper overhang to trim cleanly after installation).
Can I patch fiberglass and aluminum screens the same way?
The approach is similar, but aluminum frames need gentler handling during spline removal. Use careful prying to avoid bending the channel walls, because distorted grooves make new spline seating harder and can lead to leaks or slackness.
Next Articles
How to Build a Patio Screen Enclosure Step by Step
Step-by-step DIY guide to build a patio screen enclosure, from planning and materials to framing, installing screens, an
How to Rescreen a Patio: DIY Steps and Tips
Step-by-step DIY on how to rescreen a patio enclosure: diagnose damage, fix frame, install new screening with proper ten
How to Repair a Screen Patio: Step-by-Step Fix
Step-by-step DIY guide to repair a screened patio, from torn screen patches to replacing panels and re-tensioning for a