The most effective way to protect your patio from wind is to combine a semi-permeable barrier on the windward side with smart furniture placement in the sheltered zone it creates. A barrier with roughly 30 to 50 percent porosity (meaning gaps or mesh that let some air through) reduces wind speed better than a solid fence, which actually creates damaging turbulent eddies on the lee side. Whether you start with a quick fabric windscreen today or commit to a screened enclosure or louvered panels down the road, the core principle is the same: slow the wind before it reaches your seating area, don't just try to stop it dead.
How to Protect Patio From Wind: DIY Shelter Guide

Felix Brennan
19 Jun 2026
Why wind hits your patio the way it does
Before you buy anything, spend 10 minutes standing on your patio during a breezy day and paying attention. Wind rarely hits a patio evenly. It funnels through gaps, accelerates around corners, and drops down from overhead structures. The most common trouble spots are the open side facing the prevailing wind, gaps between fence panels or posts, and the corners of the patio where two open faces meet. Corner exposure is particularly brutal because wind wraps around and creates a mini vortex right where you probably have your seating.
Check the wind at seating height specifically, not standing height. Gusts that feel mild when you're upright can be a constant draft when you're sitting. Note which direction the strongest gusts come from (usually consistent with your region's prevailing wind), and look for any structural gaps or openings that act like a funnel. Even a 12-inch gap between a fence and a wall can channel wind with surprising force. That gap is your first target.
It's also worth remembering that windbreaks redirect wind rather than eliminate it entirely. Placing a solid barrier on one side can increase wind speed around the edges as airflow gets squeezed past it. That's why your solution needs to account for the whole perimeter, not just the obvious windward side.
Fast, low-cost fixes you can set up today
If you need relief this afternoon, these options are genuinely useful while you plan something more permanent. how to block wind on patio quick fabric windscreen. None of them require tools or permits, and most cost under $100.
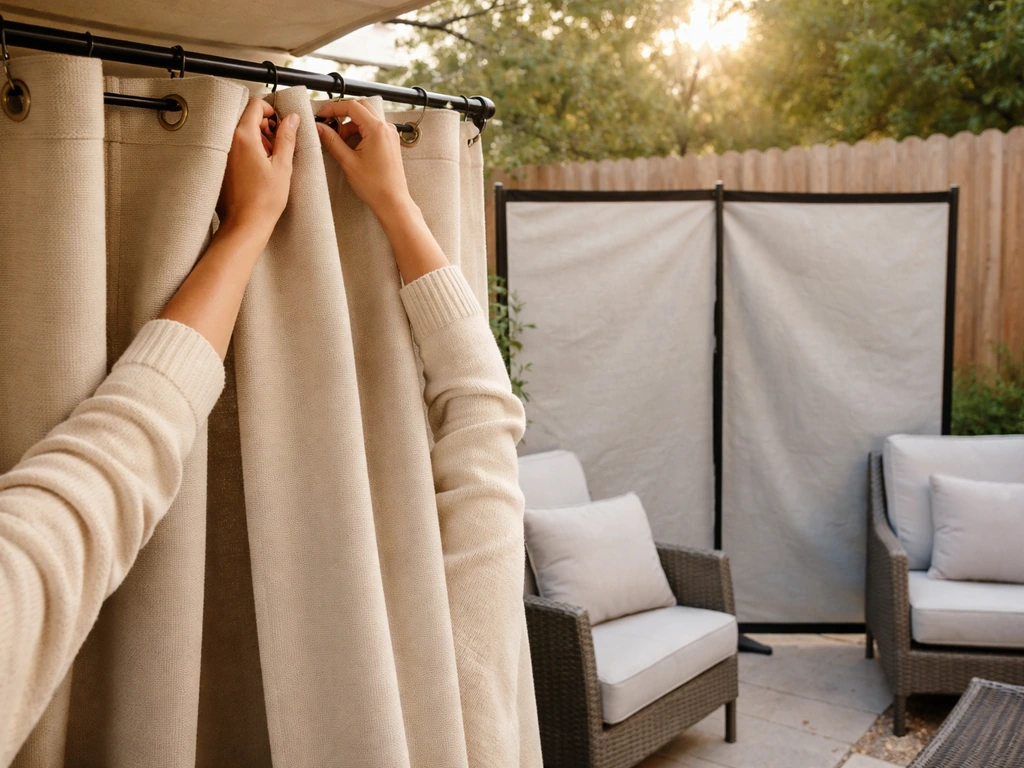
- Outdoor curtain panels: Hang heavy canvas or polyester curtains from a curtain rod or tension wire between posts or a pergola frame. Use a bottom guide cable threaded through the hem grommets and anchor both ends to the ground or deck surface. Weight the hem by sliding a length of steel rod or pipe through the bottom channel. Lighter fabric flaps and tangles constantly; aim for curtains marketed specifically for outdoor or marine use.
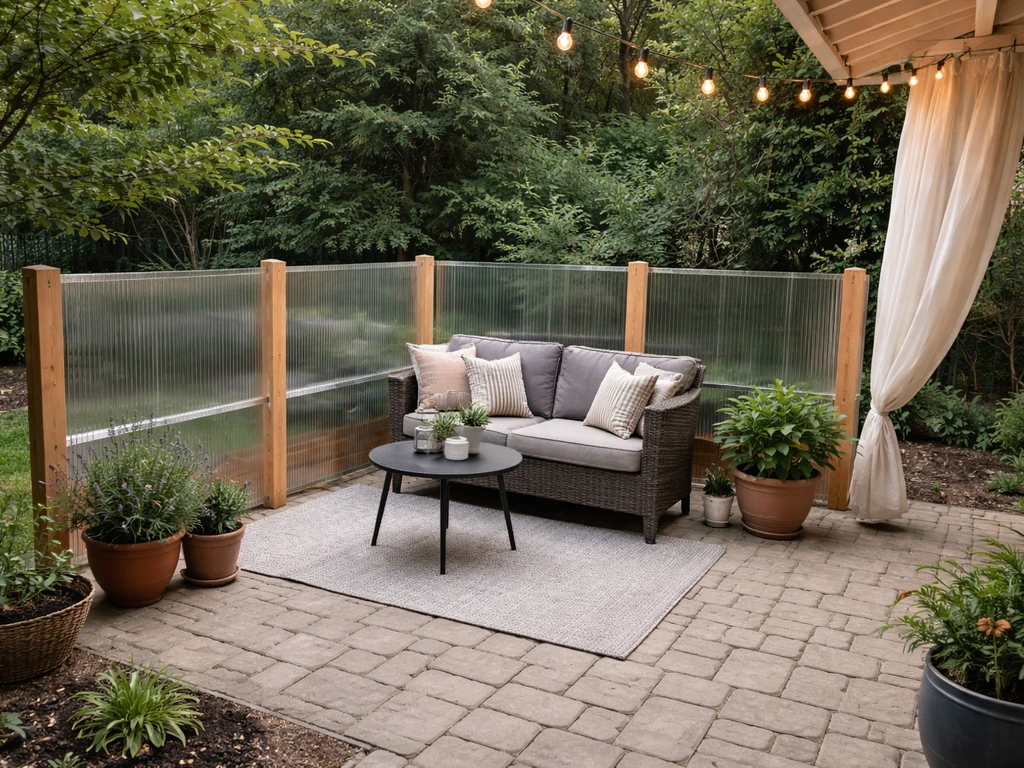
- Privacy screen or windscreen fabric: Mesh-style windscreen fabric (the kind sold for chain-link fences) comes in rolls and can be zip-tied to any existing fence, railing, or temporary frame. It's semi-permeable, which is exactly what you want. Install it on the chain-link or frame side, not just looped over the top, and use metal zip ties at every 12 inches rather than cheap plastic ones.
- Weighted planters as a moveable windbreak: A row of large planters (24 inches or bigger, filled with soil) along the windward edge creates a low but surprisingly effective barrier and doubles as a garden. Group them tightly so there are no gaps wider than about 6 inches at ground level.
- Pop-up wind panels or folding screens: Folding room dividers designed for outdoor use can be positioned around the seating area and staked or weighted at the base. Look for ones with ballast feet or ground stake holes.
- Sail shades and tarp overheads: If wind is also dropping down from above or coming at an angle, a sail shade rigged on a slight tilt (not flat horizontal) deflects overhead gusts toward the sky rather than letting them funnel down.
The key to any fabric-based temporary fix is anchoring. An outdoor curtain or fabric screen that isn't secured at the bottom becomes a sail the moment a gust hits, and a sail-sized object flapping around your patio is a hazard. Ground anchors screwed into concrete, or weighted sandbag bases on wood decking, are non-negotiable if you're in an area with winds above 15 mph. You can also prevent patio blinds from acting like sails by ensuring they are properly anchored or secured so they do not billow in gusts.
Permanent wind protection that actually lasts
Once you've identified your wind direction and gaps, it's worth investing in a solution that doesn't need to be reassembled every spring. Here are the main permanent options, roughly in order of cost and complexity.
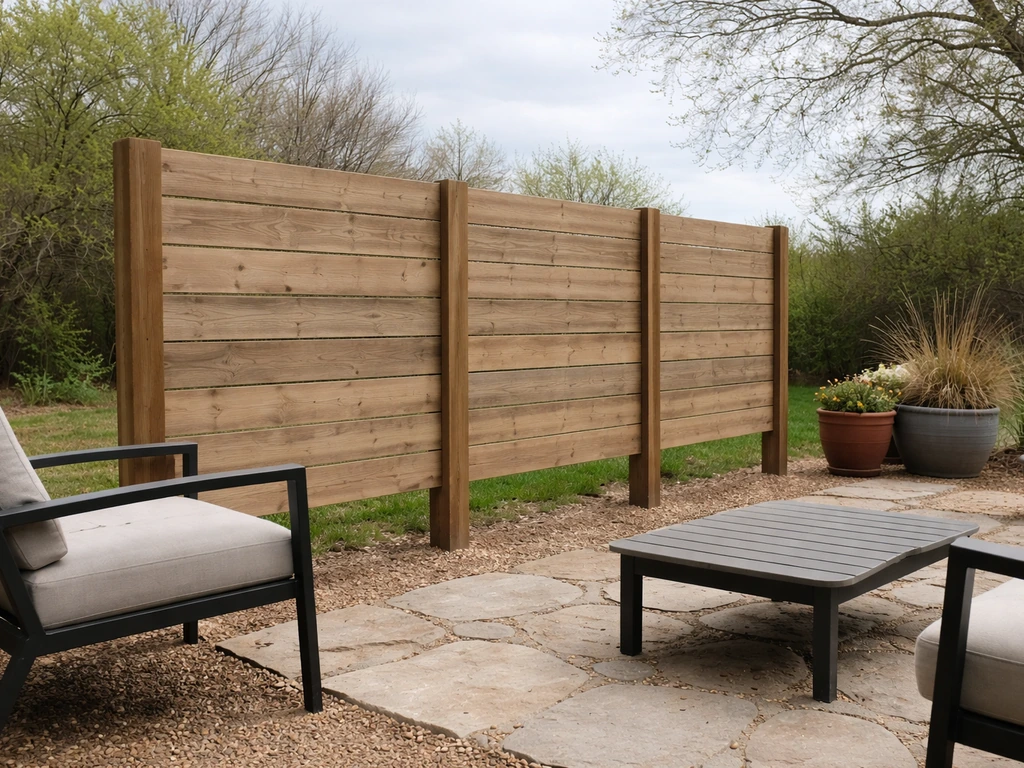
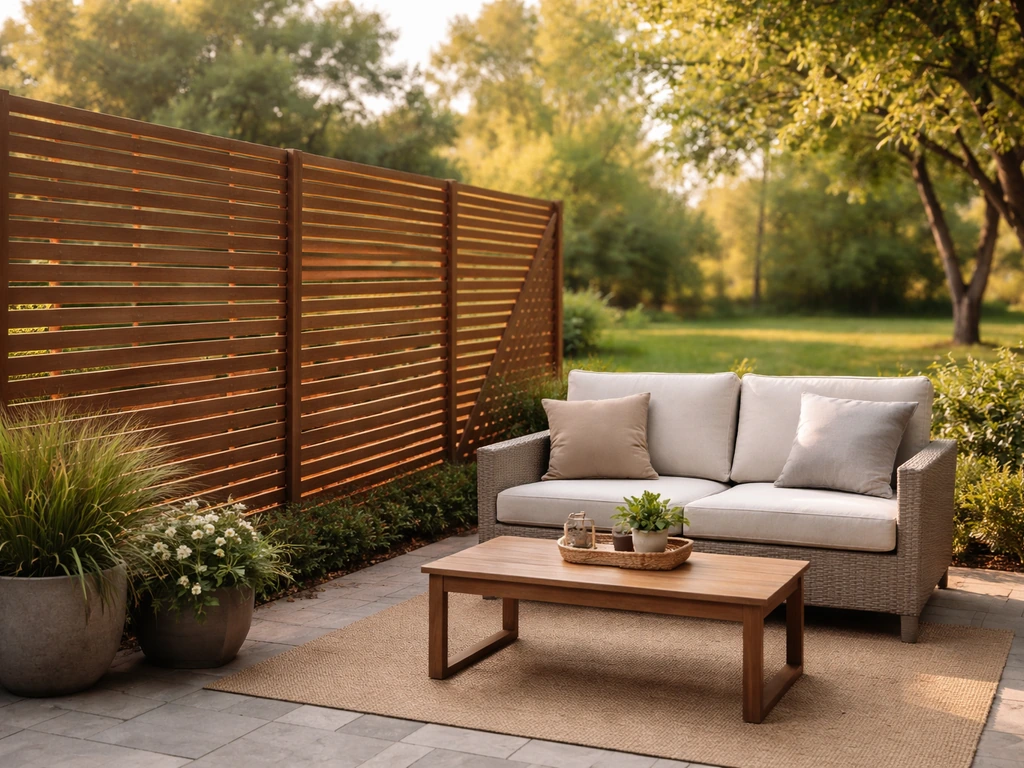
Lattice or slatted fence panels
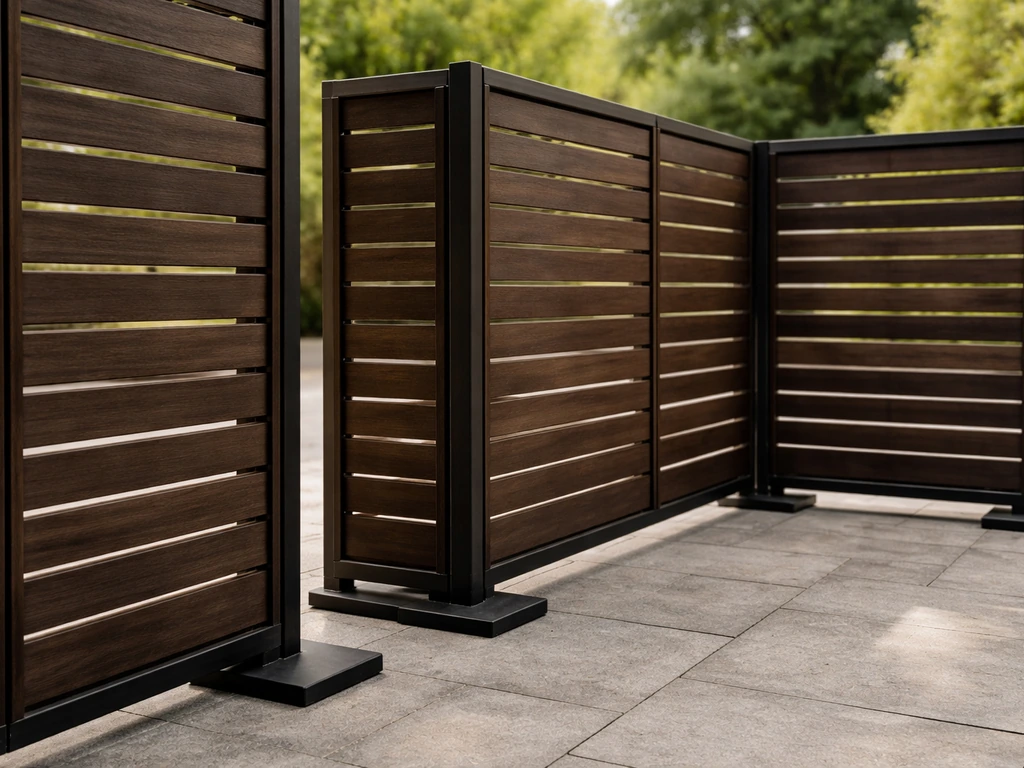
A slatted or lattice-style fence panel with about 30 to 50 percent open area is one of the most effective wind barriers you can build. It slows the wind without creating the turbulent backwash that a solid fence generates. Cedar and pressure-treated pine are the standard choices; both handle outdoor exposure well. Set posts in concrete at least 24 inches deep (deeper in sandy or loose soil) and size the posts to handle the wind load. A 6-foot fence panel in an exposed location puts real lateral force on its posts.
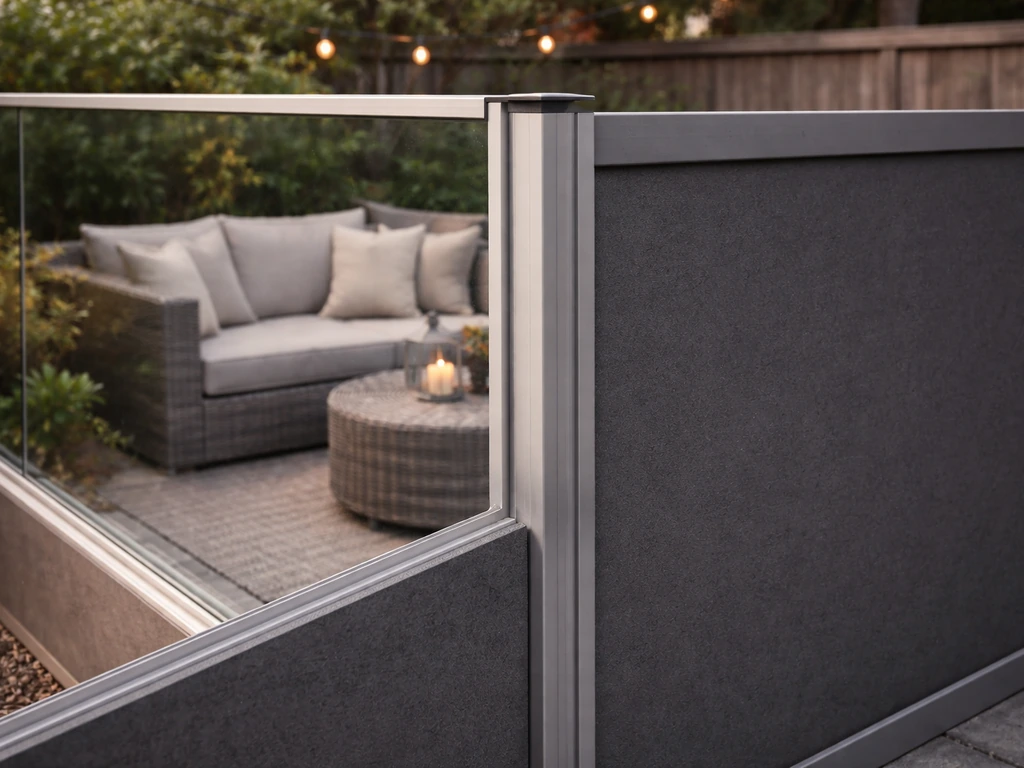
Privacy screen panels (freestanding or wall-mounted)
Modular privacy screen panels made from composite, aluminum, or dense polyethylene can be freestanding with weighted bases or bolted to an existing structure. These are faster to install than a built fence and can be repositioned if your needs change. If you're mounting them to an existing fence, make sure the fence itself is in good structural shape. Adding a wind-loaded screen panel to a rotting or loose fence is a recipe for the whole assembly to come down in a storm.
Screened patio enclosures
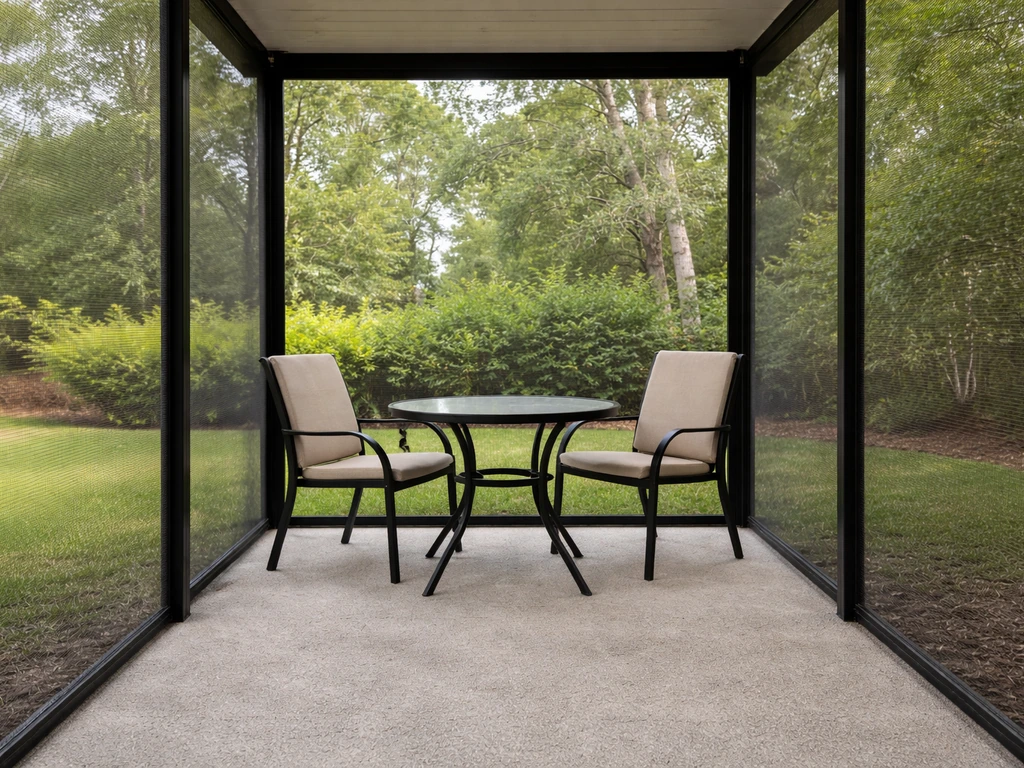
A screened patio enclosure is the most complete solution, especially if you also want to keep insects out and use the space in shoulder-season weather. Fiberglass screen mesh is the standard material and handles wind well when the frame is properly attached to the house and anchored at the corners. Aluminum framing is lighter and easier to work with for DIY builds than wood. The screen itself needs to be tensioned properly during installation; loose screen panels billow and eventually tear along the frame edges. This is covered in more detail in the installation steps section below.
Glass and polycarbonate wind panels
Tempered glass or twin-wall polycarbonate panels mounted in an aluminum track system give you a clear, wind-blocking wall that doesn't block light or views. Glass panels are heavier and require more robust framing, and they need to be sized and installed to handle local wind load requirements. Polycarbonate is lighter, cheaper, and easier to cut and install as a DIY project. Both options are essentially solid barriers, so you need to position them carefully (more on that in the layout section) to avoid creating turbulent zones behind them.
Louvered patio systems
Adjustable louvered roof and wall systems let you dial in exactly how much wind you want to block and from which direction. They're the most expensive option but also the most flexible. The louvers can be opened to let air flow on calm days and closed against wind or rain. If you're already planning a covered patio addition, a louvered system is worth pricing out alongside fixed-roof options.
Layout and design tweaks that cut wind speed before it reaches you
Where you put your barrier matters as much as what it's made of. A windbreak positioned directly against your seating area provides less shelter than one placed a few feet upwind, because you want the calm zone (the lee side) to land right where you sit. As a rough rule, a windbreak that's 6 feet tall creates a sheltered zone extending roughly 6 to 10 times its height on the downwind side. That means a 6-foot fence or screen placed 10 to 15 feet upwind of your furniture is doing more work than one right at the edge of your seating area.
Corner gaps are worth special attention. If your patio has two open sides that form a corner, wind converges there. Closing off the corner with an angled panel or a dense planter grouping breaks up that convergence. Even a 45-degree partial panel in the corner is much more effective than two straight panels that meet at a 90-degree gap.
If you have the space for two staggered barriers rather than one, research on porous fences shows that a secondary back fence can reduce pressure fluctuations from gusts better than a single front fence alone. In practical terms, this means even a low secondary barrier (planters, a hedge, a railing screen) behind your seating area adds meaningful gust protection.
Finally, think about height at the right location. A taller barrier suppresses the wind's influence further downwind in the wake zone. If you can only make one section of your windbreak taller, make it the section directly upwind of where people sit, not the sides.
Picking the right material for your conditions
The right material depends on your wind speed, climate, budget, and how much privacy you want alongside wind protection. Here's a practical comparison to help you decide.
| Material | Wind Blocking | Best Climate | DIY Difficulty | Rough Cost |
|---|---|---|---|---|
| Mesh/fabric windscreen | Good (semi-permeable) | Mild to moderate wind; UV-resistant versions for sunny climates | Easy | $20–$80 for a fence panel section |
| Heavy outdoor curtains | Moderate (adjustable) | Any, with proper anchoring; not ideal for sustained high winds | Easy | $40–$150 per panel |
| Wood slatted fence panel | Very good (semi-permeable) | Any; needs sealing in wet climates | Moderate | $150–$400 per 8-ft section installed |
| Composite or aluminum privacy panels | Good to very good | Any; aluminum is best for coastal/humid areas | Moderate | $200–$600 per panel |
| Polycarbonate panels | Excellent (solid) | Any; great for rain and wind combined | Moderate | $100–$300 per panel plus framing |
| Tempered glass panels | Excellent (solid) | Any; best in high-design or coastal settings | Hard (requires professional framing) | $400–$1,200+ per panel installed |
| Louvered system | Excellent (adjustable) | Any; best for year-round use and variable weather | Hard (usually professional install) | $3,000–$15,000+ for full system |
| Fiberglass screen enclosure | Good (semi-permeable) | Warm to mild climates; not for heavy snow loads | Moderate to hard | $1,500–$8,000 DIY depending on size |
For most homeowners dealing with everyday wind (not hurricane-prone coastal areas), a wood slatted or composite panel fence on the windward side, combined with outdoor curtains or a screen enclosure on the remaining sides, gives you the best balance of protection, cost, and DIY accessibility. If you're in a high-wind or coastal zone, skip fabric and lightweight mesh for the primary windward barrier and go straight to rigid panels with properly anchored posts.
How to plan and install your wind protection step by step
Before you build anything permanent, do a quick site sketch. Mark the patio dimensions, note which direction is windward (a compass and 10 minutes outside on a breezy day will confirm this), and mark existing structures like the house wall, fence lines, and any overhead structure. This sketch is also what you'll use if you need a permit, which is required in most jurisdictions for structures over a certain height or area.
- Determine your windward side and primary gap. This is where your strongest barrier goes. If the worst gusts come from the southwest, your main panel or fence section needs to cover that face completely, with no gap at the corners.
- Decide on barrier height. For seating-height wind at 3 to 4 feet, a 5 to 6-foot barrier is sufficient. For standing or dining use, go to 7 to 8 feet. Remember that taller panels require deeper post footings.
- Set your posts first. For a wood or composite fence panel system, dig post holes at least 24 inches deep and set in concrete. Use a level on two axes before the concrete cures. Allow 24 to 48 hours before hanging panels.
- Install panels from the windward end toward the lee side. This lets you check the fit as you go and adjust for any slight misalignment in post spacing.
- Secure fabric screens or windscreen mesh at every 12 inches along the top, sides, and bottom. Use metal zip ties or stainless steel fasteners for anything exposed to weather. Bottom edges must be fixed to the frame or ground; do not leave them loose.
- For patio screen enclosures, attach the frame to the house structure (not just the slab) using appropriate fasteners for your wall type. Anchor corner posts into the concrete slab with post-base hardware, not just surface-mounted screws.
- For polycarbonate or glass panels in an aluminum track, follow the manufacturer's channel depth requirements exactly. Under-engaged panels can pop out under wind load. Seal the top channel with foam closure strips to prevent debris and water intrusion.
- Test the installation before fully finishing. Stand in the seating area on a windy day and feel for drafts. A noticeable gap anywhere in the perimeter will reveal itself immediately. Address any gaps before declaring the project done.
- Check local building codes and HOA rules before starting anything permanent. Many jurisdictions treat fence or screen enclosures above 6 feet as structures requiring permits.
Keeping your wind protection working through the seasons
A windbreak or enclosure that isn't maintained starts failing quietly. Screen mesh develops small tears that grow with every wind event. Fabric curtains develop mildew, and mildew weakens fabric fibers. Wood panels dry out and warp, opening gaps. A monthly quick inspection is all it takes to catch problems before they become expensive.
- Monthly: Walk the perimeter and look for loose fasteners, torn mesh, or gaps that weren't there before. Check that bottom anchors on fabric panels and curtains are still seated.
- Every spring: Inspect post footings for heaving or shifting (common after freeze-thaw cycles). Push gently on posts to check for wobble. Re-tamp or add concrete if needed.
- Before storm season: Remove or roll up any fabric windscreens or curtain panels and store them indoors if your area gets high-wind events. Mesh screens with a porosity of 50 percent or more act like a sail in 50+ mph winds and will damage the frame they're attached to.
- After any major wind event: Check the whole assembly for bent framing, popped fasteners, or deformed panels. Catching a bent post before the next storm prevents a full collapse.
- Seasonal adjustment for enclosures: If you have operable panels (louvered, sliding glass, or swing-out screen doors), lubricate tracks and hinges each spring and check weatherstripping seals before cold or storm season.
- For wood structures: Reapply sealant or stain every 2 to 3 years depending on your climate. Sun and moisture are the main enemies; a sealed surface lasts twice as long as bare wood.
If you're starting with a quick fabric screen or curtain setup while you plan something more permanent, treat the maintenance routine the same way. The temporary solution has to stay functional and safe until the permanent one is in place, and a fabric screen that's torn halfway through or has pulled its bottom anchor free isn't doing its job.
The bottom line: protecting your patio from wind is a solvable problem at almost any budget. If you want to tackle this as a project, follow a clear plan for how to build a patio windbreak that fits your layout and local wind conditions. Start by identifying exactly where the wind is entering and at what height, pick the right porosity and material for your exposure level, anchor everything properly at both top and bottom, and check it regularly. Even a modest investment in a semi-permeable screen or slatted panel on your windward side will make your patio noticeably more comfortable within an hour of installation.
FAQ
How do I tell where the wind is actually coming in, if it feels different than the forecast?
Do the 10-minute check at seating height, and mark the strongest gust direction on your sketch. Forecast winds are often recorded higher up, so gusts can veer after passing eaves, corners, or nearby roofs. Also watch for where leaves or lightweight debris repeatedly move across the patio, that usually reveals hidden funnels through gaps or along fences.
Is it better to use a solid panel or a mesh screen for the windward side?
For most patios, semi-permeable barriers (around 30 to 50 percent open area) typically reduce wind speed more comfortably because they slow airflow without creating as much damaging turbulence. Solid walls can increase edge turbulence on the lee side, especially at the corners, so if you go solid, plan extra baffling at edges and the corner convergence zones.
What height should my windbreak be, and how far from the seating should it go?
Use the barrier height to estimate the sheltered zone, a practical rule is that a 6-foot barrier creates a calm area roughly 6 to 10 times its height downwind. That usually means placing it about 10 to 15 feet upwind of where people sit for maximum comfort. If you can only adjust one section, raise the portion directly upwind of the seating, not the side ends.
Can I protect a patio corner without enclosing the whole perimeter?
Yes, corner exposure is often the main issue, even when the open windward side is treated. Close the corner using an angled panel, a partial barrier set at about 45 degrees, or a dense planter grouping that blocks the wraparound flow. Two straight barriers that only meet at a 90-degree gap often leave a convergence point that still generates strong localized drafts.
How tight do I need to anchor a fabric windscreen to keep it from becoming a hazard?
Anchor the bottom and secure the edges, a windscreen left unweighted becomes a sail in gusty conditions. For decks, use sandbag bases or ground anchors appropriate to your surface, and verify that the fabric cannot lift more than a few inches in a strong gust. If winds are above 15 mph where you live, treat anchoring as mandatory, not optional.
Do patio blinds or curtains make wind protection worse if they billow?
They can, if they are not secured so they stay taut. Loose blinds turn into a flexible sail that transfers gust loads to mounts and anchors, which can loosen hardware and damage slats or tracks. Ensure they are anchored at the bottom and, if applicable, secured at side edges to prevent flapping.
Are modular freestanding privacy screens stable in high wind?
They can be, but only if the base weights match the wind exposure and the screen is assembled correctly. Before installation, check that the mounting points and base system are designed for wind loading, and avoid attaching a new wind-loaded screen to a fence that is already loose or rotting. If your screen wobbles when pushed gently, it needs reinforcement before you rely on it in a storm.
Should I add a second barrier behind the seating for better gust control?
Often yes, if space allows. A secondary back barrier can reduce pressure fluctuations from gusts better than one front barrier alone. Practical examples include a low railing screen, hedge, or planter row behind seating, positioned to work with the calm zone created by the windward barrier.
What maintenance steps prevent my enclosure or screen from failing over time?
Plan for a monthly inspection focused on three items: screen tears at corners and frame edges, fabric condition and mildew on curtains, and wood warping that creates new gaps. Even small openings that appear after several wind events can reopen the same wind funnels you worked to close, so patching or tightening early is cheaper than replacing later.
How do I avoid creating new wind problems after installing a barrier?
Treat it as a full-perimeter layout problem, not a single-side fix. Make sure the barrier does not leave large gaps at edges, and account for increased airflow around ends of solid sections, especially near the patio corners. If possible, stagger treatments (porous windward plus secondary shelter behind seating) so you reduce both speed and turbulence in the wake zone.
When should I choose rigid panels instead of fabric or lightweight screens?
If you are in a high-wind or coastal zone, prioritize rigid panels with properly anchored posts, and skip lightweight fabric or primary mesh as the main windward barrier. A good decision rule is to base the choice on how often you experience damaging gusts and how frequently you would otherwise need to retension or re-anchor temporary setups.
Next Articles
How to Build a Patio Windbreak Step by Step DIY Guide
Step-by-step DIY patio windbreak plan: choose style, measure wind, build secure posts and panels, weatherproof, maintain
How to Block Wind on Patio: Quick Fixes and Best Options
DIY ways to block wind on patio: quick fixes and best long-term windbreaks with placement, height, steps, and tips.

How to Decorate a Long Narrow Patio: Layout Tips
Practical DIY layout and decor tips to widen a long narrow patio using zoning, furniture spacing, lighting, greenery, an