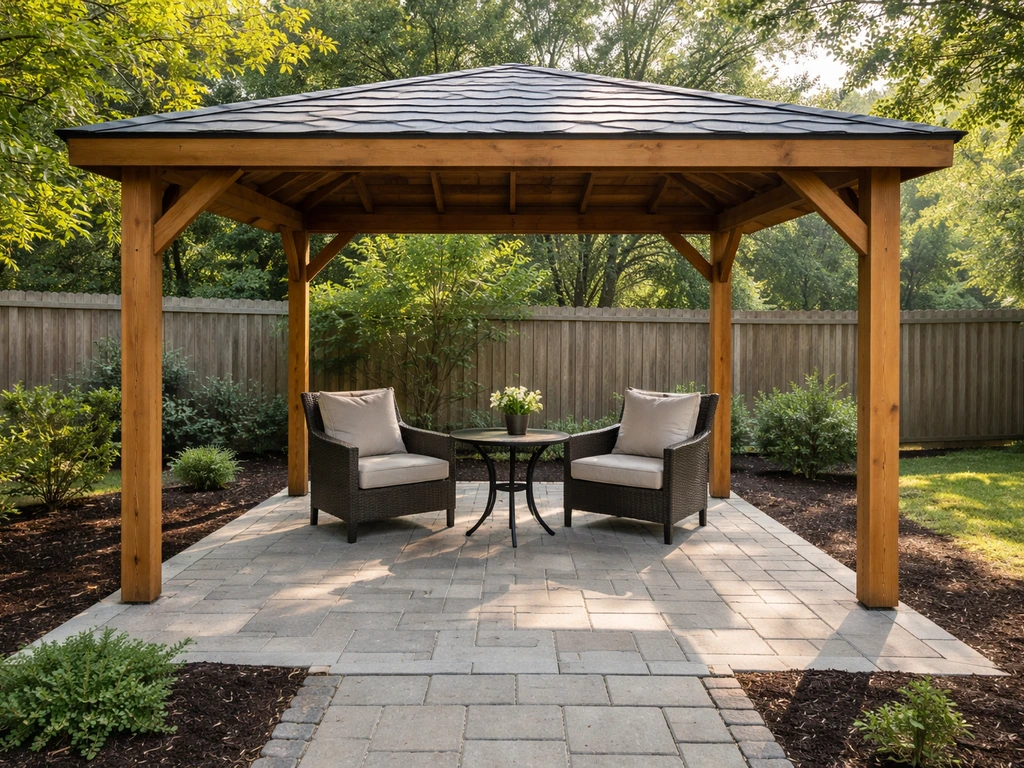
Building a shelter over your patio is a weekend-to-two-week project depending on size and complexity, and most homeowners can do it themselves with basic carpentry skills, the right materials, and a permit in hand. The core process goes like this: check local codes and pull a permit, choose your shelter style and materials, measure and prep the site, set posts or attach a ledger to the house, frame the roof, install roofing and weatherproofing, then add any walls or screening you want. That last step is where a simple overhead cover becomes a true outdoor room, and it's easier than most people expect.
How to Build a Shelter Over Patio: Step-by-Step DIY

Felix Brennan
11 Jun 2026
Start with design planning and permits
Before you pick up a single board, spend an hour figuring out what you're actually allowed to build. This isn't the fun part, but skipping it can mean tearing down work you've already done. Permits protect you and anyone who buys your home later, and the rules are more straightforward than most people expect.
Most jurisdictions require a building permit for any attached patio cover, and many require one for detached structures over 120 square feet. Some cities, like Morgan Hill in California, draw that 120 sq. ft. line explicitly. Phoenix requires permit submittal drawings that show rafter sizes, beam sizes, post spacing, connection details, and footing dimensions. San Diego requires a minimum 7-foot ceiling height measured to the underside of the rafters if your home has any wall openings (like a sliding door) that open into the covered area. These aren't edge cases; they're representative of what most municipalities ask for.
The IBC 2024 defines patio covers as structures designed to carry all dead loads plus a minimum vertical live load of 10 pounds per square foot, and snow loads apply wherever local snow loads exceed that threshold. That number matters when you're sizing your rafters and posts. Check your local building department's website first, then call if anything is unclear. Most offices have a handout specifically for patio covers.
If you live in an HOA community, add that to your checklist before you even sketch a design. HOA rules can be stricter than city code. Some HOAs cap awning and patio cover heights at 10 feet, require roof materials to match your home's existing roof, and prohibit any structure within a setback or utility easement. Get written approval from your HOA before submitting to the city, since rejection at either stage sends you back to the drawing board.
For your permit application, you'll typically need a plot plan showing your property lines, setback distances, and where the structure will sit, plus construction drawings with framing member sizes and spacing, footing details, and how the structure attaches to the house (if it does). Creating that plot plan by measuring your home and setback distances from the property line is also your first site prep step, so the work does double duty.
Picking your shelter style and materials
The two biggest decisions you'll make are (1) open-roof or solid-roof and (2) what the cover material will be. Everything else flows from those choices.
Cover vs. enclosure: what's the difference in practice
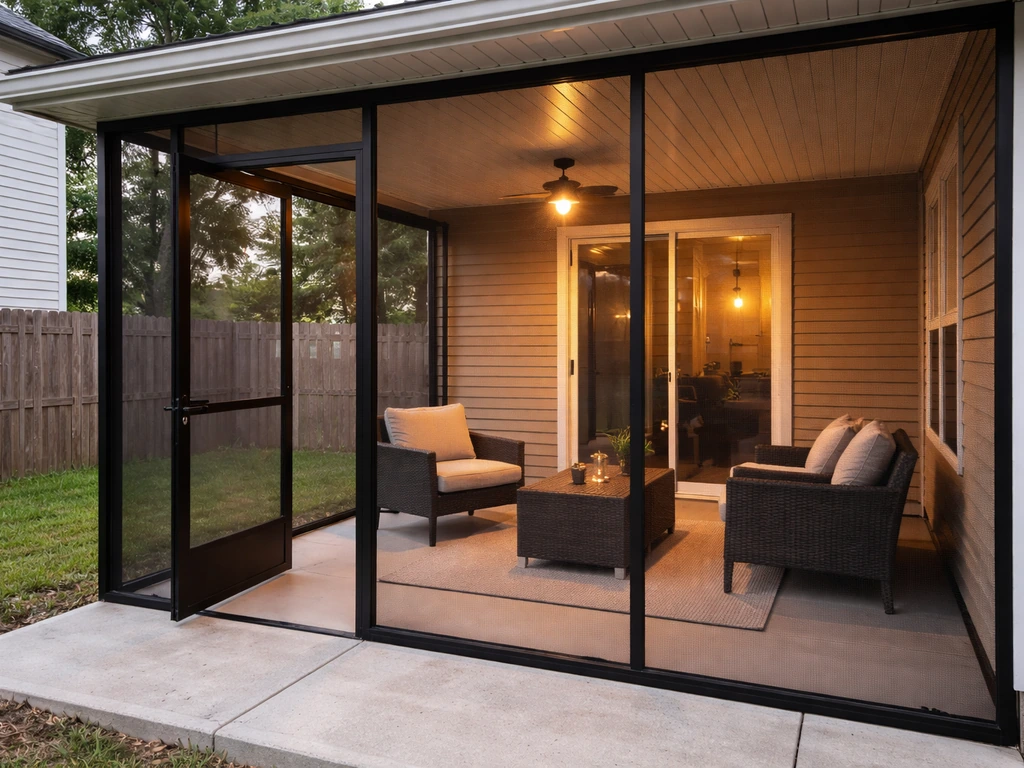
A patio shelter at its simplest is just a roof over your head: posts, beams, rafters, and a weatherproof surface. That gets you shade and rain protection. A patio enclosure adds side walls, screening, or glazed panels to create a space that blocks wind, insects, and (with the right materials) cold. If you want to go further, a do it yourself patio enclosures project can guide you through choosing panels, sealing joints, and planning for wind and insects A patio enclosure adds side walls, screening, or glazed panels. Most of this guide covers the roof build, with a dedicated section on side panels and screening since that's where a covered patio becomes a genuinely usable outdoor room year-round. If you're thinking about a fully enclosed or screened version, topics like DIY patio enclosures and how to build a patio enclosure cover those configurations in more depth. If you want to go beyond a roof, the same principles apply when you build an enclosed patio with walls, screening, or glazed panels.
Roofing and framing material options compared

| Material | Best For | Load Capacity | Cost Range | Notes |
|---|---|---|---|---|
| Asphalt shingles over plywood decking | Permanent, matched-to-house look | High (standard residential) | $$–$$$ | Requires minimum 2:12 slope; step flashing required at house wall |
| Multiwall polycarbonate panels | Light, DIY-friendly, diffuse light | Moderate to high (product-dependent) | $–$$ | Manufacturers specify wind/snow loads per panel thickness; check local requirements |
| Corrugated metal (steel or aluminum) | Budget-friendly, durable | Good for wind/snow with proper framing | $–$$ | Can be noisy in rain; needs proper overlap and sealant at seams |
| Solid aluminum/composite panels | Low-maintenance, clean look | High with aluminum clamping systems | $$$ | Often used with commercial-grade canopy systems; easier to install than shingles |
| Pergola-style (open slats) | Shade only, no rain protection | Not a weather barrier | $ | No roofing material needed; great starting point to add cover later |
If your goal is a clean, permanent structure, asphalt shingles matched to your home's roof are usually the right call and will satisfy most HOA material-matching requirements. For a DIY-friendly option that lets in diffuse light, multiwall polycarbonate is hard to beat. Just make sure the product you choose has documented wind and snow load ratings that meet your local requirements. Some cellular polycarbonate systems are tested to ASTM E-330 standards and rated well beyond 90 PSF wind pressure, which is more than adequate for almost any residential application, but budget-tier panels can fall short. Manufacturer specs matter here.
Framing material: wood vs. aluminum
Pressure-treated lumber (PT) is the most accessible framing material for DIYers. It's available at every home center, easy to cut and fasten, and familiar to work with. Use PT for any framing member that's within 6 inches of the ground or in contact with concrete. Standard dimensional lumber (SPF or Douglas fir) works for upper framing. Aluminum framing is lighter and won't rot, but it requires metal-specific fasteners, is harder to modify on-site, and typically comes as part of a kit system. For most DIY patio covers, wood framing is the practical choice.
Measuring, layout, and site prep
Good layout is the difference between a structure that looks professional and one that looks like it was built on a guess. Spend the time to get this right before you dig anything.
Measure and mark your footprint

- Measure your patio slab or the area you want covered. Write down the exact dimensions, not an estimate.
- Mark your setback lines using string and stakes. Measure from the property line inward the required setback distance (check your permit documents) and mark each corner of your structure.
- If attaching to the house, identify the ledger attachment location on the house wall. Mark the ledger height accounting for your desired roof pitch (typically 1/4 to 1/2 inch of drop per linear foot of run for adequate drainage).
- For freestanding or post-supported structures, mark post locations using batter boards and string lines. Check for square by measuring diagonals; they should be equal.
- Confirm post locations are within your setback lines and match your approved plot plan.
Digging and setting footings
Footings are what keep your posts from shifting, sinking, or pulling out in a windstorm. In areas with ground freezing, footings must go below the local frost line depth. In northern climates that's often 36 to 48 inches; Post Falls, Idaho, for example, requires a minimum of 24 inches. Even in warm climates, most jurisdictions require at least 12 to 18 inches of depth for post footings.
Dig your holes with a post-hole digger or rented power auger. For a typical 4x4 or 6x6 post, a 12-inch diameter hole is standard. Mix and pour concrete per your approved footing plan, and let it cure at least 48 hours before loading it. If you're using post bases (highly recommended over setting posts directly in concrete), install the base anchor bolts while the concrete is wet, positioned accurately with your string lines.
Post base selection matters more than most DIYers realize. Standard post bases keep a post from moving laterally but do not resist rotation, which means they're not adequate on their own for an unbraced patio cover post. Simpson Strong-Tie is explicit about this: typical post bases don't provide enough resistance to prevent rotation at the base unless the top of the post is fully restrained or you use a moment-resisting base designed for that purpose. For patio covers where the roof framing provides top restraint, a standard post base works fine. If your design has any tall, freestanding post condition, use a moment-resisting base or brace the structure at the top. Specify your anchor bolt type, diameter, length, and embedment depth on your permit drawings.
Attaching to the house: the ledger
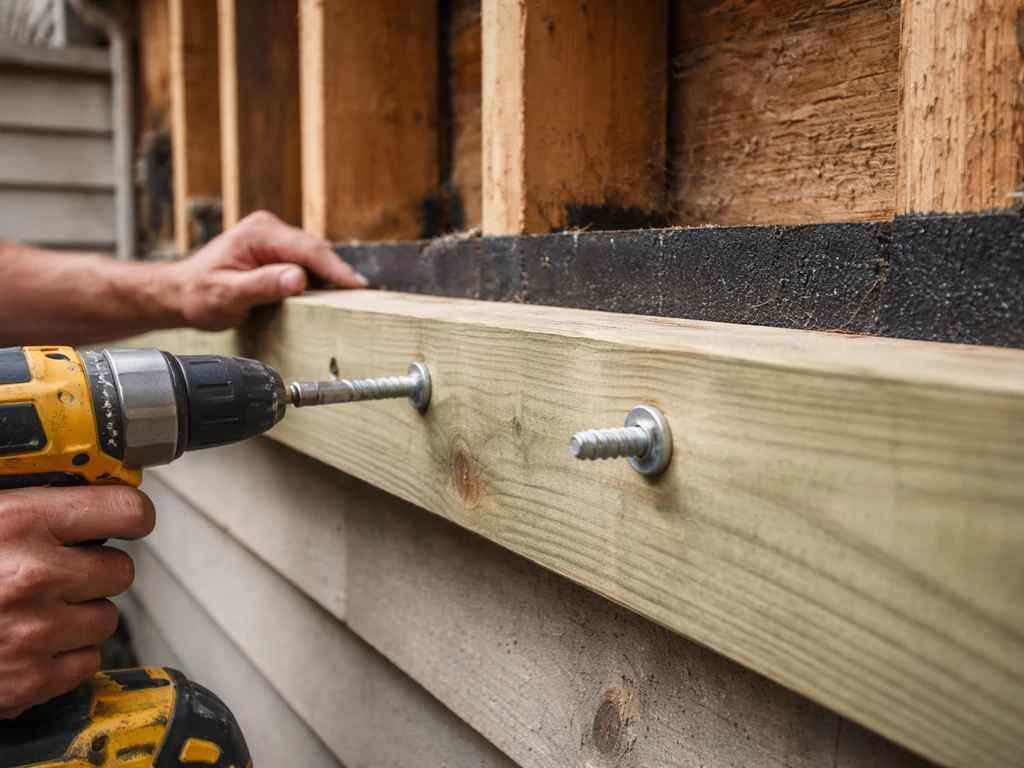
If your cover attaches to the house, the ledger board is the most critical connection in the whole project. It carries half the roof load and transfers it into your home's framing, so it needs to be bolted into the house's band joist or studs, not just nailed to the siding or fascia. San Diego's patio cover guidance is clear that patio rafters may not be solely supported by existing rafter tails or fascia. Remove siding where the ledger will sit, install flashing behind the ledger to direct water away from the wall, then bolt the ledger through the house sheathing and into the structural framing using lag screws or through-bolts at the spacing specified in your permit drawings.
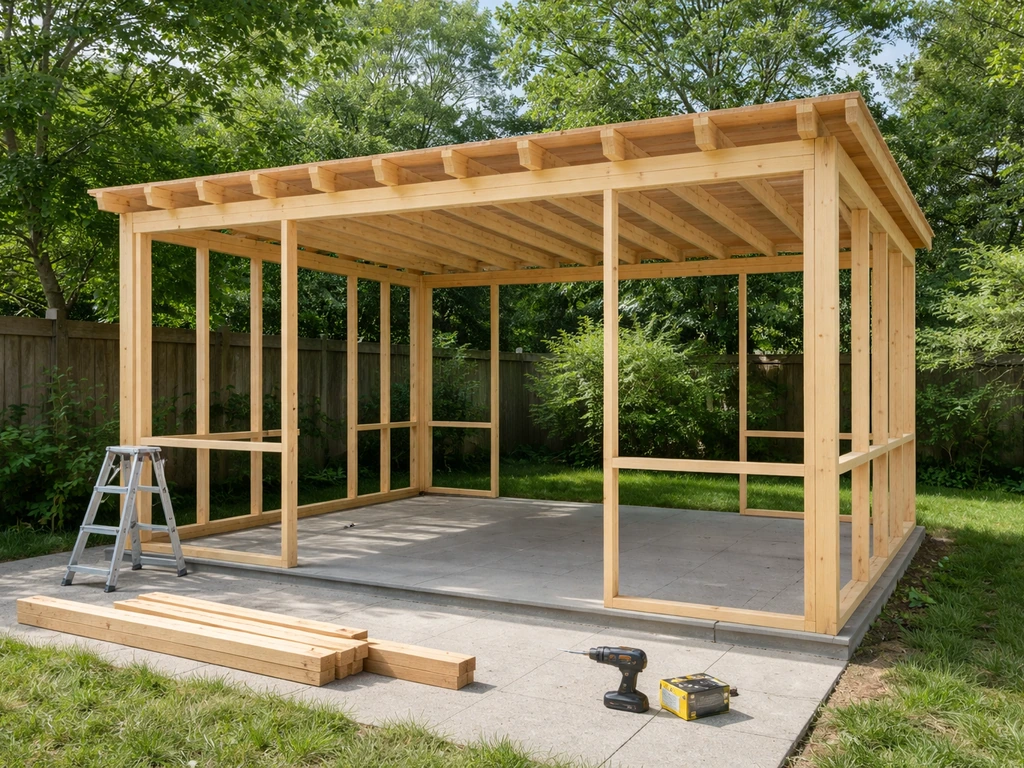
Framing the roof structure and weatherproofing
Once posts are set and the ledger is in place (if applicable), you're ready to frame. This is the most satisfying part of the build.
Beams and rafters
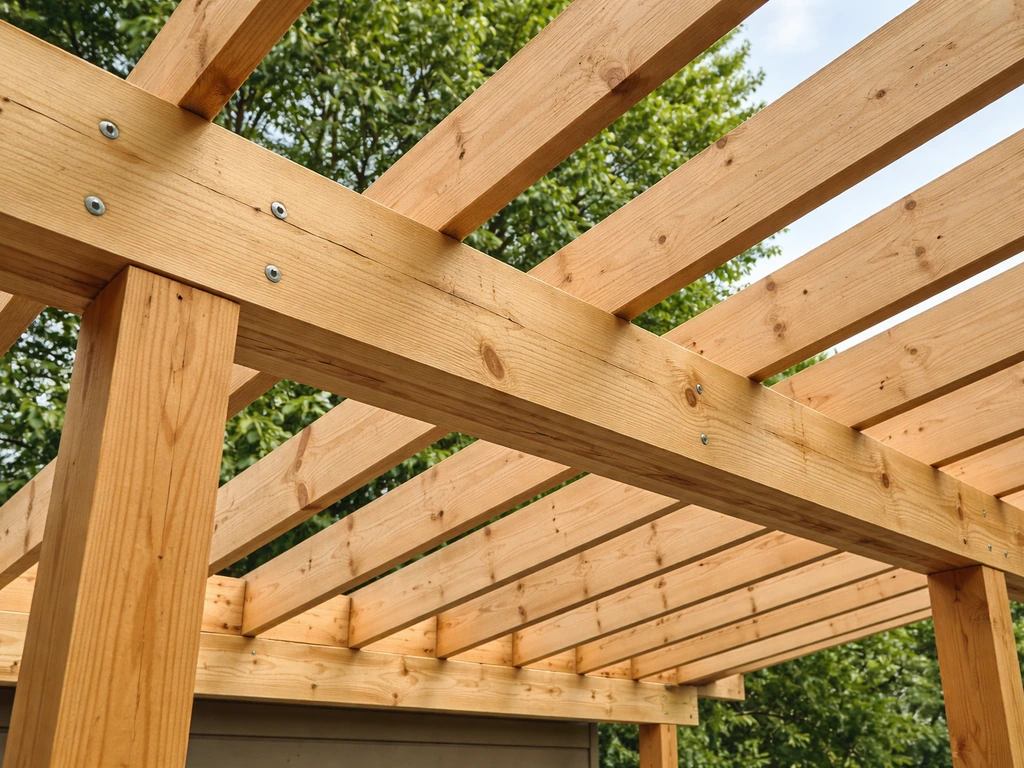
The beam sits on top of the posts and supports the rafters. Size your beam based on the span and load requirements from your permit drawings; a 4x8 or doubled 2x10 is common for spans up to 12 feet with standard residential loads. Use structural connectors (post caps) to attach the beam to the post tops, following the manufacturer's load tables for the connector you choose. Sistered or spliced beams require specific connector types; a standard post cap is not rated for spliced beam conditions, so use a full-length beam wherever possible.
Rafters run from the ledger (or ridge beam) to the outer beam at your design spacing, typically 16 or 24 inches on center. Use hurricane ties or rafter ties at every connection point. These metal connectors resist the uplift forces that wind generates on a roof surface, and they're required by code in most jurisdictions. Don't skip them.
Roof slope and drainage
A minimum slope of 1/4 inch per foot is necessary to drain water off the roof. For asphalt shingles, you need at least a 2:12 pitch (2 inches of rise per 12 inches of run). Polycarbonate and metal panels can shed water at lower slopes, but never design a flat roof with zero slope on a DIY shelter. Standing water causes leaks, panel degradation, and structural stress. Design your slope by setting the ledger or ridge connection higher than the outer beam by the appropriate amount for your run distance.
Decking and roofing
For an asphalt shingle roof, install 7/16-inch OSB or 1/2-inch plywood decking across the rafters, then apply underlayment. For roof slopes between 14 and 18 degrees, the NRCA recommends a minimum of two layers of No. 15 asphalt-saturated felt (ASTM D226). In cold climates or at eaves, use a self-adhering ice-and-water barrier (ASTM D1970) as the first course. Install drip edge along the eaves before underlayment and along the rakes after underlayment. Then shingle from eave to ridge using standard installation practice.
For polycarbonate or metal panels, follow the manufacturer's installation guide for overlap, panel orientation (flutes run in the drainage direction), and fastener spacing. Use pre-drilled holes with neoprene-gasketed screws to allow for thermal expansion. For cellular polycarbonate, many quality systems use a continuous aluminum clamping leg along the panel edges to create a weather-tight seal and proper load transfer. Don't improvise the edge connection; it's where most leaks start.
Flashing, sealing, and drainage
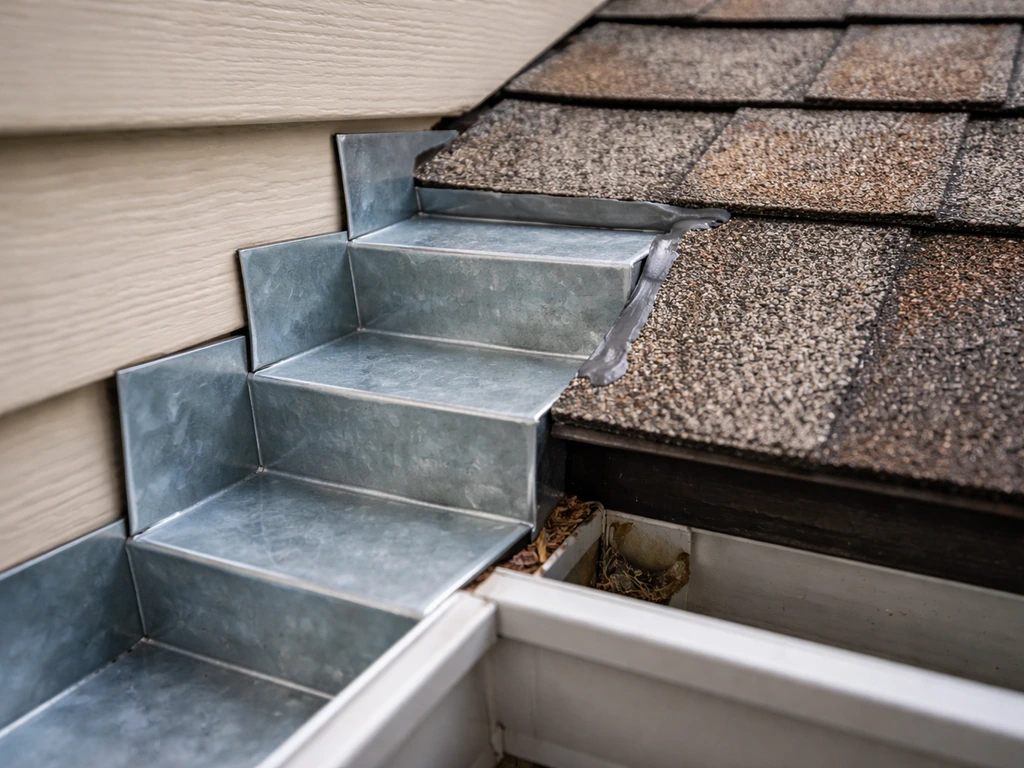
The wall-to-roof junction is the number-one source of leaks on attached patio covers. Install step flashing where the roof meets the house wall, interleaving each piece with the shingle course above it. At the top of the junction, install a continuous piece of counter-flashing embedded into the wall (cut a reglet into the mortar joint for masonry, or tuck under the siding for wood-frame walls). Use roof cement or compatible sealant as a secondary seal, not a primary one; flashing geometry does the real work.
Add a gutter along the low edge of the roof and direct downspouts away from the foundation. This keeps the drainage from the patio cover from pooling against your home's slab or foundation wall. It also prevents the drip line from eroding the ground around your posts. If you're in a region with heavy rain, size your gutter to handle the roof area (5-inch K-style gutter handles most residential patio covers up to about 300 square feet).
Adding walls, screening, and wind protection
A roof keeps the rain off. Walls and screening turn a patio shelter into a real outdoor living room. This is also where your structure's code classification can shift, so check with your permit office before adding solid walls, which may push your structure into a different use category. This guide from the National Patio Construction Authority distinguishes patio cover categories like solid/roofed covers, pergolas, shade sails, and hybrid systems, showing how enclosure level can affect code classification and structural expectations code classification can shift.
Screening for insects and airflow
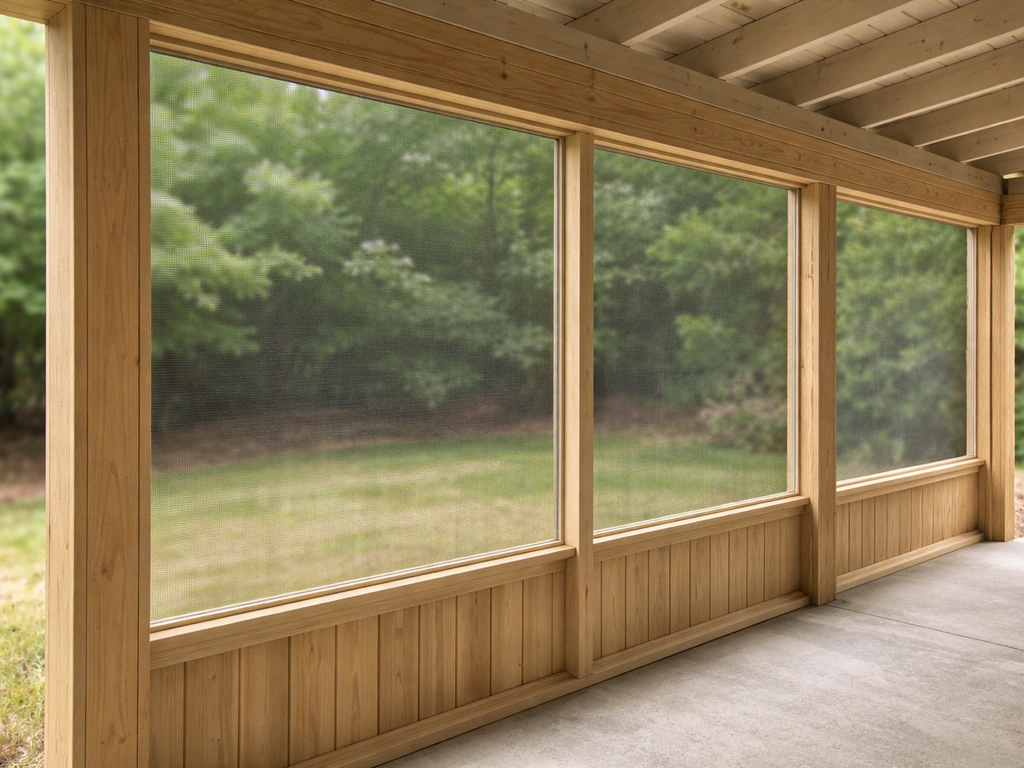
Screen panels are the most popular addition to a patio shelter and the easiest to DIY. The framing you've already built provides the perimeter structure. Install 2x4 horizontal rails between posts at roughly 2-foot intervals to give the screen panels something to attach to. Use aluminum screen frame extrusions with spline to create individual screen panels sized to fit each bay, or staple fiberglass screen directly to the framing and cover the edges with wood battens. Fiberglass screen (18x14 mesh) is the standard for most DIY projects. For a more durable option, aluminum or stainless steel screen holds up better against pets and wind. For ideas on full screened-room builds, the how to enclose a patio topic covers that project in detail. If you're also trying to keep costs down, use smart material choices and scalable enclosure options that fit a budget how to enclose a patio on a budget.
Panel options for wind and weather protection
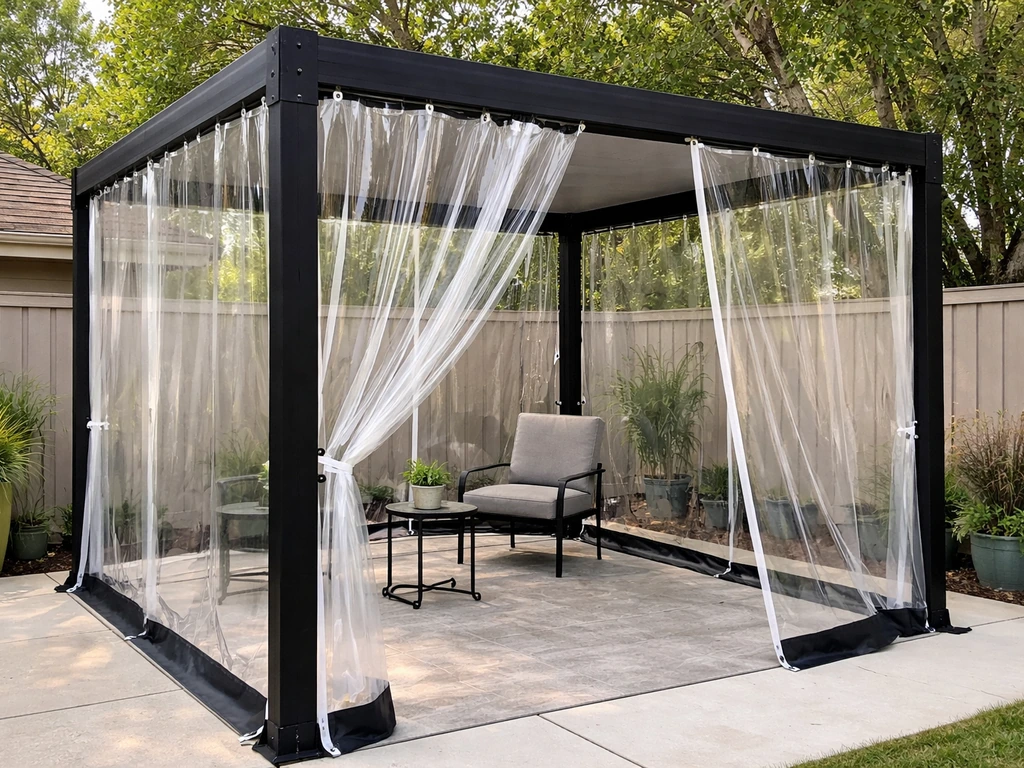
If you want more protection than screens offer, you have a few options. Clear polycarbonate side panels let light in while blocking wind and rain. Install them the same way you'd install the roof panels, with aluminum channel at top and bottom for a clean, weather-tight fit. Lattice panels offer partial wind break while preserving airflow. Board-and-batten or lap siding converts the shelter into something closer to a sunroom, but that typically triggers a more detailed permit review process, similar to a full patio enclosure. For a middle-ground solution that works seasonally, clear vinyl roll-down curtains can be installed under the eave on a track system and stored out of the way in good weather. They're not permanent construction, but they're surprisingly effective and don't require a permit in most jurisdictions.
Wind loads are real. Polycarbonate manufacturers specify load ratings per product, and those ratings matter for side panels exposed to prevailing winds just as much as they do for roof panels. If you're in a high-wind area, choose panels with documented performance ratings and make sure your framing is sized and connected to transfer those loads down to the footings. This is especially true for the windward side of the structure.
Installation details, finishing, and keeping it in good shape
Finishing touches that matter
Once the structure is built and inspected, a few finishing steps make the difference between a rough DIY project and something you're proud of. Paint or stain all exposed wood with an exterior-rated product, including cut ends. Install trim boards to cover the ledger connection, rafter tails, and any exposed framing edges. Add fascia board along the outer beam to give the roofline a clean look and to back the gutter. Caulk any gaps between the structure and the house with a paintable exterior sealant, but don't seal over flashing laps or you'll trap water.
Exterior hardware (post bases, joist hangers, hurricane ties) should be rated for exterior or pressure-treated lumber exposure. Standard galvanized connectors work in most climates; in coastal or high-humidity areas, use hot-dipped galvanized or stainless steel to prevent rust bleed-through on your framing.
Seasonal maintenance checklist
- Spring: Inspect flashing at the house wall for any lifted edges or cracked sealant; re-bed with roof cement if needed. Check gutter hangers and clean debris from gutters and downspouts.
- Spring/Fall: Inspect all structural connectors for rust. Tighten any lag screws or bolts that have shifted. Look for wood movement at post bases.
- After storms: Check for lifted or cracked roofing panels, especially at polycarbonate or metal panel seams. Look for water staining inside the shelter that could indicate a flashing failure.
- Every 2–3 years: Re-caulk all exterior joints at the house interface. Repaint or re-stain wood framing if the finish shows checking or peeling.
- In snow climates: Don't let heavy snow accumulate on the roof. Patio covers are designed to a minimum of 10 PSF live load, and wet snow can exceed 20 PSF quickly. Use a roof rake to remove buildup after major storms.
- Screens: Inspect screen panels for tears, especially at bottom rails where foot traffic and pets cause damage. Patch small holes with screen patch kits; replace panels with major damage rather than patching.
Your next steps today
The most common reason patio shelter projects stall is decision paralysis at the planning stage. Here's a simple action sequence to get moving: this week, pull your property survey and visit your city's building department website to download the patio cover handout. Sketch your shelter footprint on graph paper with dimensions and setback measurements. Next week, get material quotes from two or three suppliers and submit your permit application. Most residential patio cover permits are over-the-counter or same-day approvals in many jurisdictions. Once the permit is in hand, the actual build for a typical 12x16 covered patio with screen panels is a two-weekend project for two people with basic tools. The planning is 80 percent of the work. Start there.
FAQ
Can I fasten the ledger or posts to siding or fascia instead of into structural framing?
If your patio cover will be attached to the house, you usually need to connect the roof framing to the home’s structural members (studs or band joist), not to exterior cladding. That affects the ledger height and where you can legally fasten, so confirm before you finalize measurements. If you are building freestanding, you typically need bracing or a moment-resisting post base plan, because the roof will try to rack the posts sideways in wind.
How do I make sure water drains correctly and doesn’t damage my foundation or posts?
Plan for a real rain path, not just runoff. Use a minimum roof slope as your baseline, then add a gutter on the low edge and route downspouts away from the foundation. Also keep water from landing on post footings by draining to a stable area (gravel or a designed splash pad) rather than toward the base of the posts.
Is it okay to reduce roof thickness or spacing if I’m using lighter panels?
Yes, but only if your design still meets live load and snow load requirements for your jurisdiction. The roof materials you choose change how much thickness, spacing, and connection hardware you need, so you cannot swap to “lighter” panels unless the framing plan is adjusted and approved. If you have snow, verify the snow load triggers in your local code and ensure the roof slope and support system are adequate.
What are the most common reasons patio cover inspections fail, even when the build looks right?
The easiest way to prevent an under-specified roof is to build to the permit drawings, then double-check the spacing of rafters and the span relationships (post spacing to beam span, beam span to rafter span). If you decide to adjust dimensions after permitting, get an approved revision, because many inspections fail for connection spacing or member sizes that deviate from the submitted structural plan.
How should I fasten polycarbonate or metal panels so expansion doesn’t cause leaks?
Pre-drilled holes are important, especially for polycarbonate and metal panels. If you drive fasteners too tight, thermal expansion can cause buckling or stress at the panel edges, which later turns into leaks. Follow the manufacturer’s screw spacing and use neoprene-gasketed screws, with clearance holes where specified.
When do I need a moment-resisting post base instead of a standard post base?
Roughly, you can keep the roof system simple by using standard post bases only when the roof framing provides full top restraint, such as through beams and properly connected rafters. If you have a tall, less-braced, or freestanding condition where the top isn’t fully restrained, you need a moment-resisting base or top bracing designed for rotation. The decision changes your footing and connector requirements.
Do side walls or screening change the permit or code requirements for my patio cover?
If you add side walls or glazed panels, your structure may be categorized differently than an open patio cover, which can change permit scope and inspection items. Before installing walls, ask your permit office whether solid walls, partial walls, or enclosed glazing trigger additional requirements (like venting, fire separation, or different loading assumptions).
What’s the correct way to seal around the house-wall junction without creating hidden leak points?
Don’t rely on roof cement as the main seal at flashing transitions. Flashing geometry directs water, and sealants should be secondary, compatible with your roofing system and paintable only where needed. If you seal over laps or trap water behind flashing, you can create hidden leakage paths that are hard to detect.
What causes screen patio enclosures to warp or pull away over time, and how can I avoid it?
Most screen problems come from inconsistent bay sizes and poor anchoring of rails. Measure each bay, build panels to fit, and keep your horizontal rails level and securely fastened to posts. If pets are involved, choose stronger mesh and consider aluminum or stainless frames rather than relying on standard fiberglass alone.
How do I handle wind loads for patio covers with clear panels or screens?
If you are in a high-wind area, side panels fail as often as roof panels. Confirm wind exposure direction (windward vs leeward), then use panels with documented wind load ratings and connect the framing so uplift and lateral forces transfer all the way to the footings. Also ensure your design includes the required metal connectors at every roof-to-framing connection.
If I want a more sunroom-like look, what should I plan for beyond extra materials?
Yes, but the safest approach is to treat the project as “roofing plus enclosure,” not just a DIY finish. If your goal is a more sunroom-like wall assembly, ask whether you need additional structural review and whether materials like clapboard siding or board-and-batten count as full enclosure. Plan for more detailed flashing at wall corners and openings.
How do I stage the job to avoid rain damage while I’m mid-build?
A useful rule of thumb is to schedule the build so the ledger and roof membrane work can be completed before weather changes. Protect materials from moisture before installation, store panels flat if possible, and keep the work staged so there are no long gaps with exposed flashing edges. If you can’t finish a roof section in a day, cover temporarily in a way that doesn’t interfere with final flashing overlaps.
Next Articles
How to Enclose a Patio on a Budget: Cheap DIY Steps
Step-by-step DIY guide to enclose a patio on a budget with cheapest options, costs, planning, and common pitfalls.
How to Build a Patio Enclosure: Step-by-Step DIY Guide
Step-by-step DIY guide to build a patio enclosure with planning, framing, roofing, glazing or screens, sealing, and upke
How to Enclose a Patio Temporarily: DIY Step by Step
Step-by-step DIY options to temporarily enclose a patio, measure, install safely, weatherproof, and remove without damag