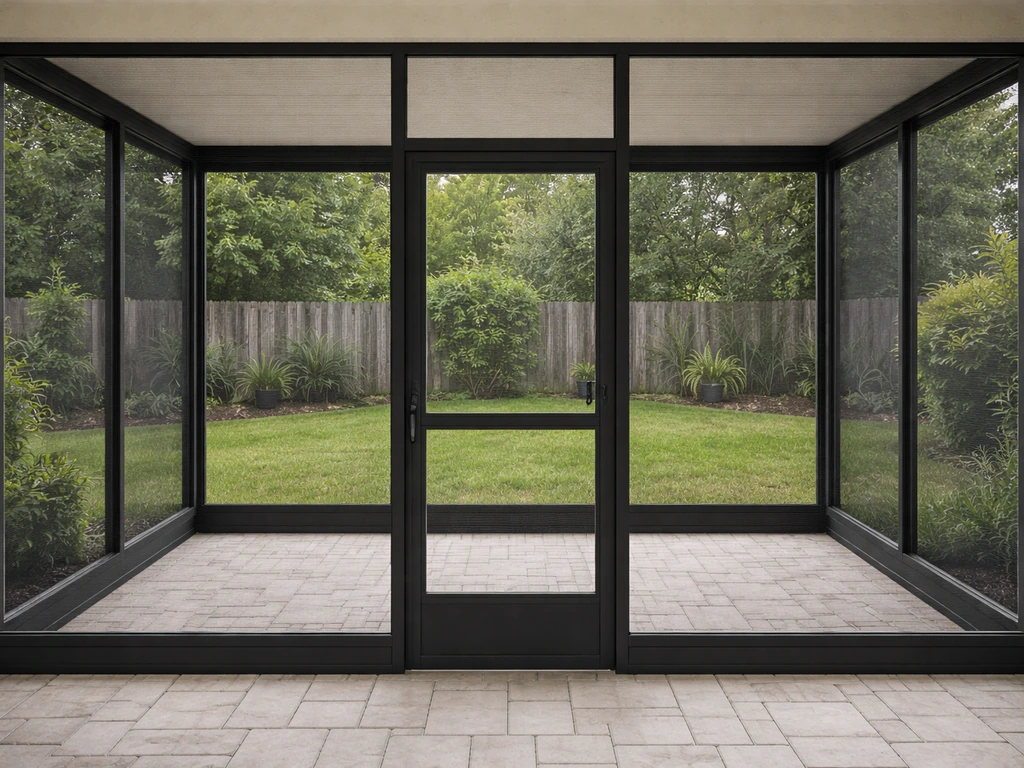
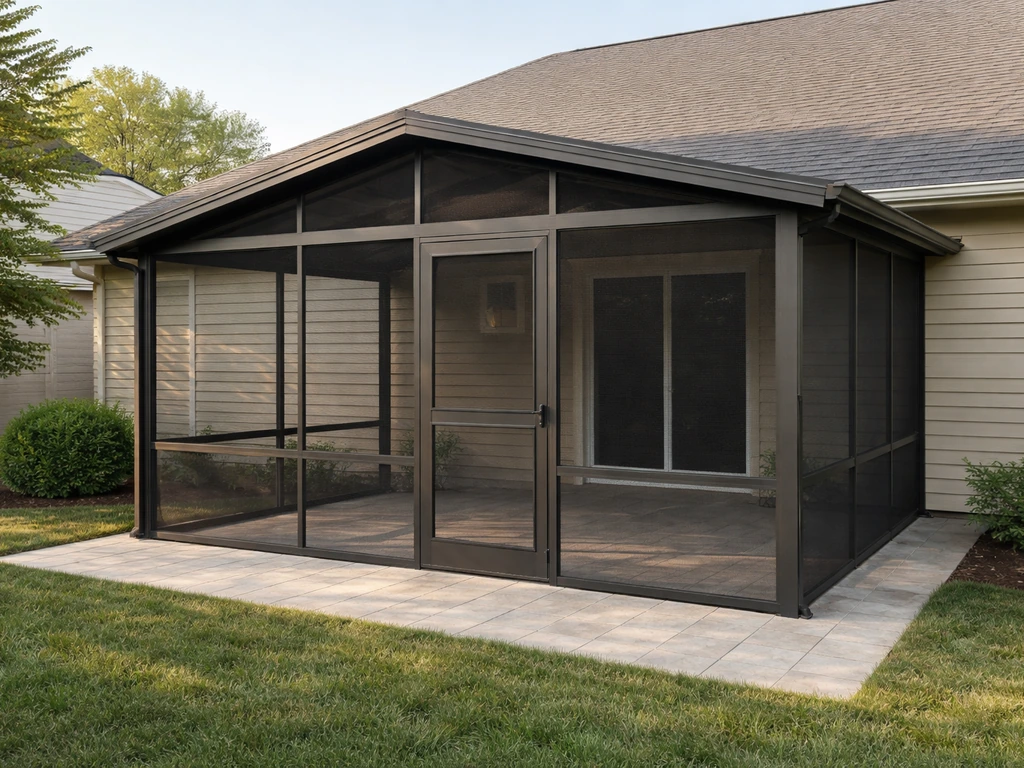
You can close in an open patio with screen by building a simple aluminum frame system around the perimeter, stretching screen mesh into each panel using a rubber spline and spline roller, sealing every gap at the posts, roof, and floor, and hanging a screen door for entry. Most homeowners can do this in a weekend with basic tools, and a 200-square-foot patio typically costs between $400 and $1,200 in materials depending on screen type and frame system.
How to Close in a Patio With Screen: DIY Steps

Felix Brennan
3 Jul 2026
That's the core of it. The details, of course, are where projects succeed or fall apart. Gaps at corners let in every mosquito in the neighborhood. A screen that isn't tensioned correctly sags within a season. A door hung without a sweep seal turns your enclosure into a wind tunnel. This guide walks through every step in the right order so you avoid those problems and end up with a screen room you actually want to use. If you want the finished result to keep bugs out year after year, follow a clear process like this to rescreen a patio when the mesh wears down screen room.
Choose a screening enclosure approach
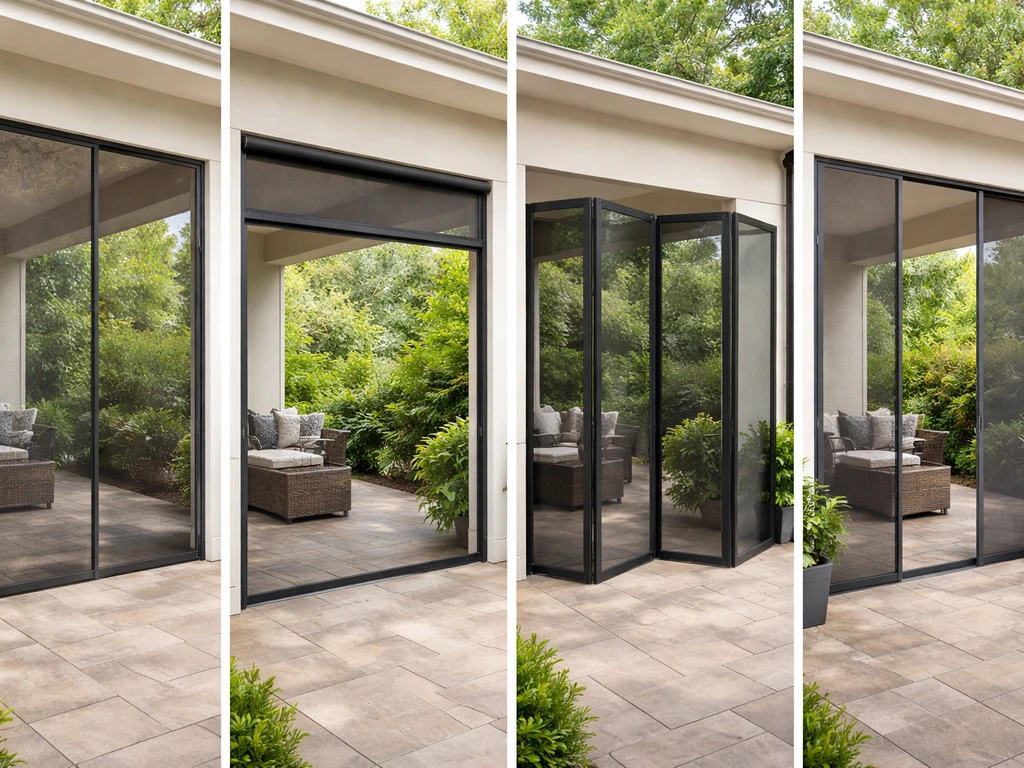
Before you buy anything, you need to pick a system. There are four realistic options for DIYers, and the right one depends on your patio structure, your budget, and how permanent you want the result to be.
| System Type | Best For | DIY Difficulty | Approximate Cost (materials) |
|---|---|---|---|
| Fixed aluminum frame with spline | Permanent enclosures, covered patios | Beginner–Intermediate | $4–$8 per sq ft |
| Pre-made screen panel kits (e.g., Screen Tight) | First-timers, modular layouts | Beginner | $5–$10 per sq ft |
| Track-mounted retractable/accordion screens | Partial enclosures, openable walls | Intermediate | $10–$25 per sq ft |
| Motorized retractable screen systems | Large openings, high-end builds | Advanced or hire out | $30–$80+ per sq ft |
For most DIYers closing in a standard covered patio, a fixed aluminum frame system using 2x2 extruded aluminum screen channel is the sweet spot. It's rigid, weather-resistant, takes standard spline installation, and the materials are available at most home improvement stores. Pre-made kit systems like Screen Tight are even simpler since the channels are designed to snap together, which is a good pick if this is your first enclosure project.
Track-mounted retractable or accordion-style screens make sense if you want walls that open fully when the weather is nice. These use overhead and floor track channels with screen panels that fold or glide horizontally out of the way. The tradeoff is higher cost and tighter tolerances during installation. Motorized systems add a headbox housing, motor, and controls on top of that, which is more custom-build than DIY kit territory for most people.
One honest note: if your patio doesn't have an existing roof or pergola, you'll need to address overhead coverage before you can screen the walls effectively. A roof keeps rain off the screen and gives you a solid attachment point at the top of each panel. If you're starting from bare ground, that's a bigger project worth planning separately.
Measure, plan layout, and confirm clearance
Accurate measurement is the single biggest thing that separates a clean install from a frustrating one. Take all measurements twice, and sketch a simple floor plan before ordering anything.
What to measure
- Total linear footage of each open wall section (measure at both top and bottom — they're often different on older patios)
- Height of each opening from slab or deck to the roof soffit or beam, measuring at both ends and the middle
- Width of any existing posts or columns that will interrupt a screen run
- Location and size of any electrical outlets, hose bibs, or light fixtures in the wall zone
- Door opening location (plan for a minimum 36-inch-wide rough opening, 80 inches tall)
- Overhang at the roof — you need at least 1 inch of solid surface to attach the top channel
Once you have all your dimensions, draw a simple elevation sketch of each wall. Mark the post locations, any interruptions, and your planned door placement. This sketch becomes your cut list. For screen panels, plan your layout so individual panel widths fall between 24 and 48 inches, panels wider than that are hard to tension evenly and tend to sag. If you are looking at different ways to close in a patio with screens, it helps to review the specific step-by-step guidance for how to make screen panels for patio before you start cutting and framing. If a wall section is 10 feet wide with no posts, plan to add an intermediate frame member at the 5-foot mark.
Check clearance carefully at the floor. If your patio slab has a slight slope for drainage (most do, usually 1/8 inch per foot), your bottom channel will need to follow that slope or you'll have a visible gap on one side. You can shim the channel up at the low end, or use a flexible sweep seal at the bottom to bridge the difference. Either approach works; just plan for it before installation day.
Estimating screen material
For screen mesh, add 4 inches to the width and height of each panel opening to account for the material you'll fold into the spline channel. Order about 10 percent extra overall for waste and mistakes. Standard fiberglass screen mesh comes in rolls 36, 48, or 60 inches wide and up to 100 feet long. Match your roll width to your largest panel dimension so you minimize seams, screen panels should never have a seam running through the middle.
Materials and tools checklist
Getting everything on-site before you start saves enormous time. Here's what a typical fixed aluminum frame enclosure requires.
Materials
- 2x2 extruded aluminum screen channel (sold by the linear foot or in 8- and 12-foot sticks)
- Screen mesh: fiberglass 18x14 or 18x16 mesh for insects; 20x20 for no-see-ums in coastal or wetland areas; solar screen if sun control is a priority
- Spline: 0.140-inch diameter for standard aluminum channel; measure your channel groove to confirm — diameter matters more than most people realize
- Corner connectors for the aluminum frame (90-degree and adjustable-angle connectors for non-square corners)
- T-connectors or mid-rail connectors for intermediate frame members
- Concrete anchors (3/16-inch Tapcon screws work well for attaching bottom channel to slab)
- Wood screws or lag screws for attaching to wood fascia, beams, or 2x4 blocking
- Masonry anchors and appropriate drill bits if attaching to brick or block walls
- Exterior-grade construction adhesive or heavy-duty caulk (polyurethane or silicone) for sealing frame-to-structure joints
- Closed-cell foam backer rod (3/8-inch diameter) for filling larger gaps before caulking
- Self-adhesive foam weather stripping (3/16-inch) for door frame perimeter
- Aluminum screen door with closer and latch hardware (pre-assembled kits simplify this step)
- Door sweep seal for the bottom of the screen door
Tools

- Tape measure and carpenter's square
- Miter saw or hacksaw with fine-tooth blade (for cutting aluminum channel cleanly — score first, then cut)
- Drill with bits for masonry and wood
- Spline roller (the concave wheel for pressing spline into the groove — don't skip this tool)
- Utility knife
- Rubber mallet
- Level (2-foot and 4-foot)
- Caulk gun
- Ladder
- Safety glasses and work gloves
Choosing your screen mesh type
Standard fiberglass 18x14 mesh blocks insects, lets air through well, and is easy to work with for beginners. It costs roughly $0.15 to $0.30 per square foot for DIY rolls. If no-see-ums or gnats are a problem in your area (common in Florida, the Gulf Coast, and Pacific Northwest wetlands), step up to 20x20 mesh. Solar or solar-shade screen (usually a PVC-coated polyester) blocks 65 to 90 percent of UV and sun heat and roughly doubles the material cost, but it meaningfully improves comfort on west-facing patios. Aluminum screen mesh is more durable than fiberglass but harder to install without creating small kinks.
Build and install the framing
This is the structural phase, and the order of operations matters. Start with the perimeter channel that attaches directly to your existing patio structure, then build the intermediate frame members, and finally add any corner or transition pieces. Do not install screen yet.
Attaching top and side channels to the existing structure
The top channel attaches to your roof fascia, soffit framing, beam, or ledger board. If the surface is wood, predrill and drive 2.5-inch exterior screws every 16 inches. If it's an aluminum patio cover, use self-tapping sheet metal screws into the structural ribs, not the thin skin panels. For a concrete or brick surface overhead, you'll need a masonry bit and appropriate anchors, 3/16-inch Tapcons into concrete work reliably if you hit solid material at least 1.5 inches deep.
Side channels attach to existing posts or to the house wall. On a wood post, simply screw directly. On brick or stucco, use masonry anchors and run a bead of polyurethane caulk behind the channel before fastening, that caulk line does double duty as both adhesive and gap sealer. Level each vertical channel before drilling. A channel that's even 1/4 inch out of plumb will make every panel in that section look tilted.
Installing the bottom channel
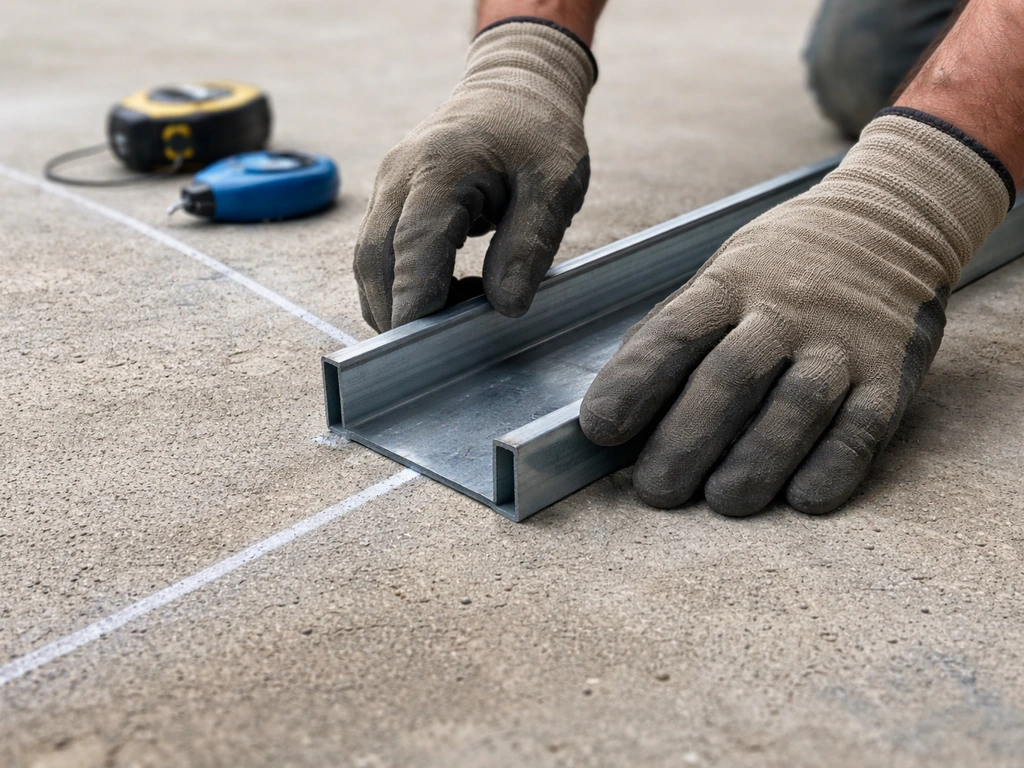
The bottom channel sits on the slab or deck surface. Snap a chalk line along its intended path first, then check for slope. If the slab slopes more than 1/2 inch across the channel run, either shim the low end with aluminum flat stock or accept that you'll rely on a brush sweep seal to close the gap. Anchor with Tapcon screws into the concrete every 24 inches. If you're on a wood deck, screw into the decking and through to the joist below where possible.
Framing corners and intermediate members
Corners deserve extra attention. Use proper 90-degree aluminum corner connectors rather than trying to miter-cut channel and butt it together, the connectors create a clean joint and leave the spline groove continuous. For non-square corners (which happen more than you'd think on older patios), adjustable angle connectors let you set the exact angle. Intermediate vertical members that divide a long wall into panel sections connect at top and bottom using T-connectors. Check plumb on every intermediate post before fastening at the bottom.
Working with uneven surfaces
Brick and block walls are rarely flat enough to get a continuous tight seal along a channel. Run a bead of closed-cell foam backer rod into any gap greater than 3/8 inch before caulking. For gaps smaller than that, exterior silicone caulk alone is enough. On wood-framed walls, if the surface is badly out of plane, sister a straight 2x4 block alongside the existing framing to give yourself a flat nailing surface before attaching the channel.
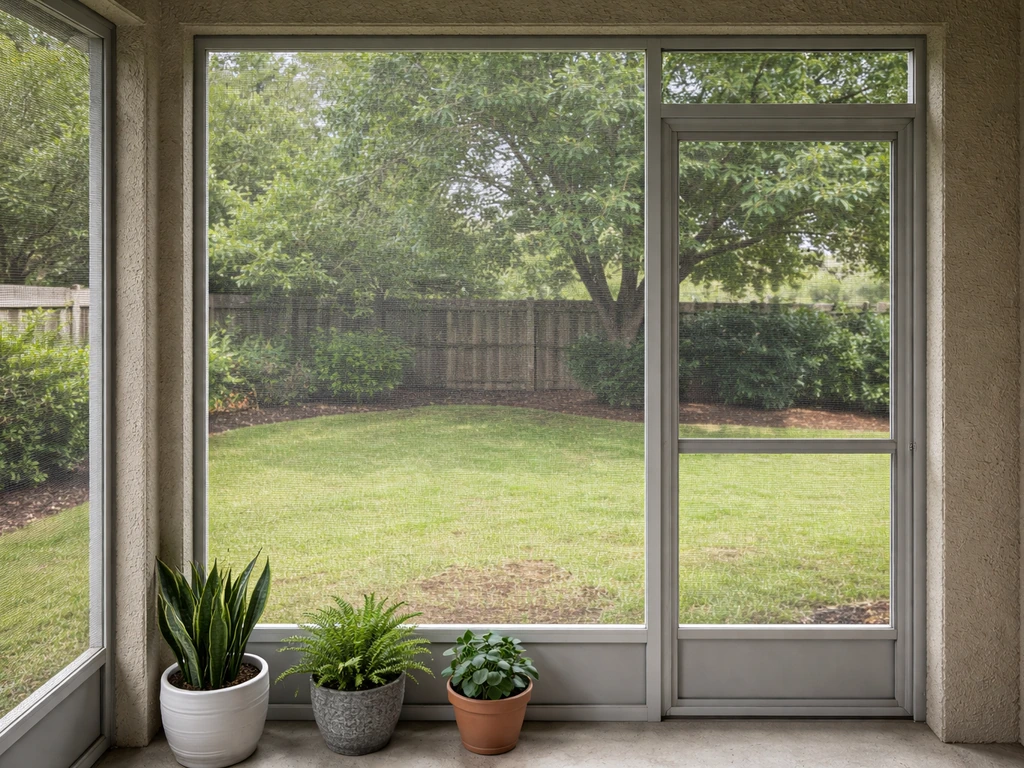
Install screen panels and seal the perimeter
With framing complete, you're ready for the most satisfying part of the job. Work one panel at a time, starting at a corner and moving across each wall. Once the panels are mounted, patching or replacing damaged screen sections is usually just a matter of removing the spline, swapping the mesh, and reinstalling the spline with the same sealant approach.
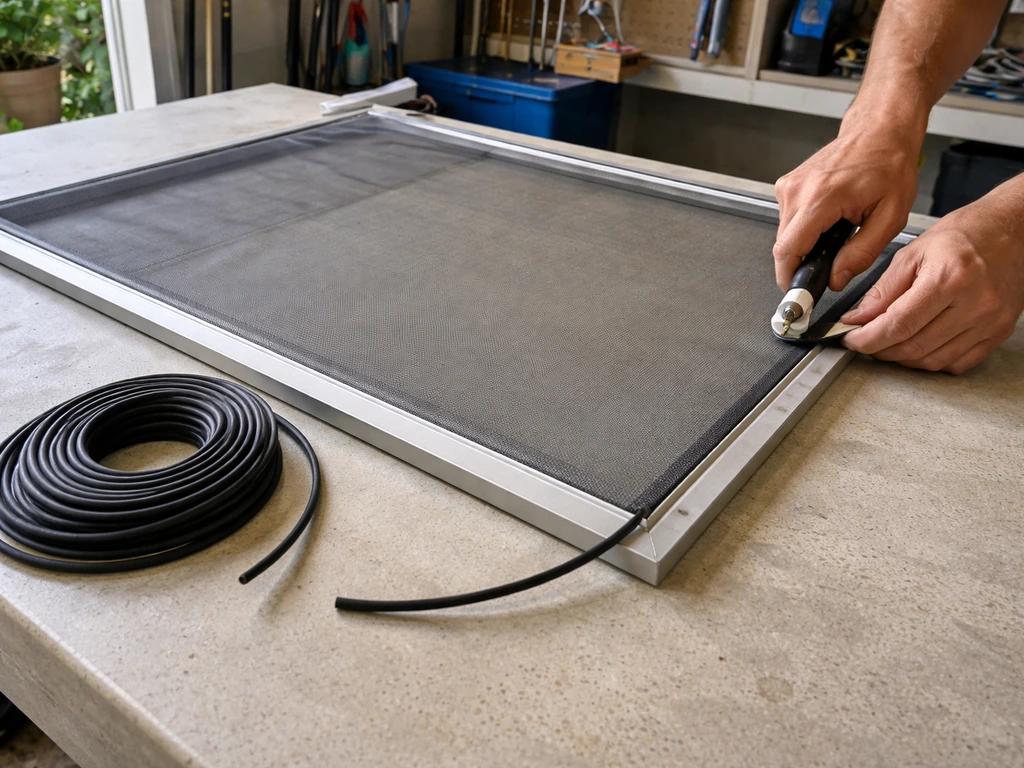
How to install screen with spline
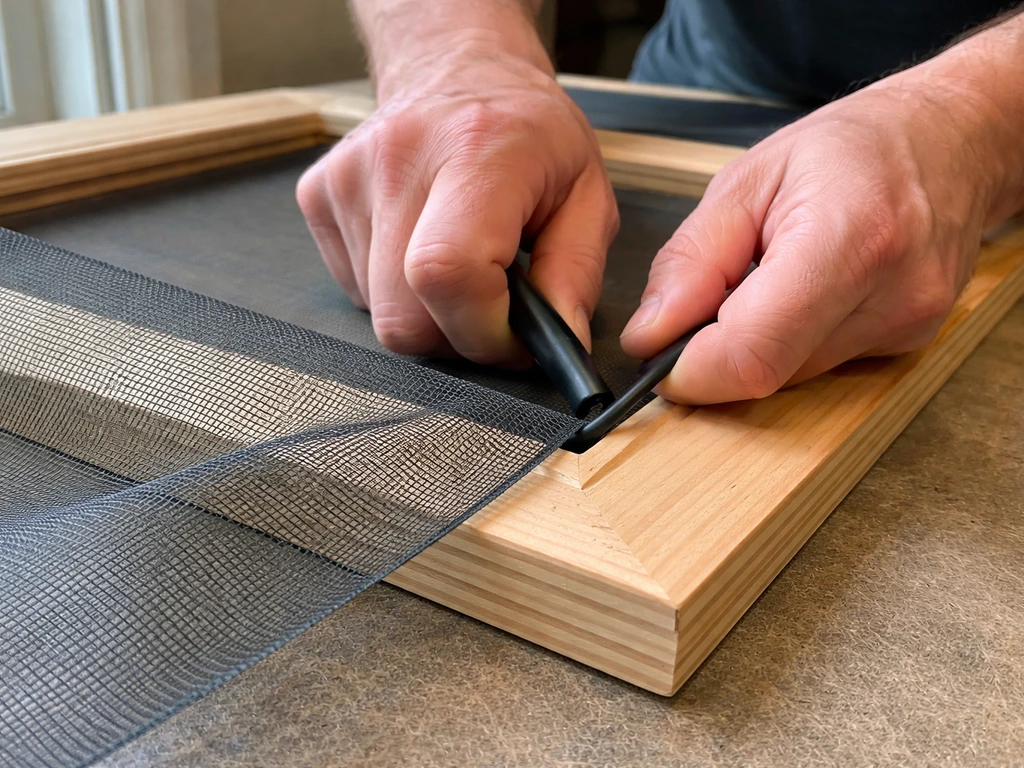
- Cut your screen mesh about 2 inches larger than the panel opening on all four sides. Lay it over the frame opening and let it drape loosely.
- Start at one corner. Press the screen into the channel groove at the top, then use the spline roller's concave wheel to roll the spline down into the groove on top of the screen. Use firm, steady pressure and keep the roller moving smoothly — don't stab at it.
- Pull the screen taut (not drumhead tight — just firm) and spline the opposite side. Then do the two remaining sides in the same opposing-sides order.
- Trim excess screen with a utility knife held at a slight angle into the channel — trim away from the spline, not against it, to avoid cutting the spline out of the groove.
- Check for wrinkles or sags. Minor wrinkles often work out as the material seats. A persistent sag means the screen wasn't tensioned enough on one side — pull the spline from that side, re-tension, and re-spline.
The most common beginner mistake is overtightening. Screen mesh that's stretched too hard will distort the mesh pattern visibly and can actually pull the spline out of shallow grooves over time. Aim for enough tension to remove wrinkles and no more.
Sealing gaps, corners, and transitions
Once all panels are in, walk the entire perimeter and look for gaps. Common problem spots: the joint where the top channel meets the existing soffit or fascia, the corners where two wall sections meet, and anywhere the bottom channel crosses a change in floor material or elevation. Seal every gap you find with exterior-grade silicone or polyurethane caulk. For the joint between the aluminum frame and a wood or masonry structure, polyurethane caulk bonds better and stays flexible through seasonal movement. Pure silicone is better at the roof-to-channel joint where water runoff is a factor.
Pay special attention to inside corners where two wall runs meet at 90 degrees. These joints are notorious for hairline gaps that seem minor but let in insects and wind. Run your finger along the corner joint after caulking to push the caulk into the seam, then smooth with a wet fingertip. Outside corners where the frame is exposed get the same treatment plus a second pass 24 hours later if the first application shrinks.
Add the entry: screen doors, gates, latches, and weather stripping
A screen enclosure without a proper door is just a half-finished project. After you frame and seal the mesh panels, you can finish your DIY bug screen for patio by adding a proper screen door to block insects at entry points. The door is what makes the space actually feel enclosed, and the details here determine whether bugs get in every time someone walks through.
Choosing the right screen door
For most patio enclosures, a standard hinged aluminum screen door (32 or 36 inches wide) is the practical choice. Pre-assembled kits come with the frame, screen, hinges, a spring closer, and a latch, everything you need. Sliding screen door systems are an option when a hinged door would swing into foot traffic or when the opening is wide enough to warrant a two-panel slider. Folding accordion-style screen doors handle very wide openings (typically 6 feet and up) and fold neatly to one side when not in use, which is useful on patios that double as entertainment spaces.
Installing a hinged screen door
- Build or confirm your rough door opening is plumb and square — 36 inches wide and 80 inches tall is standard. Check both diagonal measurements; they should match within 1/8 inch.
- Set the door frame into the opening. If your aluminum frame system doesn't include a dedicated door frame, build one from 2x4 lumber and cover the exposed wood with aluminum J-channel for a clean look.
- Shim the frame plumb and square, then fasten through the hinge-side jamb first.
- Hang the door on the hinges. Most pre-made screen doors use a Z-bar hinge system that attaches directly to the frame channel.
- Install the spring closer so the door closes automatically. Adjust the tension at the spring adjuster — too tight and the door slams, too loose and it drifts open in a breeze.
- Install the latch on the strike side. Position it so the door closes fully before the latch engages.
- Apply self-adhesive foam weather stripping around the full door frame perimeter. Use 3/16-inch closed-cell foam for a tight but not binding seal.
- Install a door sweep or brush seal at the bottom. A brush-style sweep handles uneven floors better than a rigid rubber sweep.
One detail that often gets skipped: the gap at the top of the door frame between the door header and the screen panel above it. Fill this with a horizontal piece of matching frame channel and screen, or seal it with foam weather stripping if the gap is less than 1/4 inch. Either way, close it off completely.
Finishing touches, testing for drafts, and troubleshooting leaks and sagging
With the door in and the perimeter sealed, do a full walkthrough before you call the project done. The goal is a space that feels genuinely closed, comfortable airflow through the mesh, but no detectable drafts, no visible gaps, and no entry points for insects.
How to test for drafts and gaps
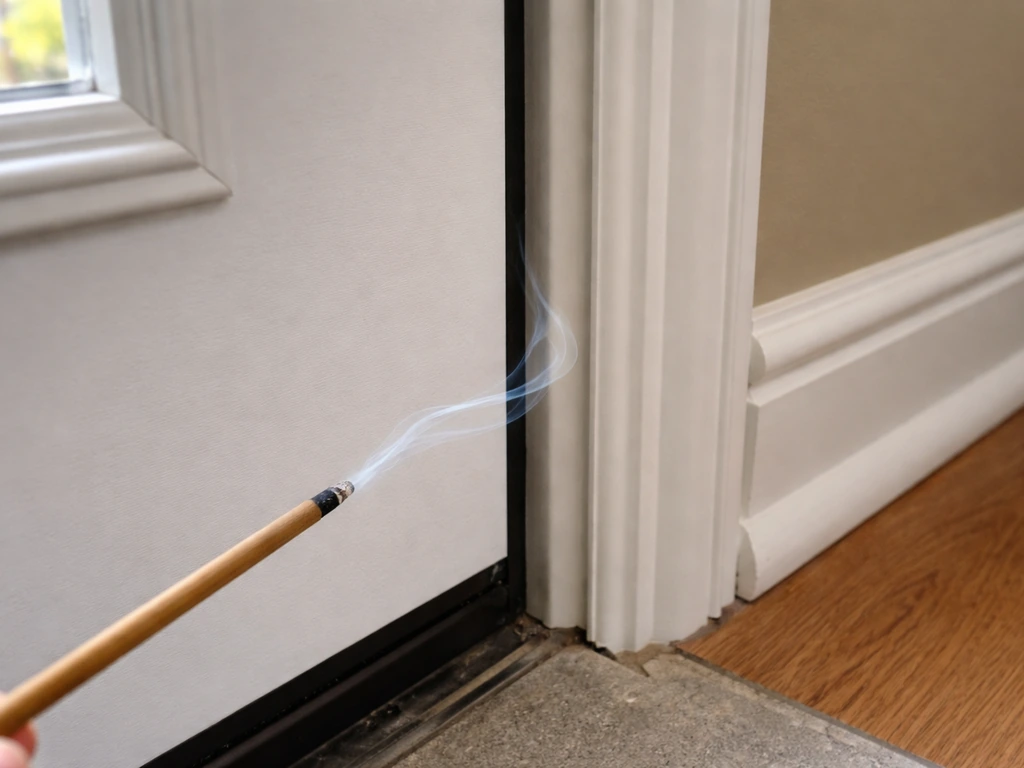
On a mildly windy day, hold a lit incense stick or a thin strip of tissue paper 2 inches from every seam, corner, and door edge. Smoke or tissue that pulls toward a joint indicates a gap. Mark each problem area with a piece of tape as you go, then address them all at once rather than chasing them one at a time. For gaps at the roof or soffit, run your hand slowly along the joint, you'll feel airflow before you see it. Re-caulk any joint where movement is detected.
Troubleshooting common problems
| Problem | Likely Cause | Fix |
|---|---|---|
| Screen sagging in the middle of a panel | Insufficient tension during installation or panel too wide | Remove spline on the slack side, re-tension screen, re-spline; or add a mid-rail channel at 48-inch height |
| Visible gap at bottom channel | Slab slope or uneven floor surface | Add brush sweep seal to bottom channel; use foam backer rod plus caulk for larger gaps |
| Insects entering near corners | Caulk gap or missing corner connector seal | Apply second bead of exterior silicone into corner seam; use a foam backer rod if gap exceeds 1/4 inch |
| Door doesn't close fully | Frame out of square or closer tension too low | Re-check frame diagonals and shim as needed; increase closer tension one turn at a time |
| Wind noise at roof transition | Gap between top channel and soffit | Fill with closed-cell foam backer rod, then caulk; consider adding a continuous drip-cap flashing at the joint |
| Screen mesh distorted or wavy | Overtightened during installation or wrong spline diameter | Remove and reinstall with correct 0.140-inch spline and moderate tension; let it relax 24 hours before evaluating |
Finishing details that matter
Paint or primer any exposed raw wood framing members before screen installation if you didn't do it earlier, it's nearly impossible to paint neatly around installed screen without getting paint on the mesh. Aluminum frame channels don't need painting but can be wiped with a mild soap solution and a soft brush to remove any metal shavings or caulk smears before they harden. Check all your fasteners for full seating, a loose Tapcon screw in a concrete anchor will back out over time and allow the channel to flex away from the wall.
Seasonal and long-term maintenance
Screen enclosures don't require a lot of upkeep, but a quick annual inspection pays off. Every fall, check the spline for brittleness, UV exposure degrades rubber and vinyl spline over time, and a cracked spline is the main reason screens fall out of their frames. Press it with your fingernail; if it crumbles or feels stiff and dry, it's time to re-spline the affected panels.
Inspect all caulk joints for cracking or separation, especially at the roof line where thermal movement is greatest. Clear any debris from the bottom channel groove so the drain holes (if your channel has them) stay open. And if you live in a freeze-thaw climate, check masonry anchors each spring since frost heave can loosen them.
If at any point you find yourself replacing significant sections of screen rather than the whole enclosure, those are skills that transfer directly. If you are specifically trying to learn how to replace patio screen mesh on an existing frame, the key steps are the same replacing significant sections of screen. The technique for replacing individual damaged panels is essentially the same spline process described here, just done on a smaller scale. And if your original screens were installed with a simpler mesh that's no longer holding up, a full re-screen with upgraded mesh is a clean weekend project on an existing frame.
Your next steps today
- Sketch your patio layout and take all wall measurements, including height at multiple points per wall
- Decide on your system type (fixed aluminum frame vs. screen kit vs. retractable) based on your budget and how permanent you want the enclosure
- Create a cut list and materials list from your measurements, adding 10 percent for screen mesh waste
- Source materials — aluminum screen channel, mesh, spline, fasteners, and a pre-assembled screen door kit are all available at major home improvement stores
- Confirm you have a spline roller before installation day — it's inexpensive and makes the difference between a clean install and a frustrating one
- Plan for one full day to install framing and a second day to screen, seal, and install the door
FAQ
How do I prevent corners from leaking even if the channels look square?
Use the correct 90-degree corner connectors and then test the inside corner joint after caulking by running your finger along the seam to force caulk into the groove. If you still see a line opening under hand pressure, add a second thin bead (wait for the first pass to set) and smooth it again. Corner leaks are usually small channel gaps, not bad screen tension.
What should I do if my patio slab slope is more than I expected?
If the slab changes elevation enough that the bottom channel cannot stay in plane, follow the slope using shims at the low end, but confirm alignment with a level before you fasten. For very uneven runs, plan on using a bottom brush or sweep seal that can flex to the floor contour, otherwise you will get drafts and insect entry at one side of the enclosure.
Is it better to tension the screen very tight to keep out bugs?
Not extremely. Over-tension can warp the mesh pattern and loosen the spline over time, which creates gaps later. Aim for a wrinkle-free surface, press it in evenly with the spline roller, and stop tightening once wrinkles are gone. If you can see the mesh distort significantly, it is already too tight.
What mesh size and type should I pick if I have gnats or no-see-ums?
Choose a tighter mesh such as 20x20 if those insects are common in your area. Also keep your panel sizing within the recommended range (so the screen can be tensioned evenly) because a too-large panel width increases the chance of sagging, which lets small insects slip through even with tight mesh.
Can I install an enclosure on a patio that has no solid roof or existing cover?
You typically need overhead coverage before wall screening, because you need a reliable top attachment surface and the screen will otherwise get hit directly by rain. If you cannot add a roof first, consider a different closure approach (like temporary side screens) until a fascia, pergola, or other structure is ready for top channels.
How do I choose between fixed panels and a retractable or accordion system?
Fixed panels are usually the best DIY choice when you want a permanent, consistent seal. Retractable or accordion systems cost more and require tighter installation tolerances at the tracks so the panels align and seal. If you go motorized, plan for electrical considerations and service access, because repairs are more involved than rescreening fixed panels.
What’s the best way to match screen width if I want fewer seams?
Plan your panel layout so each panel opening uses as much of a single roll width as possible, and avoid running a seam through the middle of any panel. Add the correct fold-in allowance for spline (so you are not short on material), then order extra for waste so you can keep seams out of the most visible, tension-critical areas.
How do I know if a caulk joint is actually sealing, not just filling the surface?
After caulking, do a physical check along the full joint with your finger to press the material into the seam, then run a second pass if you detect any airflow. A smoke or tissue test around corners and the door edges is a practical way to confirm whether the joint is tight, even when it looks filled.
What door bottom seal should I use so wind and insects do not get in?
Use a door sweep or bottom seal that matches your floor condition, especially if your patio has slope or transitions between materials. If your bottom edge is not contacting the floor closely, insects will enter at the high side and drafts will increase. Consider a more flexible sweep when your floor is not perfectly level.
Should I caulk with silicone everywhere, or only in certain areas?
Use polyurethane caulk at joints where you need flexibility between the frame and materials that move seasonally. Reserve silicone for water-runoff-heavy areas, such as roof-to-channel transitions. If you use the wrong type in the wrong zone, you can get premature cracking or loss of adhesion.
Why does my screen keep pulling out of the frame after a season?
The most common causes are brittle or damaged spline, overtension during installation, and loose fasteners that allow the channel to shift. Check spline condition annually by pressing it with a fingernail, and if it crumbles or feels stiff and dry, re-spline the affected panels rather than waiting for full failure.
Do I need to paint or prep wood framing before installing screen panels?
Yes, if there is exposed raw wood, prime or paint it before screening so you do not end up coating the mesh. For aluminum channels, cleaning off caulk smears and metal shavings before they harden helps the channels stay tidy and prevents debris from interfering with spline seating.
Next Articles
How to Patch Patio Screen: Step-by-Step Repair Guide
Learn how to patch patio screen: fix holes, sagging, or loose seams by swapping fabric and reinstalling spline tightly.
How to Build a Patio Screen Enclosure Step by Step
Step-by-step DIY guide to build a patio screen enclosure, from planning and materials to framing, installing screens, an
How to Rescreen a Patio: DIY Steps and Tips
Step-by-step DIY on how to rescreen a patio enclosure: diagnose damage, fix frame, install new screening with proper ten