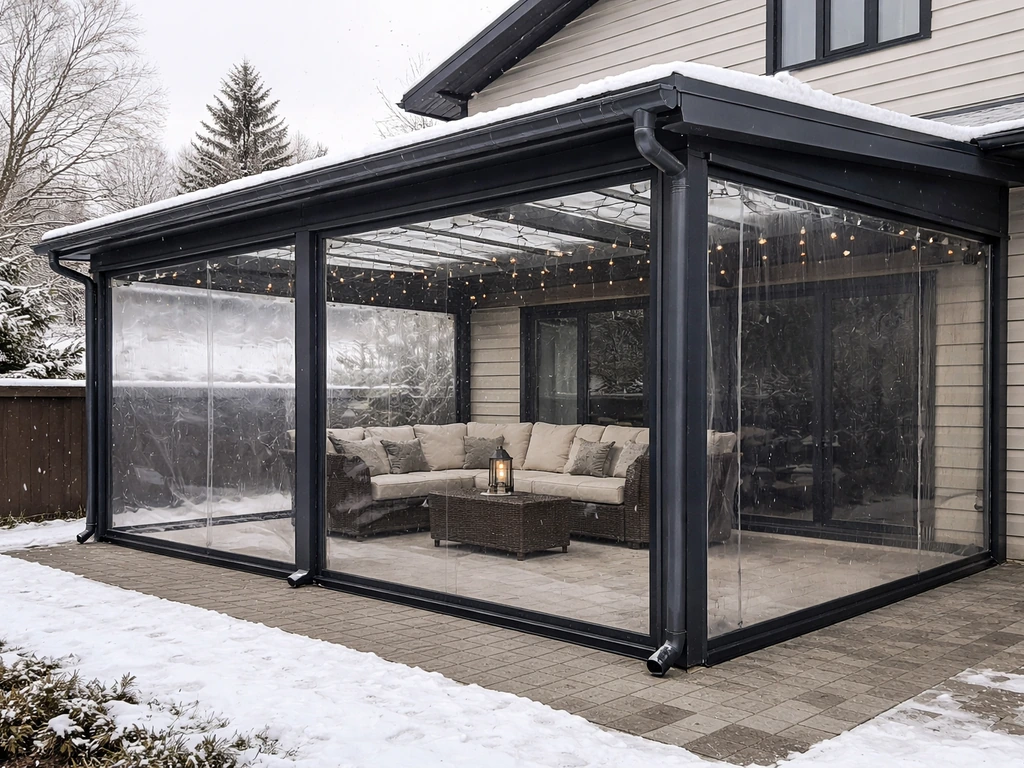
Covering your patio for winter comes down to three things: how much weather you're dealing with, how much use you want out of the space during the cold months, and whether you're going permanent or temporary. For most homeowners, a combination of a solid overhead cover (polycarbonate panels, a fabric canopy, or a full roof extension) plus side protection from wind and rain is the most practical path. If you want a more complete solution, focus on how to cover your patio with both overhead roofing and protected sides so it stays usable all winter side protection from wind and rain. You can pull this off in a weekend with basic tools, and a well-done setup will handle rain, wind, and moderate snow loads without much ongoing effort.
How to Cover Patio for Winter: DIY Guide and Checklist

Felix Brennan
23 Jun 2026
Assess your patio and winter risks first
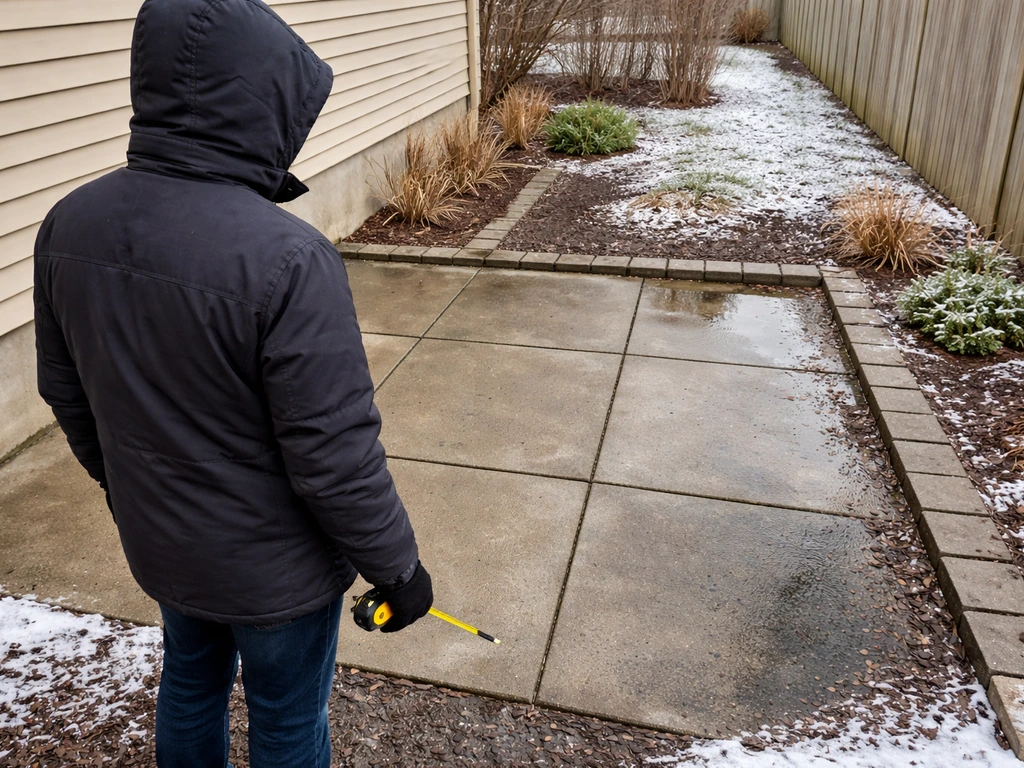
Before you buy anything, spend 20 minutes walking your patio and answering a few key questions. The answers will drive every decision after this.
- What's your local ground snow load? Check your county building department or FEMA flood/snow maps. In many northern states, ground snow loads run 25–50 psf or higher, which means your cover needs to be engineered for real structural loads, not just a tarp stretched between posts.
- Is your patio attached to the house or freestanding? Attached structures can tie into the house ledger for support, but that ledger connection must be flashed and sealed properly or you'll have water intrusion and rot within a few seasons.
- What's your prevailing wind direction in winter? A cover that handles overhead rain but leaves the west-facing side open will still leave you cold and wet.
- What's the patio surface and drainage situation? If water currently pools on your patio, adding a cover above it can make drainage worse unless you slope the cover or add gutters.
- Do you have existing posts, pergola framing, or a roof overhang you can work with? Reusing structure saves significant money and time.
Measure the full footprint of your patio: length, width, and the height from the patio surface to any existing overhead structure or the house eave. Note the distance from the house wall to the outermost edge you want covered. Also check for overhead obstructions like light fixtures, ceiling fans, or downspouts that will affect where you can run framing or attach curtain tracks.
Choose the right winter patio covering option
There's no single best answer here, so let's run through the main options honestly, including their real-world pros and cons for winter use.
Solid roof extension or patio cover
This is the gold standard for winter protection. A framed roof extension uses posts, a ledger board attached to the house, rafters, and a solid or translucent roofing material. It handles snow load, sheds rain reliably, and can be enclosed on the sides later. It requires a permit in most jurisdictions, must meet IRC or IBC load requirements (minimum 10 psf vertical live load, with snow loads governing wherever they exceed that minimum), and typically costs $3,000–$15,000 depending on size and materials. If you're in a heavy-snow region, this is the path worth taking.
Polycarbonate panel cover
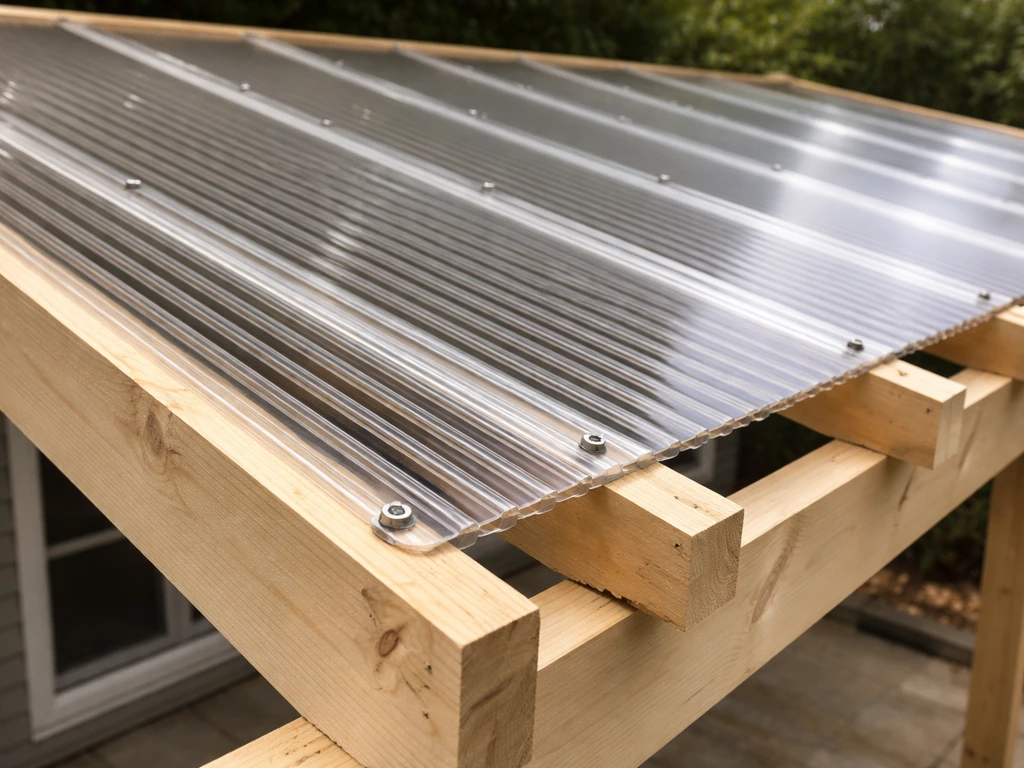
Corrugated or twin-wall polycarbonate panels mounted on a simple rafter frame are one of the most popular DIY options for a reason. If you want to extend your patio cheaply while still getting solid winter protection, polycarbonate panel covers are one of the best DIY routes to consider DIY options. Polycarbonate is blank" rel="noopener noreferrer">virtually unbreakable compared to acrylic, handles cold temperatures without becoming brittle, and lets in diffused light. UV-coextruded grades (like Palram SUNTUF or similar) include a built-in UV protection layer and typically carry warranties against yellowing and loss of light transmission. A 12x16-foot covered area can be framed and paneled in a weekend for $600–$1,500 in materials.
Fabric canopy or sail shade cover
Fabric canopies work well for mild-winter climates (think Pacific Northwest rain, not Minnesota snow). Heavy-duty polyester or solution-dyed acrylic fabric with waterproof coating sheds light rain effectively. The problem in snow country: fabric sags under snow load, accumulated snow and ice add serious weight, and the material can stretch or tear if that load isn't cleared quickly. If you go this route in a snowy climate, plan to remove or retract the canopy during any significant snowfall event.
Heavy-duty tarp or temporary cover

A reinforced poly tarp stretched over a frame is the lowest-cost temporary option, starting around $50–$200 for materials. It's genuinely useful for protecting patio furniture or an unused patio through the off-season. As a livable winter space, though, it falls short: tarps trap condensation badly, they flap and wear at anchor points in wind, and accumulated water adds weight that can collapse lightweight frames. If you go this route, use a tarp rated for your expected snow load, anchor it with proper tie-downs (not just bungees), and pitch it steeply enough to shed water rather than pool it.
Windbreak curtains and side enclosures
For many patios, the overhead cover already exists (a pergola, overhang, or existing roof) and the real winter problem is wind and cold air blowing in from the sides. Clear vinyl curtain panels, outdoor fabric drapes, or polycarbonate side panels mounted on a track system can close off those open sides seasonally. This pairs well with any overhead cover option and dramatically extends the usable season. If rain coverage is also your concern, this overlaps with guidance on covering a patio from rain, which covers side-protection details more specifically.
Side-by-side comparison
| Cover Type | Best For | Snow Load Handling | Approximate DIY Cost | Permit Usually Required? |
|---|---|---|---|---|
| Framed roof extension | Heavy snow, year-round use | Excellent (engineered) | $3,000–$15,000+ | Yes |
| Polycarbonate panel cover | Moderate snow, DIY-friendly | Good with proper framing | $600–$1,500 | Often yes |
| Fabric canopy | Rain, mild winters | Poor (must remove in snow) | $200–$800 | Rarely |
| Heavy-duty tarp | Off-season storage, budget | Poor (clear frequently) | $50–$200 | No |
| Vinyl/fabric side curtains | Wind, adding to existing cover | N/A (side protection only) | $150–$600 | No |
Materials and tools you'll need
This list covers a typical DIY polycarbonate panel cover on a simple attached frame, which is the most common project combining good winter performance with realistic DIY difficulty. Scale up for a full framed roof extension or scale down for a fabric or tarp setup.
Structural materials
- Pressure-treated 2x6 or 2x8 ledger board (sized to span your attachment wall, with 1/4-inch-per-foot slope toward the outer edge for drainage)
- 4x4 or 4x6 posts (pressure-treated) set in concrete footings or post-base hardware — footing depth depends on your frost line, which your local building department can confirm
- 2x6 rafters spaced 24 inches on center (or per manufacturer span tables for your panel product)
- Hurricane ties (H1 or H2.5 rated) at every rafter-to-ledger and rafter-to-beam connection for uplift resistance
- Galvanized joist hangers and structural screws (not standard deck screws) for all framing connections
- Ledger flashing: Z-flashing or purpose-made ledger flashing that slips behind the house siding and laps over the front face of the ledger
Roofing and enclosure materials
- Corrugated or twin-wall polycarbonate panels (UV-coextruded grade for outdoor longevity)
- Polycarbonate-compatible closure strips (foam or rubber) at the low and high ends to seal the corrugation flutes while allowing drainage
- Pre-drilled polycarbonate screws with EPDM washers — these prevent cracking the panel at the fastener point
- Aluminum or wood purlins if your panel span requires intermediate support
- Clear vinyl curtain panels or outdoor fabric for side enclosures (optional but strongly recommended for winter wind protection)
- Track hardware or tension wire system for curtain panels
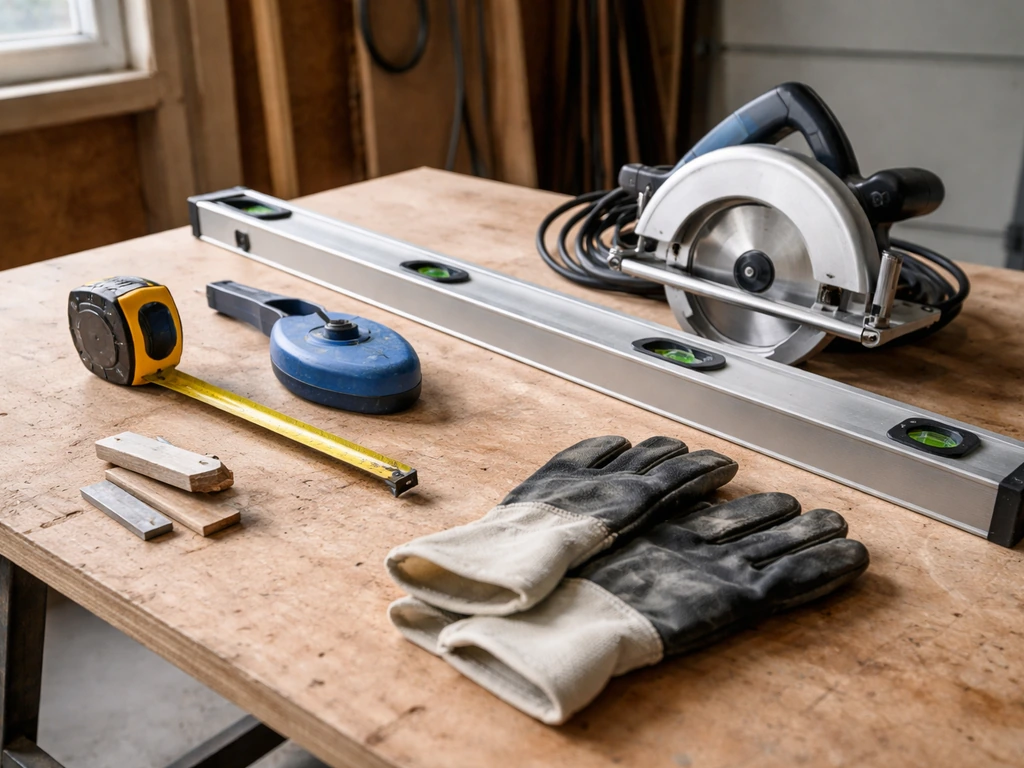
Tools
- Tape measure, chalk line, and level (a 4-foot level minimum)
- Circular saw with fine-tooth blade for cutting polycarbonate panels (standard wood blade works; score-and-snap also works for straight cuts)
- Cordless drill and impact driver
- Post hole digger or rented power auger for footings
- Hammer drill with masonry bit if attaching ledger to a masonry or stucco wall
- Caulk gun with polyurethane or silicone sealant rated for outdoor use
- Safety glasses and gloves throughout
Installation steps for common patio cover types
Step 1: Pull a permit if required
Check with your local building department before you start. Most attached patio covers over a certain square footage (often 200 sq ft) require a permit and a basic plan showing dimensions, materials, and load assumptions. Freestanding structures sometimes fall below the permit threshold, but verify rather than assume. Getting caught without a permit on a structural addition can mean removal orders and insurance complications.
Step 2: Lay out and install footings or post bases
Mark post locations using batter boards and string lines so they're square to the house. Dig footing holes to at least the local frost depth (check your municipality for the specific requirement, in many northern states this is 36–48 inches). Set post bases in poured concrete and let cure for at least 48 hours before loading. If your region has high ground snow loads, footings sized for those loads are not optional, undersized footings that heave or shift in freeze-thaw cycles will rack your entire frame.
Step 3: Attach the ledger board to the house
This is the most failure-prone step in any attached patio cover, so slow down here. Remove a band of siding where the ledger will sit. Attach the ledger to rim joist or structural framing using 1/2-inch lag screws or structural bolts in a staggered pattern (check your local table for spacing based on lumber size and loads). Once the ledger is fastened, install Z-flashing: the top leg slides up behind the siding above, and the bottom lip overhangs the front face of the ledger. Seal the top of the flashing with flexible sealant, but do not seal the bottom edge, you want water that gets behind the flashing to be able to drain out, not get trapped. Improper ledger flashing is one of the top causes of rot and water intrusion in patio cover additions.
Step 4: Install posts, beam, and rafters
Set posts plumb in post bases and brace temporarily. Install the outer beam spanning between post tops. Run rafters from the ledger to the beam at 24 inches on center, with a consistent slope of at least 1/4 inch per foot falling toward the outer edge (away from the house). Fasten every rafter with hurricane ties at both the ledger and beam connections. These connectors resist the uplift forces that wind can generate on a roof, and they're code-required in most jurisdictions for exactly this reason. Don't skip them to save $40 in hardware.
Step 5: Install polycarbonate panels
Cut panels to length with a fine-tooth circular saw blade. Install closure strips (foam or rubber) along the bottom edge of each panel run so insects and water can't enter the corrugation flutes, but leave the upper edge open or use a vented closure that allows condensation inside the flutes to drain. Overlap panels by at least one corrugation. Pre-drill every fastener hole about 1/8 inch oversized to allow for thermal expansion (polycarbonate expands and contracts significantly with temperature swings), then drive polycarbonate screws with EPDM washers, just snug, not overtightened. Overtightening cracks panels at the hole within the first winter.
Step 6: Install side curtains or enclosure panels
Mount track hardware or tension wire on the outer posts and house wall. Hang clear vinyl or outdoor fabric curtain panels so they reach from the underside of the roof framing to within a few inches of the patio floor (leave a small gap at the bottom for drainage and to prevent mildew). To keep it comfortable and protected, plan how your cover will work alongside the patio railing height and open space so nothing blocks the view or airflow curtain panels. For a more permanent enclosure, polycarbonate side panels in aluminum channel frames give better insulation and durability. Either way, make sure at least one side panel section opens or rolls up so you're not building a completely sealed box with no ventilation.
Weatherproofing details and safety considerations
Snow load: the number that matters most
The IRC and IBC both require patio covers to handle a minimum vertical live load of 10 psf, but where your ground snow load exceeds that minimum, your cover must be designed to the actual snow load instead. If you're in Colorado, Minnesota, New England, or anywhere with meaningful winter snowfall, that 10 psf minimum is almost certainly not enough. Talk to your building department or a structural engineer before finalizing your rafter and beam sizing. Many manufactured patio cover systems carry a permanent decal or tag (required under evaluation reports like ICC-ES ESR-2676) stating the allowable roof live load and design wind speed, so check that tag against your local requirements before buying.
Ice dams
Ice dams form when heat escapes through a roof, melts snow above, and that meltwater refreezes at the cold eave overhang, building a ridge of ice that blocks further drainage. On a patio cover, the risk is lower than on a heated house roof, but it's not zero, especially on an attached cover where heat from the house wall can warm the upper panel area. Keep your patio cover roof clear of snow accumulation as soon as possible after storms rather than letting it sit and melt unevenly. Make sure gutters and downspouts on your patio cover are clear before freeze events so meltwater has a path off the structure. An Allstate ice-dam handout explains that pooled meltwater behind an ice dam can be forced toward vulnerable roof areas, so keeping gutters and downspouts in good working order helps drainage paths stay clear pooled meltwater behind an ice dam forces water toward vulnerable roof areas.
Wind uplift and anchor integrity
Even a structurally framed cover can fail at connection points if hardware loosens over time. Hurricane ties and structural screws are your primary defense. For fabric covers and tarps, anchor points bear the full wind load and should be inspected after every major storm. Anchors that loosen even slightly allow the cover to shift, which puts concentrated stress on a single point and accelerates failure. Re-tighten and replace any worn-through anchor hardware before the winter season begins.
Flashing and water intrusion
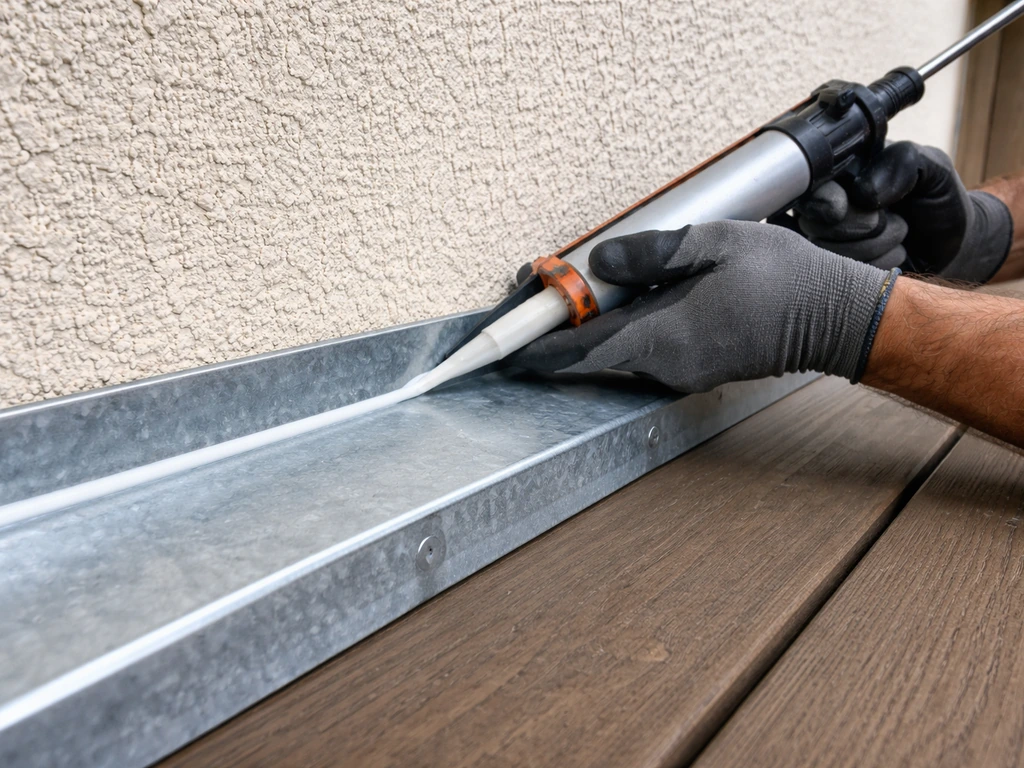
Anywhere your patio cover meets the house wall is a potential water entry point. Apply flexible polyurethane sealant at the top of ledger flashing and at any penetration where fasteners go through the house wall. Check these seals at the start and end of every winter season. If you see water staining below your ledger on the interior side of the wall, the flashing detail needs attention immediately, not next spring. Even small leaks at a ledger can cause significant rot within two to three seasons.
Managing moisture, condensation, and airflow
Any covered patio is going to develop condensation during cold weather. Warm, humid air from inside (or even from your breath and any heat source you bring out there) hits the cold underside of your polycarbonate or fabric cover and drops water. This is completely normal, but if you trap it without ventilation, it creates a dripping mess on your patio furniture and a mold-friendly environment on framing surfaces.
- Leave a ventilation gap at the ridge or upper end of your roof panels. For corrugated polycarbonate, use a vented ridge closure rather than a sealed one so trapped moisture vapor can escape upward.
- Don't fully seal all four sides of your patio enclosure. At minimum, leave a 2–4 inch gap at the bottom of side curtains, or include a vent panel on the windward side that can be cracked open on milder days.
- If you're using twin-wall polycarbonate panels, make sure the flute channels run vertically (top to bottom) so any condensation inside the twin-wall channels drains out the bottom rather than sitting and breeding algae.
- Apply a moisture-resistant sealant or paint to any exposed wood framing. Bare pressure-treated lumber is decay-resistant, but painted or sealed wood resists surface mold better in a damp, enclosed patio environment.
- After extended rain or snowmelt events, air out the patio by rolling back curtain panels on a dry day. Even 30 minutes of open-air circulation can significantly reduce trapped moisture.
If you're heating your patio with a space heater or patio heater during winter use, the humidity differential gets worse. Warm air holds more moisture, and when that heated air hits a cold panel surface, condensation increases. Running the heater with at least one side partially open, rather than in a fully sealed box, dramatically reduces dripping.
Winter setup checklist and maintenance plan
Run through this checklist in late fall (ideally before your first freeze) and again in early spring after the last hard freeze. It takes about an hour and will catch 90% of the problems before they become expensive repairs.
Pre-winter setup checklist
- Check all ledger lag screws and beam-to-post connections — tighten any that have worked loose with a wrench, not just a drill.
- Inspect ledger flashing for gaps, cracks, or lifted edges. Re-seal with flexible polyurethane where needed.
- Clear gutters and downspouts on or adjacent to the patio cover. Add downspout extensions if water currently drains toward the foundation.
- Check polycarbonate panel fasteners — back off any that have overtightened and cracked the washer seal, and replace with new EPDM-washer screws.
- Inspect hurricane ties and structural connectors for rust or deformation. Replace any that show visible corrosion.
- Hang or deploy side curtain panels and confirm they're secured at top and bottom.
- Confirm roof pitch is shedding water away from the house — pour a cup of water at the high end and watch where it goes.
- If using a fabric canopy or tarp in a snow-prone area, identify your removal plan and keep a snow rake or soft-bristle broom nearby to clear panels before heavy accumulation.
- Check post footings at grade level for frost heave or cracking in the surrounding concrete. Any post that has shifted needs attention before the freeze-thaw cycle makes it worse.
- Test any lighting, heaters, or electrical components in the patio space and confirm all exterior-rated fixtures are properly sealed.
During-winter maintenance
- After significant snowfall (4 inches or more), clear snow from polycarbonate panels using a soft-bristle broom or foam-head snow rake — never a metal shovel, which will scratch or crack panels.
- After ice events, do not chip ice off panels. Let it melt naturally or use warm water. Ice chipping cracks panels and can damage the UV-coextruded surface coating.
- Check curtain panel anchor points and track hardware after any wind event above 30 mph.
- Keep an eye on the underside of the ledger connection from inside the house after rain. Any new staining or dripping means a flashing issue to address as soon as conditions allow.
Spring check-out
- Rinse polycarbonate panels from top to bottom with a garden hose to remove winter grime and mineral deposits from snowmelt.
- Inspect panel edges and closure strips for cracking, shrinkage, or gaps that developed through freeze-thaw cycling. Replace any compromised closures before summer storms arrive.
- Pull back side curtains, clean with mild soap solution, and store or re-hang depending on your season.
- Re-check all flashing and sealant after the frost has fully left the ground and any heaving has settled.
- Look at the patio surface itself for new cracks, drainage issues, or pooling that the winter freeze-thaw created. Address these before they undermine your post footings.
Once you've been through one full winter with your cover in place, you'll have a good sense of where it performs well and where you want to improve. Most homeowners start with a basic overhead cover (which overlaps with decisions covered in best-way-to-cover-a-patio thinking) and add side enclosures the following season once they've experienced where the cold air actually comes from. If you’re still deciding what setup makes the most sense, start by comparing overhead covers and side enclosures based on your climate and how you plan to use the space best way to cover a patio. That staged approach works well and keeps any single project manageable in time and cost.
FAQ
How can I prevent condensation and dripping on a covered patio during cold weather?
Most patio covers are easiest to vent by leaving one side partially open and using gravity-drainable closure strips on the panel edges. If you add side curtains, choose a design where at least one panel section opens or rolls up, and keep the bottom edge slightly elevated or gapped so condensation can dry out instead of pooling.
What’s the most common installation mistake that causes winter leaks or cracked polycarbonate panels?
Polycarbonate screws with EPDM washers should be snug, not over-compressed. If you notice cracking at fastener holes after the first freeze-thaw cycle, it usually means the panels were tightened too hard (or holes weren’t oversized for expansion). Loosen-and-replace cracked fastener hardware early to avoid a widening failure.
Can I cover my patio and still remove snow from the roof if it accumulates?
Yes, you generally can, but the safest approach is to build the cover to handle roof snow load and then decide how you will clear it. Avoid scraping panels aggressively (they can scratch and weaken over time), instead use a roof rake with a wide, soft edge and remove snow soon after storms to prevent ice buildup and excessive weight.
Do I need to worry about where runoff goes, not just the cover itself?
If you have gutters or downspouts tied into the patio cover area, confirm water will drain away from footings and the house foundation. After freeze events, check for standing water at the base and along the ledger line, and ensure downspout extensions discharge far enough that meltwater won’t re-freeze against posts or the wall.
Is a fabric canopy a bad idea if I get heavy snow where I live?
Fabric and tarp enclosures in snowy climates often fail because they either sag under snow weight or trap moist air where it condenses on the underside. If you use fabric, plan a clear retraction or removal procedure for major snowfalls, and choose a fabric rated for waterproof performance in subfreezing temperatures.
Should I enclose all sides of my patio or leave some open?
Before fully closing sides, decide where the cold air can escape. A practical test is to sit outside after the first cold night and feel where drafts enter, then cover the windward side first. Completely sealing all sides can trap humidity and increase condensation.
What limitations should I expect if I use a poly tarp instead of a rigid roof?
Tarps can work for off-season furniture protection, but they can’t reliably protect a livable space because they trap condensation and can develop heavy water pockets. If you see sagging, replace with a frame that keeps tension consistent, use proper tie-downs rated for snow load, and pitch the tarp steep enough to prevent pooling.
How do I troubleshoot a leak that appears to come from the house wall/ledger area?
For attached covers, pay extra attention to the ledger attachment and flashing. Even if the overhead roof looks fine, leaks at the house wall can rot rim joists and framing quickly. If you spot interior staining after storms, rework sealant and flashing immediately rather than waiting for spring.
Can I combine polycarbonate panels with other materials like wood or metal trim for winter coverage?
Yes, but only if you design for thermal expansion and allow movement where materials meet. Oversized pre-drilled holes, correct washer material, and not over-tightening screws are the typical requirements for polycarbonate panel systems. If you mix materials, keep joints flexible where they attach to prevent stress cracks.
How often should I inspect my patio winter cover during the season?
A good rule is to inspect before winter, after the first major storm, and again before early spring. Focus on fasteners, flashing, and anchor points after wind events, because loosening connections can turn small defects into concentrated failures.
What should I ask the building department before starting so I don’t waste time buying the wrong system?
If your local building department requires a permit for the square footage threshold, ask whether you can cover it as a patio cover classification rather than a fully enclosed structure. Also ask for design live load requirements based on your ground snow load, then match those numbers to the intended roof system so sizing is not guesswork.
Next Articles

How Can I Extend My Patio Cheaply A DIY Step by Step Guide
Step-by-step DIY ways to extend a concrete, paver, or brick patio cheaply, with leveling, base prep, costs, and quick up

Cheapest Way to Cover a Patio: DIY Shade and Roof Options
Find the cheapest patio cover options: DIY shade cloth, slats, panels, and simple pergola setups with costs and steps.
How to Cover Your Patio: Shade, Roof, or Enclosure DIY
Step-by-step DIY guide to cover a patio with shade, roof, or enclosure, including materials, layout, safety, and upkeep.