You can extend a patio cheaply by adding a section of compacted gravel, sand-set pavers, or brick right next to your existing surface for as little as $3 to $8 per square foot in materials. The key is matching your extension method to what you already have, getting the base depth right (4 to 6 inches of compacted aggregate for most pedestrian patios), and sloping everything away from your house at about 1/8 inch per foot so water drains instead of pooling. Done right, a DIY extension holds up for years. Done wrong, it sinks, shifts, and looks crooked within a season.
How Can I Extend My Patio Cheaply A DIY Step by Step Guide

Felix Brennan
21 Jun 2026

Quick Decision Checklist: What You Have and What You Need
Before you spend a dollar, take 10 minutes to answer these questions. They'll determine which extension method actually makes sense for your situation.
- What surface do you have now? Poured concrete slab, sand-set pavers, mortared brick, or gravel? Write it down.
- How much do you want to add? Measure the area in feet (length x width). Even a rough sketch helps. Most people underestimate how much space they actually need.
- What's the existing edge like? Is there a clean, straight edge you can build against, or is it crumbling and uneven?
- What's the grade? Does the ground slope away from your house already, or does it slope toward it? You'll need to correct a slope that runs toward the house before adding anything.
- What's the soil type? Clay drains poorly and shifts; sandy or loamy soil drains better. Clay means you'll need a deeper base or a layer of geotextile fabric to prevent migration.
- Do you need a permit? In many areas, a simple ground-level patio extension under a certain square footage doesn't require one, but always check with your local municipality. Some jurisdictions trigger permit requirements around 200 square feet or when adding a cover structure above the patio.
- What's your honest budget? A 10x10 foot extension done cheaply with gravel runs roughly $150 to $250 in materials. The same area in basic concrete pavers runs $300 to $500. Knowing this upfront shapes every decision below.
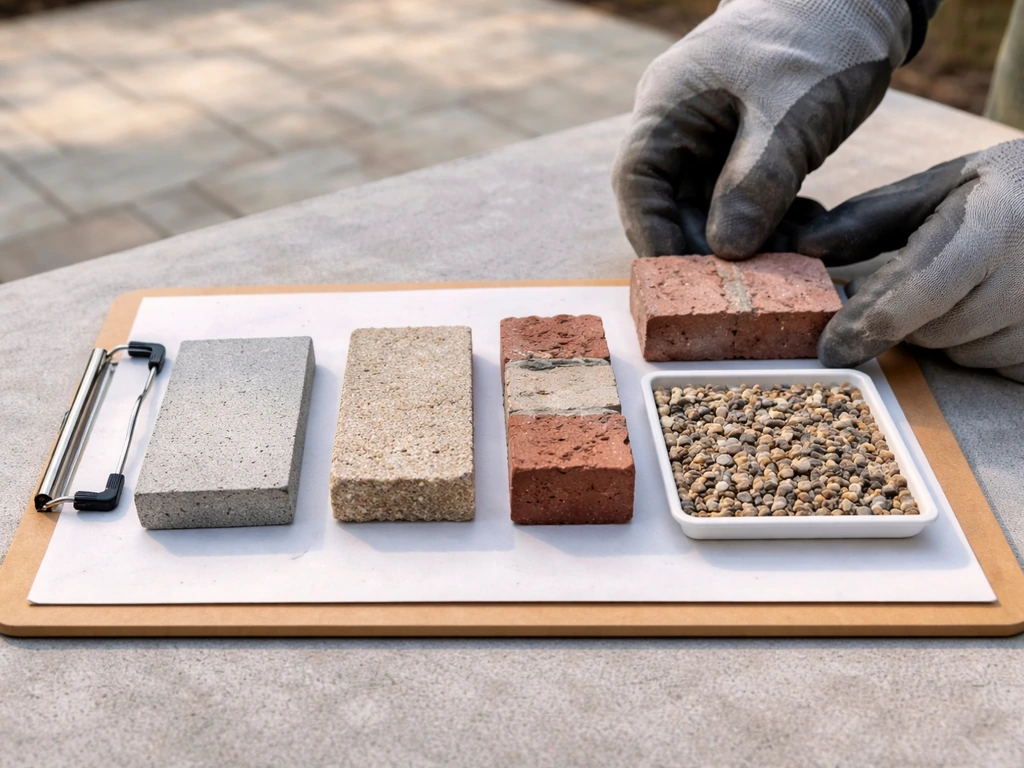
Low-Cost Extension Options Matched to Your Existing Patio
Not every extension method works well next to every existing surface. Here's how to match them up so the finished result looks intentional rather than patched together.
| Existing Patio Type | Best Cheap Extension Match | Why It Works | Approximate Material Cost (per sq ft) |
|---|---|---|---|
| Poured concrete slab | Sand-set concrete pavers or brick pavers | Clean height transition, no demo needed, pavers sit flush at slab edge with proper base | $3–$6 |
| Sand-set pavers | Same or similar pavers (sand-set) | Matches construction method exactly, easy to tie in, consistent look | $3–$7 |
| Mortared brick | Loose-set or sand-set brick pavers | Brick-on-brick looks cohesive; loose-set avoids mortar work and cost | $4–$8 |
| Gravel/crushed stone | More compacted gravel or decomposed granite | Simplest, cheapest, zero skill barrier, easy to phase | $1–$3 |
| Concrete slab (want seamless look) | Poured concrete extension with expansion joint | Cleanest result but highest cost; use if matching is critical | $6–$12 (DIY mixed) |
If your existing patio is poured concrete and you want the cheapest possible extension that still looks good, sand-set pavers butted up against the slab edge are your best bet. You get a clean transition, no demo, and a durable surface. If budget is the only priority and looks are secondary, compacted gravel with a clean plastic or aluminum edge restraint is the fastest and cheapest route regardless of what you have now.
Planning It Right: Layout, Measurements, Leveling, and Drainage
This is the part most DIYers rush past, and it's exactly why extensions sink, tip, or look crooked. Spend an hour here and the actual build goes smoothly.
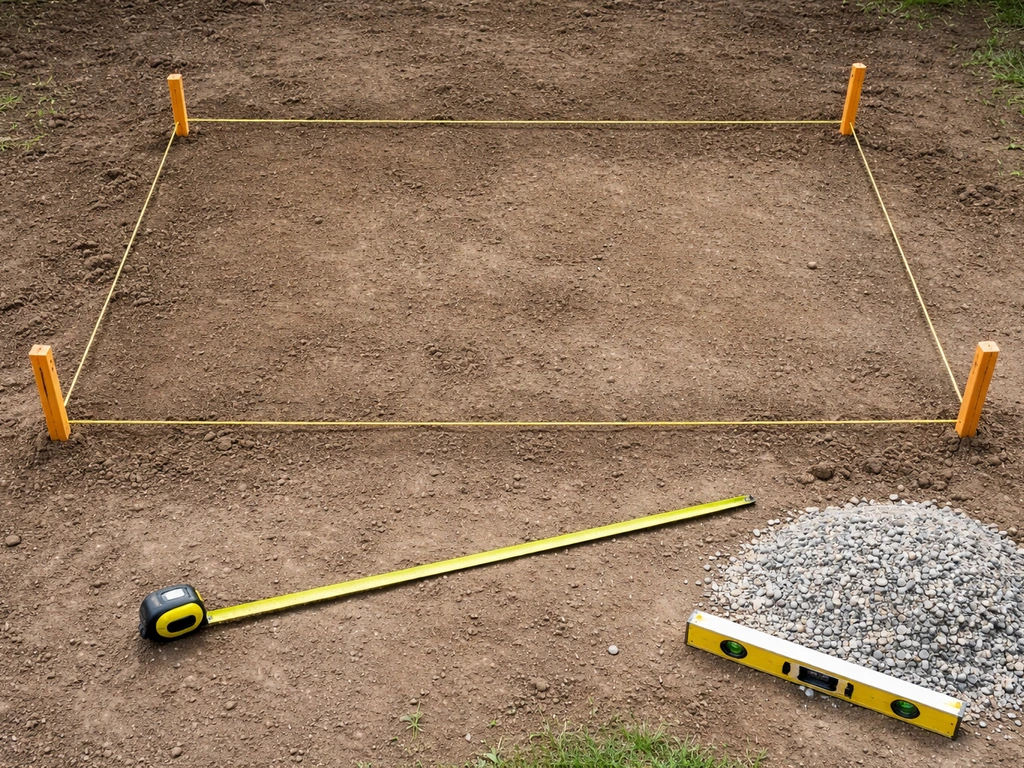
Lay Out the Shape First
Use stakes and mason's line to mark the perimeter of your extension before you dig anything. If you are trying to cover an open patio, start by planning for shade, weather protection, and safe drainage before you choose materials. Keep shapes simple: rectangles and squares are the cheapest to build because they minimize cut pavers and wasted materials. An irregular or curved edge requires more cuts, more waste, and more time. For a first extension, stick with a rectangle.
Measure for the Base Depth
For most pedestrian patio extensions, you need to excavate about 7 to 8 inches below your desired finished surface height. That breaks down roughly like this: 4 to 6 inches of compacted aggregate base, then 1 inch of bedding sand, then the paver or brick thickness (usually 2 to 2. This Old House describes building that gravel/stone patio base as compacted layers, including a 3/4-inch crushed stone with stone dust blend, followed by about 1 inch of coarse sand or stone dust before setting the pavers or stones 4 to 6 inches of compacted aggregate base, then 1 inch of bedding sand. 5 inches for standard pavers). So total excavation is typically around 7 to 9 inches depending on your paver. Mark this depth on your stakes so you know when to stop digging. For gravel-only extensions, you still want at least 3 to 4 inches of compacted material over undisturbed or compacted subgrade.
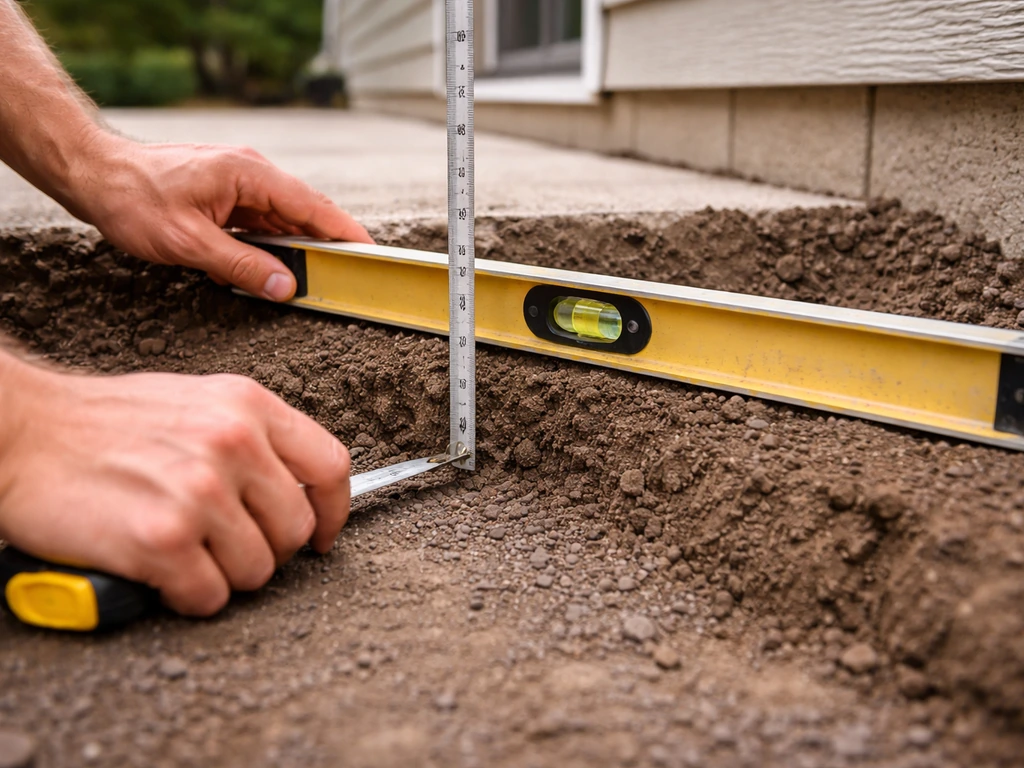
Check the Slope and Grade
Your finished surface needs to slope away from your house at a minimum of 1/8 inch per foot, with 1/4 inch per foot being safer in wetter climates. Grab a long level and a tape measure. Stretch your mason's line from the existing patio edge toward where your extension will end and check the grade. If the ground currently slopes toward the house, you'll need to re-grade the subgrade before adding any base material. Getting this right now means you won't be dealing with water pooling against your foundation later. If you plan ahead for winter coverage, you can protect the pavers and prevent water pooling before freezes set in.
Account for Drainage and Soil Type
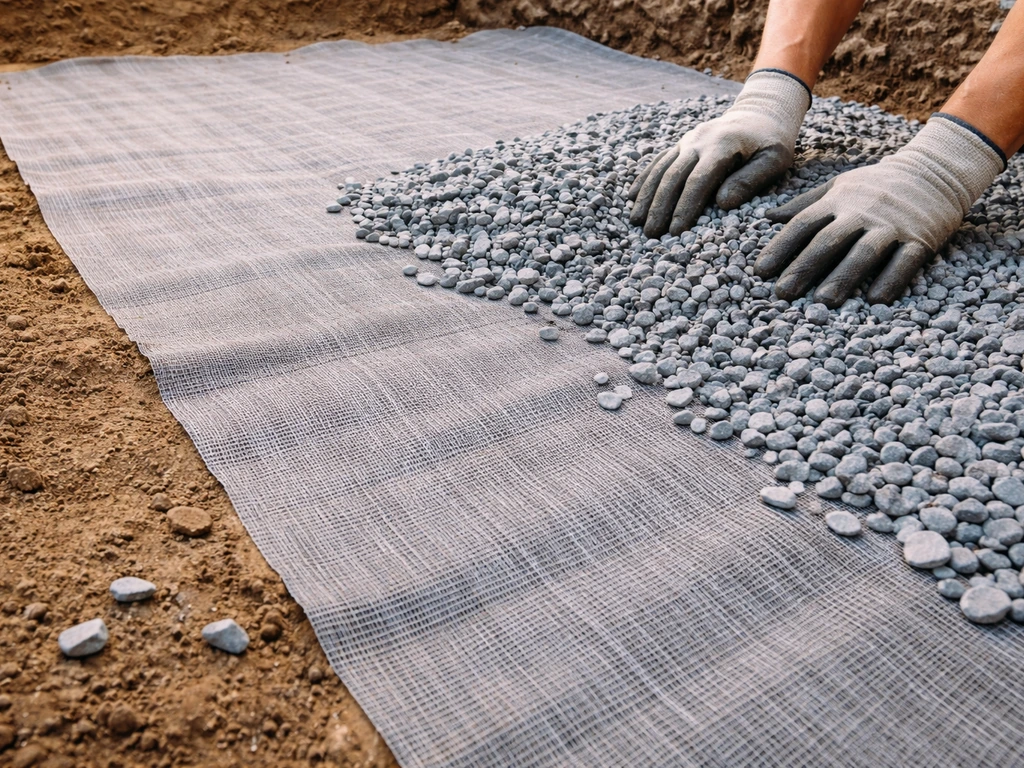
If your soil is heavy clay, water doesn't drain through it well and the ground can heave and shift seasonally. In that case, add a layer of woven geotextile fabric directly on the subgrade before your base material goes in. This fabric separates the base aggregate from the clay underneath and prevents the fine soil particles from migrating up into your base over time, which is one of the main reasons extensions sink. Use a quality woven polypropylene fabric, not the thin spun-bond type sold for garden beds.
Budget Materials and Base Prep
The materials list for a budget patio extension is short. What matters is not skimping on the base, because everything else sits on it.
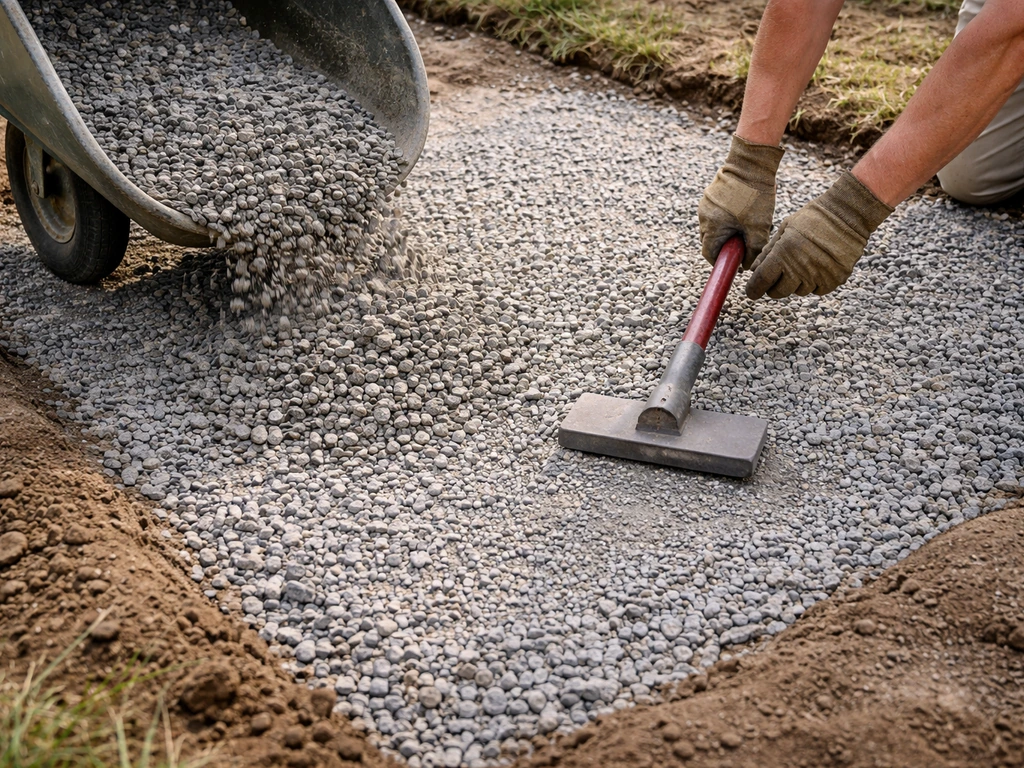
Base Aggregate
Use 3/4-inch crusher run (also called processed gravel, road base, or compactable gravel depending on your region). This is the crushed aggregate blend that compacts tightly and drains reasonably well. It's sold by the ton or cubic yard at landscape supply yards, almost always cheaper than buying it in bags at a home center. For a 10x10 foot extension at 4 inches deep, you need roughly 1.25 cubic yards of base material. A cubic yard of crusher run typically costs $25 to $45 depending on your location.
Bedding Sand
For sand-set pavers, use coarse angular concrete sand (also called bedding sand or coarse washed sand), not fine play sand. You're targeting a 1-inch screeded layer, which is just enough to allow minor adjustments as you set each paver. Fine sand compacts poorly and can shift. Buy it by the bag if you're doing a small area, or by the yard for anything over 100 square feet.
Edge Restraint
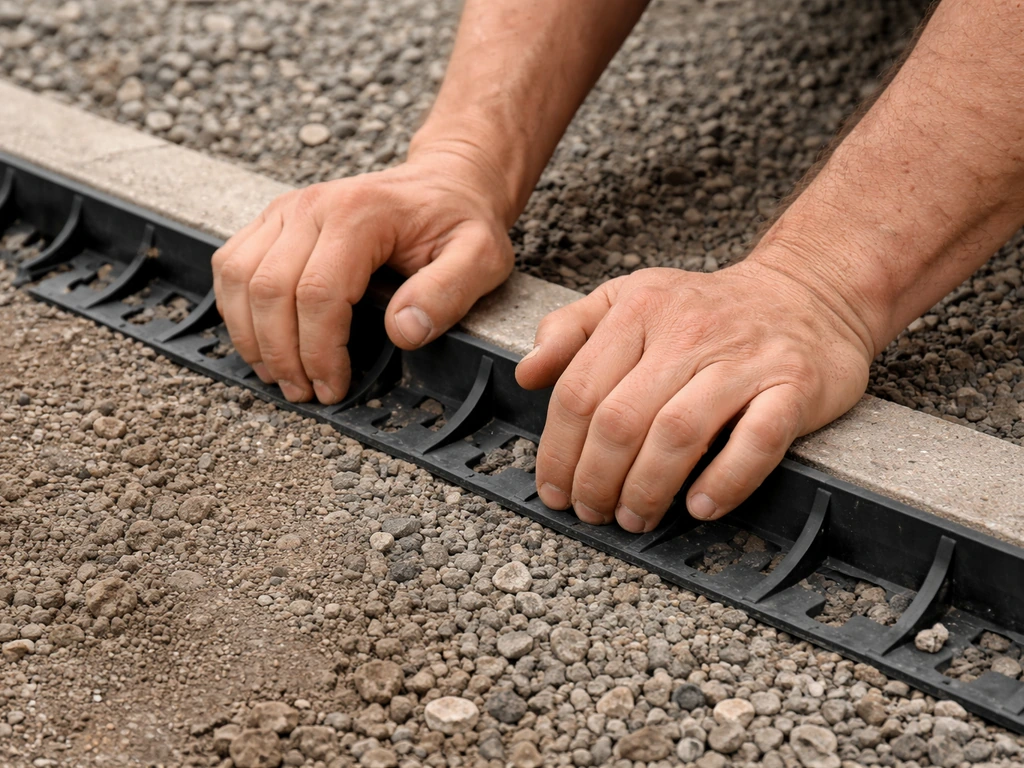
Plastic paver edging or aluminum edge restraint is essential for any sand-set or gravel extension. Without it, the edges migrate outward over time and the whole surface spreads and loosens. To keep the patio safe and up to code, make sure your railing cover and any fasteners do not interfere with your layout or edge restraints patio railing cover. Install it on top of the compacted base (and on top of any geotextile fabric), then spike it down with 10-inch non-galvanized landscape spikes spaced roughly every 12 inches. Don't skip this step to save $20. It's what keeps the whole system together.
Weed Control
For gravel extensions, lay woven geotextile fabric over the compacted base before adding your top layer of decorative gravel. For paver extensions, weed fabric goes under the base aggregate if you're on clay, but weeds under pavers are typically more of an issue through the joints than from below. Filling joints tightly with polymeric sand (for pavers) is your best defense against joint weeds. Apply polymeric sand over dry pavers only, sweep it in, blow off the excess from the surface, then lightly mist to activate it.
Step-by-Step DIY Build Process by Patio Type
Extending a Concrete Slab with Sand-Set Pavers
- Mark your extension outline with stakes and mason's line. Keep it rectangular.
- Excavate to roughly 7 to 8 inches below the finished height of your existing slab surface. The finished paver surface should sit flush with or slightly (1/4 inch) below the slab top.
- Remove all organic material from the subgrade. Compact the subgrade with a plate compactor or hand tamper.
- If on clay soil, lay woven geotextile fabric across the bottom and up the sides slightly.
- Add your first 2 to 3 inch lift of crusher run, rake level, and compact. Add a second lift to reach your target base depth (4 to 6 inches total compacted). Compact each lift separately.
- Install plastic or aluminum edge restraint around the three open sides (the slab acts as your fourth edge), spike every 12 inches with 10-inch spikes.
- Screed 1 inch of coarse bedding sand across the compacted base using two parallel pieces of conduit or screed pipe as guides.
- Lay pavers from the slab edge outward in your chosen pattern. Use a rubber mallet to set each paver. Check for consistent surface slope as you go (1/8 to 1/4 inch drop per foot away from the house).
- Cut border pavers as needed with a diamond blade angle grinder or rent a paver splitter for a day.
- Sweep polymeric sand into joints over dry pavers, blow off excess from paver faces, then lightly mist to set.
Extending Existing Sand-Set Pavers with More Pavers
- Remove the edge restraint from the outer edge of your existing paver area.
- Mark and excavate the new section to match the existing base depth (measure from your existing paver surface down to the subgrade and replicate it).
- Compact the subgrade, add geotextile if needed, then build up your compacted aggregate base to the same depth as the existing section.
- Screed 1 inch of bedding sand.
- Lay new pavers, continuing the existing pattern across the joint between old and new.
- Re-install edge restraint around the full new perimeter.
- Fill all joints (old and new) with polymeric sand so the surface reads as one unified field.
Adding a Gravel Extension (Cheapest Option)
- Mark and excavate to about 4 to 5 inches deep for a gravel-only surface.
- Compact the subgrade thoroughly.
- Lay woven geotextile fabric across the entire base.
- Install edge restraint around all open perimeter edges before adding any gravel.
- Add 3 to 4 inches of compacted crusher run in layers, compacting each layer.
- Top with 1 to 2 inches of your finish gravel (pea gravel, decomposed granite, or washed stone depending on preference).
- Rake level and check your slope is running away from the house.
A gravel extension is not glamorous, but it's genuinely functional, drains well, and costs a fraction of any paved surface. If you want to cover your patio, choose the extension setup that best fits your layout and coverage goals, then build the base to match gravel extension. If you phase your project, gravel now and pavers later is a completely reasonable approach.
Cost-Saving Tactics and Mistakes to Avoid
Ways to Keep the Cost Down
- Buy base aggregate by the ton from a landscape supply yard rather than by the bag from a home center. The per-cubic-yard savings can be 50% or more.
- Keep your shape a simple rectangle. Every irregular edge or curve adds cut waste and labor time.
- Check Facebook Marketplace, Craigslist, and local buy-nothing groups for surplus or salvage pavers. Lots of people have leftover materials from their own projects sitting in a garage.
- Rent a plate compactor for half a day rather than buying one. Proper compaction is non-negotiable, and a tamper by hand won't cut it for anything larger than about 25 square feet.
- Phase the project. Build in sections over a few weekends rather than doing it all at once. This spreads the cost and lets you correct any issues before committing the whole area.
- Use standard off-the-shelf paver sizes (12x12 or 16x16 inch concrete pavers) so cuts are minimal and costs stay low.
Mistakes That Cost You Later
- Skipping compaction. This is the single biggest reason extensions sink and shift. Compact the subgrade, then compact each 2 to 3 inch lift of base separately. Don't dump in 6 inches of gravel and compact it all at once.
- Ignoring drainage slope. If your finished surface slopes toward the house even slightly, you're directing water at your foundation. Check slope repeatedly as you work.
- Using the wrong sand. Fine play sand or masonry sand under pavers compacts poorly and allows movement. Use coarse angular concrete sand.
- No edge restraint. Even a few months without proper edging will let the outer courses of pavers or gravel migrate. Install it during the build, not as an afterthought.
- Laying pavers on wet sand or immediately after rain. Polymeric sand especially must go on completely dry pavers or it hazes and stains.
- Getting the finished height wrong. Your extension surface should meet the existing patio at a smooth transition. Measure and re-measure before your final base compaction pass.
- Organic debris in the subgrade. Remove all grass, roots, and topsoil. Organic material decomposes and creates voids that cause settling.
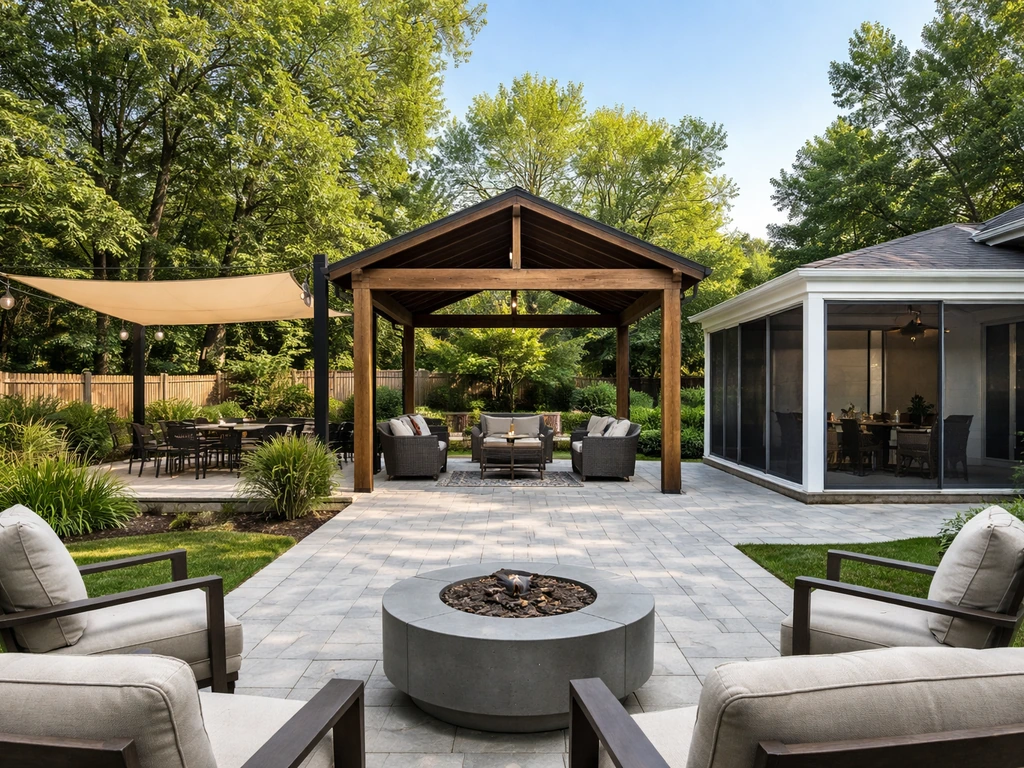
Budget-Friendly Add-Ons After You Extend
Once the surface is done, the extended space is just empty ground. A few targeted additions turn it into a room you'll actually use. You don't need to spend a lot, and you don't need to do it all at once.
Shade on a Budget
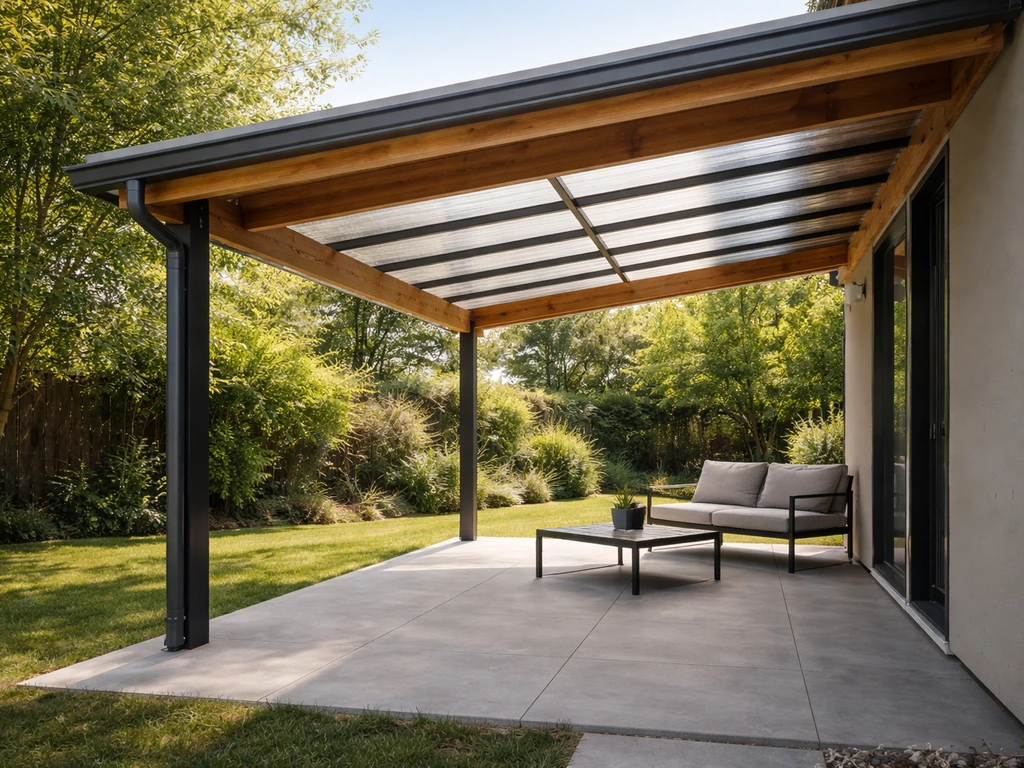
A shade sail is the cheapest entry point for overhead coverage, and it works well over a newly extended patio area. For the absolute cheapest way to cover a patio, focus on low-cost shade sails or other simple overhead options that can be installed without major construction. Anchor points are the critical factor: the fabric itself rarely fails, but under sustained wind load the anchors and mounting hardware take the stress. Drive posts into the ground at the corners of your new extension or attach to existing fence posts and the house wall, using proper hardware rated for the load. A 12x12 foot shade sail with hardware runs $60 to $150 and can be installed in a few hours. For something more permanent, a basic freestanding pergola kit covers 100 to 200 square feet for $400 to $800 at home centers and provides structure you can add shade cloth, a cover, or even screen panels to later. For pergola projects that include hammock or similar post loads, Home Depot notes that concrete footings may be needed in certain scenarios instead of using post bases blank" rel="noopener noreferrer">concrete footings for certain hammock-post scenarios. Before building any covered structure above the patio, check local permit requirements since some jurisdictions require permits for covers exceeding a certain size or height.
Wind Protection Without a Big Build
A windbreak on the exposed side of your new extension makes an enormous difference in usability, especially in spring and fall. The cheapest options are a section of privacy lattice panels attached to posts, a bamboo reed fence roll zip-tied to existing posts or stakes, or a row of dense fast-growing shrubs if you're thinking longer term. Any of these can be installed in a day for $50 to $200 and immediately make the extended space more comfortable.
Screening and Enclosure Starters
If you're thinking about eventually enclosing the extended patio space, a pergola or simple post-and-beam frame installed now is the smart foundation to build on later. Even a basic frame with screen panels on two or three sides keeps insects out and creates a defined outdoor room without a big investment. Screening a patio area, adding a cover to keep out rain, or building toward a partial enclosure are all natural next steps once the ground-level extension is solid. Screening a patio with a cover is one way to keep the surface dry during rain once your extension is solid keep out rain. The extended square footage you've added is what makes those upgrades worthwhile, so get the surface right first and let the enclosure come later.
Start today by measuring your existing patio, sketching a rough rectangle for the extension, and pricing crusher run and basic concrete pavers at your local landscape supply yard. With a weekend and a rented plate compactor, most homeowners can add 100 to 150 square feet of functional outdoor space for well under $500 in materials. The base prep is where the work is, but it's not complicated. Get that right and everything else falls into place. To keep it weatherproof and comfortable, you can also plan lighting, furniture placement, and surface leveling as part of how to cover an outdoor patio Get that right.
FAQ
My existing patio is concrete but the surface is rough and uneven. What extension method should I choose cheaply?
If your existing patio surface is stamped, broom-finished, or textured concrete, the cleanest cheap tie-in is usually a sand-set paver extension, not a direct gravel butt-join. You still need an edge restraint and correct slope, but sand-set pavers tolerate minor surface irregularities at the slab line better than trying to “blend” gravel up to a rough edge.
Can I just extend from the edge of my patio without rebuilding the base?
Do not plan on relying on the existing patio to carry the load for your extension. Even when you butt up right next to the old slab, build a full compacted base for the new area (typically 4 to 6 inches of compacted aggregate plus bedding). This prevents the common issue where the new section settles later and creates a visible step at the connection.
How do I confirm the drainage slope is correct across the whole extension?
The fastest way to get the slope right is to set your edge restraints and then check grade with a long level across multiple spots, not just one measurement. If you are aiming for 1/8 inch per foot, confirm it at both ends of the extension and in the middle, because soft spots and uneven subgrade can “bend” the finished plane.
Why does my paver base keep shifting, even though I used sand?
The biggest sand-set paver mistake is using fine play sand. If you do, it tends to move when stepped on, and you end up with pavers rocking. Coarse angular bedding sand gives you a stable 1-inch screeded layer that locks in once compacted and correctly edge-restrained.
I have clay soil. What happens if I skip geotextile, and can I fix it cheaply later?
If your soil is heavy clay and you skipped geotextile, you may see movement seasonally even if the surface looks fine at first. The preventive fix is adding woven geotextile directly over the undisturbed subgrade (or removed and re-built base if it is already installed). Thin spun-bond fabric often doesn’t stop particle migration effectively under base loads.
I want to phase the project, gravel now and pavers later. Is that actually a good plan?
Yes, but do it by design. For a phased project, gravel first then pavers later can work if you keep the base thickness and slope consistent, and do not disturb the final compacted aggregate during the later switch. Plan your edge restraints now at the final height you want, otherwise the later paver installation may end up too low and allow pooling at the seam.
What is the most common reason cheap patio extensions look crooked after a season?
Edge restraint is what keeps a “cheap” extension from spreading. If you omit edging, the perimeter often migrates outward a little each season, which then loosens the bedding and makes the whole run look wavy. Budget for plastic edging or aluminum restraint and install it on top of the compacted base, spiked down at regular intervals.
How should I use polymeric sand so joint weeds do not return quickly?
Polymeric sand can be a problem if you apply it over damp pavers or if the joints are not packed tight. The safer approach is only use it on dry pavers, sweep it in until joints are full, remove excess from the surface right away, then mist lightly to activate. If you over-saturate, it can harden improperly and discolor the paver face.
What layout choices make a cheap patio extension easier to keep level and neat?
If you want low maintenance but you have to use pavers, consider a tighter, simpler layout and minimal cuts (rectangles or squares). Curves and complex borders raise waste and increase the number of cut edges, which are more prone to slight movement if your edge restraint and base preparation are not perfect.
My extension will end near a door or step. How do I avoid creating a trip hazard?
If you are extending toward an existing step or door threshold, the main concern is achieving the right final height so you do not create a tripping lip. Use the same thickness assumptions consistently (aggregate base plus bedding plus paver or brick thickness), then start marking your excavation depth from the target finished surface height, not from your old patio’s top.
What’s the real weak point with a cheap shade sail over an extended patio?
For shade sails, the fabric usually survives the first few years, but cheap anchoring hardware is what fails in wind. Use corner posts into the ground or properly rated connections to the house and fence, and confirm the mounting locations will not interfere with your edge restraints or any rail cover components you plan to mount.
Next Articles

Cheapest Way to Cover a Patio: DIY Shade and Roof Options
Find the cheapest patio cover options: DIY shade cloth, slats, panels, and simple pergola setups with costs and steps.
How to Cover Your Patio: Shade, Roof, or Enclosure DIY
Step-by-step DIY guide to cover a patio with shade, roof, or enclosure, including materials, layout, safety, and upkeep.
Best Way to Cover a Patio: DIY Options, Steps, Tips
DIY guide to choosing and installing the best patio cover for shade, rain, wind, and style with clear steps.