
To protect a screened patio from a hurricane, your best results come from combining three things: structural reinforcement before storm season, temporary opening protection installed 48–72 hours before landfall, and a clear plan for securing every loose item on the patio. No single fix is enough on its own, but working through all three in the right order keeps the damage manageable and, more importantly, keeps you safe.
How to Protect Screen Patio from Hurricane: DIY Prep & Fixes

Felix Brennan
22 Jul 2026
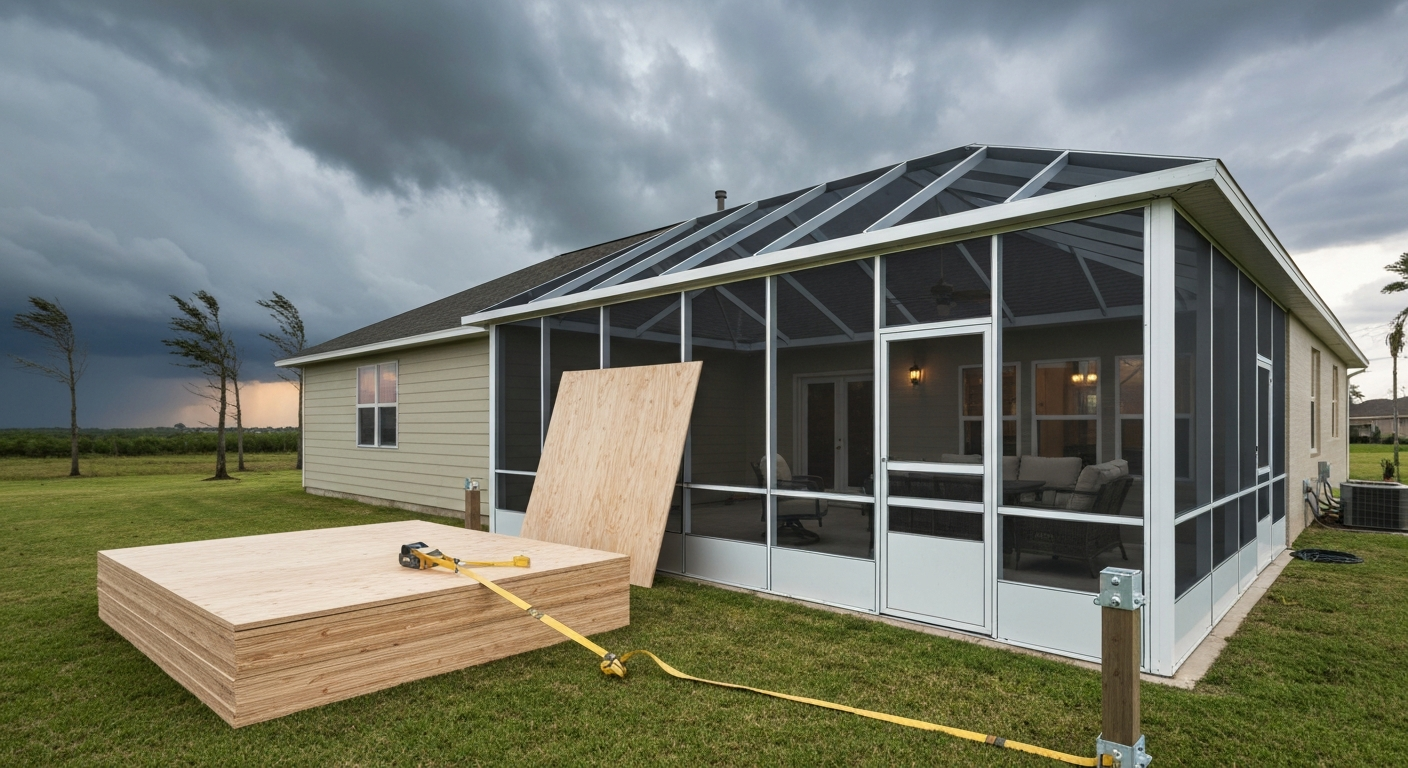
Who this guide is for and what it covers
This guide is written for homeowners with a screened, partially enclosed, or fully enclosed patio who want to act before a storm arrives, not just read about it afterward. Whether your enclosure is a simple aluminum-framed screen room, a wood-framed structure with a corrugated roof, or a more solid four-season enclosure, the principles here apply. We'll walk through assessing your risk, choosing a protection strategy, working through a step-by-step prep timeline from 72 hours out to the moment you shelter in place, and what to check once the storm passes. Along the way we'll cover specific hardware, materials, cost ranges, and the honest limits of what you should tackle yourself versus when to call a licensed contractor.
Quick risk assessment before you do anything else
Before buying a single bolt or roll of tape, spend 30 minutes honestly sizing up your situation. The goal is to match your prep level to your actual exposure, because over-preparing a very sheltered patio wastes money and time you may not have, while under-preparing an exposed coastal enclosure can turn your screen room into a projectile launcher.
Wind exposure and design wind speed
Look up your site's basic design wind speed using the ASCE 7 Hazard Tool, it's free, geocoded to your address, and gives you the actual number your local building code uses for components and cladding. Use the ASCE Hazard Tool (ASCE/SEI 7) to get a geocoded, code-referenced basic design wind speed for your address. A property one block from the ocean in South Florida might have a design wind speed of 170+ mph; the same style enclosure 30 miles inland could be rated for 120 mph. That gap matters enormously for what products are approved and what fastening patterns are required. Combine that number with the Saffir-Simpson scale (Cat 1 starts at 74 mph sustained; Cat 3 hits 111 mph; Cat 5 is 157 mph and above) to understand what category of storm would actually exceed your structure's rated capacity.
Screen type and framing condition
Standard fiberglass or aluminum insect screen is essentially zero protection against hurricane-force wind, it will tear away well before sustained 74 mph winds arrive. If you have a heavier PVC-coated or shade-screen fabric, that's marginally more resistant but still not rated protection. What matters more is the frame holding it: aluminum extrusion, wood, or vinyl spline? Check every corner joint and post base for rust, rot, or loose fasteners. Wiggle each post by hand. If a post moves noticeably at the base, that's a structural weak point you need to address before the storm, not after.
Roof and attic framing connections
FEMA identifies three areas most vulnerable in any hurricane: roof-to-wall connections, openings (windows and screens), and the continuous load path from roof down to foundation. For a patio enclosure, that translates to: how is the patio roof attached to the house and to the patio posts? Look in the attic or crawl space above the enclosure if accessible. If you see just toenailed framing with no metal connectors, that's your first structural priority. If the patio roof is a free-standing pergola-style frame just sitting on posts without positive connections, treat it as high risk.
Identifying your weak points
- Screen panels: any panel larger than roughly 4 feet wide with no mid-span horizontal support
- Doors: screen doors, sliding glass doors, or French doors without supplemental storm protection
- Post bases: posts set in soil or secured only with small J-bolts may pull out under uplift
- Roof connections: patio roof attachment points to the house fascia or ledger board
- Gutters and downspouts: likely to become projectiles or block drainage during heavy rain
- Loose furnishings and planters: any object that can become airborne at 60+ mph
Deciding your protection strategy
There's a spectrum between "do nothing and hope" and "full permitted retrofit," and where you land depends on your wind zone, your timeline, your budget, and what you're actually capable of building safely. Here's how to think through it.
Temporary vs. structural measures
Temporary measures, plywood panels, removable storm panels, tarps, can be installed in hours and taken down after the storm. They're best when you're in a lower wind zone (under 130 mph design speed), working with a short lead time, or protecting an older enclosure that doesn't warrant a major investment before replacement. Structural reinforcement (hurricane clips, post anchors, frame tie-downs) is a permanent upgrade that adds lasting protection season after season. It requires more planning, sometimes permits, and more skill, but if you're in a Cat 3+ wind zone, it's not really optional for a structure you want to keep.
Permits and code considerations
In many coastal jurisdictions, and especially in Florida's High-Velocity Hurricane Zone (HVHZ), any opening protection product installed as a permanent fixture must carry a Miami-Dade NOA (Notice of Acceptance) or equivalent local product approval. Temporary plywood panels are generally allowed without a permit when pre-cut, pre-drilled, and installed with permanent corrosion-resistant hardware meeting local code (typically referencing IBC Section 1609. International Building Code Section 1609.2 requires impact-resistant glazing or approved opening protection in windborne-debris regions and references ASTM E1996/E1886 for impact and cyclic testing; limited use of predrilled 7/16" wood structural panels is allowed where specified International Building Code – Section 1609.2 Protection of openings (example code text). 2 and FEMA P-804 guidelines). Hurricane-rated motorized screen systems, however, are typically engineered systems requiring PE-stamped drawings and a permit, they are not a simple DIY swap. Check with your local building department before purchasing any product marketed as a permanent hurricane screen or shutter. When in doubt, a 30-minute phone call saves you from buying non-compliant products.
Honest DIY capability check
Most of the temporary protection and anchoring tasks in this guide are within reach of a confident DIYer with basic tools and a helper. Installing hurricane clips on existing framing, pre-cutting plywood panels, and anchoring furniture are all achievable weekend projects. Reframing a post base, re-roofing a patio cover, or installing engineered hurricane screens are not typical DIY work unless you have relevant construction experience. We'll flag those points clearly throughout.
Prioritized prep checklist: 72 hours to landfall
Storm prep works best as a countdown, not a scramble. Here's what to tackle at each window. If you're reading this outside hurricane season, use the 72-hour list as your off-season project plan, the work you do in spring saves you hours of panic in August.
72 hours out: structural and permanent tasks
- Install or verify hurricane clips and straps on all patio roof-to-wall and roof-to-post connections
- Check and tighten all post-base hardware; replace any corroded fasteners with stainless or hot-dip galvanized equivalents
- Pre-cut and label plywood panels or confirm storm panels are staged and ready
- Inspect and re-caulk any gaps between the patio structure and the house wall
- Clear gutters and downspouts above and around the enclosure
- Photograph the enclosure from all angles (for insurance documentation)
48 hours out: opening protection and weatherproofing
- Install storm panels, plywood, or roll-down shutters over all screen openings and doors
- Apply weatherstripping or foam backer rod to any gaps in screen-door frames
- Lay sandbags or temporary water barriers at door thresholds if drainage is marginal
- Lash or strap large furniture to posts or anchor points; move lighter pieces inside
- Remove and store or heavily anchor all planters, plant pots, hanging baskets, and decor
- Verify all drain lines are clear so standing water can't accumulate under panels
24 hours out: final checks and loose-ends
- Walk the perimeter and tug each storm panel or plywood sheet — nothing should flex more than an inch
- Verify every fastener is tight and every anchor cap is seated
- Move remaining lightweight items (cushions, small pots, décor, tools) inside or into a locked storage box
- Check that outdoor electrical outlets and fixtures are covered or shut off at the breaker
- Confirm your post-storm inspection plan so you know what to look for first
0 hours: shelter in place
Once winds reach tropical storm strength (39+ mph), stop working outside entirely. No last-minute adjustments are worth the risk. Lock the house, follow your local emergency management instructions, and let the prep you've done do its job.
Tools, materials, and estimated DIY cost ranges
Here's a practical breakdown by task category. Prices reflect general retail availability as of mid-2026; coastal markets often run 10–20% higher, especially right before a storm watch is issued.
| Task category | Key materials / tools | Estimated DIY cost range |
|---|---|---|
| Plywood panel protection | 7/16" or 1/2" plywood (4x8 sheets, ~$40–$60 each), circular saw, drill, corrosion-resistant screws, permanent anchor hardware | $150–$400+ depending on number of openings |
| Removable storm panels (aluminum or polycarbonate) | Certified panel kit with PanelMate anchors, washers, caps, wing nuts | $200–$600 per large opening; anchor kits $50–$150 |
| Hurricane clips and straps | Simpson Strong-Tie H10A or equivalent, 1.5" structural screws, impact driver | $3–$8 per connector; $80–$200 for a typical patio roof |
| Post-base anchors | Expansion anchors or screw anchors (Hilti or equivalent), epoxy if needed, drill with hammer setting | $10–$30 per post; total $50–$200 |
| Furniture anchoring hardware | Ratchet straps, D-ring anchors, concrete anchor screws | $20–$80 depending on furniture count |
| Weatherstripping and sealing | Foam weatherstrip tape, door sweep, paintable exterior caulk | $20–$60 |
| Temporary water barriers | Pre-filled or self-inflating sandbags, plastic sheeting | $30–$100 for a patio perimeter |
| Safety gear | Work gloves, safety glasses, non-slip footwear, hearing protection for drilling | $30–$60 if not already owned |
Structural reinforcement: the options and when each one matters
Structural reinforcement is the work that stays in place year-round and pays off every storm season. It's not glamorous, but a few weekends of work here can be the difference between a patio that survives a Cat 2 intact and one that partially lifts off. FEMA P-804's "Mitigation Packages" break this work into Basic, Intermediate, and Advanced tiers. For most DIYers, the Basic tier, adding hurricane connectors, improving post-base connections, and securing the roof-to-wall joint, is both achievable and highly effective, particularly in wind zones below 130 mph.
If your patio was built before the mid-1990s, there's a decent chance it has no metal connectors at all at the roof-to-post joints. Adding them now costs under $200 in materials for a typical enclosure and can be done in a day. For newer builds or those in higher wind zones, an Intermediate approach adds post-to-foundation anchors and may involve reinforcing mid-span posts. An Advanced approach, re-engineering the load path, replacing undersized framing, or installing a fully compliant hurricane screen system, generally requires a contractor and permits.
When to reinforce vs. when to replace
Reinforcing a patio enclosure makes sense when the primary structure (posts, beams, roof framing) is sound but the connections are weak. If the posts are actively rotting at the base, the roof framing is undersized for your wind zone, or the enclosure was built without permits in a coastal county, reinforcement is a band-aid on a larger problem. In those cases, get a contractor evaluation before investing in hardware that might outlast the structure it's holding together.
How to reinforce screen frames, posts, and connections
This is the practical hands-on part. Work through these steps before storm season, ideally on a dry weekend when you have time to do it right.
Adding hurricane clips and straps to the roof
- Identify every rafter or truss tail where the patio roof meets the supporting beam or wall ledger
- Select the correct connector for your framing dimension — Simpson Strong-Tie H10A works for standard 2x lumber; check the load table for your design wind speed before purchasing
- Seat the clip over the rafter tail so the predrilled holes align with both the rafter and the beam/ledger below
- Drive 1.5-inch structural screws (not drywall screws) into every hole in the connector — skipping holes cuts rated capacity significantly
- For spans over 8 feet between rafters, consider adding a blocking piece between rafters at the bearing point before installing the clip
- In coastal environments, use stainless steel or hot-dip galvanized connectors and fasteners as specified by FEMA Technical Bulletin TB-8; standard zinc-plated hardware corrodes quickly in salt air
Reinforcing post-to-beam connections
- Inspect each post cap or saddle connector at the top of every column; if there's only a toenail connection, add a rated post cap (Simpson Strong-Tie PC or BC series for dimensional lumber)
- At the post base, check for a positive anchor connection to the concrete slab or footing
- If the post just sits on or near the slab surface, install a surface-mount post base (Simpson ABU or ABA series) using concrete screw anchors; follow the manufacturer's embedment depth and edge-distance requirements exactly
- For posts set in soil or minimal footings, consult a contractor — pulling these out and resetting them with proper footings is not a quick DIY task but may be necessary in high wind zones
Reinforcing screen frame connections
Aluminum screen frame extrusions are typically fastened to the structural posts and beams with self-tapping screws. Check every spline channel and corner where the frame meets structural members. Add screws every 12–16 inches along the top and bottom rails if existing fastening is sparse. For wood-framed screen walls, add 3-inch structural screws at each stud-to-plate connection. The screen fabric itself will not survive hurricane-force winds regardless of frame quality, the goal is to keep the frame from becoming a projectile, not to keep the screen intact.
Temporary protection choices: pros, cons, and what fits your situation
You have several options for closing off screen openings before a storm. None of them turn a screen room into a hurricane bunker, but each reduces wind load, flying debris impact, and rain intrusion to varying degrees. Here's an honest breakdown.
| Protection type | Wind protection level | Rain protection | DIY installation | Approx. cost per opening | Notes |
|---|---|---|---|---|---|
| Pre-cut plywood (7/16" or 1/2") | Good (lower wind zones) | Moderate | Yes, with pre-drilled hardware | $40–$120 | Code-accepted in many areas; heavy and awkward to handle alone; label panels by location |
| Certified aluminum storm panels | Very good (ASTM/NOA rated) | Good | Yes, with anchor kit | $200–$600 | Lightweight, reusable, stack flat for storage; requires pre-installed anchor track |
| Polycarbonate storm panels | Very good (rated products) | Excellent | Yes, with anchor kit | $200–$700 | Clear panels let in light; verify product carries certification for your wind zone |
| Roll-down shutters (manual or motorized) | Excellent (engineered) | Excellent | Professional install recommended | $800–$2,500+ | Best long-term solution; not a typical DIY project; requires permit in most jurisdictions |
| Hurricane-rated screen systems | Good to very good (engineered) | Moderate | No — requires PE drawings and permit | $1,500–$5,000+ | Not a simple DIY product; engineered installation required |
| Heavy reinforced tarps | Low (not code-approved) | Low to moderate | Yes | $30–$150 | For very low wind zones or as a last resort only; will not hold above ~60 mph sustained |
The practical recommendation for most DIYers: invest in certified aluminum or polycarbonate storm panels with a permanent anchor track installed before storm season. The anchor hardware goes up once, and the panels themselves can be deployed in under two hours per side of the enclosure. Plywood is a solid backup if you need something in a hurry and can't source panels, but store your pre-cut sheets labeled and accessible, scrambling to cut plywood 36 hours before landfall is exactly the chaos you want to avoid.
Fastening and anchoring: hardware, spacing, and common mistakes
The best storm panels in the world fail if the anchors aren't installed correctly. Here's what to get right.
Concrete anchor installation for panel tracks and post bases
For any anchor going into a concrete slab or block wall, follow the manufacturer's anchor chart for minimum embedment depth, edge distance from slab edges, and spacing between anchors. Hilti and Simpson Strong-Tie both publish detailed fastening technical guides for their product lines. A common DIY mistake is drilling too shallow, if the chart calls for 2.5 inches of embedment and you drill 1.75 inches, you're not getting the rated pullout capacity. Another common error is installing anchors too close to a slab edge, which splits the concrete. In salt-air environments, use stainless steel anchors or specify a corrosion-resistant coating from the start.
Panel fastening spacing
For plywood panels, FEMA P-804 and the IBC reference prescriptive fastening patterns tied to design pressure. As a general rule for DIY plywood installation: space fasteners no more than 12 inches apart along all edges and 24 inches in the field, using corrosion-resistant screws or bolts into the permanent anchor hardware. For certified panel kits, follow the manufacturer's spacing exactly, anchor spacing is part of the product's approval, and changing it voids the rating.
Pitfalls to avoid
- Using standard zinc-plated hardware in coastal environments — it corrodes within one season and may fail silently
- Over-torquing concrete screw anchors, which strips the hole and reduces holding power
- Installing panel anchors into the screen frame extrusion rather than the structural post or beam behind it
- Skipping holes in hurricane clip connectors — every hole in the connector template is part of the rated load
- Mixing panel brands with anchor tracks — stick to one manufacturer's system for rated performance
- Installing panels without a second person — a 4x8 sheet of plywood in wind is dangerous to handle alone
Securing loose items: planters, furniture, and décor
This is where a lot of people underestimate their risk. A 40-pound ceramic planter becomes a serious projectile at 80 mph. A patio umbrella, regardless of its base weight, will become airborne in tropical storm winds. The safest rule: if you can pick it up with both hands, it needs to either go inside or be anchored to something structural.
Planters and plant pots
Heavy ceramic or concrete planters should move inside a garage or interior room at the 48-hour mark. For planters too heavy to move easily, lay them on their side against an interior wall of the enclosure (if the enclosure itself is substantially protected) or cluster them in the corner least exposed to prevailing winds. Anchor them to a D-ring bolt set in the slab with a ratchet strap rated above the planter's weight. Plastic pots should always go inside, they're light enough to blow through a neighbor's window. For more on protecting planters and pots from storm damage year-round, the same principles that apply to everyday patio protection come into play for hurricane season as well. See the guide on how to protect patio from plant pots for detailed methods to anchor, move, and store planters (resource id 72b99e85-62c8-48ef-962e-1a86dbf9909f). For a practical checklist on how to protect patio from planters, see our guide on how to protect patio from planters.
Furniture and décor
- Remove and store all cushions, pillows, and fabric items inside — fabric tears free and creates debris
- Collapse and store patio umbrellas flat inside; never just lower them — the pole will still catch wind
- Bring lightweight chairs and small tables inside or stack and strap them to a fixed anchor point
- For heavy wrought iron or concrete furniture too large to move, strap it to a post with 1-inch ratchet straps; lay it on its side if it's top-heavy
- Outdoor string lights, wind chimes, and hanging lanterns: take them all down and store them; wind chimes at 90 mph are not decorative
Protecting against rain intrusion
Hurricane rain is as damaging as wind in many cases. A Cat 1 storm can dump 6–12 inches in a few hours, and if water is finding its way into the enclosure, it's finding its way into your house framing, flooring, and wall cavities as well. Address the entry points now, before the season starts.
Sealing gaps and weatherstripping
Walk the entire perimeter of the enclosure where it meets the house wall and where the roof meets the fascia. Any gap wider than a pencil is a rain-entry point. Fill small gaps with paintable exterior silicone caulk. Larger gaps, where the patio roof ledger meets the house, for example, may need backer rod foam cord first, then caulk over it. For screen doors, apply a foam weatherstrip tape to the door stop on all four sides and add a door sweep to the bottom. These materials cost under $30 and take an afternoon to install. Protecting your patio from rain intrusion is a job that overlaps with general rain protection strategy, and the sealing steps here will serve you well every rainy season, not just during hurricane threats.
Improving drainage
If your screened patio slab doesn't drain well in normal rain, a hurricane will flood it. Check that the slab is sloped away from the house (a 1/8-inch per foot minimum is the standard). Clean out any patio drain covers or trench drains embedded in the slab. If drainage is genuinely flat or pitched toward the house, this is a longer-term fix, but for the immediate storm, temporary water barriers (sandbags or self-inflating flood bags) at door thresholds can prevent the interior from flooding.
Temporary water barriers
Self-inflating sandbags and traditional pre-filled sandbags can be positioned at the base of screen doors and any door between the enclosure and the house. For storm panel installations, use closed-cell foam backer rod or rubber gasket tape between the panel and the wall surface to reduce wind-driven rain infiltration around the panel perimeter. A strip of butyl tape behind each panel edge is a low-cost upgrade that makes a real difference. For step-by-step instructions on how to protect patio, see the detailed guide how to protect patio.
Safety precautions and the limits of DIY work
Let's be straight about this: hurricane prep involves working on ladders, with power tools, often in the days leading up to a storm when stress is high and time is short. That combination causes injuries. Here are the non-negotiable safety rules, followed by the structural red flags that tell you to call a professional.
Personal safety rules
- Always have a second person when carrying or lifting large panels, plywood sheets, or heavy furniture
- Stop all outdoor work when sustained winds reach 35–40 mph — debris becomes dangerous at that speed
- Wear safety glasses when drilling into concrete; anchor installation kicks up concrete dust and fragments
- Use a properly rated ladder with a spotter; never lean a ladder against a screen frame — it will flex
- Keep tools, fasteners, and cut plywood pieces from becoming wind-borne; stage materials inside until needed
- Disconnect or lock out outdoor electrical circuits before working near outlets or light fixtures
When to call a contractor or inspector
Call a licensed contractor or building inspector, not a handyman, if you find any of these conditions during your assessment: post bases that are visibly rotted or corroded at the base plate; concrete footings that have cracked or heaved; roof framing that is undersized for your wind zone according to the IRC span tables; any situation where the patio roof is attached to the house with nothing more than a few lag screws into the fascia board; or if you're in an HVHZ jurisdiction and considering any permanent opening protection product. These aren't DIY fixes, and attempting them without proper knowledge or engineering puts both you and your neighbors at risk.
Post-storm inspection and repair checklist
Don't go outside until local emergency management says it's safe, the calm of the eye or a drop in wind noise does not mean the storm is over. Once conditions are declared safe, work through this inspection in order.
Immediate safety checks
- Walk the exterior perimeter before entering the enclosure — check for downed power lines, structural lean, or sections of roof that have lifted
- Do not enter if you see significant structural distortion, smell gas, or see sparking near any electrical components
- Photograph all damage before touching anything — this documentation is critical for insurance claims
- Check the connection between the patio roof and the house wall first; any gap or lifting here must be secured temporarily before you use the space
Damage assessment and temporary repairs
- Inspect every post base for movement; if a post has shifted, brace it with temporary diagonal lumber before removing any roof load
- Check all hurricane clips and connectors for deformation — bent connectors have already yielded their load capacity and should be replaced, not reused
- Torn screens: leave them in place until a full assessment is done; the frame condition matters more than the fabric
- Roof membrane or panels that have lifted: cover with a heavy-duty tarp anchored with weighted boards — do not attempt to re-nail a roof panel in wet or windy conditions
- Water intrusion: use a wet-dry vacuum to remove standing water; place fans to dry out the space before replacing any flooring or baseboards
- Document everything with photos and a written list before starting any repairs — insurance adjusters need this information
Notes for longer-term repairs
After a major storm, licensed contractors are in extremely high demand. If you have structural damage beyond temporary bracing, contact a licensed general contractor or structural engineer as soon as possible, before the demand surge makes scheduling difficult. For screen replacement, aluminum frame repairs, and hardware replacement, these are reasonable DIY repairs once the structure itself is confirmed sound and the storm has passed. Prioritize the load-path connections first: roof-to-wall, post-to-beam, and post-to-footing. Everything else is cosmetic until those are confirmed.
Quick decision guide: what to do based on your situation
Use this table to match your current scenario to the right action steps. It won't replace reading the full guide, but it's a useful at-a-glance reference when time is short.
| Your situation | Time before storm | Recommended actions |
|---|---|---|
| Low wind zone (under 110 mph design speed), sound structure, no previous damage | 72+ hours | Pre-cut and stage plywood or pull out certified panels; install hurricane clips if not already present; anchor furniture |
| Moderate wind zone (110–130 mph), screen room with aluminum frame | 72+ hours | Install certified storm panels or plywood on all openings; add hurricane clips; reinforce post bases; stage sandbags |
| High wind zone (130+ mph) or HVHZ, any screen structure | 72+ hours | Call contractor for an assessment if not already done; install permitted opening protection; do not rely on plywood alone as primary protection |
| Any wind zone, only 48 hours to spare | 48 hours | Focus on opening protection and furniture securing; skip any new structural work you haven't planned — now is not the time to improvise structural changes |
| Any wind zone, 24 hours or less | 24 hours or less | Furniture and loose items inside or anchored; verify existing panels are tight; shelter in place per emergency management instructions |
| Post-storm, structure appears sound | After storm | Safety check first; photograph all damage; remove panels and inspect connections; schedule contractor assessment before next season |
| Post-storm, visible structural damage | After storm | Do not occupy until inspected by a licensed contractor or building inspector; apply temporary tarps from a safe position only |
FAQ
How do I quickly assess the risk to my screened patio before a hurricane?
Check three things: wind exposure (coastal/exposed vs. sheltered), your patio’s screen and framing type (light aluminum/mesh vs. rigid framed/glazed), and structural connections (how roof, posts and frames tie to the house and foundation). Use local design wind-speed maps or an online ASCE hazard lookup to estimate expected wind speeds for your location and compare those to Saffir–Simpson hurricane wind ranges. High exposure, lightweight screens, and weak or missing load-path connections mean higher risk and more reinforcement.
What should I do 72–48 hours before landfall (early prep)?
Inspect and inventory: note openings, measure widths/heights for panels, check fasteners and corrosion, and gather tools and materials (plywood, anchors, straps, hurricane clips, tarps, shutters). Move loose items (pots, furniture) indoors or to a sheltered garage. Trim trees/branches near the patio. Create a deployment plan and place commonly used anchors and hardware near the patio for fast access.
What are the priority tasks 48–24 hours before the storm?
Install permanent or semi-permanent reinforcements if time permits (hurricane straps, clips, bolting posts). Pre-cut and pre-drill plywood or place labelled removable panel packs near openings. Secure heavy furniture/planters to the structure or lower them to the ground and add straps. Close and lock all doors and windows accessing the patio and test drainage/ gutters. Charge lights, and keep a battery drill, impact driver, and required bits ready.
What should I do within 24 hours and immediately before landfall (0–6 hours)?
Deploy temporary protection: bolt or attach storm panels/plywood/approved shutters to openings, stow or anchor any remaining loose items, roll down or close permanent shutters/screens, and add tarps to vulnerable roof seams only as a last resort. Ensure all fasteners are torqued to spec. Evacuate if ordered; do not stay in an unreinforced patio during a hurricane.
Which structural reinforcement options can a DIYer realistically do, and how do they help?
DIY-friendly structural options: install hurricane ties/straps on roof-to-wall and rafter-to-header connections using manufacturer guides; add post-to-beam connectors and through-bolts at posts (follow anchor embedment charts); reinforce screen frames by adding mid-rails or screwing wood blocking to prevent racking. These measures improve the continuous load path and reduce the chance of uplift or frame failure. Follow product installation tables and use corrosion-resistant hardware in coastal areas.
What temporary protection choices are available and the pros/cons of each?
Plywood panels: cheap, easy, code-allowed when pre-cut/pre-drilled and properly fastened; cons—heavy, less reusable and lower visibility. Aluminum storm panels: lightweight, reusable, good wind protection when certified; cons—cost and need storage. Polycarbonate panels: clear, durable, reusable; cons—higher cost and potential UV/yellowing. Roll-down or fixed metal shutters: best protection and convenience but expensive and often require pros for installation. Fabric/tARP-style covers: cheap and fast but generally not code-approved for windborne debris and offer poor debris protection.
Next Articles
How to Protect Patio from Planters: DIY Guide & Prep
How to protect patio from planters: DIY steps, drainage, anchoring, materials, costs & seasonal maintenance.
How to Protect Patio From Plant Pots: DIY Fixes
DIY solutions to stop pot water stains, rust, scratches, cracking, soil mess with liners, mats, pads, and drainage fixes
How to Decorate a Long Narrow Patio: Layout Tips
Practical DIY layout and decor tips to widen a long narrow patio using zoning, furniture spacing, lighting, greenery, an