
The best way to stake patio tomatoes depends on two things: whether your variety is determinate or indeterminate, and how much vertical space you actually have. Determinate (bush) types stay compact at roughly 3 to 4 feet tall and do well with a single stake or a standard 18-inch cage. Indeterminate (vining) types keep growing, often reaching 6 to 10 feet, and really need a tall trellis, a string system, or a heavy-duty cage at least 5 feet tall. Get those two decisions right and everything else follows.
How to Stake Patio Tomatoes: Best DIY Methods for Containers

Felix Brennan
29 Jul 2026
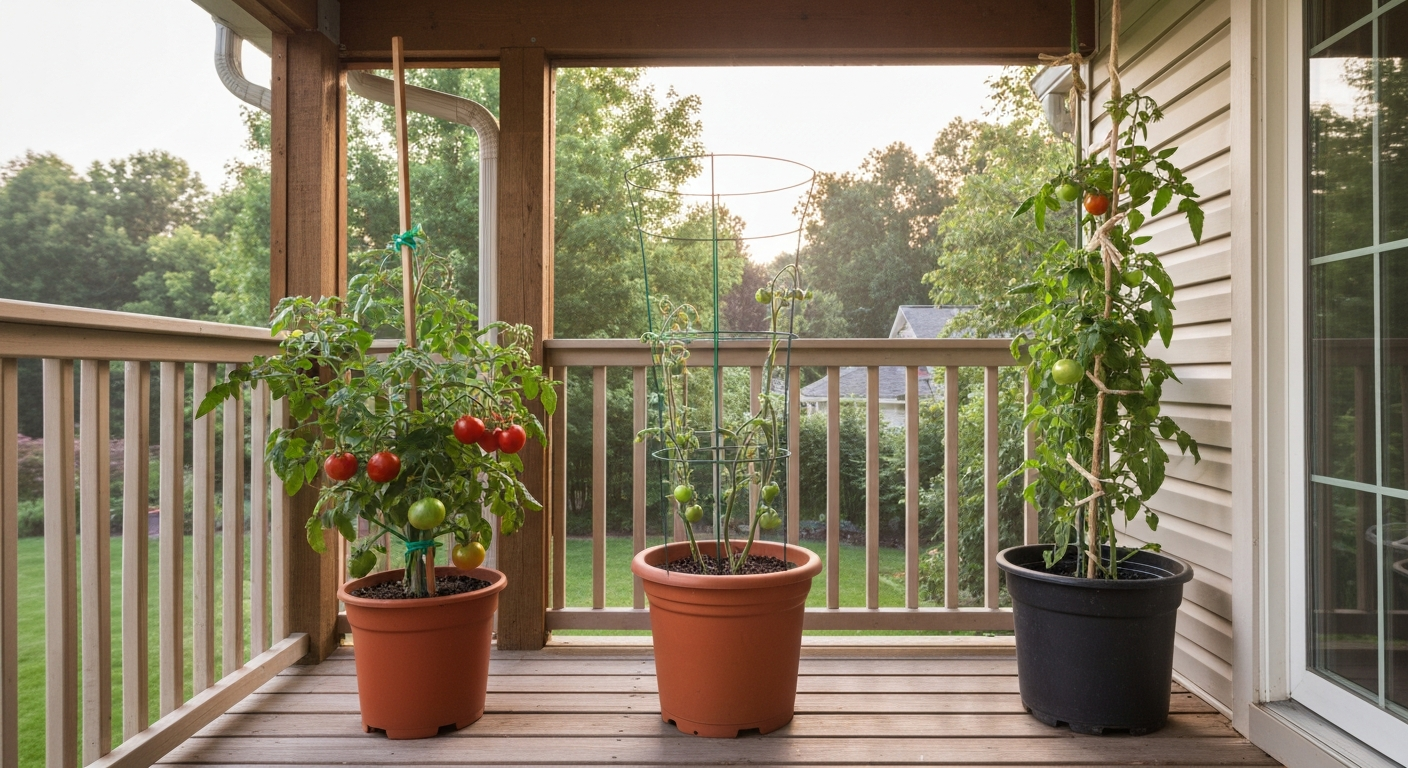
Why staking patio tomatoes is different from garden staking
Growing tomatoes in containers on a screened porch or open patio changes the rules in a few important ways. First, your containers can tip. A 10-gallon pot with a fully-loaded indeterminate vine and a top-heavy stake becomes a fall risk in any wind gust, which is a real problem on balconies or screened enclosures where you do not want a pot crashing into a screen frame. Second, you usually cannot drive a stake straight into the ground, everything has to anchor into the pot itself, clamp to a railing, or stand on its own weighted base. Third, space is tight. A traditional in-ground trellis row that works fine in a yard can block every inch of a 6x10 patio if you are not thoughtful about orientation and footprint.
The goal with patio staking is to keep plants upright, improve air circulation around the leaves (which reduces fungal problems), make harvest easier, and do all of that without damaging the structural framing of your patio or screened enclosure. One important rule we will repeat throughout this article: never attach plant weight to screen mesh. Screen fabric is not load-bearing. Always anchor to structural posts, joists, or rails, or use a freestanding weighted support.
How to choose the right staking method
Before you buy a single stake or roll of twine, run through these four filters: tomato type, container size, available space, and how much the setup will bother you to look at all season.
Determinate vs. indeterminate: the most important factor
Determinate (bush) tomatoes set their fruit in one concentrated flush and stop growing at a genetically fixed height, usually 3 to 4 feet. They are the easiest to support, a single stake or a standard 4-foot cage handles them comfortably. Common patio varieties like Patio, Tumbling Tom, Bush Early Girl, and Celebrity are determinate or semi-determinate. Indeterminate varieties, Sungold, Sweet 100, Cherokee Purple, most heirlooms, keep growing until frost and can easily hit 6 to 8 feet in a large container. Those need tall string systems, 5 to 6-foot cages, or a wall-mounted trellis to stay manageable. Extension and university guidance contrasts supports: single stake (minimal footprint, good for determinate/one‑stem training), wire/mesh cages (easy, good for determinate and short vines, but bulkier and can delay harvest), and string/trellis systems (best for indeterminate vines, maximize vertical space and air flow but require overhead anchors and more labor) Extension and university guidance contrasts supports: single stake (minimal footprint, good for determinate/one‑stem training), wire/mesh cages (easy, good for determinate and short vines, but bulkier and can delay harvest), and string/trellis systems (best for indeterminate vines — maximize vertical space and air flow but require overhead anchors and more labor)..
Container size and stability
Iowa State and University of Tennessee extension services both recommend a minimum of 5 gallons (about 19 liters) for determinate and cherry types, and 10 to 20 gallons or more for indeterminate vines. A larger pot gives you two advantages beyond root room: it is heavier and less likely to tip, and it can absorb a stake or cage leg more securely. If you are growing a big indeterminate variety in anything under 10 gallons, count on watering twice a day in summer heat and expect the whole setup to be genuinely top-heavy by August.
Space and aesthetics
If you have 12 inches of depth between a container and your screen wall, a freestanding cage is not going to fit cleanly. A flat wall-mounted trellis or a string system anchored overhead uses almost no floor footprint and keeps the sight lines open. If you are more concerned about not drilling into anything than about aesthetics, a weighted freestanding trellis frame or a heavy cage with a ballast base is the right move. Think about how much of your view and seating space you are willing to trade for tomatoes, and plan accordingly.
| Method | Best for | Typical height | Container minimum | Patio footprint | Anchoring required |
|---|---|---|---|---|---|
| Single stake | Determinate, single-stem trained | 5–6 ft stake | 5 gal | Minimal | Into pot only |
| Tomato cage | Determinate, short indeterminate | 4–6 ft cage | 5–10 gal | Moderate (18–24" dia.) | Into pot or weighted base |
| Freestanding trellis | Indeterminate, multi-plant | 5–7 ft | 10+ gal | Small footprint, tall | Weighted base or clamp to rail |
| Wall/fence trellis | Indeterminate, space-saving | 5–8 ft | 10+ gal | Virtually none | Screws into structural framing |
| String / vertical cord | Indeterminate, overhead anchor | Up to ceiling height | 10+ gal | Minimal | Overhead joist or beam |
| Hanging / sling system | Cherry, trailing types | Hanging pot depth | 3–5 gal | Zero floor use | Overhead structural anchor |
Materials and tools you will need
Here is what to have on hand before you start. Some items are universal across methods; others are specific to the approach you choose.
Universal materials and tools
- Containers: 5-gallon minimum for determinate types, 10 to 20-gallon for indeterminate (12–18 inch diameter for compact varieties, 18–24 inch for larger vines)
- High-quality potting mix (not garden soil — it compacts in containers and impedes drainage)
- Soft plant ties, silicone clips, or strips of old cotton fabric for attaching vines to supports without cutting stems
- Scissors or pruning snips for tie trimming and sucker removal
- Tape measure
- Level (useful for any trellis or post installation)
- Marker or chalk for measuring cut points on stakes
Method-specific materials
- Single stake: 1-inch nominal wooden tomato stake or 3/8-inch (#3) rebar, 5 to 6 feet long for indeterminate types, 4 feet for determinate
- Cage: Welded wire or concrete-reinforcing mesh (9 to 10 gauge), cut to form an 18 to 24-inch diameter cylinder, 4 to 6 feet tall; or a commercial heavy-gauge wire cage
- Freestanding trellis: 1-inch PVC Schedule-40 pipe or 1x2 cedar lumber for the frame, horizontal dowels or wire, and a concrete paver or ballast base
- Wall-mounted trellis: 2x2 or 2x4 lumber screws, galvanized eye screws, jute or nylon twine
- String/cord system: heavy-gauge jute or polypropylene twine, eye hooks or screw hooks rated for the ceiling or beam load, a small swivel clip or tomato hook for each plant
- Hanging system: a sturdy pot with drainage, a load-rated ceiling hook (confirm the anchor can hold at least 30 to 50 lbs, including pot, soil, water, and plant weight), and a chain or macrame hanger
Anchoring hardware for patios and screened frames
If you are attaching anything to a concrete or masonry wall or ceiling, use proper anchors, wedge anchors, sleeve anchors, or adhesive anchors depending on your substrate. A correctly installed 3/8-inch wedge anchor in sound concrete can hold hundreds of pounds of pullout force, but always follow the manufacturer's load tables (Simpson Strong-Tie and Hilti both publish these). Simpson Strong‑Tie’s Strong‑Bolt® 2 Wedge Anchor product page includes allowable tension and shear tables for properly installed 3/8‑inch wedge anchors Strong‑Bolt® 2 Wedge Anchor | Simpson Strong‑Tie (product/technical data). For screened patio framing, attach only to the structural aluminum or wood posts and beams, never to the screen mesh or spline channel. On railings, look for clamp-on railing brackets designed for your specific railing profile. When drilling into any anchor point is off the table entirely, use weighted ballast: a heavy concrete paver under the pot or a water-filled stabilizer base transfers load to the floor rather than the structure above.
Single stake method
Pros and cons
- Pro: smallest footprint of any method — a single vertical line in the pot
- Pro: very affordable (a 6-foot wood stake costs under $2, rebar under $5)
- Pro: excellent for single-stem (suckers-removed) trained plants and tight spaces
- Con: requires regular tying as the plant grows — plan on checking ties every week
- Con: a single stem trained tightly can snap in strong wind if ties are too rigid
- Con: not suitable for unpruned indeterminate vines — too much lateral growth for one stake
Step-by-step setup
- Choose your stake: a 1-inch nominal wood tomato stake or 3/8-inch rebar. For a determinate variety in a 5-gallon pot, 4 feet is sufficient. For an indeterminate variety trained to a single stem, use a 5 to 6-foot stake.
- Insert the stake before filling the pot with mix. Push it all the way to the bottom of the container. This gives it the maximum purchase and reduces rocking. If the pot has drainage holes, you can let the stake rest on the container floor — it does not need to protrude below.
- Fill the pot with potting mix and transplant the tomato seedling 2 to 3 inches away from the stake to avoid root damage.
- When the plant reaches 10 to 12 inches tall, make the first tie. Loop a soft tie in a figure-eight pattern: one loop around the stem, one around the stake. This keeps the stem from rubbing directly against the stake. Leave a little slack — the stem will thicken.
- Add a new tie roughly every 8 to 10 inches of new growth, as Virginia Cooperative Extension recommends for vertical stake systems. In a typical season you will end up with 4 to 8 ties per plant.
- Remove all suckers (the shoots that emerge in the crotch between the main stem and a leaf branch) to keep a single-stem plant. If you want two stems, allow one sucker to develop and add a second stake or switch to a cage.
- Check ties weekly. Loosen any that are digging into the stem as the plant thickens.
Stability note for containers: if your pot feels tippy with the stake installed, place it inside a slightly larger decorative pot or set it on top of a concrete paver to lower the center of gravity. On a windy balcony, consider zip-tying the stake base to the pot's drainage tray rim as an extra precaution.
Tomato cage method
Pros and cons
- Pro: low-maintenance once set up — no weekly tying required for most determinate types
- Pro: supports multiple stems and natural branching without pruning
- Pro: inexpensive commercial options widely available; heavy-duty DIY versions last decades
- Con: bulky — an 18 to 24-inch diameter cage takes up significant container and floor space
- Con: cheap flimsy commercial cages (the small conical wire ones) collapse under a loaded indeterminate vine — buy or build heavy-gauge versions
- Con: can make harvest awkward on dense plants; can delay ripening slightly by reducing airflow if foliage gets crowded
Step-by-step setup
- Size your cage correctly. UC ANR and OSU Extension both recommend 18 to 24 inches (46 to 61 cm) in diameter and 4 to 6 feet (1.2 to 1.8 m) tall. For a patio determinate variety in a 5-gallon pot, a 4-foot cage is fine. For indeterminate types in a 15-gallon or larger pot, go 5 to 6 feet tall.
- If you are building a cage yourself, use 9 to 10 gauge welded wire or concrete-reinforcing mesh. Cut a length of about 56 to 75 inches to form a cylinder 18 to 24 inches in diameter. Bend the cut ends into hooks and link them to close the cylinder. Bend the bottom wire rings outward to form 'feet' that press into the potting mix.
- Set the cage into the pot before — or right at the time of — transplanting. Press the cage feet firmly into the potting mix so they reach the bottom of the container. For a pot on a hard patio surface, the cage feet resting on the container floor provide significant resistance to tipping.
- If your pot is on a windy balcony and feels unstable, run a short bungee cord or zip tie through the bottom ring of the cage and around the pot rim in two or three places to lock them together.
- As the plant grows, gently guide main stems through the horizontal cage rings. You rarely need ties with a good cage — the rings do the work.
- For heavily loaded fruiting branches on large-fruited varieties (beefsteak tomatoes can produce individual fruits weighing several hundred grams), add a soft sling tie under the fruit cluster to a nearby cage wire.
- For a screened patio with limited width, orient rectangular wire cages (available commercially) along the wall to reduce how far the cage protrudes into your seating area.
Trellis systems (freestanding and wall-mounted)
Pros and cons
- Pro: extremely space-efficient — a flat trellis against a wall uses almost no floor depth
- Pro: ideal for training indeterminate vines to grow upward in a narrow zone
- Pro: can double as a privacy or shade element on an open patio
- Con: wall-mounted versions require drilling into structural framing — not always possible on rented properties or screened enclosures with thin aluminum profiles
- Con: freestanding versions need a weighted base or railing clamp to stay upright on a hard patio surface
- Con: more initial setup time and cost compared to a single stake or basic cage
Wall-mounted trellis setup
- Identify your anchor points. On a screened patio, look for the structural vertical posts (typically every 4 to 8 feet) and the top horizontal beam. Never fasten into the screen frame channel or mesh itself — only the structural framing behind it.
- Build or buy a trellis panel. A simple DIY version uses two 2x2 uprights cut to your desired height (typically 5 to 7 feet) with horizontal runs of 14-gauge galvanized wire or 3/4-inch dowels spaced every 10 to 12 inches vertically.
- Mount the uprights to the wall or structural posts with lag screws or through-bolts, keeping the trellis face 3 to 4 inches away from the wall for air circulation behind the plant.
- Position the container 6 to 8 inches in front of the trellis. As stems grow, tie them loosely to the horizontal wires with soft plant ties every 8 to 10 inches of new height.
- For masonry walls, use sleeve anchors or wedge anchors — follow manufacturer embedment depth tables for the load you are applying. A 1x2 framework holding a tomato vine puts modest loads on anchors, but it is worth getting it right once.
Freestanding trellis setup
- Build a simple A-frame or single-panel frame from 1-inch PVC Schedule-40 pipe or 1x2 cedar. PVC is lightweight and weather-resistant; cedar is more rigid and looks cleaner. For a freestanding panel, cross-brace the back with a diagonal to prevent racking in the wind.
- The frame should stand 5 to 7 feet tall and 18 to 24 inches wide to serve one or two containers. Run horizontal wire or twine lines every 10 to 12 inches up the frame.
- Weight the base: set the frame feet inside a heavy concrete paver laid flat, or fill the PVC legs with sand or gravel before capping them. A weighted base of 20 to 30 pounds at floor level significantly reduces the overturning risk in wind.
- Position one container on each side of an A-frame to balance loads, or place a single container at the base of a panel trellis and lean the top of the frame against a wall or rail for extra security.
- Clamp options: railing-mount clamps designed for balcony furniture and planters (sold at most hardware stores and garden centers) can secure the trellis base or upright to a railing without drilling.
String, vertical cord, and espalier systems
Pros and cons
- Pro: makes the most efficient use of vertical height — great for a screened porch with 8 to 10-foot ceilings
- Pro: minimal floor and visual footprint; a single string per plant disappears against foliage
- Pro: excellent airflow around the plant compared to cage methods
- Con: requires a reliable overhead anchor point (ceiling joist, beam, or overhead rail) — not always available on every patio
- Con: demands consistent pruning to a single or double stem; unpruned vines in a string system become unmanageable quickly
- Con: if the overhead anchor fails, the entire plant comes down
Step-by-step setup: single vertical cord (the simplest string method)
- Find your overhead anchor. On a screened patio, use a structural ceiling joist or the main top beam of the screen frame — not the screen itself. Drive a galvanized screw hook (rated for at least 30 to 50 lbs) into the joist directly above the pot location.
- Cut a length of heavy jute or polypropylene twine about 12 inches longer than the distance from hook to soil surface. Tie one end to the hook above and the other loosely around the base of the tomato stem (just below the first set of leaves) or anchor it to the pot rim. The plant will be trained to wind around this cord as it grows.
- As the plant grows, gently wrap the main stem around the vertical cord every 6 to 8 inches of new growth, or clip it loosely with a tomato clip. The goal is a single straight column of growth.
- Remove all suckers consistently — weekly during peak summer growth. If you miss a sucker and it grows out, you can allow it to become a second stem and add a second cord.
- The first wrap should happen when the plant is about 10 to 12 inches tall. By the end of the season on a 9-foot ceiling, you may be training 7 to 8 feet of vine on a single cord.
Florida weave and horizontal twine lines (for multiple plants)
If you have a row of containers along a patio wall, the Florida weave (also called the basket weave) is a clean, practical method. Drive two posts or stakes, one at each end of the row, about 6 feet tall, and anchor them to the wall or a ballast base. Run the first horizontal twine line about 8 to 10 inches above the soil surface, weaving it in front of one plant stem and behind the next along the entire row. Add new lines every 8 to 12 inches of vertical growth. Per guidance from Johnny's Selected Seeds and Virginia Cooperative Extension, this lateral support keeps plants upright and spreads the load across the whole system rather than concentrating it on one anchor.
Espalier training for flat wall growth
Espalier is a technique borrowed from fruit tree training (it works well for patio fruit trees too) where you train the plant to grow in a flat, two-dimensional plane against a wall. For tomatoes, fix horizontal wires to the wall at 10 to 12-inch intervals and tie main lateral branches out along them as they develop. It looks impressive, maximizes wall space, and keeps the plant almost entirely flat against the surface. The trade-off is that it requires the most consistent pruning and tying of any method covered here.
Hanging and other vertical supports
Pros and cons
- Pro: uses zero floor space — the plant hangs from the ceiling or a high bracket
- Pro: great for cherry and trailing varieties like Tumbling Tom that naturally cascade downward
- Pro: can look genuinely attractive as part of patio decor
- Con: weight is entirely on the ceiling anchor — soil, pot, water, and plant together can easily reach 20 to 40+ lbs; the anchor must be correctly rated and installed
- Con: watering a hanging pot is awkward and more frequent than ground pots since smaller containers dry out faster
- Con: not practical for large-fruited varieties — the fruit weight plus pot weight puts serious stress on any overhead system
Hanging basket setup
- Select a container with good drainage holes and a volume of 3 to 5 gallons. Use a lightweight potting mix with perlite to reduce hanging weight. Trailing cherry or grape tomato varieties are the best candidates — cherry tomatoes produce fruits of roughly 5 to 30 grams each, which is a manageable hanging load.
- Find a structural anchor point. On a screened porch, this means a ceiling joist or the overhead structural beam — not the screen mesh or its frame channel. Drive a heavy-duty screw hook rated for at least 40 to 50 lbs into the joist, pre-drilling to avoid splitting.
- Hang the pot using a rated chain, metal-link plant hanger, or a thick macrame hanger. Swivel hooks between the ceiling anchor and the hanger will prevent the chain from twisting as the plant grows.
- Water hanging pots more frequently than ground containers. During summer heat they may need water daily. Push a finger an inch into the soil each morning — if it is dry, water until it drains from the bottom.
- Do not try to add a stake or support system to the hanging plant. Let trailing varieties cascade naturally downward. If the plant starts producing too much upward growth, pinch the growing tips.
Overhead shelf and sling systems for screened enclosures
If you have an existing overhead structure, a pergola top rail, a patio cover beam, or the top chord of a screened patio frame, you can build a simple sling shelf from galvanized pipe and chain, or use a commercial planter shelf bracket bolted to the structural upright. If you want a more controlled environment for year-round growing, see a step-by-step guide on how to make a patio greenhouse. The key rule for any screened enclosure is the same as for hanging pots: always transfer the load to the structural frame, not the screen fabric. The screen mesh is there to keep insects out, not to carry weight. Depending on your structure, you may also be able to hang a horizontal bar or dowel across two posts and use it as a low-tech overhead anchor for vertical cord systems across multiple containers.
For balcony applications, remember that exterior balconies are commonly designed to a live load of 60 pounds per square foot under building codes like the International Residential Code. A few tomato containers and a light trellis frame are well within that, but if you are planning a serious array of large pots with heavy overhead anchors across a smaller balcony, it is worth checking in with a structural engineer or your building manager before proceeding.
Planting, timing, and care through the season
When to set up your support system
Set up your support at planting time, not after the plant gets big. This is especially important in containers. Driving a stake or pressing a cage into a fully rooted pot risks tearing roots. If you can, insert the stake or set the cage before you add potting mix, so it sits on the container floor and gets the maximum grip. Transplant the seedling after the support is already in place.
Pruning and tie schedule
For single-stake and string methods, remove suckers weekly throughout the growing season. For step-by-step guidance on safely cutting ties and pruning, see how to use a patio knife. For cage methods, pruning is optional but removing a few interior stems improves airflow and can reduce fungal problems. For guidance on pruning woody patio plants, see a how to trim a lavender patio tree guide that covers timing and technique for regular maintenance. Add a new tie or wrap whenever a stem grows 8 to 10 inches past its last attachment. Set a reminder on your phone for Sunday mornings, ten minutes of weekly tying and pruning is a lot easier than fixing a plant that has flopped over and broken a main stem.
Watering and fertilizing in containers
Container tomatoes need consistent moisture, drought stress followed by heavy watering causes blossom end rot and fruit cracking. Check the top inch of soil daily in summer. A 5-gallon pot in direct sun may need water every day or twice a day in peak heat. A 15 to 20-gallon container in partial shade might stretch to every other day. Use a balanced fertilizer (10-10-10 or similar) every two weeks through the season, switching to a low-nitrogen, higher-phosphorus and potassium blend once fruit sets, to direct energy toward the fruit rather than foliage.
Sun and wind on the patio
Tomatoes need at least 6 to 8 hours of direct sun. On a screened patio, fiberglass or aluminum mesh typically filters only 10 to 20 percent of sunlight, so most varieties do fine. On a deep covered patio that gets mostly indirect light, you may struggle to ripen fruit, choose cherry or grape varieties which are more forgiving of lower light. Wind is a bigger concern on open balconies: it dries out soil faster, can snap stems, and puts lateral stress on your support system. Positioning containers against a wall, using a cage instead of a single stake, and weighting pot bases will all help. If your balcony gets consistent strong wind, consider a semi-transparent windscreen panel, it cuts air speed significantly while still letting light through.
Troubleshooting common patio tomato problems
Plant or container tipping over
This is the most common patio-specific problem and almost always comes down to under-sized containers combined with top-heavy supports. Move to a larger, heavier container, weight the base with a concrete paver, or switch to a cage that interlocks with the pot rather than sitting loosely on top of it. If you are using a single stake and the pot keeps rocking, add a second stake on the opposite side of the pot and tie the two stakes together at the top with a cross piece.
Leggy, weak stems
Leggy growth usually means insufficient light or too much nitrogen fertilizer. Move containers to the sunniest spot you have, and cut back on nitrogen once fruit sets. Weak stems that will not hold themselves up between ties often benefit from a temporary horizontal cross-tie between two nearby stakes to share the load while the stem thickens.
Disease and pest issues
Poor airflow is the main disease driver in staked patio tomatoes. If you see yellowing leaves with dark spots (early blight) or a powdery coating (powdery mildew), thin the interior foliage and consider switching from a dense cage to a string or stake method that keeps stems more separated. Remove any affected leaves immediately and dispose of them away from the patio, do not compost diseased foliage. For pests, aphids and whiteflies are common on patio tomatoes; a strong spray of water knocks most off, and insecticidal soap handles heavier infestations without leaving residue on edible fruit.
Cost and time estimates at a glance
| Method | Materials cost (approx.) | Setup time | Weekly maintenance |
|---|---|---|---|
| Single wood stake | $1–$3 | 10–15 min | 5–10 min (tying) |
| Single rebar stake | $3–$6 | 10–15 min | 5–10 min (tying) |
| Commercial wire cage (flimsy) | $3–$8 | 5 min | Minimal |
| Heavy-gauge DIY cage (remesh) | $8–$15 in materials | 30–45 min | Minimal |
| Wall-mounted trellis (DIY) | $15–$40 | 1–2 hours | 10–15 min (tying) |
| Freestanding trellis (DIY) | $20–$50 | 1–2 hours | 10–15 min (tying) |
| Vertical string system | $5–$15 per plant | 20–30 min | 10–15 min (wrapping + pruning) |
| Hanging basket setup | $10–$30 (hardware + pot) | 20–30 min | 5 min (watering more frequent) |
None of these methods requires advanced carpentry or specialized tools. The hardest part is usually identifying the right anchor points on your specific patio structure, spend 15 minutes on that before you buy anything else and the rest of the setup will go smoothly. If you are already growing other edibles on your patio, the skills and hardware here overlap directly with supporting other container plants, from growing strawberries on a patio to setting up space for lettuce, so any investment in good anchoring hardware pays off across your whole container garden. For step-by-step guidance on small-space salad greens, see our guide on how to grow lettuce on a patio.
FAQ
What are the best staking/support methods for patio container tomatoes and which types are they best for?
Single stake: simple, low-cost, best for determinate/bush or patio/compact varieties in 5–10 gal containers. Tomato cage (wire/cattle panel or commercial cage): easy to use, 18–24" diameter × 4–5' tall recommended; good for many determinate and smaller indeterminate varieties. Trellis/string/vertical trellis: best for indeterminate/vining types and space-saving vertical growth; needs overhead or strong anchor points. Espalier/string-up system: maximizes vertical space on a wall or railing for indeterminate vines. Hanging/vertical supports & self-supporting frames: useful for small-fruit types (cherry) or when floor space is limited; requires secure supports and weight management.
How do I choose a method based on tomato type and container size?
Determinate/patio types: 5–10 gal containers, single stake or 18"–24" cage is usually sufficient because plants stop growing at a set height. Indeterminate/vining types: use 15–20+ gal (or 10+ gal minimum) containers and tall supports (4–6'+ trellis, string systems, or tall rigid cages). Container diameter guidance: ~12–18" diameter for determinate/patio types, 18–24+" diameter (or 15–20+ gal) for indeterminate types to provide root volume and stability.
What materials and tools do I need for each support method?
Single stake: 1" nominal hardwood stake or 3/8" rebar, 5–6' long for indeterminate; soft ties/twine; mallet. Cage: 9–10 ga welded wire/cattle panel or commercial 4–5' cage; cutters, zip ties or heavy twine; pliers. Trellis/string: 1"–2" posts or metal T‑posts for anchor, heavy twine or horticultural string, eye screws or hooks for railing/overhead attachment, horizontal crosspieces every 8–12"; drill, screwdrivers. Espalier/hanging: strong brackets or railing clamps, nylon-coated wire or twine, turnbuckles for tension, weighted base or through‑bolts if allowed. Tools: drill, hammer, level, wire cutters, measuring tape, adjustable wrench.
How should I anchor supports in pots and on patios to prevent tipping and protect screens?
Insert stakes/supports before adding potting mix: push stake to container bottom so it bears against pot base. For heavy loads use rebar or metal posts that can be driven below pot base or attached to a heavy base (concrete paver, filled ballast container). For balcony/railing attachment use purpose-made railing brackets or clamp systems sized to your railing; avoid attaching to screen fabric—anchor to structural framing (posts/rails) or use freestanding weighted frames. For through‑fastening to concrete or masonry use correct anchors (wedge/sleeve/adhesive anchors) per manufacturer load tables and local code; consult a pro for structural work.
Step-by-step: How do I set up a single-stake system in a container?
1) Choose stake length 1–2' taller than expected plant height (5–6' for indeterminate). 2) Drive stake into pot to the bottom before adding soil or transplanting so it reaches pot base. 3) Plant tomato next to stake, leaving 2–3" from stake. 4) Use soft ties or garden twine to loosely tie main stem to stake every 8–12" as it grows, starting when plant is ~12" tall. 5) For multi-stem training, select one or tie multiple stems individually to separate stakes.
Step-by-step: How to make/use a tomato cage on a patio?
1) Choose a cage 18–24" diameter and 4–5' tall for most varieties. 2) Insert bottom of cage into the pot to sit on the pot floor (install before potting if possible) or press firmly so legs reach pot base. 3) For heavy vines, stabilize cage by placing a concrete paver or heavy weight on pot base, or use a cage with extended legs that go under the pot rim. 4) Train branches inside the cage as they grow; loosely weave/zip‑tie heavy stems to cage at intervals. 5) For screened porches, avoid attaching cage to screen; anchor to structural posts or use weighted base.
Next Articles
How to Care for Patio Fruit Trees: Complete Guide to Growing
Patio fruit tree care: choose dwarf varieties, right pots & soil; water, prune, protect, pollinate & harvest.
How to Grow Lettuce on a Patio: Step-by-Step Guide
Step-by-step patio lettuce in containers: varieties, sun and soil setup, watering, feeding, pest fixes, and harvest timi
How to Trim a Lavender Patio Tree Step by Step
Step-by-step pruning for lavender patio trees: when, how much to cut, shaping rules, and aftercare for healthy regrowth.