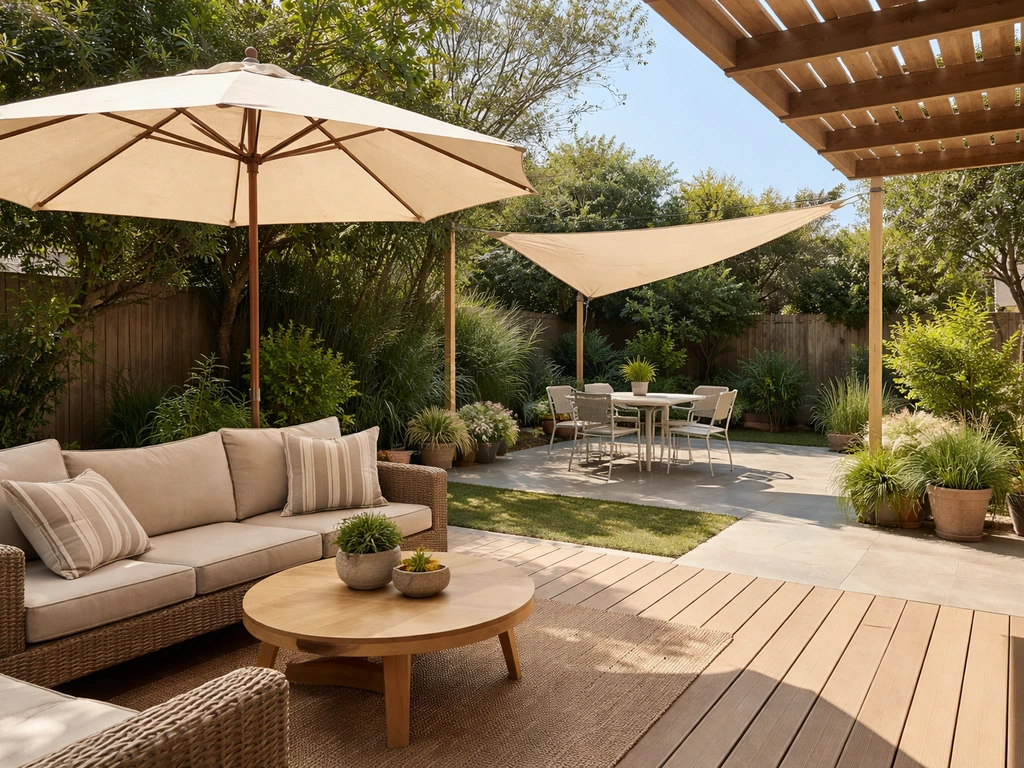
The fastest way to shade a patio from the sun is to match your shading method to the direction the sun hits your space and how much coverage you actually need. A west-facing patio pounded by afternoon heat calls for something solid and fixed, like a retractable awning or a pergola with a shade cloth roof, while a patio that only gets glare for a couple of hours can often be handled with a well-placed shade sail or a large offset umbrella. Once you know when the sun hits and from which direction, the right solution becomes pretty obvious and the installation is manageable as a weekend DIY project.
How to Shade Patio From Sun: DIY Options and Installation

Felix Brennan
27 May 2026
Step 1: Figure Out Your Sun Problem Before You Buy Anything
Before you spend a dime, spend 20 minutes actually watching where the sun hits your patio and when. Walk out there at 10 a.m., noon, 2 p.m., and 4 p.m. on a sunny day and mark the hottest zones. The direction the sun comes from changes everything about what you need.
If you want a more precise picture without camping outside all day, free tools can help a lot. Sun Scout lets you drop a pin on your property and see hour-by-hour shadow lines across seasons. SunMap shows sun azimuth (compass direction) and altitude (angle above the horizon) for your exact location and time of year. SunQuest is a phone app that lets you visualize the sun path over your actual space. These tools are especially useful if you're planning a permanent structure and want to get the orientation right the first time.
While you're assessing, answer these four questions because they'll drive every decision that follows:
- What direction does the hot sun come from, and at what time of day is your patio most uncomfortable?
- How large is the area you need covered, in feet? Measure length and width.
- Do you need full weather protection (rain, wind) or just sun blocking?
- Do you also want privacy from neighbors, or is this purely about sun?
West-facing patios typically get the worst of it, taking direct afternoon sun from roughly 2 p.m. onward when heat is already at its peak. East-facing patios get morning sun, which is usually gentler. For west-facing patios, the low, late-afternoon sun often needs stronger afternoon shading and sometimes side coverage to fully block glare. South-facing spaces get consistent midday overhead sun that's harder to block with angled solutions. North-facing patios in the northern hemisphere rarely need much shading at all. Knowing your sun direction is the single most important variable in choosing the right product.
Choosing the Right Shading Option for Your Patio
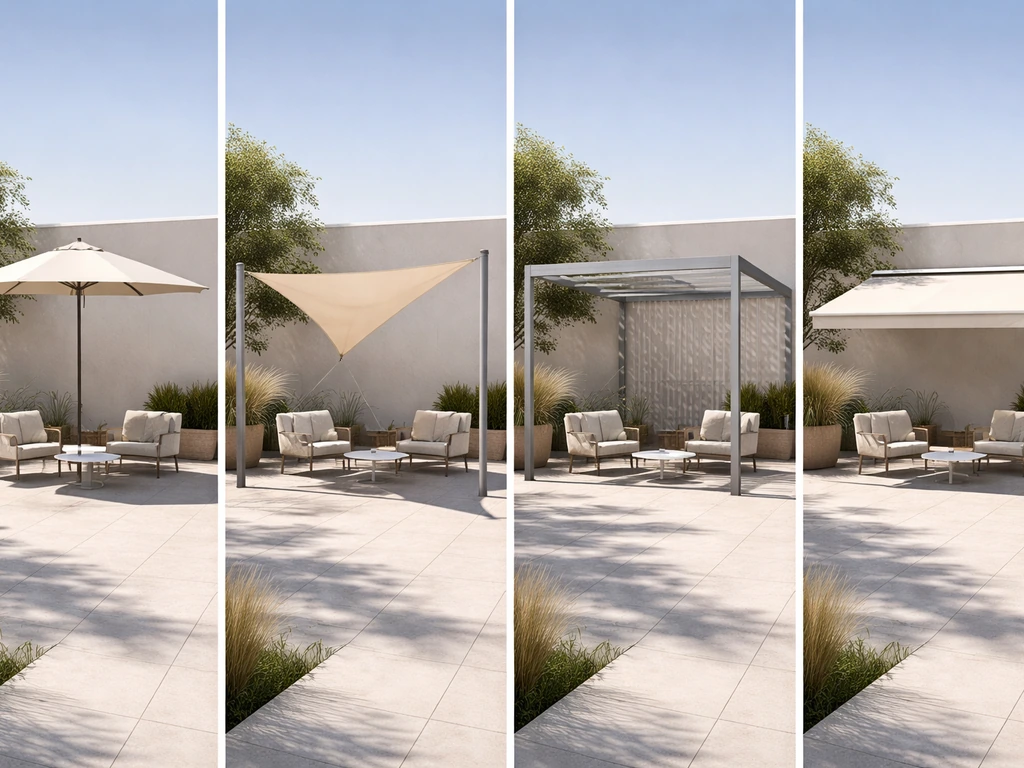
Here's a straightforward comparison of the main options, including what each is best for, what it costs, and how permanent it needs to be.
| Option | Best For | Coverage | Approximate Cost (DIY) | Permanence |
|---|---|---|---|---|
| Patio Umbrella | Small seating areas, renters, budget installs | Up to ~11 ft diameter | $50–$300 | Portable |
| Shade Sail | Casual coverage over mid-size areas, angled looks | 100–400+ sq ft | $80–$400 | Seasonal/removable |
| Pergola | Partial shade, structure, outdoor room feel | Custom to patio size | $500–$5,000+ | Permanent |
| Retractable Awning | Flexible full coverage, houses with siding/fascia | 8–20 ft projection | $500–$3,500 | Fixed but retractable |
| Fixed Awning/Canopy | Consistent full coverage, low maintenance | Custom to opening width | $300–$2,500 | Permanent |
| Screen/Roof Enclosure | Full protection from sun, bugs, rain, wind | Full patio footprint | $2,000–$10,000+ | Permanent |
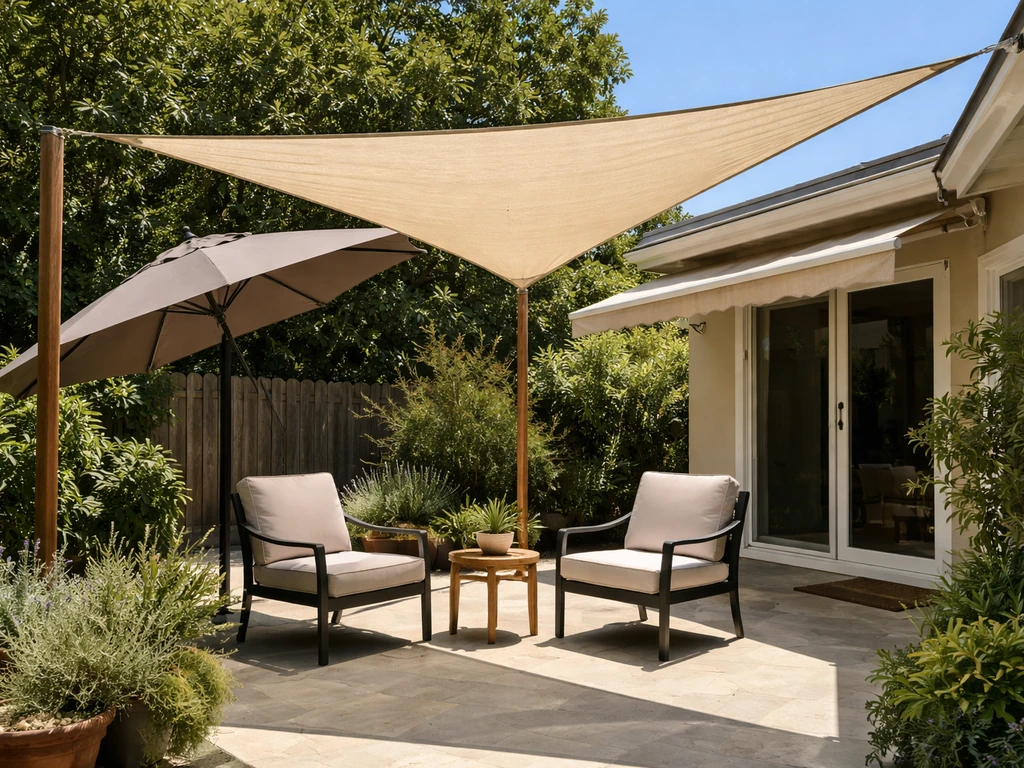
Umbrellas: Simple and Immediate
A good offset (cantilever) umbrella on a weighted base is the fastest solution if you need shade this weekend. It can tilt and rotate to follow the sun angle, which is a real advantage. The downside is coverage is limited to roughly an 8–11 foot diameter, it'll blow over in strong wind if the base isn't heavy enough (look for bases rated at 50+ lbs), and it does nothing for rain. Great for a bistro table or small seating grouping, not great for covering a full 16x20 patio.
Shade Sails: Flexible and Stylish, But Demanding to Install Correctly
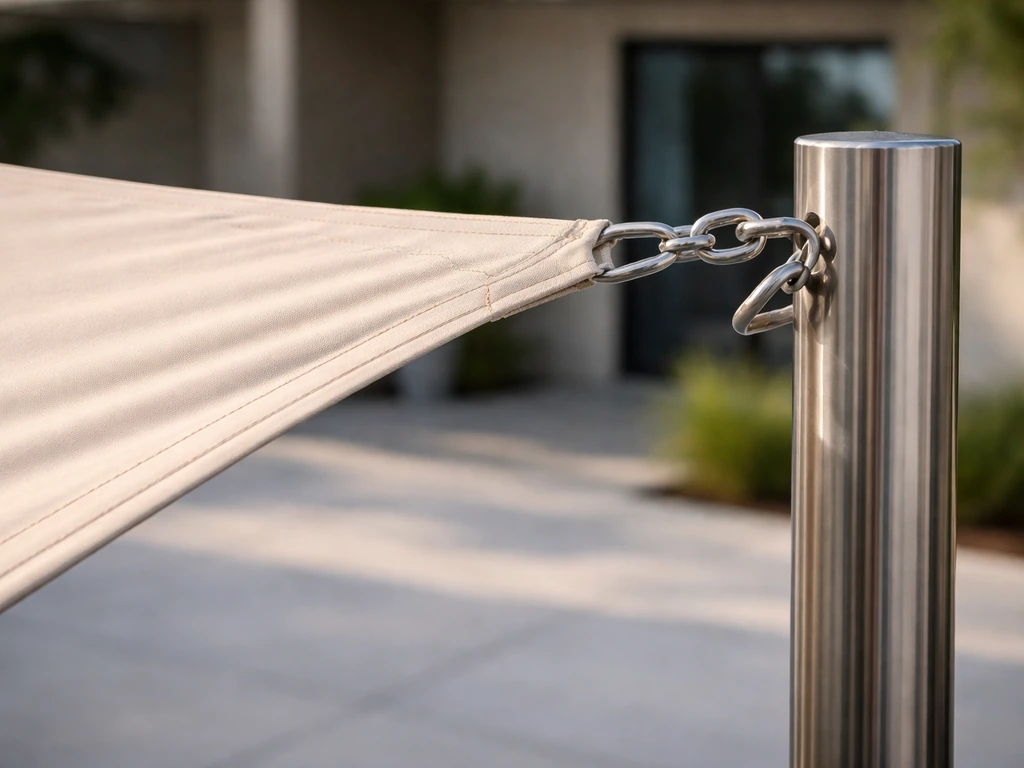
Shade sails look simple but need to be installed properly to perform well and last. A flat, un-tensioned sail will sag, pool water, flap in the wind, and tear at the corners within a season or two. The key requirements are: anchor points that are higher on at least one or two sides to create slope for drainage, solid footings or walls that can handle real tension, and proper hardware including turnbuckles at the corners for adjusting tension after installation. For example, ShadeLOGIC’s triangle shade sail assembly instructions specify product-specific installation guidance such as anchoring and tensioning with the included turnbuckles proper hardware including turnbuckles at the corners for adjusting tension after installation.. Most triangle sail kits use one snap hook and two turnbuckles. Square sails use turnbuckles at all four corners. The sail needs to be taut, not just hanging.
Pergolas: Great Ambiance, Limited Full-Sun Blocking
A pergola adds serious structure and outdoor-room feel, but understand this upfront: a standard pergola with 12-inch slat spacing admits a lot of sun. A common way to think about pergola shade is the “shade factor” idea: slat and roof choices control how much sun is admitted, and because pergolas do not fully block sunlight like solid roofing, the slat configuration is a key decision for meeting your specific shade goals. At that spacing you might be getting only about 10% shade from the slats alone. If you want real sun blocking from a pergola, you need to add a shade cloth, polycarbonate roofing panels, or a retractable canopy on top of the frame. Think of the pergola as the skeleton and choose a roof material that matches your actual sun-blocking goal. A pergola with a solid fabric canopy top gives you full shade. Open slats give you dappled light, which is pleasant but won't cool a hot patio much.
Retractable Awnings: The Best of Both Worlds
A retractable awning mounted to your home's fascia or wall gives you on-demand shade and the ability to retract when you want full sun or when a storm rolls in. Most residential awnings project 8 to 20 feet out from the wall and are available in manual crank or motorized versions. They work best when the mounting surface is solid, whether that's wood fascia, a concrete wall, or a structural header. The pitch angle matters: install at 15 degrees or more to shed rain properly. At 15 degrees on a 13-foot projection, you're looking at roughly a 4-foot vertical drop at the front edge, which also helps block low-angle afternoon sun.
Fixed Awnings and Canopies: Set It and Forget It
A fixed awning is essentially a permanent roof extension over a door or patio opening. It's lower maintenance than retractable because there are no moving parts, and it handles rain well. The tradeoff is you can't adjust it seasonally. These work extremely well for south-facing patios with consistent overhead sun. They're typically anchored through the home's rim joist or a concrete wall, so you need to locate solid structure before you mount anything.
Screen and Roof Enclosures: Full Protection
If you want complete sun control, rain protection, bug exclusion, and a degree of privacy all at once, a screened enclosure with a solid or lattice roof is the answer. This is the most involved build on this list, and it typically requires a permit. But it transforms a patio into a true outdoor room you can use comfortably from spring through fall. This is a natural next-level upgrade beyond the other shading methods, especially for homeowners in hot, sunny climates.
Planning the Layout: Orientation, Anchor Points, and Coverage Math
Before you order anything, take these measurements and write them down: patio width and length, height from patio surface to the underside of your eave or fascia, distance from your home's wall to where you want shade to reach, and the compass direction your patio faces. These numbers determine what size product you need and whether your chosen anchor points are viable.
Orientation Rules That Actually Matter
- For west sun (afternoon heat): shade needs to block the sun from roughly the west to northwest. A solid vertical screen or side panel on the west edge, combined with overhead shade, is more effective than overhead alone.
- For south sun (overhead midday): an overhead solution like an awning or pergola with solid roof is ideal. The deeper the projection, the better it blocks high-angle sun.
- For east sun (morning glare): this is usually manageable with a shade sail or umbrella since morning sun is lower and cooler.
- For all-day exposure: a fixed or retractable awning with a full-patio-width mounting is your best bet.
How to Calculate Coverage
For awnings, the projection depth (how far it extends from the wall) determines how much of the patio is shaded. A useful rule is that the shaded area equals the patio area directly under the awning footprint. For shade sails, the coverage area is roughly the square footage of the sail itself, less about 15% at edges due to the angle. So a 16x16 foot square sail covers around 220 usable square feet. For pergolas, measure the exact footprint you want covered and size the structure to match, adding 1–2 feet of overhang on the sun-facing sides for better blocking of low-angle light.
Anchor Points: What Will Actually Hold the Load
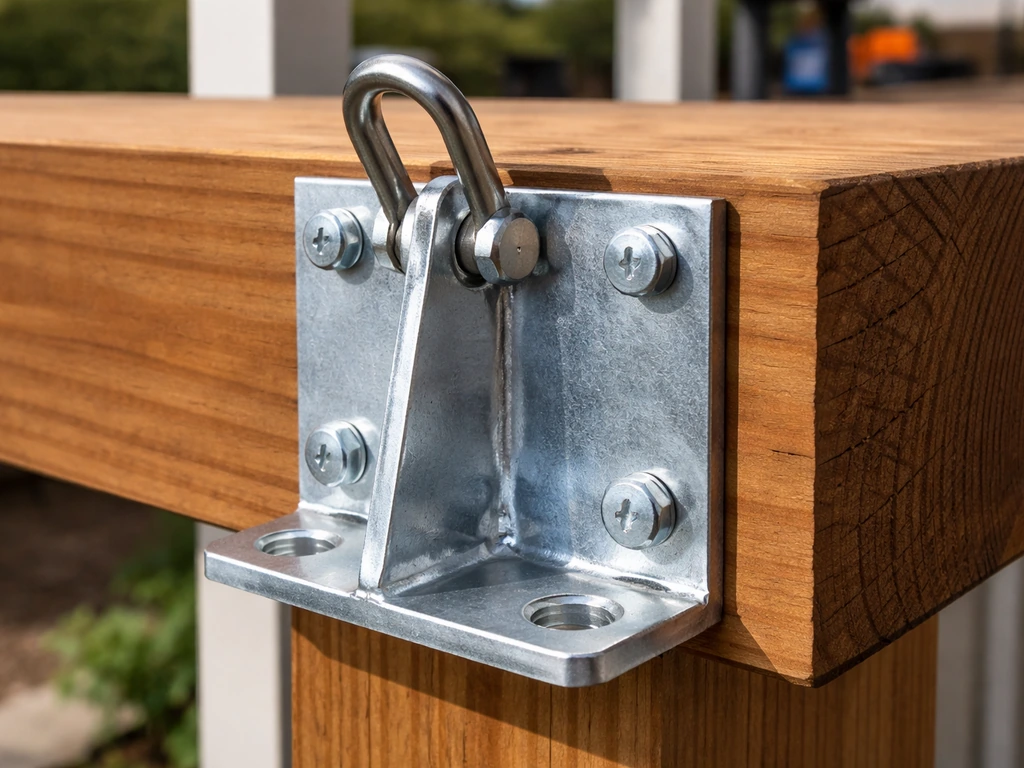
This is where a lot of DIY shade installs go wrong. Every shading structure puts outward and downward force on its attachment points, and that force multiplies dramatically in wind. Here's what each attachment type requires:
- Siding/fascia: Use 3/8-inch or 1/2-inch lag screws driven into the rim joist or a structural header, not just the siding. Siding alone will pull away under load.
- Masonry or concrete wall: Use sleeve anchors or wedge anchors rated for your load. Pre-drill with a hammer drill and masonry bit.
- Freestanding posts: For shade sails or pergola posts, dig footings at least 24–36 inches deep and set posts in concrete. In windy regions, go deeper.
- Existing deck posts: Check that they're in good condition and fastened properly to the deck frame before adding any overhead load.
DIY Installation Walkthroughs for the Top Options
Installing a Shade Sail
- Map your anchor points: For a triangle sail, you need three solid anchor points. Space them wider than the sail dimensions to allow for tensioning. One point should be higher than the other two by at least 1–2 feet to create drainage slope.
- Install anchor hardware: Use a stainless steel eye bolt or heavy-duty eye lag screwed into solid structure. On masonry, use a sleeve anchor. Verify each anchor can hold at least 500 lbs per point for a typical residential sail.
- Attach the sail loosely: Clip one corner to its anchor with a snap hook, then hand-tighten the turnbuckles at the remaining corners just enough to hold the sail in place without tension.
- Tension the sail: Tighten the turnbuckles gradually and evenly, alternating corners. The sail should be drum-tight with no sag in the center and a consistent curve at the edges. Use a strap tensioner if provided with your kit.
- Check the slope and drainage: Water should run off a corner or edge, not pool in the center. If it's pooling, your high anchor point isn't high enough or your tension isn't even.
- Test in wind: Leave it up for a day and watch how it behaves in breeze. Some flutter at the edges is normal. Excessive flapping means you need more tension or a different anchor geometry.
Installing a Retractable Awning

- Locate your mounting surface: Find the rim joist or structural header behind your home's exterior wall. Use a stud finder and verify with a small drill probe. If you're mounting to masonry, locate a solid section free of voids.
- Mark and install brackets: Lay out the bracket positions according to the awning manufacturer's guide. Bracket count varies by awning width (typically one bracket per 2–3 feet of width). All brackets must be on the same level plane, so use a chalk line or laser level.
- Pre-drill and fasten: For wood framing, use the lag screws provided. For masonry, use sleeve anchors. All fasteners should be fully seated and torqued before loading the awning.
- Hang the awning: Most retractable awnings have a two-person lift requirement. Have a helper hold one end while you secure the other. Slide the awning tube onto the brackets and lock it in place.
- Set the pitch angle: Adjust the front bar tension spring or pitch adjustment to achieve at least 15 degrees of slope. This is critical for rain drainage and for how effectively the awning cuts low-angle sun.
- Test extend and retract: Slowly extend the awning by hand crank or motor. Check that it travels straight and that the fabric doesn't bunch or ride unevenly. Make any alignment corrections now while it's easy to access the brackets.
Building a Basic Freestanding Pergola With Shade Cover
- Set your post locations: Mark the four corners. Dig footings 30–36 inches deep (deeper in freeze-thaw climates). Pour concrete and let it cure 48 hours before loading posts.
- Set and brace posts: Use 4x4 or 6x6 posts depending on your span. Plumb each post with a level and brace it while concrete cures. Double-check diagonal measurements across all four corners to confirm square.
- Install beam ledgers and beams: For a house-attached pergola, attach the ledger board to the home's rim joist with lag bolts. For freestanding, run double beams across the post tops using post caps. Use structural screws or through-bolts.
- Add rafters and cross members: Space rafters 16–24 inches apart for a solid shade cloth application. If you're going with open slats for aesthetics, tighten spacing to 8 inches for more shade.
- Attach your shade material: Shade cloth (70–90% block rating) can be stapled and screwed to a frame or attached with grommets and zip ties for easier seasonal removal. For polycarbonate panels, pre-drill and use gasketed screws to allow thermal expansion.
A Note on Ladder Safety During Installation
Most of these installs require working at 8–14 feet off the ground, which means ladder work. Follow the 4:1 rule: for every 4 feet of ladder height, the base should be 1 foot out from the wall. So if your mounting point is 12 feet up, your ladder base needs to be 3 feet out. Always set the ladder on a stable, level surface, never on soft dirt or a sloped deck without a leveling device, and have a helper stabilize it when you're working with both hands on the mounting hardware.
Materials, Durability, and Real-World Weather
Shading products live outside 24/7 for months, and the materials you choose determine whether you're replacing them every two years or every ten. Here's what actually matters:
Fabric and Shade Cloth
High-density polyethylene (HDPE) is the gold standard for shade sails and shade cloth. It has UV stabilizers built into the fiber, allows air flow (which reduces heat buildup under the sail compared to solid material), and resists mold and rot. Look for a UV block rating of at least 90% for hot climates and products that specify UV-stabilized HDPE. Cheaper fabrics use a coating rather than stabilizers in the fiber, and the coating degrades within a couple of seasons under intense sun.
Wind Load: The Biggest Risk Factor
This is underestimated constantly. A 16-foot triangle shade sail (roughly 110 square feet) can experience enormous force in a 40–50 mph wind gust. The forces on your anchor points scale with the square of wind speed, meaning a 60 mph gust puts roughly double the force of a 40 mph gust on your hardware. Follow these rules: use hardware rated for the load (turnbuckles with appropriate working load limit ratings, not cheap hardware store carabiners), take down shade sails before any forecast with sustained winds over 30–35 mph, and never leave a shade sail up through a thunderstorm or any chance of snow accumulation.
Rain and Drainage
Pooling water is the enemy of shade sails and fabric canopies. A pool of water weighing 60 lbs will pull your anchor points outward and stress every seam. The fix is consistent drainage slope built into the install, at least a 1:8 pitch (a drop of 1 foot over 8 feet) on any fabric surface. Solid roofing like polycarbonate or metal on a pergola needs gutters or a pitched run-off direction planned before install.
UV and Material Longevity by Option
| Material | UV Resistance | Typical Lifespan | Wind Vulnerability | Rain Performance |
|---|---|---|---|---|
| HDPE Shade Sail/Cloth | Excellent (UV stabilized) | 7–15 years | High if improperly tensioned | Drains if sloped correctly |
| Acrylic Awning Fabric | Excellent | 10–15 years | Low when retracted | Good with proper pitch |
| Polycarbonate Panels | Good (coated) | 10–20 years | Low on solid frame | Excellent |
| Aluminum Frame | Excellent | 20+ years | Very low | Excellent |
| Pressure-Treated Wood Pergola | Moderate | 10–20 years (with maintenance) | Low on solid footing | Good with proper finish |
| Polyester Patio Umbrella Fabric | Fair–Good | 3–7 years | High without weighted base | Poor (not designed for rain) |
Permits, HOA Rules, and Safety Checks You Can't Skip
This section trips people up because it feels like bureaucratic friction when you just want to shade your patio. But skipping it can mean being forced to remove a structure you just spent $2,000 building, or voiding your homeowner's insurance in a storm.
When Do You Need a Permit?
Portable umbrellas and shade sails attached to existing posts: almost never need a permit. Freestanding pergolas: usually need a permit if over a certain size (commonly 120–200 square feet, varies by jurisdiction). Attached pergolas or awnings that connect to the home's structure: often need a permit because they add load to the home. Screened enclosures and roof additions: almost always need a permit, and in some states there are ventilation requirements, such as a minimum clear ventilating opening of 18 inches between the roof underside and the top of any enclosing wall. Call your local building department before you break ground on any permanent structure. The call takes 10 minutes and saves enormous headaches.
HOA Rules
If you're in an HOA, check your CC&Rs before ordering anything. Many HOAs have rules covering awning fabric color (must match or complement the home exterior), maximum projection distance, whether shade sails are allowed at all, and for motorized awnings, whether electrical work requires a licensed contractor and prior approval. Some HOA architectural review processes take 30–60 days, so plan ahead. Submitting a quick application with product specs and a photo mockup usually gets faster approval than a vague request.
Electrical and Structural Safety
If you're installing a motorized retractable awning, you'll need a dedicated outdoor-rated outlet or a wired connection. In most jurisdictions this requires a licensed electrician unless you're plugging into an existing GFCI outlet. Don't run extension cords permanently to outdoor motors. For any structure that attaches to your home, confirm you're not fastening into compromised wood (probe with an awl for rot before committing to a mounting location), and make sure your lag bolts are going into actual structural framing, not just sheathing or exterior trim boards.
Keeping Your Shade Working All Season Long
Routine Maintenance by Option
- Shade sails: Inspect tension and hardware at the start of each season. Re-tighten any slack turnbuckles. Clean fabric with mild soap and water (avoid high-pressure washing which can degrade UV coatings). Take the sail down before winter in cold climates or before any major storm.
- Retractable awnings: Retract the awning whenever winds exceed about 25–30 mph or rain is heavy. At the end of the season, extend it fully to let it dry, then retract and leave it stored. Clean the fabric with mild soap and rinse thoroughly before winter storage.
- Pergola with shade cloth: Inspect connection points at the start of season, tighten any loose hardware, and replace shade cloth if you notice UV degradation (fading or tearing at grommets). Stained or algae-covered cloth can usually be cleaned with a diluted bleach solution on HDPE fabric.
- Fixed awnings/canopies: Check fasteners at the wall connection annually, especially after a hard winter. Look for rust at screw heads, pull-out at the lag bolt holes, or delamination in polycarbonate panels. Caulk any gaps at the wall connection to prevent water intrusion.
Seasonal Adjustments That Make a Real Difference
Sun angle changes significantly between summer and winter. In summer, the sun is high in the sky and overhead shading does most of the work. In spring and fall, the sun is lower on the horizon and comes in at a shallower angle, which means your overhead awning or pergola may let in more direct glare at those times. Shade sails with adjustable height on one or more anchor points can be reoriented seasonally to account for this shift. Retractable awnings with adjustable pitch can be angled steeper in shoulder seasons to cut more of that low-angle light. If you have a pergola, adding a removable side screen or panel on the west or south side can address the gap that fixed overhead structures leave when the sun is lower.
Your Pre-Install Checklist Before You Order
- Write down your patio dimensions (length x width) and the height from the ground to your eave or fascia.
- Identify the direction your hot sun comes from and the worst-case time of day.
- Choose your primary anchor points and confirm each one is structural (framing, masonry, or concrete-set post).
- Check with your local building department about permit requirements for your chosen structure.
- Review HOA guidelines if applicable and submit an architectural review request if needed.
- Select a product sized 10–15% larger than your coverage area to account for angle and edge loss.
- Order hardware separately if needed: turnbuckles, lag screws, sleeve anchors, and carabiner clips rated for outdoor use.
- Plan your installation day for calm weather with a helper for anything above 8 feet.
Patio shading is one of those projects where the planning really does take longer than the installation once you know what you're doing. Get the sun direction right, pick a method that matches your coverage needs and how permanent you want to go, anchor everything into real structure, and you'll have a comfortable patio you can actually use through the hottest part of summer.
FAQ
How do I decide whether I need side coverage or only overhead shade when I’m trying to shade patio from sun?
Measure the sun direction from your seating area, not just the patio slab, then choose coverage by time. If the hottest part is only afternoon glare, prioritize side coverage (offset umbrella or shade sail with one higher anchor), not just overhead shade.
When calculating size, should I buy the exact dimensions of my patio or add a buffer?
Plan for at least 10% extra width and depth beyond the “target” seating area, because wind and sag change the effective coverage once the fabric settles. For sails, also keep the taught-line angle in mind, slack reduces shade and increases flapping.
Can I leave a shade sail up all year, including storms and snow?
Most shade sails should not be left up through storms with sustained winds above about 30–35 mph, and you should remove them before thunderstorms. For snow regions, plan on taking them down because snow load can rapidly increase tension on anchors and hardware.
What should I do if my shade sail starts sagging and pooling water?
If you see water pooling after installation, tension is usually too low, slope is missing, or one anchor is too low. Fix by re-tensioning with the corner turnbuckles and confirming you built at least a 1:8 drainage pitch on the fabric surface.
Why does my awning block midday sun but still lets in glare in the afternoon?
For afternoon sun, use a steeper pitch or side strategy rather than counting on a flat top. A common mistake is installing an awning too level, which can shed less rain and also allows more low-angle glare in spring and fall.
What’s the most common mistake when attaching shading hardware to a home?
Don’t rely on small “decor” anchors or light-duty hardware. Use components with a stated working load limit and install into structural framing or a rated masonry surface, then verify lag bolts are long enough to bite into real structure, not sheathing.
Do I need a permit to shade a patio with an umbrella, shade sail, or pergola?
Yes, but it depends on attachment points and local rules. Standalone, freestanding setups often have fewer permit issues, while any structure that ties into the home or has significant coverage usually increases the chance of review.
What HOA details should I confirm before I order shade sails or awnings?
In an HOA, “shade” products can still be restricted by color, placement, and motorization. Bring product specs (fabric color, projection depth, and mounting method) and a simple photo mockup so the reviewer can approve quickly.
Do shade sails make the patio cooler, or do they just block light?
If you want cooler seating temperatures, prioritize breathability (UV-stabilized HDPE shade cloth or an open-frame roof with an intentional air gap). Solid tops reduce light and heat buildup differently than airy materials, so choose based on whether you want maximum sun blocking or airflow.
How do I adjust my patio shading for winter vs summer sun angles?
Seasonal sun-angle change is the reason. For shoulder seasons, re-angle adjustable systems (shade sails with adjustable anchors, retractable awnings with adjustable pitch), and consider a removable side panel for west or south exposures.
What electrical setup do I need for a motorized retractable awning?
For motorized awnings, confirm power options first. Many installs require a dedicated outdoor-rated outlet or permitted wired connection by a licensed electrician unless you are using an existing compliant GFCI outlet.
How do nearby trees and debris affect which material is best for shading from the sun?
If your patio sits under trees, decide whether you want the shade to resist debris and moisture buildup. HDPE and UV-stabilized shade cloth tolerate exposure better, but you may still need periodic cleaning and scheduled re-tensioning after leaves accumulate.
Can I combine shading with rain protection on the same structure without creating drainage problems?
Yes, but do it carefully. Confirm that the structure is rated for the added forces and that gutters or runoff paths won’t direct water toward the foundation. A roof-based shade needs a planned drainage direction, otherwise water pooling will stress anchors and seams.
Next Articles
How to Shade a Patio: Best DIY Options and Steps
Step-by-step DIY guide to shade a patio with sails, awnings, umbrellas, pergolas, and secure anchoring for lasting cover

How to Decorate a Long Narrow Patio: Layout Tips
Practical DIY layout and decor tips to widen a long narrow patio using zoning, furniture spacing, lighting, greenery, an

How to Decorate a Rectangular Patio Step by Step
Step-by-step plan to decorate a rectangular patio with smart layout, zones, furniture fit, lighting, plants, and seasona