You can decorate your patio for Christmas in a single day by working zone by zone, starting with lighting, and sticking to a unified theme across all your pieces. The key is treating your patio like a room: give every area a job, use outdoor-rated materials throughout, and resist the urge to fill every surface. A cohesive patio Christmas display with three well-done zones looks far better than a crowded one with decorations everywhere.
How to Decorate a Patio for Christmas in Any Space

Felix Brennan
24 May 2026
Pick a Christmas patio style that fits your space
Before you buy a single decoration, spend five minutes choosing a style. This one decision makes everything else easier because it tells you exactly what to buy, what to skip, and how to keep it all looking intentional. The three styles that work best outdoors are modern minimal, glam metallic, and rustic woodland.
Modern minimal uses a tight palette of whites and greens, clean shapes, and a lot of negative space. Think a single oversized wreath, white LED string lights, and a pair of potted evergreens flanking the door. No mixed colors, no novelty figurines. This style is forgiving on small patios because less is literally more.
Glam metallic leans into silver and gold. Warm white or cool white lights with metallic ribbon, mirrored ornaments, and a few shiny lanterns give the space a polished, upscale feel without needing a lot of square footage. This style photographs beautifully and works especially well on covered patios where the shimmer can bounce around.
Rustic woodland uses natural materials: burlap ribbon, plaid accents, wood slice ornaments, pinecones, and warm white lights. It reads as cozy and intentional rather than themed, and it blends naturally with most existing patio furniture. It also tends to be the most budget-friendly since you can source a lot of the materials locally.
Once you pick one, commit to it. Use the same palette and material family across every zone of the patio. A unified color scheme and balanced lighting are what make a display look like one designed scene rather than a collection of random pieces you pulled out of storage.
Patio layout plan: decorate by zones
Think of your patio in four zones: the entry, the seating area, the dining area, and the edges or perimeter. Decorating zone by zone prevents the common mistake of clustering everything in one spot and leaving the rest bare. Each zone gets at least one focal piece and lighting.
Entry zone (door and threshold)
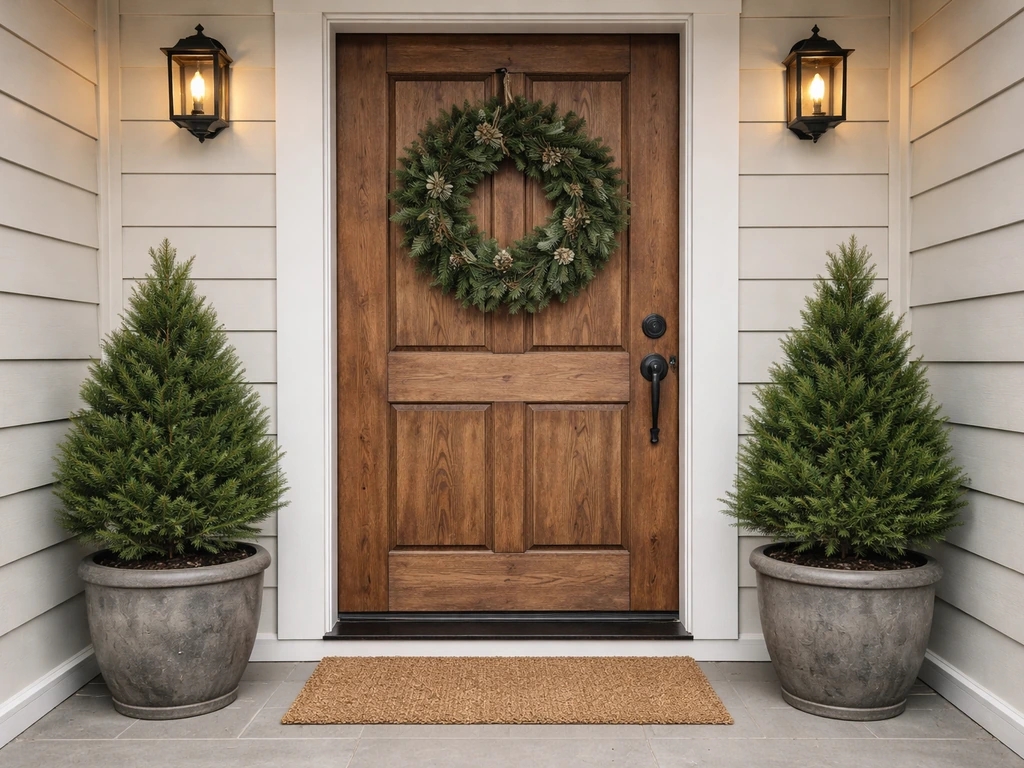
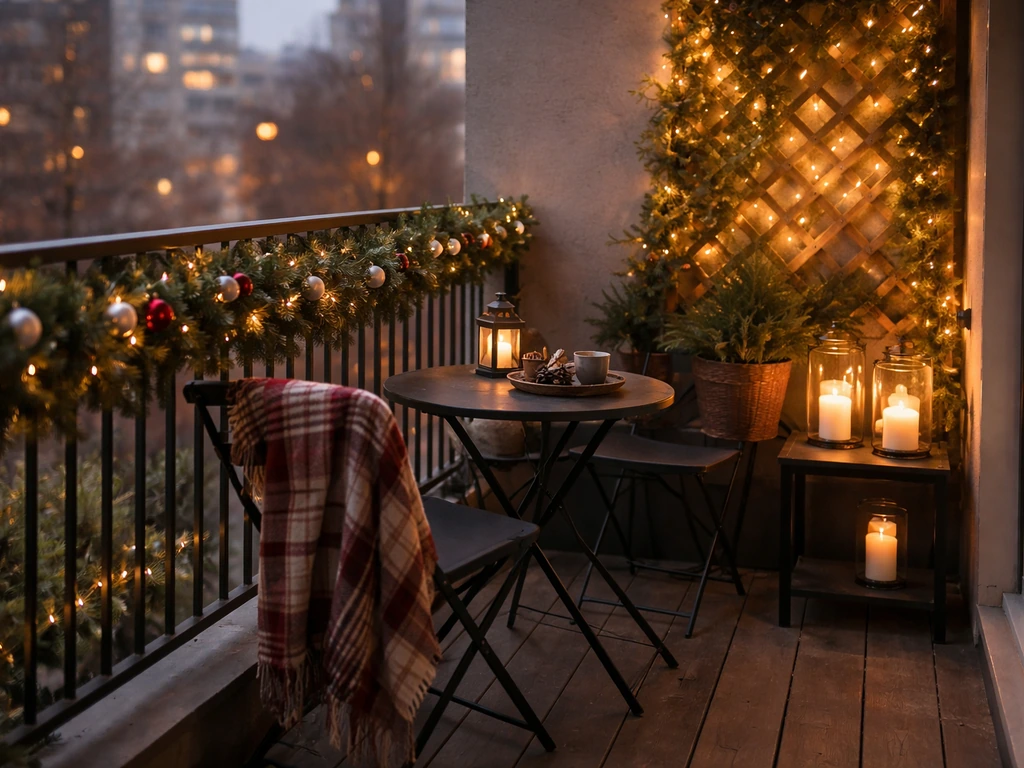
This is your highest-impact zone because it's what everyone sees first and what you see every time you come outside. A wreath on the door is the anchor piece. Flank it with two potted evergreens or lanterns if space allows, and run a garland along the top of the door frame or down the railing if you have one. This zone should be 80 percent done before you move on.
Seating zone
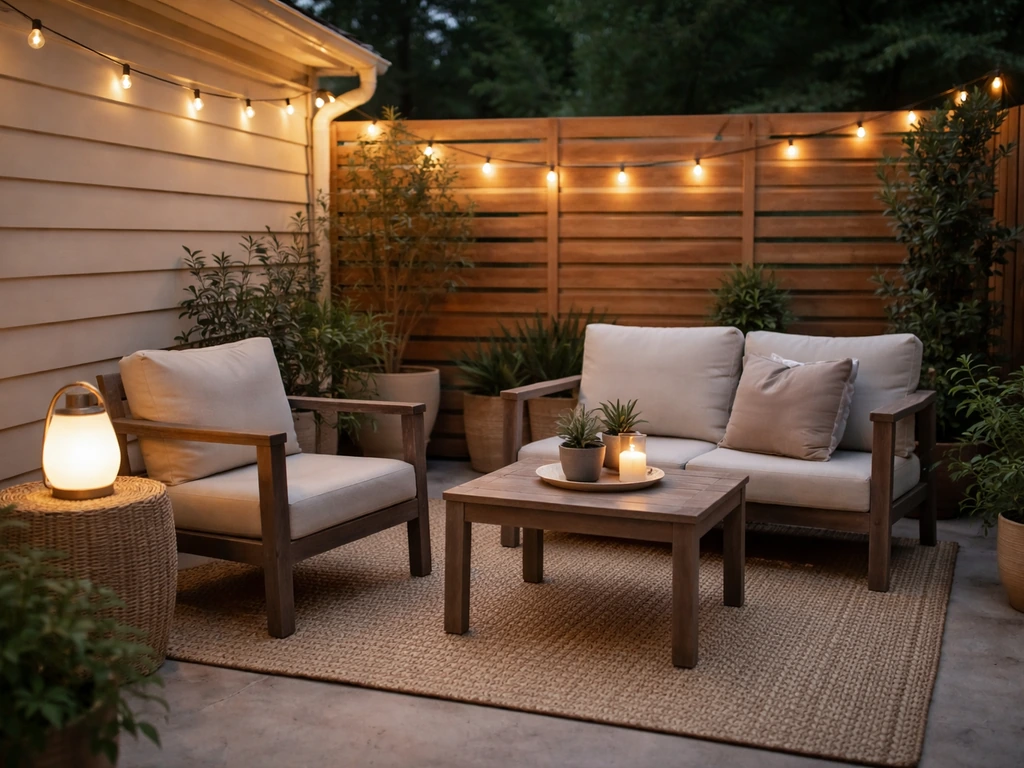
Your seating area is where people actually spend time, so focus on comfort-adjacent decor here. Swap in a few outdoor throw pillows in your chosen palette, add a lantern or two on side tables, and drape string lights above or around the seating perimeter. Avoid putting tall or wide decorations directly on the floor around seating since they create trip hazards and make the space feel cramped.
Dining zone
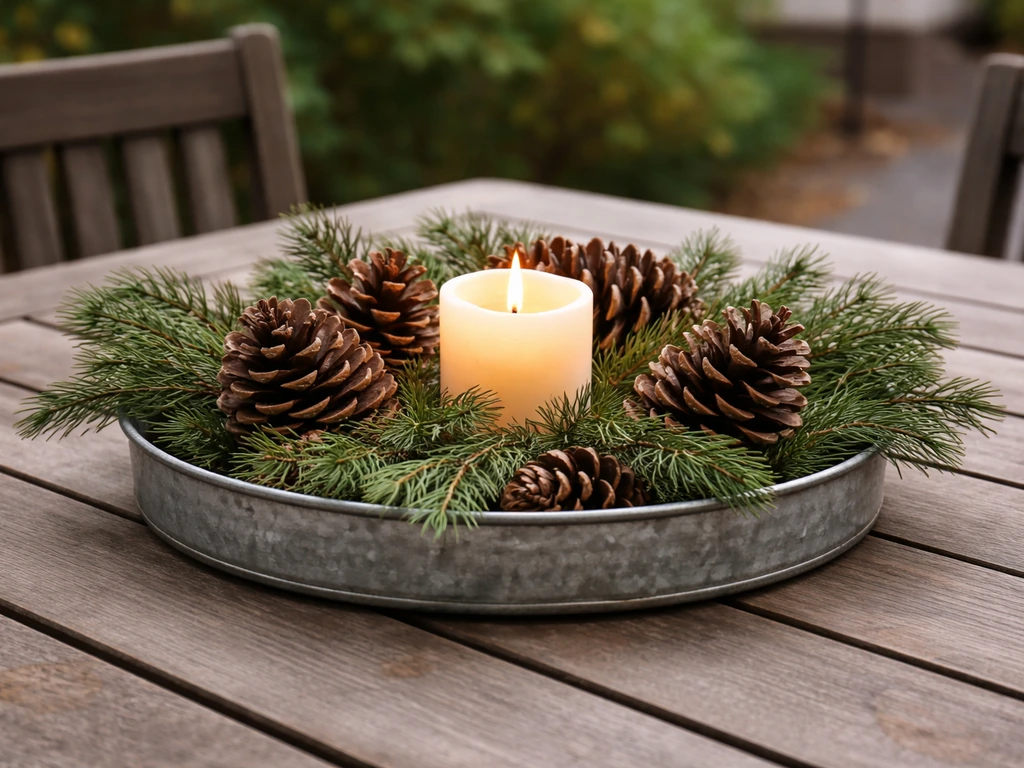
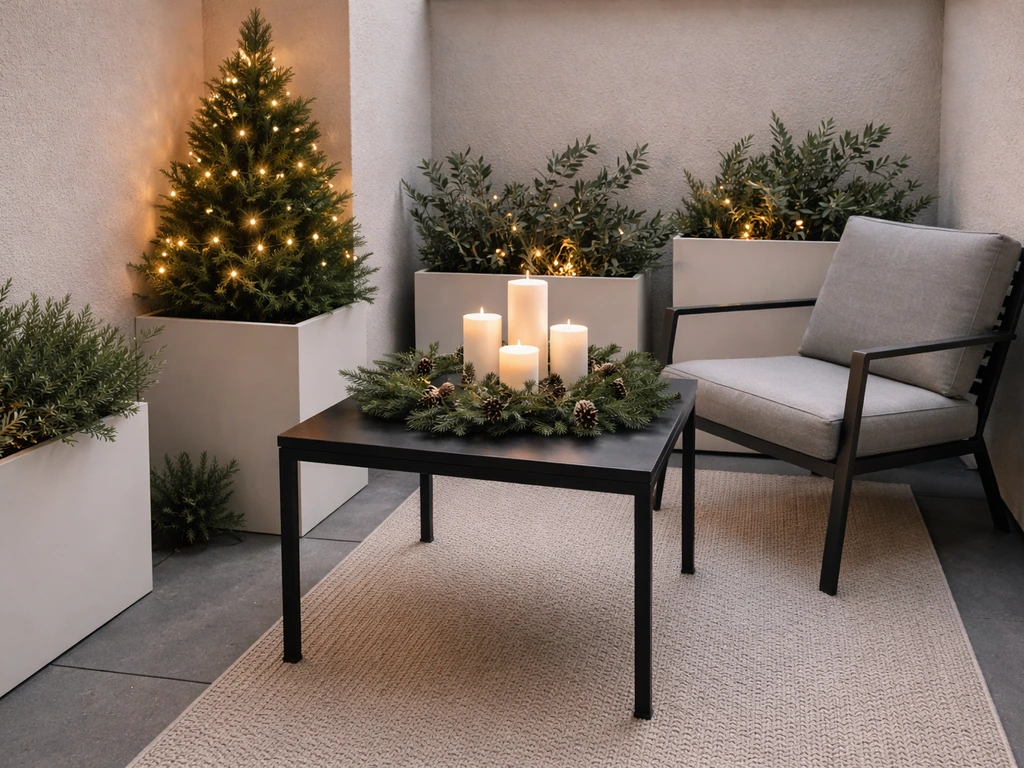
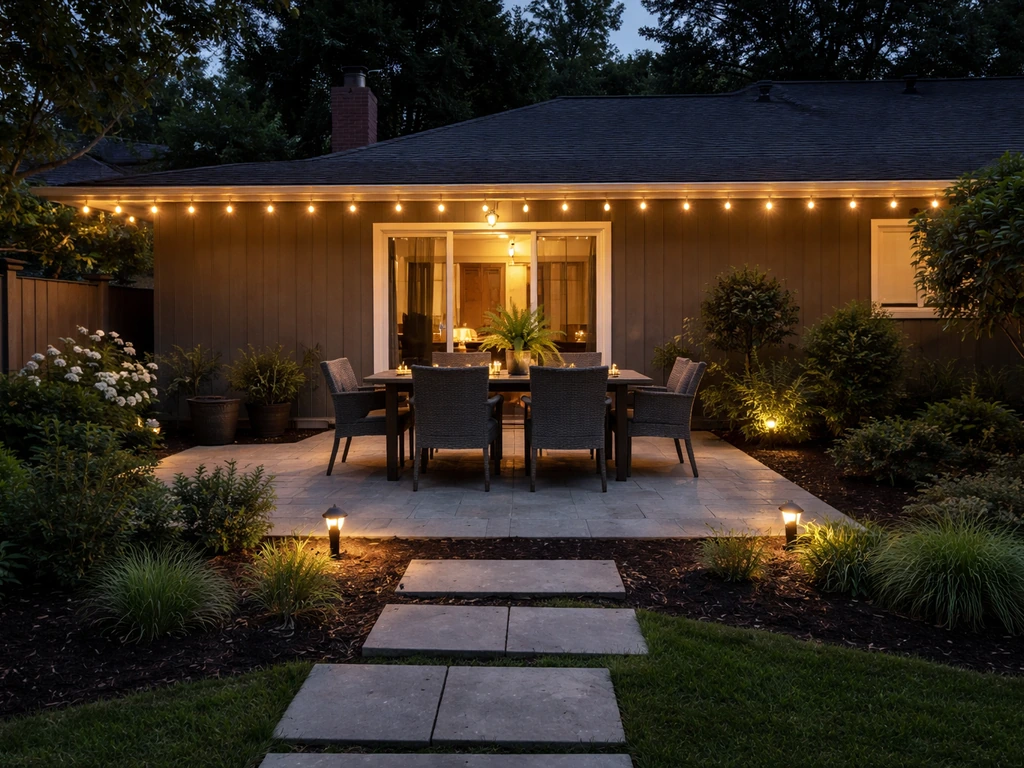
If you have a patio dining table, a simple centerpiece goes a long way. A galvanized tray filled with pinecones, a battery-operated LED candle, and some fresh-cut greenery takes about ten minutes to assemble and ties the whole zone together. Overhead string lights above the dining table (if you can run them) immediately elevate the space and make evening meals feel festive.
Edges and perimeter
The perimeter is where garland, railing lights, and corner planters live. Wrapping your railing with garland and weaving lights through it creates a finished border that ties all the other zones together visually. Corner planters or tall shepherd's hooks with hanging lanterns also work well here because they add vertical dimension without taking up floor space. Keep floor-level decor in this zone to a minimum.
Christmas lighting for patios: safe setup, placement, and timers
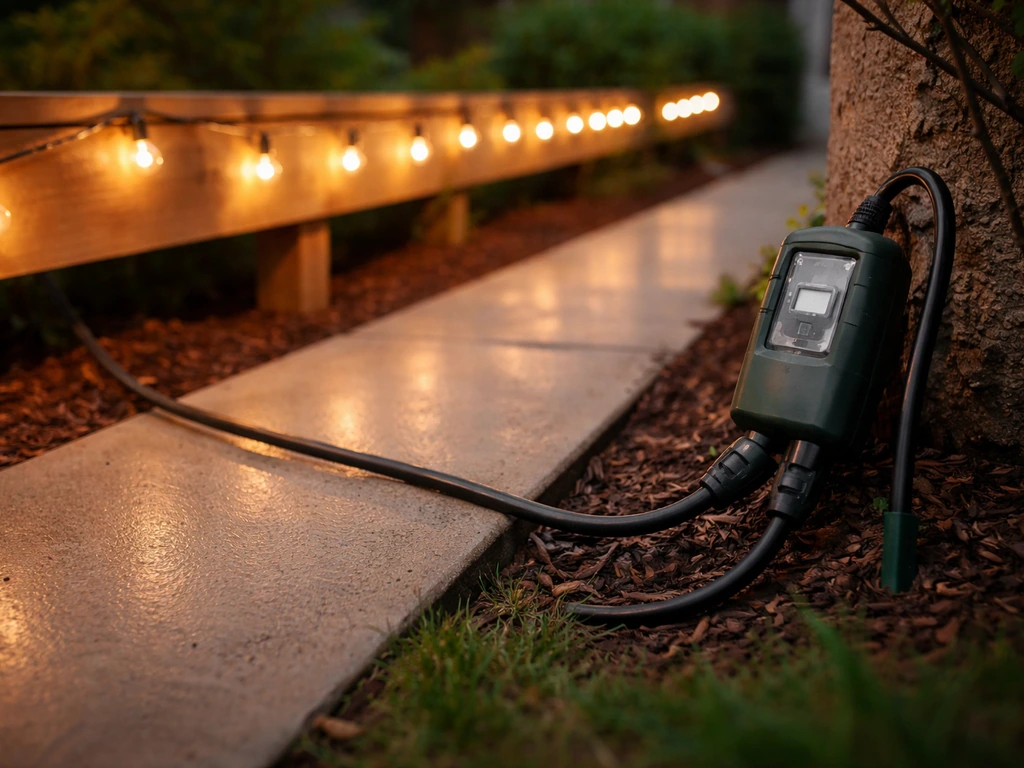
Lighting is the single most important element of a Christmas patio display. Get it wrong and nothing else matters. The baseline rule is simple: every light strand or electrical item you use outdoors must be rated for outdoor use. Check the packaging for that label before you buy. The CPSC recommends plugging all outdoor lights into a GFCI-protected outlet, and if your patio doesn't already have a GFCI receptacle, pick up a portable GFCI adapter at any hardware store for under $20. It's not optional.
For extension cords, use only cords rated for outdoor use. Indoor extension cords are not weatherproof and can become a fire or shock hazard when exposed to rain or dew. Look for the outdoor rating on the packaging, and don't daisy-chain multiple cords together to reach a distant outlet.
Where you place lights matters as much as what kind you use. Run string lights overhead first (strung across the patio ceiling or pergola beams) to create ambient light, then layer railing or garland lights second, and finally add accent lighting at the entry and table level. This top-down approach keeps cords organized and makes the overall effect feel layered rather than flat.
Protect all electrical connection points from moisture. Where two light strands connect or where a cord plugs into an extension cord, wrap the junction with self-fusing silicone tape or use a weatherproof outdoor cord cover. These cost almost nothing and prevent the most common failure point in outdoor light setups.
Use a timer. Plug your lights into an outdoor-rated timer so they come on automatically at dusk and turn off at a set hour. It saves electricity, extends bulb life, and means you don't have to remember to go unplug everything every night. Most basic outdoor timers cost $10 to $20 and take two minutes to program.
- Use only lights labeled for outdoor use and certified by a recognized testing lab like UL or ETL
- Plug everything into a GFCI outlet or use a portable GFCI adapter
- Use only outdoor-rated extension cords, and avoid chaining multiple cords
- Cover all plug-to-plug and strand-to-strand connection points with weatherproof protection
- Set a timer so lights run on a consistent, automatic schedule
- Never leave lit displays running when you're away from home for extended periods
Small patio strategies to maximize impact without clutter
A small patio actually has an advantage at Christmas: a little goes a long way, and the space fills up fast. The goal is high visual impact with minimal floor coverage. The single most effective strategy is to go vertical. For more ways to decorate a patio without crowding it, use a zone plan and focus on a few key focal pieces go vertical. String lights overhead, hang a wreath, add a wall-mounted garland, and use tall planters in corners. Vertical elements read as full and festive without eating into the floor space you need to actually use the patio.
Choose fewer, larger pieces rather than many small ones. A large wreath reads better than four small ones. Two tall potted evergreens flank an entry more powerfully than a collection of small figurines spread across a ledge. When everything is small and scattered, the eye doesn't know where to land and the space feels cluttered even if it's actually sparse.
Stick to two or three ribbon and accent colors maximum. More than that and a small space starts to feel chaotic. If you're going with the rustic style, use plaid ribbon in one colorway and natural greenery. If you're going glam, pick either silver or gold and stick with it. Limiting your palette is the single cheapest upgrade you can make to a small-space display.
Use multi-purpose pieces wherever possible. A lantern with an LED candle inside works as a table centerpiece and a light source. A garland with built-in lights handles both greenery and illumination. Every item that does two jobs is one fewer item you need to find space for.
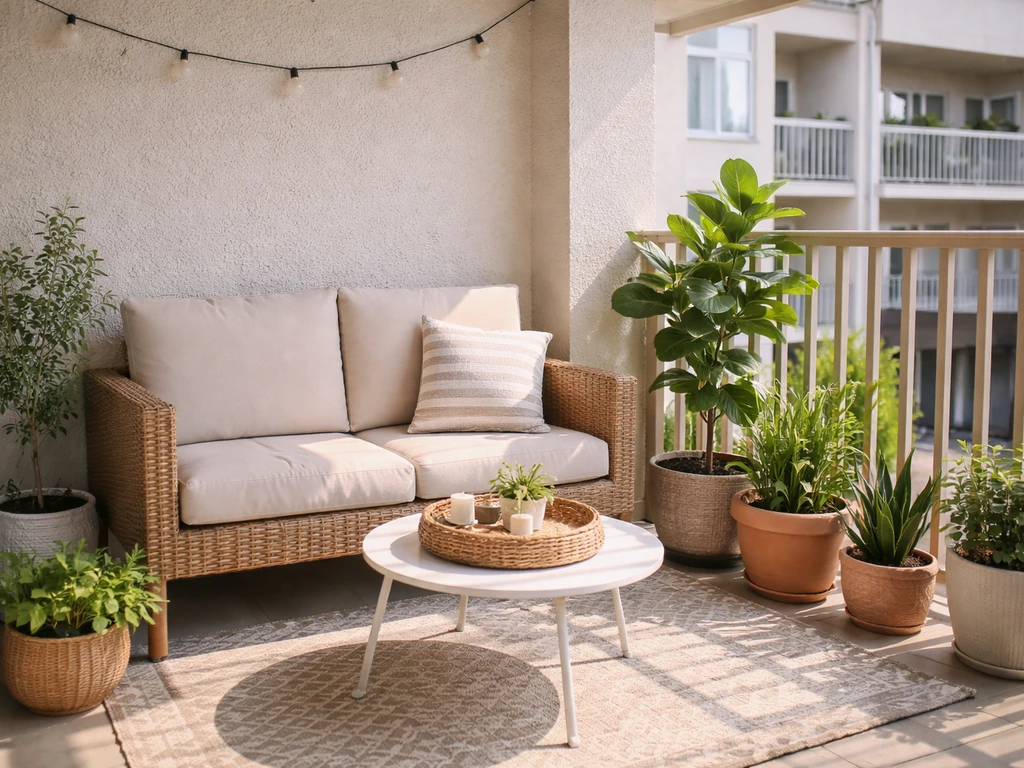
Apartment patio and balcony decorating: rules and smart mounting
If you're decorating an apartment balcony, the first step before buying anything is to read your lease and any community guidelines. Many apartment complexes and HOAs restrict how you can attach things to railings, walls, and ceilings. Common restrictions include no drilling, no permanent adhesives, no open flames, and weight limits on railings. Some communities specify that lights must be attached via approved methods like Command hooks, zip ties to railings, or wrapping around pillars only.
Knowing your rules upfront saves you from having to undo your work. If your lease is unclear, a quick email to your property manager asking specifically about outdoor holiday decor will get you a written answer you can rely on.
For mounting without drilling, waterproof adhesive hooks and clips designed for outdoor use are your best tools. These are widely available and hold string lights and garlands reliably on smooth surfaces. For railings, use zip ties or velcro straps to secure garland and lights without causing damage. Both methods are easy to remove cleanly at the end of the season.
Skip open-flame candles entirely on a balcony. Building fire codes and most apartment policies prohibit them, and the wind on a balcony makes them impractical anyway. Use battery-operated LED candles instead. Look for ones rated at IP44 or higher for outdoor use, and pair them with a weather-resistant lantern to protect them from wind and rain. They look nearly identical to real candles in photos and in person at evening.
Keep heavier decor pieces low and centered on the balcony floor rather than propped on railings. Wind can knock things over, and items falling from a balcony are a serious safety hazard. Weighted planters and floor-level lanterns are safer bets than anything perched up high.
| Challenge | Apartment/Balcony Solution |
|---|---|
| No drilling allowed | Waterproof adhesive clips, zip ties to railings, Command hooks |
| Open flame prohibited | Battery-operated LED candles rated IP44 or higher in weather-resistant lanterns |
| Limited floor space | Vertical elements: wall-hung wreaths, railing garlands, overhead string lights |
| Wind knocking items over | Weighted planters, floor-level lanterns, secured-down pieces only |
| HOA/lease color or size restrictions | Read guidelines first, stick to neutral palettes that are unlikely to conflict |
Weatherproof decor checklist and quick maintenance tips
Not everything sold as "outdoor decor" is actually built to handle sustained exposure to rain, freezing temperatures, and UV light. Polyresin (also sold as resin or polystone) is one of the most reliable materials for outdoor Christmas figures and accent pieces because it resists moisture and temperature swings. Metal pieces with a powder-coated or galvanized finish also hold up well. Avoid anything made of untreated wood, paper, or foam in wet or freezing climates.
For electrical items, look for an IP (Ingress Protection) rating. IP44 means the item is protected against splashing water from any direction, which is sufficient for covered patios and balconies. IP65 or higher means it's protected against water jets and is better suited for open, exposed areas. These ratings appear on the packaging of quality outdoor lights, LED candles, and other powered decor.
- Lights: outdoor-rated, UL or ETL certified, GFCI protected
- Garlands: look for UV-resistant materials and sealed wire connections if pre-lit
- Figurines and statues: polyresin or powder-coated metal only for wet climates
- Candles: battery-operated LED only for outdoors; minimum IP44 rating
- Ribbon and fabric accents: use outdoor-rated or synthetic materials; natural burlap can mildew if left wet for extended periods
- Extension cords: outdoor-rated, appropriately gauged for the total wattage of connected items
Once everything is up, a quick weekly check takes about five minutes. Look for any connection points that have come loose or show moisture entry, any lights that have gone out, and any decor pieces that wind has shifted. After a heavy rain, dry off any pieces that are pooling water. At the end of the season, store everything in a cool, dry space away from direct sunlight. For LED candle care and storage, Hueseeka recommends storing LED candles in a cool, dark space away from direct sunlight to help prevent fading or warping Care Instructions. Keep LED candles and battery-operated items separated from metal items to avoid contact corrosion, and label your storage bins by zone so next year's setup is faster.
Shopping list and 1-day decorating plan
Here's a practical baseline shopping list that covers a standard patio with entry, seating, and dining zones. Scale it up or down based on your space and style.
| Item | Notes |
|---|---|
| Outdoor-rated LED string lights (2-4 strands) | Check for UL/ETL outdoor certification; warm white for rustic/minimal, cool white for glam |
| Outdoor-rated extension cord(s) | Match length to your layout; buy outdoor-rated only |
| Portable GFCI adapter | Required if your outlet isn't already GFCI-protected |
| Outdoor timer | Basic mechanical or digital; plug-in style |
| Wreath (one large, front-door size) | Choose your style's palette; 24-30 inches is a good size for most doors |
| Garland (1-2 lengths) | Pre-lit simplifies setup; get at least 9 feet per railing section |
| Potted evergreen or faux topiary (pair) | For flanking the entry; weighted base preferred for wind stability |
| Outdoor lanterns (2-4) | Battery-operated LED candles go inside; look for weather-resistant rating |
| Battery-operated LED candles (1 per lantern) | IP44 minimum for outdoor use |
| Ribbon in your chosen palette | 2-3 rolls maximum; synthetic ribbon lasts better than natural fibers outdoors |
| Adhesive outdoor hooks or zip ties | For no-drill mounting on railings and smooth surfaces |
| Weatherproof tape or cord covers | For protecting electrical connection points |
| Table centerpiece materials | Galvanized tray, pinecones, greenery, one LED candle |
The 1-day decorating schedule
- Morning (30 minutes): Walk your patio and mentally assign each zone. Measure your railing length and overhead span if you plan to run lights across the ceiling. Make sure you have your shopping list finalized before you leave for the store.
- Mid-morning (1-2 hours): Shop or unbox everything. Lay it all out on the patio floor so you can see what you have before anything goes up.
- Late morning (1 hour): Run all electrical first. Mount your string lights overhead, then along the railing or perimeter. Plug everything into your GFCI outlet through your timer and test it before moving on. Protect all connection points now.
- Early afternoon (1 hour): Hang the entry zone. Mount the wreath, install door frame garland, and place or mount the flanking potted evergreens or lanterns. Step back and adjust before moving on.
- Mid-afternoon (45 minutes): Set up the seating and dining zones. Place lanterns on side tables, assemble the table centerpiece, add any accent pillows or throws.
- Late afternoon (30 minutes): Finish the perimeter edges. Add railing garland, corner planters, or shepherd's hooks with hanging lanterns. Do a full walk-around and remove anything that feels redundant or out of place.
- Evening (15 minutes): Turn the lights on at dusk and evaluate. Adjust any strands that look uneven. Set your timer for your preferred on/off schedule.
The whole project, including a store run, fits comfortably into one day when you plan zones and buy materials before you start decorating. If you already have your materials from a previous year, you can realistically have the whole patio finished in three to four hours.
A few things that will help this process go smoothly: keep your style choice visible while you shop so you don't impulse-buy pieces that don't fit, have a step ladder accessible before you start, and do all your electrical work before dark so you're not troubleshooting cords at night. If you're working on a budget, the lighting and the entry zone wreath are the two places to spend money. With the right approach, you can use these same zone and lighting tips to decorate your patio on a budget all year long working on a budget. Everything else can be simplified or DIY'd without losing the overall effect. For more year-round patio lighting ideas that carry over beyond the holidays, the general patio lighting guide on this site covers placement and fixture choices that can anchor your seasonal displays. For a faster seasonal refresh that still looks polished, you can also use these Christmas patio lighting tips as a comparison point to brighten up a patio For more year-round patio lighting ideas that carry over beyond the holidays. For more year-round patio lighting ideas that carry over beyond the holidays, the general patio lighting guide on this site covers placement and fixture choices that can anchor your seasonal displays how to style outdoor patio. For a fuller guide on how to plan and style your outdoor space, see our tips for how to dress up patio.
FAQ
What’s the easiest way to make a small patio look festive without blocking seating or walking paths?
Use one main vertical anchor per zone (for example, a wreath at the entry, a garland along the rail, and a tall planter in a corner) and limit floor items to one “landing” spot per area, like a single centerpiece on the table. Keep any tall decor at least a couple feet away from the main walkway so you do not create squeeze points.
Can I use indoor decorations on my patio, or do they all need to be outdoor-rated?
You can use some indoor decor if it is not exposed to rain, like a framed sign under a covered ceiling, but anything near moisture, dew, or wind should be outdoor-rated. For powered items, outdoor rating is mandatory, and for greenery and fabrics, choose pieces designed for outdoor use so they do not wilt or fade quickly.
How do I avoid tangled cords and messy extension-cord runs when decorating?
Lay out the cord path before you hang anything, then route lights along structural edges like columns, railing posts, or pergola beams. Use cord clips or adhesive cord organizers rated for outdoor conditions, and group connections at one or two accessible points so you can troubleshoot without unstacking decor.
What should I do if my patio does not have a GFCI outlet nearby?
Use an outdoor-rated portable GFCI adapter, but also position the adapter so the cord connections stay off puddling areas. If the nearest outlet forces long runs, consider battery-powered accent lighting for the far side rather than stretching extension cords everywhere.
How can I make lights look layered like a “designed” scene, not flat string lighting?
Prioritize overhead or ceiling-level lighting first, then add a second layer at railing or garland height, and finish with small accent points at entry and tabletop level. Keep the warmness consistent within your theme (all warm white or all cool white) to avoid a patchwork look.
Is it safe to hang garland and wreaths from railings, and what’s the best attachment method?
It is often safe if your attachment method does not damage the surface and stays within the weight limits for that railing. Use zip ties, outdoor Velcro straps, or approved adhesive outdoor hooks, and avoid anything that requires drilling or compromises the railing coating. Remove promptly after the season to prevent residue or UV brittleness.
Should I use warm white or cool white lights for Christmas on a patio?
Warm white usually looks more traditional and pairs well with rustic woodland and traditional greens, while cool white can look crisper with modern minimal palettes and metallic glam accents. If you have both, do not mix across the same zone, pick one temperature per area to keep the look cohesive.
What IP rating do I really need for patio Christmas lights if my patio is covered but not sheltered from mist?
If you only get occasional splashes or mist, IP44 is generally sufficient, but if your setup could face direct water jets during storms or wind-driven rain, choose IP65 or higher. When in doubt, prioritize higher IP for powered items and LED candles, since failures are usually caused by water at connection points.
Are battery-operated LED candles always a good substitute for real candles on patios and balconies?
Yes, especially if wind or building rules are concerns, but check the candle’s outdoor rating and whether it is designed to handle rain exposure. For the most realistic look, place LED candles inside enclosed lanterns or on stable, non-slip surfaces so wind cannot tip the lantern base.
How do I prevent outdoor Christmas decor from getting damaged after heavy rain or freezing weather?
After storms, dry off pieces that collect water, especially any covered fabric, burlap ribbon, and battery compartments. During freezes, avoid storing outdoor figures in unventilated bins while damp, let everything dry fully first, and keep LEDs and battery items separated from metal to reduce corrosion.
What’s a quick weekly maintenance routine so the patio still looks good mid-season?
Once a week, scan for three issues: any lights that went out, any connection points that show moisture or looseness, and any decor shifts from wind. Replace dead bulbs or batteries promptly, straighten garlands while they are still flexible, and check that extension cords are not resting in pooling water.
How can I personalize the patio Christmas theme if I already have patio furniture in a strong color?
Let your furniture set the base, then match your accent colors to it while keeping ribbon and ornaments limited to two or three accent tones. For example, if your cushions are bold (red or teal), choose modern minimal with mostly white and green so the decor complements instead of competing.
Next Articles
How to Light Patio: DIY Layout, Power, and Placement
Step-by-step DIY guide to light a patio: fixtures, placement, power safety, and troubleshooting for even, glare-free out
How to Decorate an Apartment Patio: DIY Steps
Step-by-step DIY guide to decorate an apartment patio: assess limits, pick layout, add weatherproof seating, plants, lig
How to Decorate a Patio: Step-by-Step DIY Guide
Step-by-step DIY plan to decorate your patio: layout, style, outdoor decor, privacy, shade, lighting, and seasonal refre